Search the Community
Showing results for tags '2.5l'.
-
My truck is an 89 with 2.5L and 4spd. I bought it a little over a year ago for $400 and have been tinkering on it since. When i got the truck it was basicly stock other then the 31x10.5 15s, the lights on the sides of the cowl which were cosmetic and had never been wired in , and a flowmaster muffler,it ran and drove but had been neglected/abused and needed ALOT of little things. First upgrade i did was a guage swap,my truck is a base model with idiot lights so i swapped them out for guages from a 1990 XJ. No photos but I'm sure youve seen MJ/XJ guages next project was the interior,the truck had some thrashed bucket seats out of some car thrown in it and bolted onto wood blocks screwed into the floor. I tore all that out,fabricated new mounts and put in a set from a 97 Dakota. next the rear, the rear bumper was missing and the truck had a reciever that hung below the missing bumper.I chopped off the reciever and tucked it up then made a rolled pan to cover it then I installed a winch bumper,I had one laying around from my old 83 F250. It was way too big so after a chat with a torch and welder it looked like this Now time for a lift,I decided to install a 5" lift from Rocky-road outfitters,It uses old man EMU springs and i installed long travel shocks. the entire install took me about 7 hrs to complete by myself. the truck drives much better on the road now and has lots of flex off road. the other day i decided to redo my headliner since the old one had been cut out but i wanted something different so i customized it. And thats about were I'm at now,with lots still to do.
-
Hi again guys. I'd like some guidance on tackling a No-Start Issue that reared its ugly head again recently. My truck has had this issue since purchasing it from the previous owner in 2021. Thought that I had resolved the problem but it slowly resurfaced. 1986 2.5L MJ 5-Speed Manual Most notable symptoms that occurred BEFORE it began: • Driving: Sputtering during acceleration, and also when shifting upward • At Idle: sputtering when applying gas, and acted like it wanted to die when letting off • At idle: sometimes RPMs increased to, and sustained 2.5K - 3K for a few seconds (after working throttle for a while) Symptoms NOW: • NO Engine Starting (at all) Improvements that I've done up to this point (all within 2 years) Clean/Rebuilt Throttle Body - New Spark Plugs, Wires & Cap - New Vacuum Lines - Cleaned all or most Electrical Connectors - Reinforced & Cleaned All Grounds - New Oxygen Sensor - Transmission Professionally Rebuilt - Installed REM Clock My Evap Canister has been disconnected for several years - and all associated lines have been plugged. But please note that it never reeks of gas, and performance seems unaffected.
-
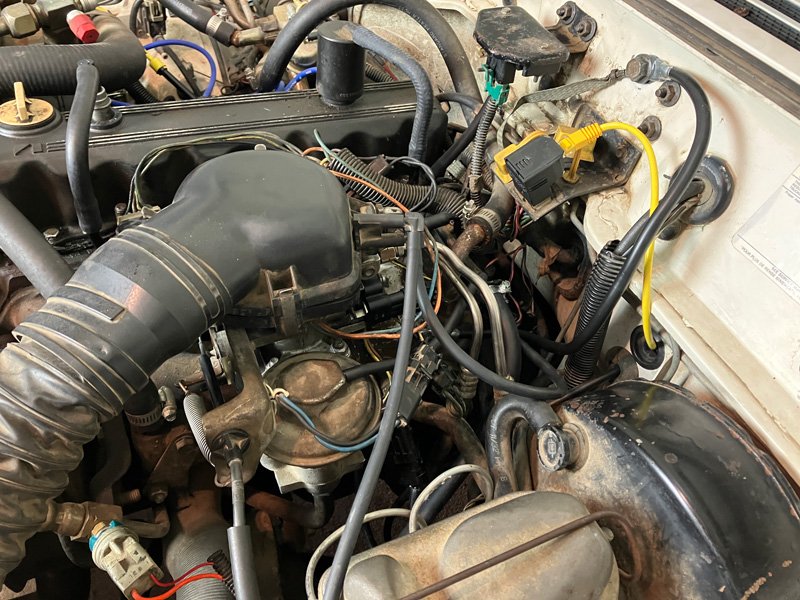
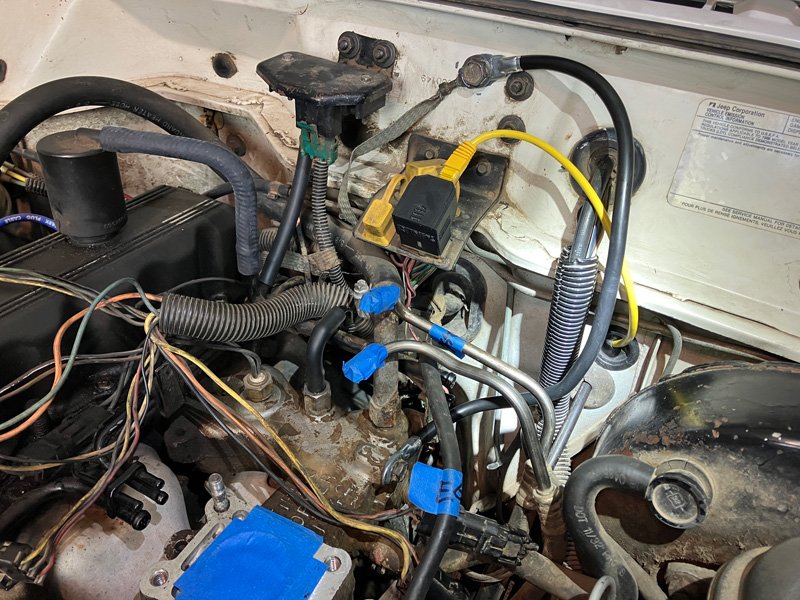
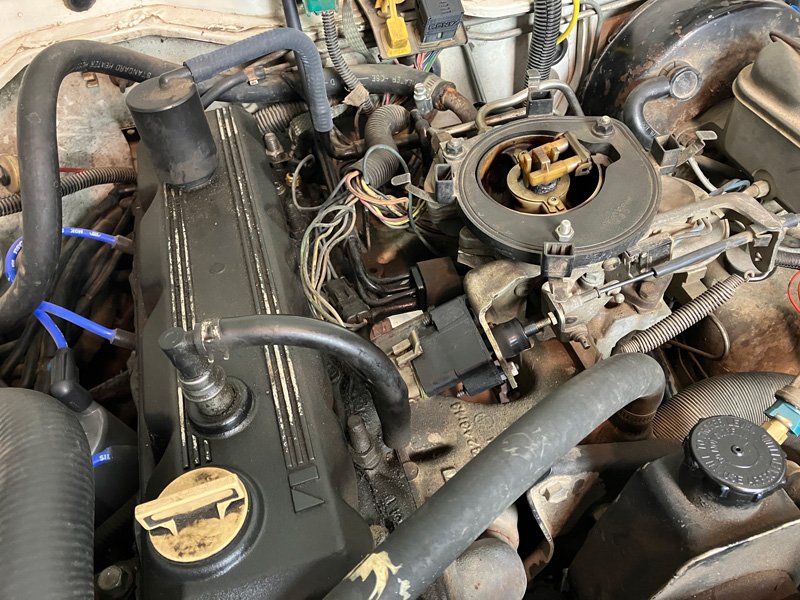
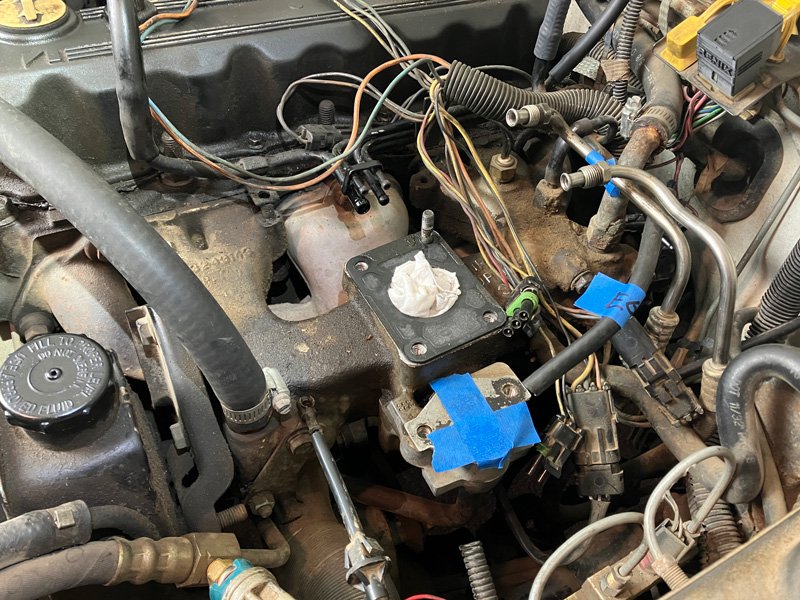
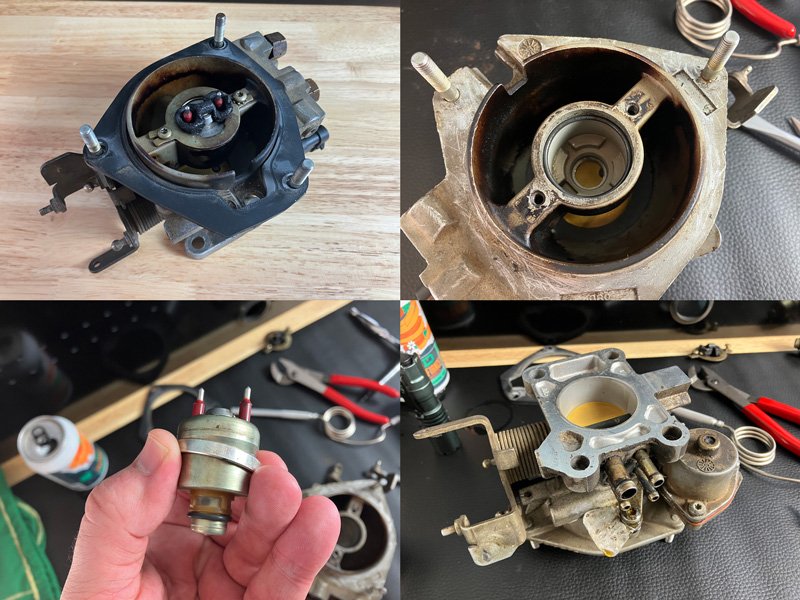
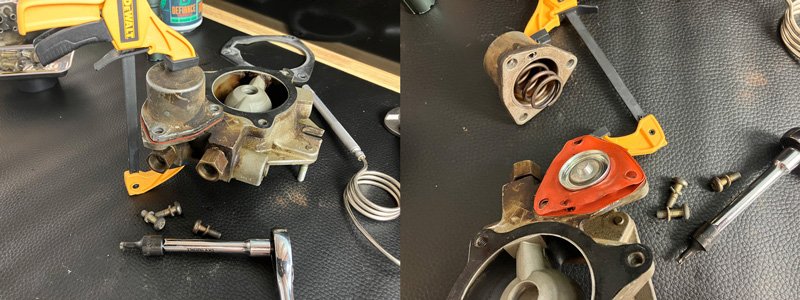
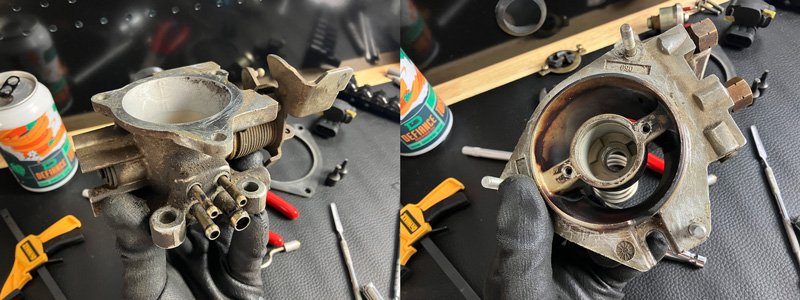
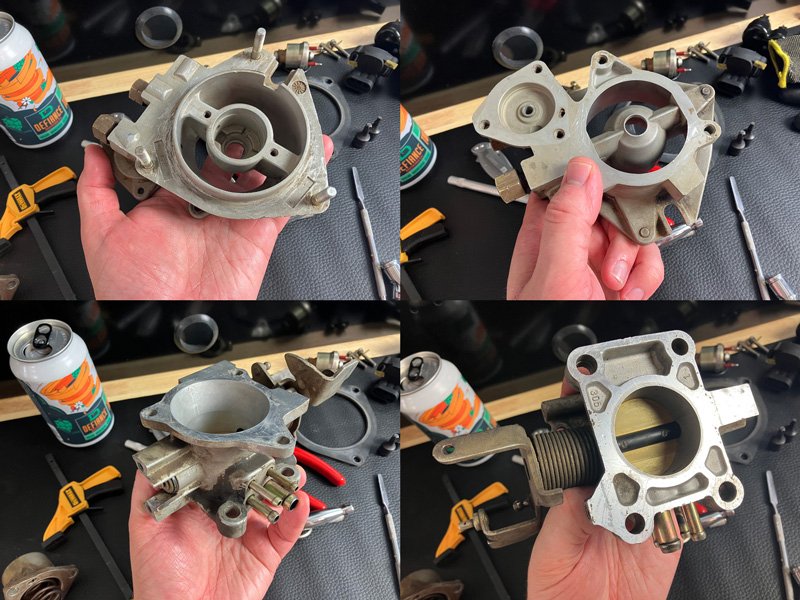
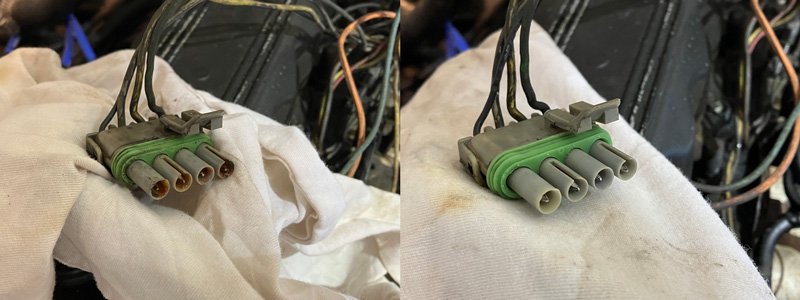
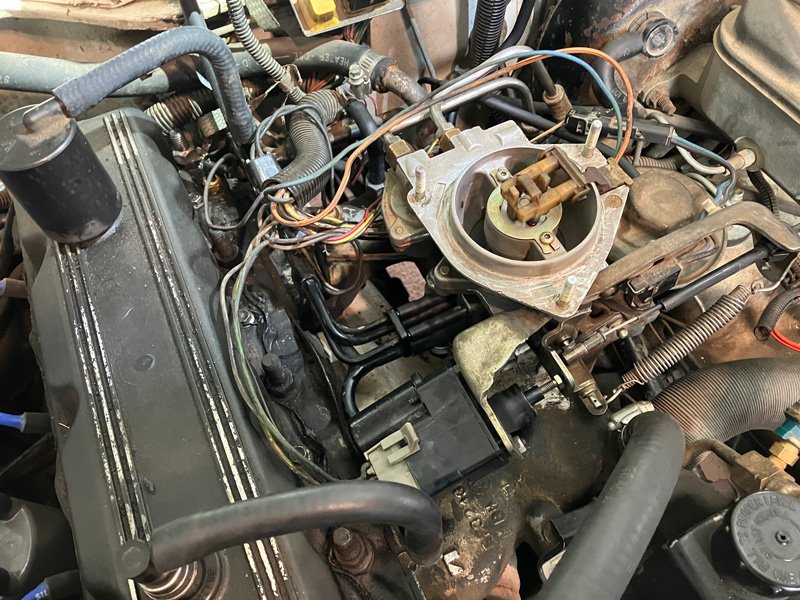
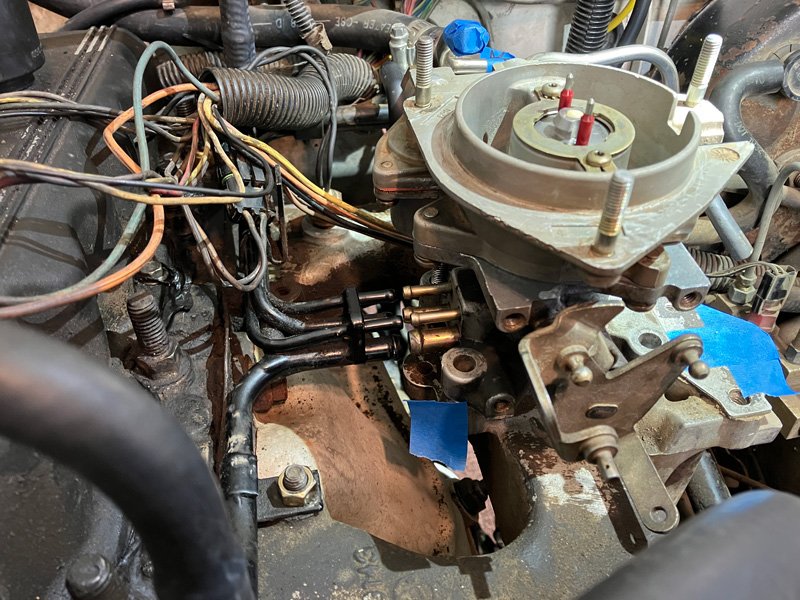
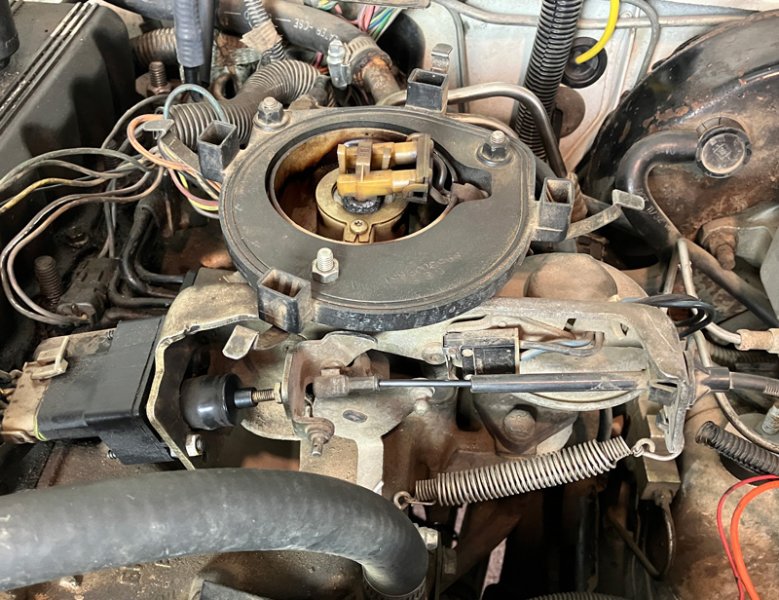
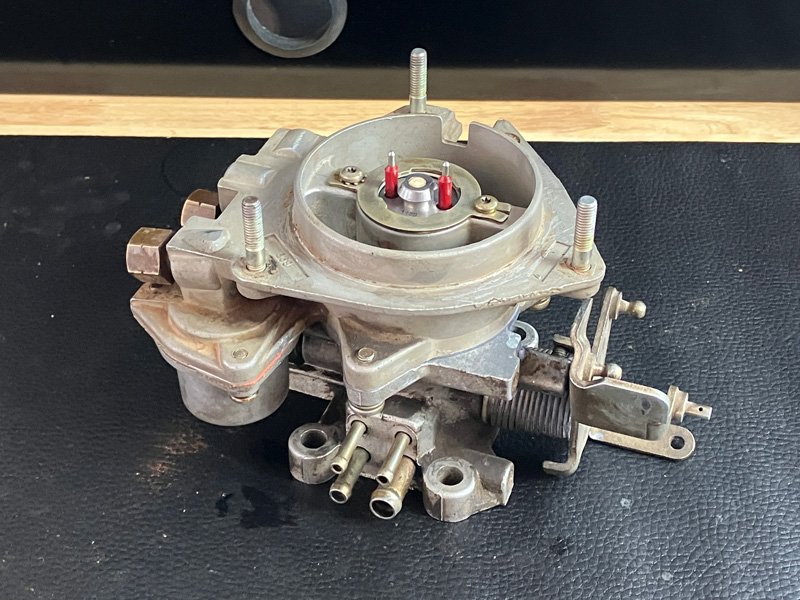
 Cleaning and rebuilding my throttle body was a project that seemed daunting while leading up to it. However, this project was FAR LESS of a big deal than anticipated. This guide is a helping hand for those 2.5L guys that haven’t done this before. Since the throttle body is going to be out anyway, I’d recommend doing all the things Cruiser54 suggests. Removing the TB opens up so much room to get at the things that might be bugging you. This whole project took 27hrs that stretched out in 3 weekends. Besides the TLC I gave to the throttle body, I also did this stuff: • Tighten all Manifold Bolts to spec... I had one of these bolts missing! • Clean all Wire Harness Connections • Firewall to Intake Ground • Clean PCV Valve • Clean EGR Valve • Clean Intake Air Temp Sensor • TB 4-Hose Vacuum Connection • Replace Any Vacuum Hoses • Adjust TPS What You’ll Need: Standard Motor Products #1605 Throttle Body Rebuild Kit. The key is to take your time and be methodical. Read up on manuals, label stuff, and take reference pictures as you disassemble. Since I have an 86 MJ I bought this manual for assistance: 1983 - 1987 Jeep Throttle Body Fuel Injection Component Service Manual Published by Detroit Iron and can be purchased through Rock Auto General Order of Operations: • Disconnect Battery & Unscrew Gas Cap • Disconnect Air Bonnet Assembly, with Vacuum Hoses • Disconnect Fuel Lines • Disconnect TPS, WOT, ISA & Fuel Injector Connectors • Remove EGR Valve • Disconnect Throttle Linkage Spring & Cable • Remove Throttle Plate Assembly (keep the ISA motor attached) • Remove Throttle Body Assembly Once the air bonnet assembly and hoses are off, there’s a plastic part on the very top of the TB that needs to be taken off. Once its off, the TB removal process becomes much clearer to recognize and understand. Just go about it logically. Lots more room available after TB is removed! Use tape for identification and to keep out grime — Note: firewall to intake ground improvement Dirty Throttle Body The throttle body itself is pretty straight forward to dismantle. A few Torx sockets will get it apart. I used a plier with deep teeth to lift the fuel injector out. Use a twisting motion as you lift to remove it. Others use a slotted screwdriver to pry it out, but I think the plier method is best. I used a mini bar clamp to help take apart the fuel injection pressure regulator. Inside is a strong spring, and this little clamp helped out tremendously. To clean the throttle body I’d recommend using a few Scoth-Brite pads. They’re flexible and won’t do any damage. I used a full can of throttle body cleaner during the cleaning process. A nylon brush comes in useful for the exterior, and a few pipe cleaners did wonders for inside the tubes. Throttle Body After Cleaning Re-assembly was easy. Only a few things will be used from that #1605 kit. Just match up the old with the new. The mini bar clamp came in handy again when bolting together the fuel injection pressure regulator. A few pieces of low tack tape will help hold that orange diaphragm in place as you close it up. Clean & Assembled Throttle Body Clean those Electrical Connections! Throttle Body Bare Vac Connection New TB Vacuum Hose Connection A word of advise... this picture above was taken before I successfully connected my clean throttle body to the new hoses. I failed at the first try. I ended up pulling all four hoses out, and barely reattached them to the vacuum hard lines. Why? Because you'll need all the available hose length to successfully attach the TB. Have a heat gun ready. 1) Lube every metal tube with silicone spray... including the TB brass tubes 2) Warm hoses with a heat gun 3) Slowly, but quickly get that clean TB onto the hoses 4) Continue to warm with heat gun if needed. Also, be sure to place your intake gasket BEFORE mating the TB to the 4 hoses. Clean & Fresh 2.5L Throttle Body with New 4-Hose Vacuum Connection All Buttoned Up!

-
I need help with my 87 2.5l comanche, when I turn the key to start the engine, the fuel pump runs, but the starter and spark plugs don't work, we tried to push start it and that didn't work, I jumped the starter and it spun the motor but it didn't fire, then took a volt meter and the plugs have power the relays have power 20230824_152454.mp4
-
Might be a dumb question but how do I figure out specifically what kind of transmission I currently have? After browsing online looks like most people are recommending an ax5-15 for the 4x4 conversion
-
2.5 litre 5 speed 2wd not currently safetied but want to have it done for a daily driver. Wanting to do a 4x4 swap. cold air intake Aftermarket temp gauge oil pressure gauge. rpm gauge 200k km Known issues brakes don't work breather falls off rust in rockers, cab corners, box sides, and front fenders Exhaust is there but needs to be re attached at rusted off point leaks rain in the cab from as of now unknown issues passenger door handle button is gone so you can only open it from the inside. Passenger door window crank doesn’t work either. Driver side grinds runs and drives great.I Will definitely be driving this one for a long time. Will also restore bit by bit. I can do everything myself aswell. Gonna be a fun project. my goal is to keep the 2.5l manual and get the 4x4 swap for winter reasons. Let me know any ideas and money saving tricks you got.


-
Oh yeah burnt the hell out of that throw out bearing. Wouldn't you know it, I was on my way to work. Yep custom intake and open up air flow I, someone else on CC has done similiar using a speaker mesh to cover as to mine is just open. Attempted to do CAD flip but needed to jack up truck to aline 2 piece shaft for colar to slide over. Someone elses photo on CC but just to show what it looked like before I closed it up. Oh that's my clutch pedal and clutch master push rod linkage Cleaned up both brake and clutch pedal welded clutch pedal Reinstalled, just wish I could have removerd the hanger for clean up too.
-
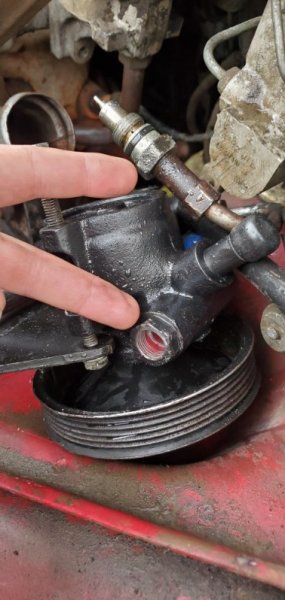
Quick question (hopefully). Putting a new power steering pump in my 90 Comanche, 2.5l. When I disconnected the old PS pump high pressure line (top finger) this is what it looked like. New pump looks like bottom finger. I assuming i just need to take the nipple with the o-ring off the old high pressure line, then that long cylinder before the bigger nut will go in the pump, right? Any help is appreciated! Thanks
-
This is my first attempt at completely rebuilding/restoring a vehicle. I have no previous mechanic experience. I was curious if anyone would give me some advice on the process. What needs to be done first? I have drained most of the fluids. Removing the gas tank is next. But after that, do I just clear everything out underneath the hood? How do I check to see if I need to replace my engine (supposedly it has a cracked head gasket; and if its not terrible I should be able to replace it, correct?). I am open to any suggestions. I am flying blind on this one. I have checked YouTube for help, and found a few videos; but nothing showing the entire process of rebuilding and restoring. Any direction to a website or video would be appreciated. Thank you in advance!
-
Well, I guess this is the start to my build thread! won't really be a build just the progress of my daily. I’ve had her for like 2 months now and so far ive: Replaced both window regulators Fixed a lower radiator hose leak Got a steal on new taillights Did front breaks New tires Window tint Right now I'm working on chasing down a TCU problem. My trans isnt shifting on its own so I have to go 1-3-4. I’ve got some big plans for this truck in the future its just a matter of saving up! If you want to follow the build closer follow my insta @ DannyD815 I will add more photos when I can!
-
I have only been on this site for a little bit and haven't posted enough things to create a classified listing yet, but I am looking to convert to the aluminum cover for my 2.5L. I don't have many options for junkyards around here and haven't found a suitable donor yet and am wondering if anyone has one they can part with or can point me in the right direction to find one. I've seen for the gasket to use a FelPro vs50502r and a cover from a 93- YJ or a Dakota with a 2.5. I haven't been able to locate any of those valve covers online anywhere either though.
-
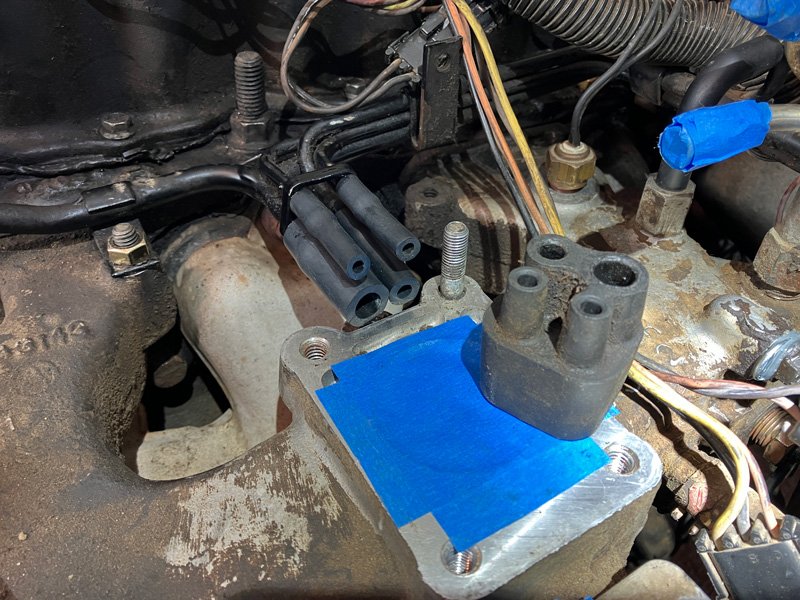
 I am about to head to parts store to grab some bulk hose to do heater control valve delete and wanted to know if the hose I am pointing to at in picture needs replumbed. It seems to run from thermostat housing into front of Intake manifold and right out the back of Intake manifold and into heater control valve.
-
Hello guys, hope everyone is doing well! My motor is on the way out, I check the engine compression and three cylinders are at 90 psi and idling rough . thought about rebuilding but going with remanufacture instead, what are you guys thoughts on ATK and sure fire engines ? I heard really bad reviews and what do you guys recommend ? (still wanted to keep small 4 cyclinder instead going 4.0 ) The MJ is my daily driver, details in my MJ are 1987 base 4x2 2.5 L Thanks for the reply !
-
 For those of us that still love our 4 screaming squirrels, here is a little necessary upgrade/Egr Delete The manifold I used was from a 2.5l yj ( a knock off pacesetter header from ebay) Header Link and EGR Block off plate There are going to have to be some modifications, the new mid pipe is shorter than the original, so you can either lengthen your new mid pipe or lengthen youe existing exhaust set up if you are going to reuse it It is short about 1-1.5 ft, so it gives you the opportunity to run a new exhaust if you want
 -
Hey guys, as some of you may know my oil pressure sending unit fitting broke flush with the block and this is a write up on how to get it out. Yes there are several ways to get this fitting out, such as pulling the engine, removing the engine mount etc. This is what worked for me and can be used as a reference for other 2.5l renix owners. This problem started when I swapped my cluster from the dummy lights to a full cluster. The oil pressure switch ( which turns on the dummy light if oil pressure goes down) does not work with the full cluster. I got the oil pressure sending unit and it is a direct swap, so i thought it was going to be a 20 min job at the most. As I am trying to loosen the original switch the fitting it screws into breaks flush with the block. After singing like a sailor, i started scratching my head. Attempt #1 I thought about using a 5/16 extractor bit. The bit fits into the hole but without removing the engine mount there is not enough room to be able to get a drill to spin it out. Attempt #2 I ran to Home depot with the advice of some of my fellow members and got a set of pipe nipple extrators These would have been perfect if it fit into the hole of the fitting. It would work beautifully but since a hammer doesn't fit to tap in the extractor. Attempt #3 So the next attempt was getting a small metal cutting blade and modifying it w/ an angle grinder to fit into the fitting Before cutting away at the fitting, I removed the alternator and the ac compressor Covering the blade in grease carefully cut 2 grooves into the fitting on opposite sides, either top and bottom or left and right. Once the grooves are cut get yourself a flat head screwdriver (one that is just as wide as the fitting) slide it into the grooves and carefully back it out
-
Hey guys I was wrenching on the jepp today and nothing good happened. The plan was to go in and remove the oil pressure light switch in favor of the oil pressure sending unit I have for the gauge to read properly. As I was trying to take the old one out *SNAP* the 90° brass fitting snapped at the block. I am trying to figure out what to do. I have tried an extractor bit but the drill doesnt fit the the space and the engine mount is in the way. I will post up pics soon
-
I tried searching for the answer to this, but I've had no luck. I tried starting my truck today, and it wouldn't start. So I opened the hood, and noticed gasoline sprayed around the passenger side firewall area. I'm at work right now, so i havn't had a chance to really check it out. Does anyone have any clue what could be going on? If any of you have seen my build thread, you probably read that the PO put gasoline in the master cylinder. So I'm terrified about what else he did.
-
Just curious, what is the group consensus on painting the grill/headlight surrounds to match body color? Like how Zone Offroad did with their comanche. Personally, I think it looks great. Kinda afraid to do it though, because I love the classic look. Although, my truck already has the wrong grill. It's an ugly chrome now, and I very much dislike chrome. I guess worst case, I could paint it black if I ended up not liking it. thoughts/comments? ps. here is a picture of the Zone truck because I know everyone hates threads without pictures. lol
-
Let me apologize in advance if this thread is in the wrong place. I bought a toolbox for the comanche. Unfortunately it has no key, so i have no way to lock it. Has anyone ever replaced the locking mechanism on a toolbox? Is it fairly simple? I won't be keeping anything valuable in there, so if this is going to be a huge PITA, I will just live with not being able to lock it. It would be nice to not have to worry about someone stealing my jumper cables or gas can though.
-
I'm new to the site and recently picked up an 86 2.5L with a 5 speed and 4.10 gears. I know its a 4cyl but it just doesn't have the power to make it up some of the hills in town anywhere close to the speed limit. Are there any upgrades (other then motor swaps) that will increase the power and performance? Right now it is fully stock, but I'm planning on putting on a 3" lift and 31s before the winter starts here. I have heard about throttle body swaps and different injectors, but i don't know where to start. Any help would be appreciated.
-
I have a 1989 Comanche sport truck. It is a 2.5l 4cyl 2wd. I am in the current process or rebuilding the engine and doing a 4wd swap. I have pulled the ax4 as it is worn out with nearly 350,000 miles on it and intend to replace it with a Ax5/np231 combination. I have sourced a pair from a 97 2.5l TJ. Will that bolt up to my '89 block once i get done rebuilding my engine? and is there any serious modification required to do that swap? Any extra electronics on the '97?
-
Looks like this guy has had a hard life, someone should save him: http://www.govplanet.com/jsp/s/item/666840?h=345-22,15471 2.5L 4x4, 1986 Model with 160k on the clock. Probably none of that was highway miles either. But, the auction starts at only $900!
-
So the belts on my 86 Mj are dry-rotted, and I'm in need of some new ones. Problem is, I have too many options. Unfortunately I'm using my phone at the moment so I have no way to upload pictures, but I need the one that has the grooves in it, I belive it's called the v belt. I'm probably wrong on that though. I also need the smooth one. Rockauto has belts for my truck, but some day with ac, others say without and I don't know which ones I need. My truck does have factory ac, power steering, etc. Problem is, I don't know which belt is supposed to power what. Any help?
-
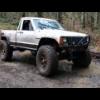
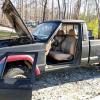
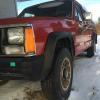
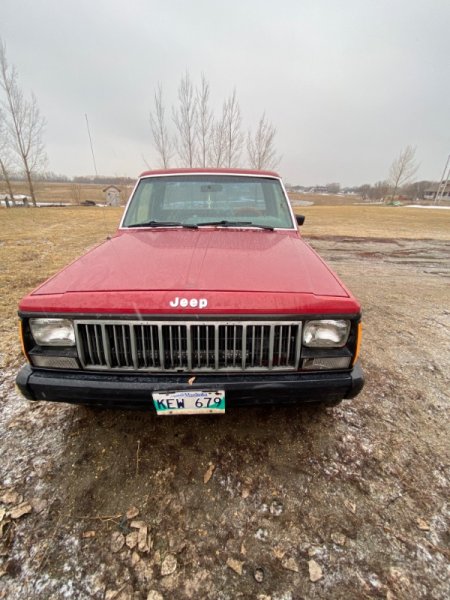
Hey, so i just picked up my first Comanche, its a 1987 4x4 2.5L 5 spd. sporTruck in red. It's a project to say the least, but I'm excited none the less. I'm pretty mechanically inclined and have all the tools and access to most of the machines to do most of what I need to, only major problems being: 1: Funds 2: Minor access to heated building to work on it in the frigid Illinois weather as my garage is not heated and my dads garage has two cars in the front heated garage and 3 cars in the heated shop in the back yard :fs1: he has more projects than me I think It has a few issues that i currently know of and I've been doing a ton of reading on here and everything is super super helpful, it cuts 75% of the diagnosis work out of it. Issues being: 1: 4x4 does not engage to front axle (believe its the stupid vacuum issue; Easy fix) 2: Brake lights do not work, and blinkers on the drivers side just light up the brake light on that side... (screams ground issue to me; Should be a relatively simple fix) 3: Intermittent knocking noise under cab on drivers side/center floor, sounds like maybe a trans/t-case mount may be loose or missing, happens at weird RPM's weather the vehicle is stopped or driving, haven't had a chance to get under it and check out where its originating from yet 4: No heat... maybe a heater core from what I can find... the blower motor is working, open to any help on this one 5: Previous owner said it gets death wobble, I have yet to verify that as I've only been to 45mph so far, but hey its a jeep what do you expect right? 6: Radio is inoperable HA who cares I just want to hear the roar of that beastly 2.5L screaming down the highway at 50mph, no but seriously that's the least of my worries as I have a history with car audio so it should be somewhat simple when I get around to it 7: Parking brake doesn't work, haven't looked much into this yet... can't be terrible 8: Speedometer is not working, not sure if the cable is busted or just detached or....? The truck currently runs, drives, and stops, and is not too bad in the rust department and my dad is a body-man so what rust that is there can be taken care of somewhat easily, so that's a plus... Clearly I couldn't pass it up for for $350 The booty-my first view of the truck The front and side view of her Taking her home! Yeah she runs but i had to drive 4 hours away to get it so definatly not going to drive it back :shake: Got her in the garage to check a few things out but had to move it out shortly after Interior is looking pretty good, needs a few window crank handles (got a free vice grip out of the deal :thumbsup:) This is where she sits now! The block heater makes all the difference in startups though wow! :yes: Yes I know the top is ugly :ack: but I'm probably going to leave it on for winter, the bed is pretty nice on the inside! ...and I will pull the carpets and fix the floors come spring time! Any suggestions, criticism, or help would be welcomed and appreciated!!!
-
Merry Christmas everyone! Quick question about the fan/fan clutch. I finally got her running so now its time to buy the parts I'm missing to get her driveable. My question is, on my 86 mj, the pulley for the fan clutch only has one stud coming out of it. is that normal, if not, can it be fixed, or do I need a new one? I'm trying to post a picture but photobucket isn't working for me at the moment.