


ghetdjc320
-
Posts
5079 -
Joined
-
Last visited
-
Days Won
1
Content Type
Profiles
Forums
Gallery
Everything posted by ghetdjc320
-

Cruise control switch/stalk, can't find one
ghetdjc320 replied to knever3's topic in MJ Tech: Modification and Repairs
Yes the old one just pulls straight out. If you do want to retain the cruise wire though, tie on a string onto the pot connector and pull it through so you have a pull string in place to pull the new wire through. This is much easier to do with the steering wheel removed. I rented a puller from Oreillys and it was a simple process. -
Fuel line problem, need part numbers.
ghetdjc320 replied to Skylynx's topic in MJ Tech: Modification and Repairs
It looks like the fuel filter rubber lines are not fuel injection lines as they look like they’ve bulged under pressure. Grab some 3/8 fuel injection hose and fuel injection clamps for those. The fuel rail rubber line could be replaced by AN fittings but you’ll need a 3/8 fuel rail fitting to -6 connector. The connection that is leaking is going to need to be severely cleaned. You can then use an ac/fuel line quick disconnect tool and hopefully get that rubber kine off the hardline. There won’t be much of a gain going to AN lines here as the fittings will still be the same on each end, but it would look nice. -
clutch kit preference-quality
ghetdjc320 replied to tarmac2dirt's topic in MJ Tech: Modification and Repairs
Luk rep-set has been my go to. But chuck the throw out bearing and get a timken or skf unit -
Any thoughts on this load leveling device?
ghetdjc320 replied to ghetdjc320's topic in MJ Tech: Modification and Repairs
Following up on this: I was able to work with the manufacturer to make a custom kit that should fit my MJ. I can't say for sure that it will fit all MJ's as my shock mounting and leaf mounting are not stock. I will report back though on how it works. Hope to have it installed in a couple of weeks. The more I look at the design the more I like how it works. I was wanting to add a rear sway bar as well but may not need to with this setup. Will report back with my overall findings. Hoping this works for stock or lifted trucks to reduce squat without having to have a lot of forward rake in the suspension to accomodate. In my application, I tow a fair amount and will also load up the bed with cargo for work. I have already added some belltech chevy 1" drop shackles (which are around 6.375" eye to eye and similar to the teraflex). That added just over an inch of lift while keeping my angles at the driveshaft correct. -
Makes sense. To me the roll bar has been an aesthetic piece, but I suppose it could provide some level of protection in the event of a rollover.
-
I'm suggesting not doing any bending but rather, using mandrel bent pieces and welding them together similar to how a custom exhaust is fabed up.
-
Out of curiosity, why not just fab this from 3" 16 gauge exhaust tubing with mandrel bends? That way it will look like a factory part. Simple enough to either tig or mig and smooth out the welds. I also like Pete's idea of a 2 piece design that could be either welded or bolted together for those that don't have access to a welder.
-
I found them on Amazon a few years back. Cheap to. They have thin bare wire type leads that wrap around the base iirc. Will try to find the part number I ordered edit: found it https://a.co/d/0ruB4Pf If you go with the LED’s use green if you want a factory like appearance. The yellow incandescent bulb went through a blue filter to create green on the oe application. With the brightness of the led, green gives the best look.
-
You can still paint the red over the POR15 if you want to keep a factory look. The por15 will really be your friend here if you want to preserve as much as possible
-
Why not spray raptor on those parts? Raptor holds up very well on bumpers and other parts exposed to UV. Whatever you do, epoxy primer is an extremely good and durable base to build on. Even if you have others paint the color portion. Maybe grab a gallon of epoxy primer and hardener and shoot what you feel comfortable with??? Raptor liner and most any other finish sticks to it very well so long as you follow the appropriate drying and recoat time tables
-
Don’t use self-etching primer with base/clear. Grab some epoxy primer and shoot everything with it. Reading the technical data sheet (TDS) of each product your applying and following it will give the best results. If you have bare metal, body filler and factory paint in different areas, the epoxy can seal up all of that and provide a good uniform base that the paint will adhere to. Personally, I shoot 4 coats of base and 6 coats of clear but this depends on the coverage of the paint being used and the quality and thickness of each layer of the clear coat (you don’t want to have any sagging). The goal is to have a good looking end product you can then cut and buff a couple of layers off of to achieve a perfect end product. That being said, I’d shoot down one more coat of base after I achieve a uniform color over the entire truck followed by at least 3 coats of clear. ps, don’t wet sand anything before your apply paint. That is a recipe for trapping moisture and rusting down the road. The TDS will recommend what grit to sand to before applying the product. It is good practice to shoot epoxy primer down on all bar metal BEFORE doing any fillers. The chemical reaction from the filler causes it to warm up and condensation can form. Many fillers also absorb water very easily. Mineral spirits is your friend for wiping down things before paint. Tach or cheese cloth to remove any tiny debris once the base layer is dry. The primer, base and clear all go on within specific time frames and will typically involve a long marathon day of mixing and spraying.
-
Most 1k air dry paints don’t form a good chemical bond with clear coat. Why not just grab some base coat and clear from your local paint dealer? If you just want white, it can be found pretty much anywhere at very reasonable costs. If you’ve already spent the time and effort to do body work, put on a product thats worth it. Almost anything looks good when it’s first applied, but only the correct paint looks good years after
-
Thanks! I don’t have a dial caliper with me at the moment so this is super helpful.
-
I would dare to say that the ball joints will be a bolt in swap provided the old ones are extracted properly. I’ve never had to use a knurled or alternative design to the Dana 76944x joints. I’ve only done about (5) d30 axles’ ball joints but they were from a wide range of years (88-05) and the spicer part number fit them all without issues. But I can’t emphasize enough proper extraction with the right tool. You may be able to rent a similar tool from your local auto parts store.
-
I'm needing the rear spring eye outside diameter (shackle side) in MM if possible.
-
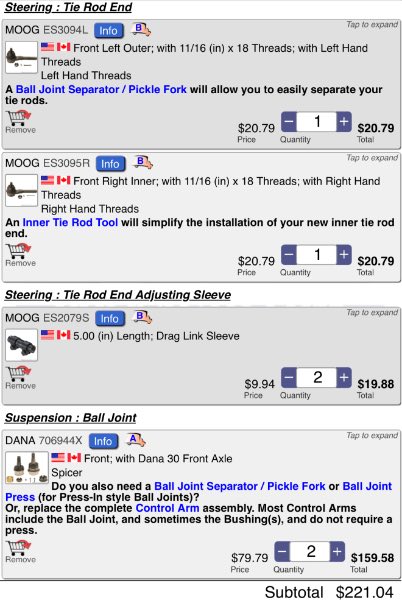
If you’re not upgrading the tie rod to the ZJ version then this is what you need (see pic). The parts below don’t replace the drag link which has a tie rod end integrated for the passenger wheel. If you need to replace that too than add Moog part number DS1238. Spray your ball joints with some PB blaster or similar a couple of times a few days before you’re planning to remove them (or have them removed by a mechanic). If you’re going to remove them, you’ll need a good quality ball joint press (OTC makes a great one) and the appropriate Jeep adapter cup. It can be done using other methods/tools but I’ve never had any damage to the inner C using the above tools and new stock replacement ball joints went right in place without issue.
-
Are my synchronizers toast?!
ghetdjc320 replied to InTacosWeTrust's topic in MJ Tech: Modification and Repairs
Post the part number or link. Probably the same thing -
Overheating still!
ghetdjc320 replied to InTacosWeTrust's topic in MJ Tech: Modification and Repairs
The flowkooler with the billet impeller is a great unit. There are other “high flow” pumps though that use a stamped impeller. You have the right combo though. The mishimoto has a greater capacity than stock. Mishimoto, cold case, Novak and the old Griffith have multiple cores with large passageways and higher overall capacity. I’m sure some other radiators do as well but there are also many that don’t. When you start getting a radiator with small passageways and/or low capacity, the high flow pump can work against you. As stated above, the 4.0 is designed to run warm. But it should hold a relatively steady temp once it gets to normal operating range. Even an inaccurate temp gauge shouldn’t keep skyrocketing into the red given that the gauge sweep is exponential and not linear. It should hold steady at some point with a functional cooling system. But to the OP, I would suggest an IR temp meter as well. If you check the thermostat housing, just know that will typically read a few degrees above the gauge temp. -
Overheating still!
ghetdjc320 replied to InTacosWeTrust's topic in MJ Tech: Modification and Repairs
Interesting. What radiator did you use? The high flow pumps have given problems in the XJ/MJ platform. The high flow pumps coupled with certain “upgraded” radiators can move water too quickly for heat dissipation. Many upgrade radiators actual have lower fluid capacity (often a result of multiple thin cores). Coupled with a higher flow water pump, the relatively smaller amount of coolant is moved faster which is a recipe for over heating. There are some but not many improvements to be had in an MJ/XJ stock cooling system. -
Was wondering if there was a way to have more storage space for videos. Could we possibly even have a DIY videos thread? Currently, I can only upload a tiny video clip.
-
'97 up console install in '89
ghetdjc320 replied to Colt6920's topic in MJ Tech: Modification and Repairs
The 97+ console still looks and functions very well with the 96- interior. They seem to be a better design overall with functional cup holders. Try running it and see if the gap is even a concern. I didn't even really notice it after a while. -
'97 up console install in '89
ghetdjc320 replied to Colt6920's topic in MJ Tech: Modification and Repairs
There used to be a guy on the XJ forums who was making a custom "filler piece" that looked very nice and cleaned up the transition but he's been out of business for some time now. Wondering if @Dzimm may have something in the works. -
'97 up console install in '89
ghetdjc320 replied to Colt6920's topic in MJ Tech: Modification and Repairs
Once you line up your case and transmission shifter bezels, you will notice a decent gap up front. It would be nice if the console could slide forward a but more but the gap is primarily a height gap. The 96- console flips up at the end to meet the lower dash trim. the 97+ stays pretty low in that area. -
Finally found one...Now it has a new floor.
ghetdjc320 replied to watchamakalit's topic in Member Projects: Your Comanches
I just had a chance to look through some of your thread. Nice work! I feel your pain on those worthless rebuilt steering boxes. I should have learned my lesson on my Yj when I went through 3 "rebuilt" Durango boxes before buying a new one. Same for my current MJ, went with RedHead steering box as it seemed like they really knew their stuff. Same problem, bad valve circuit . PSC keeps taking the win For a paint preserver/appearance helper, I had really good success with Flood Penetrol for old paint. It doesn't leave behind a residue once it dries (about 24hrs). It also comes off easy enough if you repaint down the road. I was really stoked with the results on my 97 TJ. I would apply it about every 6 months and that is with there tropical sun and heavy rain/salt spray. Worked really well under the chassis as well. For A/C lines, Cold Hose will build you about anything you need if you provide the specs. Vintage air also has sections of pre-flared aluminum tubing in different lengths that can be bent as needed and added to an AC hose like a reduced barrier setup for a custom line. -
'97 up console install in '89
ghetdjc320 replied to Colt6920's topic in MJ Tech: Modification and Repairs
You just need the rear bracket. No trimming needed but there will be a gap where the console meets the lower dash.