


ghetdjc320
-
Posts
5079 -
Joined
-
Last visited
-
Days Won
1
Content Type
Profiles
Forums
Gallery
Everything posted by ghetdjc320
-

Pinging under load need help
ghetdjc320 replied to ja_racing's topic in MJ Tech: Modification and Repairs
Interesting, one more question: have you always ran it on the same Renix system? And is it the 89-90 or the earlier ECU? -
Pinging under load need help
ghetdjc320 replied to ja_racing's topic in MJ Tech: Modification and Repairs
Has it always has this pinging issue since it was built or is this a new issue? -
Fuel Pump Ballast Resistor Upgrade
ghetdjc320 replied to HOrnbrod's topic in MJ Tech: DIY Projects and Write-Ups
You can still get a stock style replacement https://www.summitracing.com/parts/cwa-33000682 It doesn’t have the ring terminals as the one posted here but will function the same -
Pinging under load need help
ghetdjc320 replied to ja_racing's topic in MJ Tech: Modification and Repairs
Did you degree in the camshaft using an adjustable timing set? -
Pinging under load need help
ghetdjc320 replied to ja_racing's topic in MJ Tech: Modification and Repairs
Do you happen to know what your quench distance is? Low comp strokers have had these issues before. Has the cam timing been adjusted at all? And when you say stock cam, is it an oe renix cam? What’s your actual stroker recipe/combo? -
It could also be that it’s starving for fuel when warm. Seen this happen in many older efi systems. Try adding a bit of gas to the TB and see if it fires up
-
Keep in mind that the fuel tables will typically provide less fuel when starting up while warm and not more fuel.
-
Adding AC, need details for Dealer AC harness
ghetdjc320 replied to Kedosp's topic in MJ Tech: Modification and Repairs
The diode is like a one way check valve for the AC clutch power. It should be located inline near the AC clutch. Its purpose is to prevent the clutch from back feeding electrical current when the clutch is cycled off. I've run without them before in an MJ ac system but they are good insurance and should be installed. The diode should have a symbol of some sort indicating the direction of current flow. Again, just think of this as a check valve -
Windshield Glass Replacement
ghetdjc320 replied to kriswinner's topic in MJ Tech: Modification and Repairs
I had safelite replace the glass in my MJ several years ago. I just told the exactly what it was (91 MJ). They installed the 97+ glass and seal by default. -
Any thoughts on this load leveling device?
ghetdjc320 replied to ghetdjc320's topic in MJ Tech: Modification and Repairs
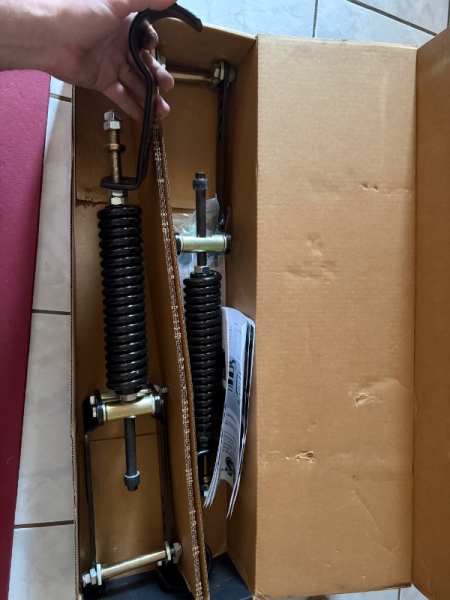
I started with the white disk. Originally I attempted to adjust it while the leaf springs were at full droop, but this turned out to be too much spring preload. So I lowered the jeep back down until the wheels were back on the ground and the spring pack leaf ends were just contacting each other again. Basically, this put the leaf springs in “neutral” similar to how they would be if the were resting off the jeep (no compression or droop). Then I set the coil preload to the white disk. I found this to be a bit on the lite side so I essentially made a shim stack from a feeler gauge that was halfway between the white and black shims. For me, the ideal setting was an addition 2 full turns of preload past the white shim preload. Hopefully that makes sense . As for which kit to order, I have no reason to suspect this kit wouldn’t work on a stock rig. Personally, I’d like to see the spring eye hooks be like 2mm smaller for a tighter hook. But that could probably be accomplished with just a small 2-3lb hammer maybe with a bit of heat. That being said, I don’t notice any ill effects with the current spring hook size. The kit number they set me up with is numbered “4621”. They don’t list it on their site but you can call and order it. I believe they have a pretty good return policy if it doesn’t fit properly. Keep the box and keep the unit in good shape and I think you have 30 days to try it out. It would be great if someone with a stock spring setup could give this a shot. Curious also to see if a long bed could make use of this kit with the smock mount location. Checkout the pictures of my setup and see what you think in regards to fitment. But ultimately, someone just has to give it a shot and perhaps make a few small tweaks. -
Any thoughts on this load leveling device?
ghetdjc320 replied to ghetdjc320's topic in MJ Tech: Modification and Repairs
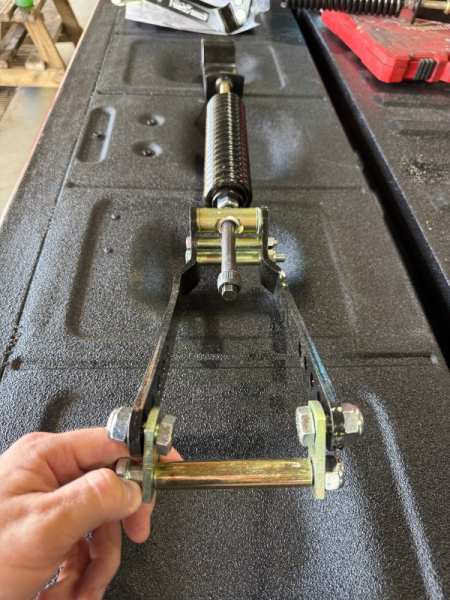
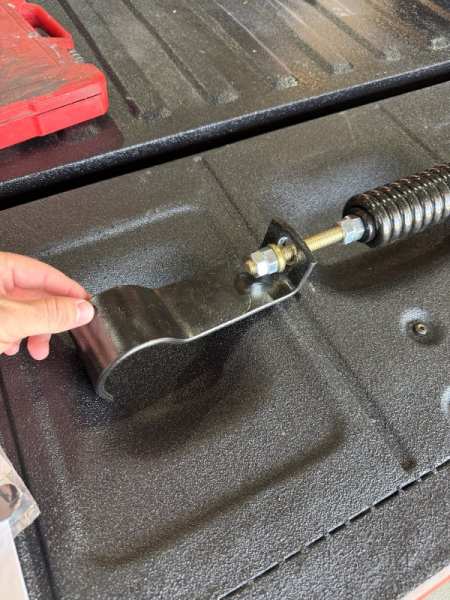
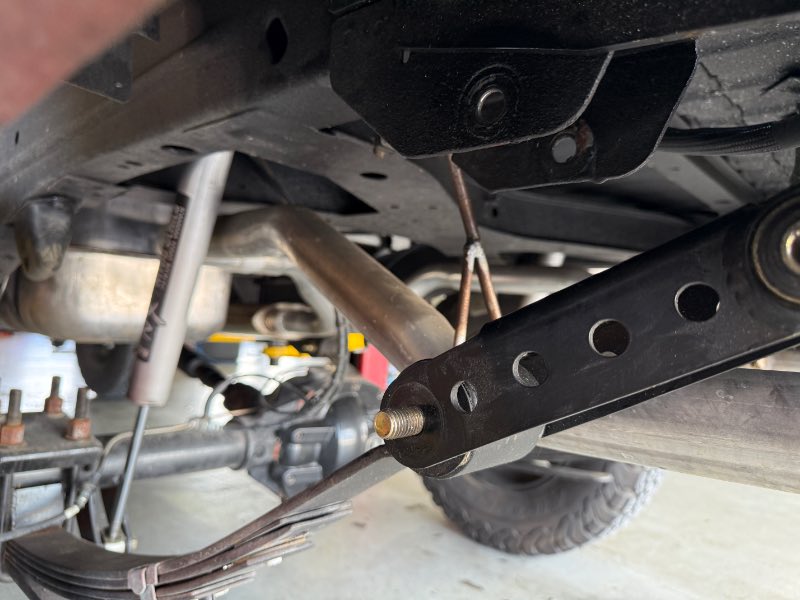
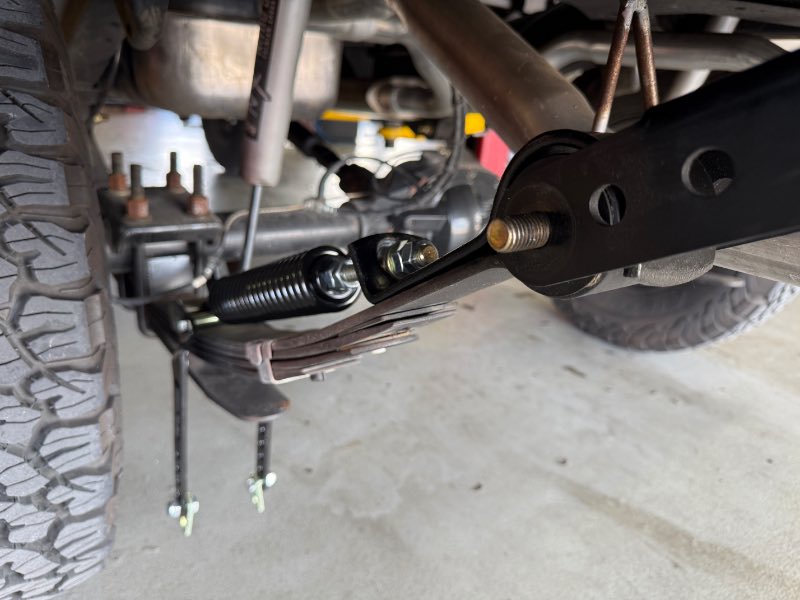
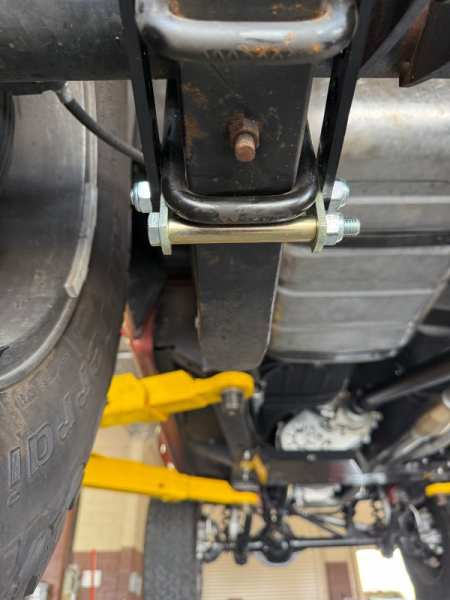
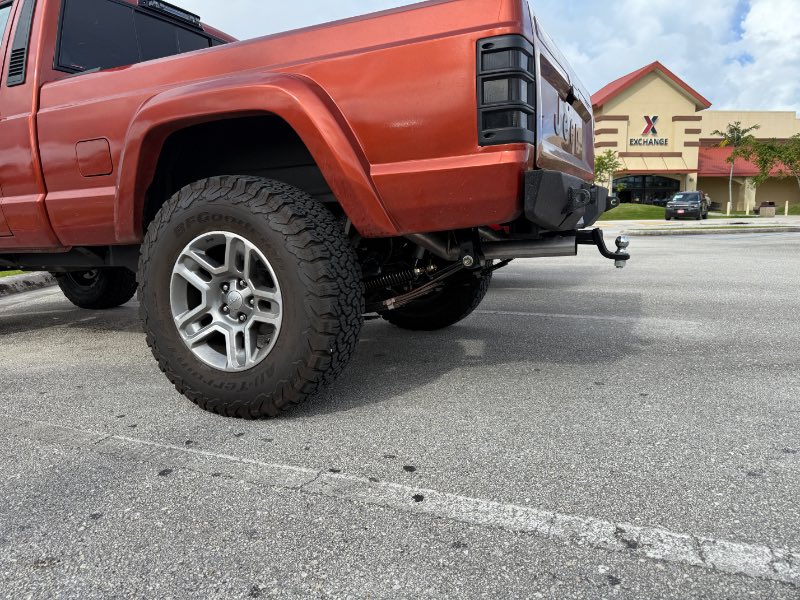
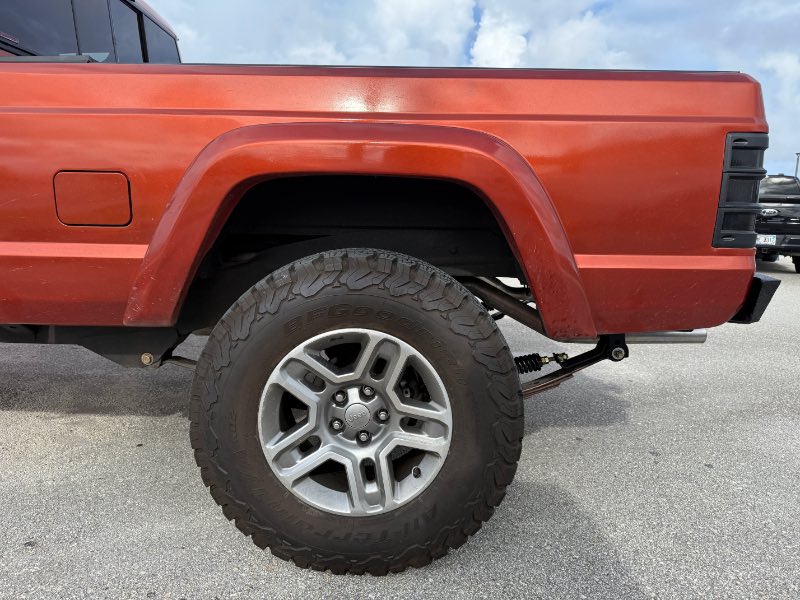
Following up on this. Install went well. I’m running some belltech 1” Chevy drop shackles which provide about 1” of lift over stock. Installation: I believe the hook portion of the RAS would fit a stock MJ shackle as well but it should be noted that you’ll have to remove one side do the shackle, either top or bottom, to install the hook portion around the rear spring eye, then reinstall the shackle. As for preloading the new coil, the recommendation is to tighten it with no load on the spring (full droop). But I found this to not be practical as the spring rate of the coil spring is about identical if not slightly higher than the main leaf. Therefore, the coil will try to bend your leaf if you just keep cranking it down to get the proper preload. Note that the “kit” comes with a pair of thin plastic disks that you insert between the spring coils to determine how much preload the coil spring is set to. According to the instructions, the white disk provides and additional 25% load capacity and the black disk provides a 40% increase. The way I installed it, I allowed the wheels to touch the ground so the springs were holding some of the truck weight. I then stacked a feeler gauge with enough leaves to represent a thickness halfway between the white and black plastic disks. I then tightened the coil until the new preload was set. I feel like this level of preload is just right. I tried cycling the suspension several times on the lift to make sure there was good tension still at full droop so nothing would loosen up and it was spot on. Results: First off, I have not yet towed with it but have tried various bed load from empty to a few hundred pounds. With any load the squat is gone. More importantly, the handling when unloaded is exactly what I was looking for. Even while unloaded, the truck feels “planted” and like it has a sway bar back there. How this would affect wheeling I can’t say for sure but would theorize that it would actually help as there would be a bit more downward force on each wheel due to the RAS. Similar to an active version of a Currie anti-rock. I don’t have any axle wrap that I was aware of but there is an enhanced smoothness to taking off now that was surprising. With an unloaded bed on a slick steep incline, I resist spinning better for some reason . I haven’t seen any drawbacks yet, no noises creaking or adverse affects. It’s a fairly simple device that I expect should be fairly durable. Personally, I will likely swap to some high grade stainless hardware as the level of salt and moisture here is extreme. Once installed, I sprayed it all down with CRC Marine coating spray which has worked very well for me in the past to prevent corrosion on zinc and galvanized parts. I’ll probably spray down the underside of the jeep with Penetrol at some point to preserve things and keep them in top shape. While installing, I had access to a full lift and shop which made the install go quicker but this could easily be a driveway job. Use Case: I’d be very inclined to use a setup like this on an otherwise stock MJ to run 31’s comfortably. It does provide a small amount of lift maybe 1.5” or so. But given the new spring characteristics and load handling, it should be a great fit for a simple puck lift or OME 2” front coils. That would be a seriously great handling combo. Since the unit goes on top of the springs, you loose no ground clearance nor would you alter the pinion angle. I suppose it could help axle wrap if you had that problem with your current spring/shock combo. A lowered or street MJ would probably also like this setup to prevent bottoming out along with some improved handling. Those with heavy loads, towing or toppers of course can appreciate what this does And finally, here are some install pics: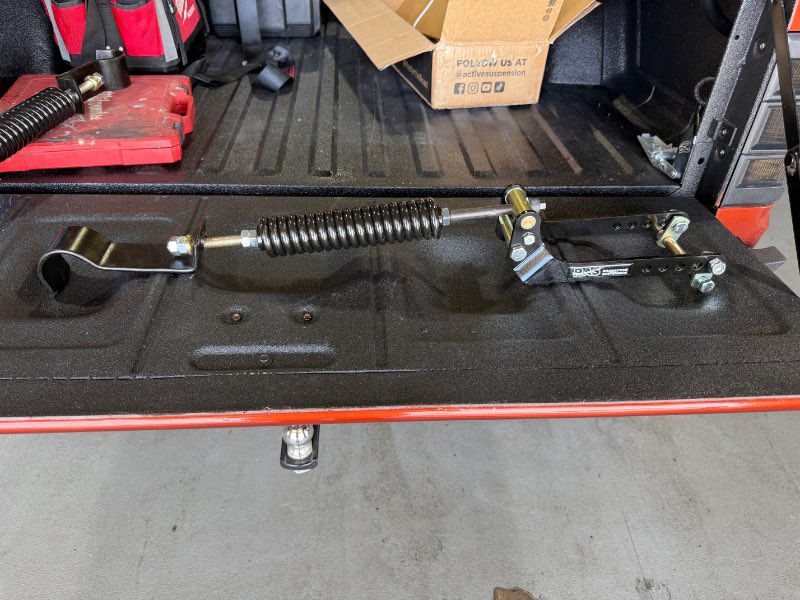


-
Headlight Confusion!
ghetdjc320 replied to Spinnakerblue89's topic in MJ Tech: Modification and Repairs
I have a set of rampage housings. Solid glass front and aluminum rear with a very nice beam pattern. For a replacement housing, they are extremely nice -
Project “Tomahawk”
ghetdjc320 replied to ghetdjc320's topic in MJ Hardcore Tech: Epic Journeys to Greatness
After further driving, definitely feels solid and well planted. No harshness, no noise. Curious to see how it handles a load and will probably try within a week or so. I could actually see this being a neat setup for running 31’s on a very capable, stock rig. -
This is the best idea imo. But 20 gauge is particularly thin. Mandrel bent exhaust tubing that is 16 or 14 gauge is the way to go here imho. I’ve also looked into doing this. Thbest I could figure is to just sell the 5 bend pieces and the mounting plates. Then let the end user get the straight 3” tubing locally and weld it up. Heck, you could pack that up into a fairly compact box.
-
Overwhelmed with installing 4.0
ghetdjc320 replied to Jacoop91's topic in MJ Tech: Modification and Repairs
I’ve found that having the transmission mounted to the engine (not including the transfer case) prior to dropping it in helps two things. Lining up the transmission properly to the block and giving you a nice fulcrum point where you can easily adjust the engine angle by placing a jack under the transmission tail. -
Project “Tomahawk”
ghetdjc320 replied to ghetdjc320's topic in MJ Hardcore Tech: Epic Journeys to Greatness
Install went fairly smoothly given that this was a custom setup. I’ve only driven it a few block so far but it feel “planted” it’s almost like a have a sway bar and some additional weight in the bed. Very impressed with ride quality so far. Will report back once I get some use and see how they work out. Here are some of my install pics: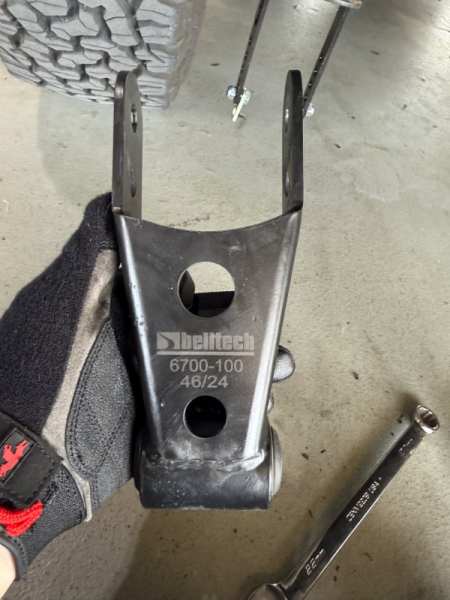

-
Project “Tomahawk”
ghetdjc320 replied to ghetdjc320's topic in MJ Hardcore Tech: Epic Journeys to Greatness
Going on today. Will report back on results. Also been looking at possibly running an E force supercharger. Can’t help but noticing that I think I could clear my hood I know there are other options out there but very few seem like a good fit.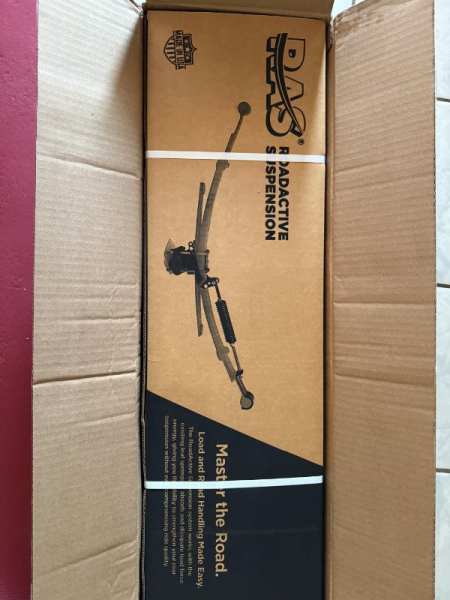
-
Overwhelmed with installing 4.0
ghetdjc320 replied to Jacoop91's topic in MJ Tech: Modification and Repairs
Also, did you swap the actual frame side mounts from the XJ onto the MJ? I’ve found it to be a much easier process to install the engine with tranny assembled then add the transfer case -
I run that exact kit with the add a leaf. It has a nice spring rate and blends well with the pack but there are a couple of items to note. The actual lift is only a hair over an inch as this not made specifically for an MJ. You will need to redrill the center pin in the add a leaf as it doesn’t line up with the offset of the MJ leaf pack. There are pictures somewhere in my build thread that document the whole process. Are you trying to match this to a BDS 2 or 3” front coil spring? I’m running the bds 3” complete kit. The front does indeed lift around 3”. The MJ has a stock rake of around 2” give or take. So adding 3” to the front and 1” to the rear leaves the truck pretty level but it will squat with any load. A 6.25” long shackle will help significantly and keep it looking a bit more like a truck. BDS also has the rear shock lengths incorrect for this application. The rear shocks in their 3” kit are too long once the springs settle and will bottom out. The BDS control arms, front springs, and add a leaf are all good quality and far better than most others but the bds stock shocks and track bar aren’t so good. The ride quality of the add a leaf in the stock pack is very good though. You could also go with the General Spring 4 leaf spring pack and add some longer (5.75-6.25” eye to eye) shackles. That would net around a solid 2-3” of rear lift which would couple nicely with some good 3” coils or even 4” if you wanted a more “leveled” stance. Here is a recipe for a really solid suspension setup for a low-mid lift: metal cloak 3.5” front XJ coils Currie (rock jock) adjustable XJ control arms or possibly metal cloak XJ or TJ arms Iron man fab track bar kit (standard drop no offset and no drop pitman arm) Iron man fab steering brace kit Moog jeep ZJ steering linkage black magic or centric posi-quiet brake pads GS 4 leaf spring pack (or a full length add a leaf like bds) 1” Chevy drop shackles (or teraflex shackles) Fox shocks valved for an MJ from accutune off-road. Later model XJ larger sway bar
-
Fuel line problem, need part numbers.
ghetdjc320 replied to Skylynx's topic in MJ Tech: Modification and Repairs
Nice video, I’d be concerned about not having a barb for the clamp though. I tried doing that in my YJ and even used two fuel clamps but it still came off after a few hundred miles spraying fuel everywhere. This was on a 58psi line pressure system though so I’d expect it to last longer with the lower MJ line pressure. If you have an appropriate size hydraulic crimper though, you could slide on a new steel ferule and crimp it down. -
Yeah those are real problem spots. I’ve added seam sealer to the bottom corners of the windshield frame to provide small “ramps” to drain the water out of those corners. POR15 is also great there. So long as they can shoot some epoxy primer in the frame and back mask it for the window urethane, you should have a solid, leaf and oxidation free seal.
-
Look at the dimensions from similar year trucks and see if one may fit. Rangers, S10, Dakota and the like. There may be some long bed units there you could make work.
-
Make sure they don’t paint the glass minting surfaces. That is a common mistake made. The TDS for window urethane says to leave it in epoxy primer only or leave some of the old urethane behind for adhesion. Paint and or clear coat should not be on the actual glue surface for the body. Saves a lot of headache down the road
-
Fuel line problem, need part numbers.
ghetdjc320 replied to Skylynx's topic in MJ Tech: Modification and Repairs
I’d try to disassemble your current ones and make sure your tube fitting surface is still in decent enough shape to reuse. If it isn’t, you maybe need to switch to compression style tube adapters. Alternatively, If you have a quality 37* flaring tool that will work on 3/8 stainless tube, you can add an appropriate AN tube nut and flare the end. Earls and Fragola have been my go to for AN fittings and hoses respectively. -
The bigger trick is the shipping imo.