

Salvagedcircuit
-
Posts
1381 -
Joined
-
Last visited
Content Type
Profiles
Forums
Gallery
Everything posted by Salvagedcircuit
-

Project Morris: The 89 to 99 Comanche Long Bed
Salvagedcircuit replied to RuBacon's topic in Member Projects: Your Comanches
That is very cool to know the dash manufacturer still exists. I do wonder what parts of the ECU are replaced during "remanufacturing". I bet they just ship them to some place in china, tell them to replace the few capacitors, re-seal with silicone, paint and bobs your uncle. -
running issues
Salvagedcircuit replied to richard meier's topic in MJ Tech: Modification and Repairs
What engine do you have? In terms of vacuum readings, check all your vacuum fittings. Assuming you have a renix 4.0L, start with the easy to reach ones first: The fittings on the air box, the vacuum cluster in the front of the engine bay and those that go to the valve cover. The rubber fittings on the valve cover can crack over time. The new ones can stretch over time. I had to add heatshrink to mine because the dorman rubber elbow stretched. Check the vacuum line that connects the brake booster to the intake manifold. There is a hard plastic vacuum line that runs along underneath the firewall seam. This terminates into a rubber hose that connects to the evap canister by the passenger side rear of the engine bay. Mine was so dry-rotted that it turned to dust when touched. I replaced it with heater core hose. Also, check the EGR valve, it could be plugged up. -
The embed link is "youtube.com/embed/XdSgWt1Qi5Q" the official youtube link is: "youtube.com/watch?v=XdSgWt1Qi5Q" Unfortunately, neither show up on archive.org your best bet is to search your computers / archives for files. I find that Everything search works substantially better than windows search https://www.voidtools.com/ you can search by file type extension. So you can search for just .MP4, .MTS, .MPEG, .AVI, etc... Who knows, maybe you'll find it. Good luck
-
Turbine Wheel Center Cap Repair
Salvagedcircuit replied to Dandxj's topic in MJ Tech: Modification and Repairs
Honestly, It's something that needs to be done. Maybe in the future -
Chunk, A 1984 XJ
Salvagedcircuit replied to eaglescout526's topic in Member Projects: Other Cool Stuff
Heck yeah man. Wow. I'd definitely never see this in my lifetime. -
did you try editing the first post, copying the embed code and using a website link expander. then using that link in wayback machine?
-
vent window repair
Salvagedcircuit replied to M.T.Hands's topic in MJ Tech: Modification and Repairs
Nice job! Sometimes you can revive a threaded bolt with a die / thread chaser, but if the threads are too far gone, replacement is your answer. 10/10 good work. -
Project “CommuteChe”
Salvagedcircuit replied to WranglerMangler's topic in Member Projects: Your Comanches
Comanche hard at work. Nice job -
She's a beaut and well worth fixing. Excellent find!
-
Hahaha. I found a quarter in one of my spare seat belt buckles . No wonder why it didn't work
-
What Do You Say to "You should Sell the Jeeps"
Salvagedcircuit replied to Drahcir495's topic in The Pub
He's got a point. The water pump on a 4.0L is literally $40 from acdelco and that's a higher tier part. you could get a clone zone for less. The alternator is $100 and 45min to install. My dad's jeep WK2 starter was $200 for a rebuild and you need to unbolt the engine from the engine mounts, jack the engine up, ratchet strap the exhaust out of the way so you can access it. On the 4.0L you have to crawl under the vehicle and access some bolts that are not super easy to reach, but you don't have to nearly remove an engine from the engine bay to access it! -
If you are considering using one of those OBD tracking dongles from insurance companies, don't bother. The measly discount they offer vs the value of the data they will collect, attach to you and resell without your consent, is not worth it.
-
This is a pretty excellent shot. Noice
-
1988 Golden Brick
Salvagedcircuit replied to Salvagedcircuit's topic in Member Projects: Your Comanches
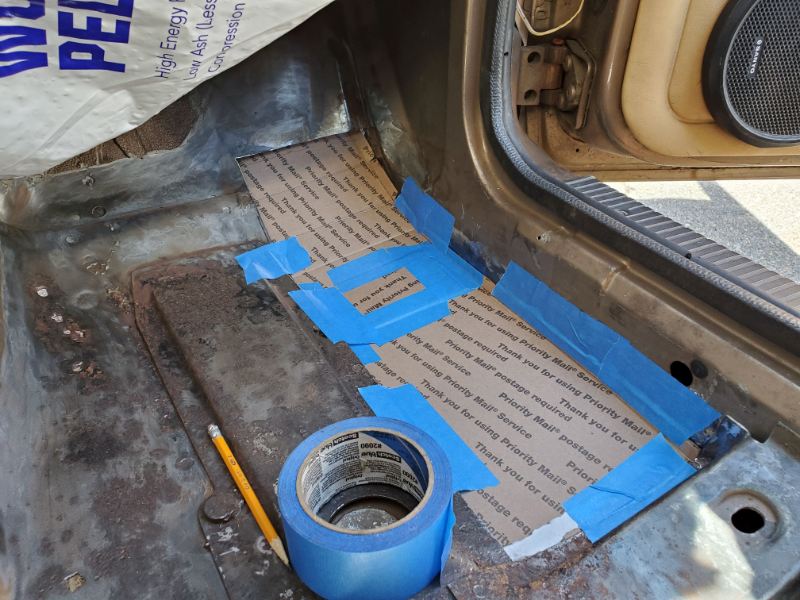
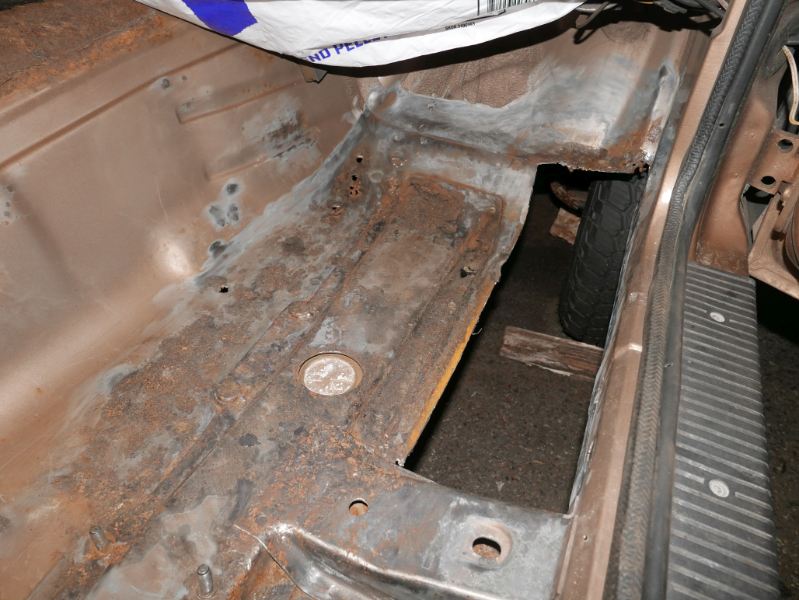
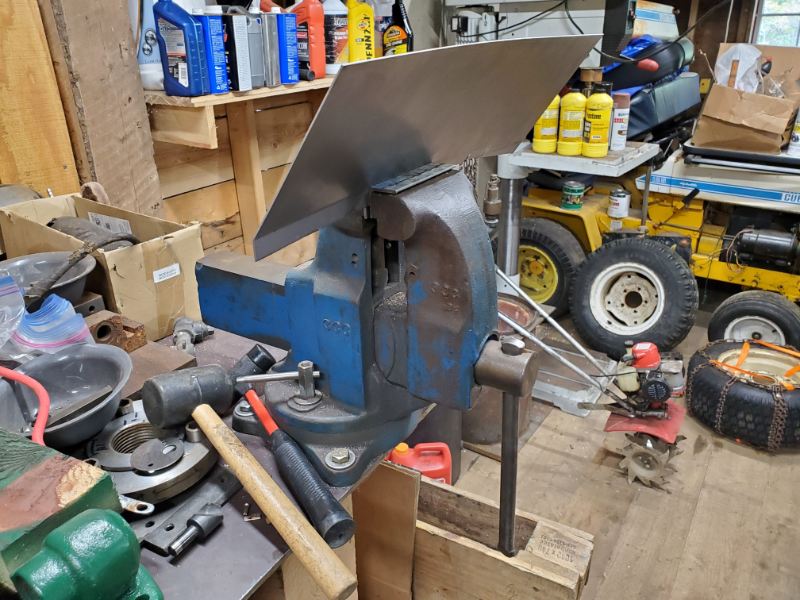
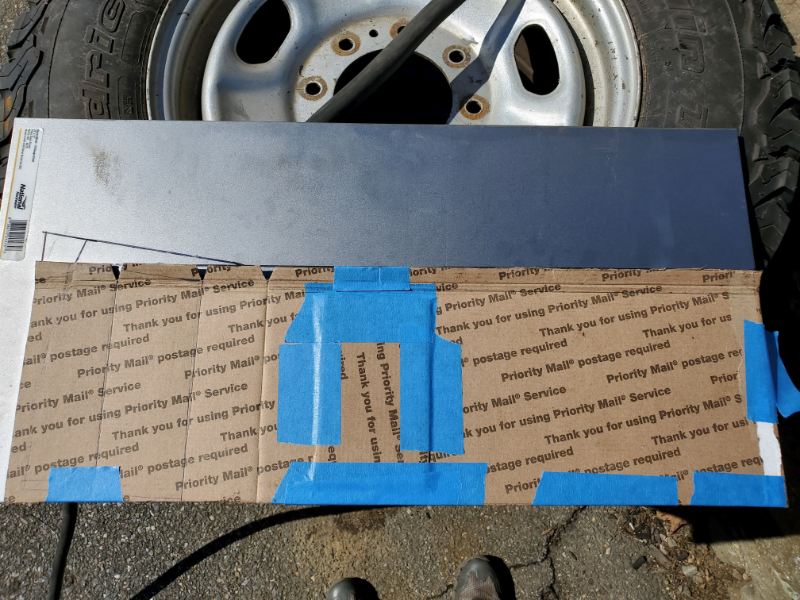
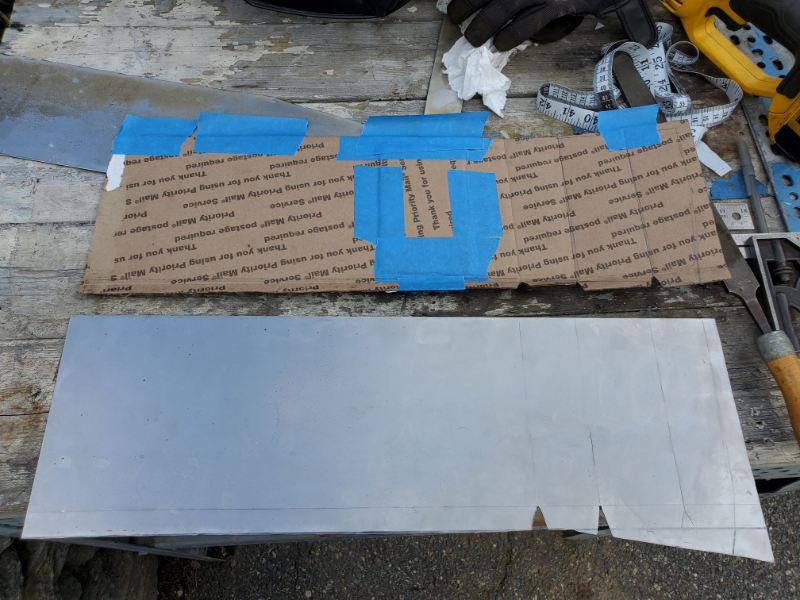
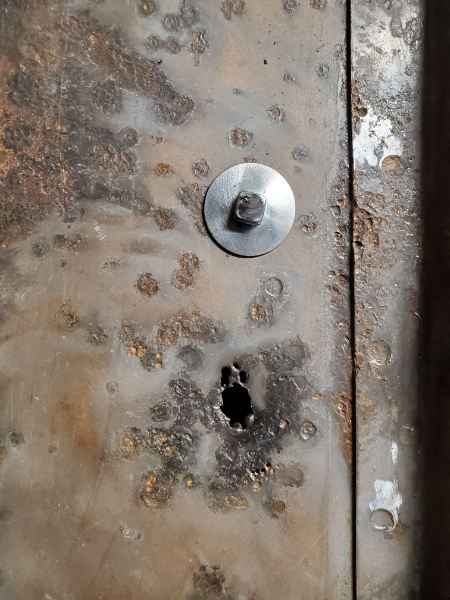
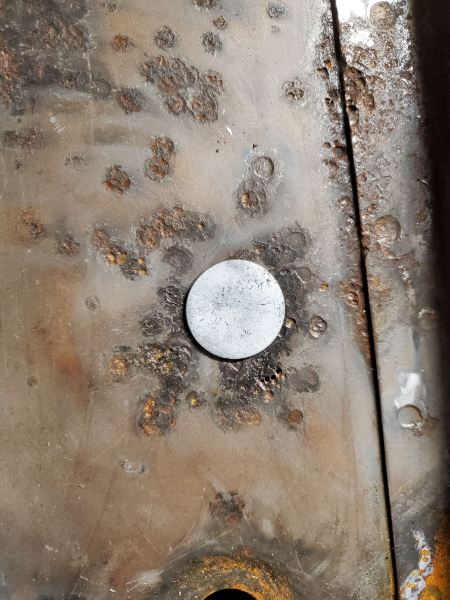
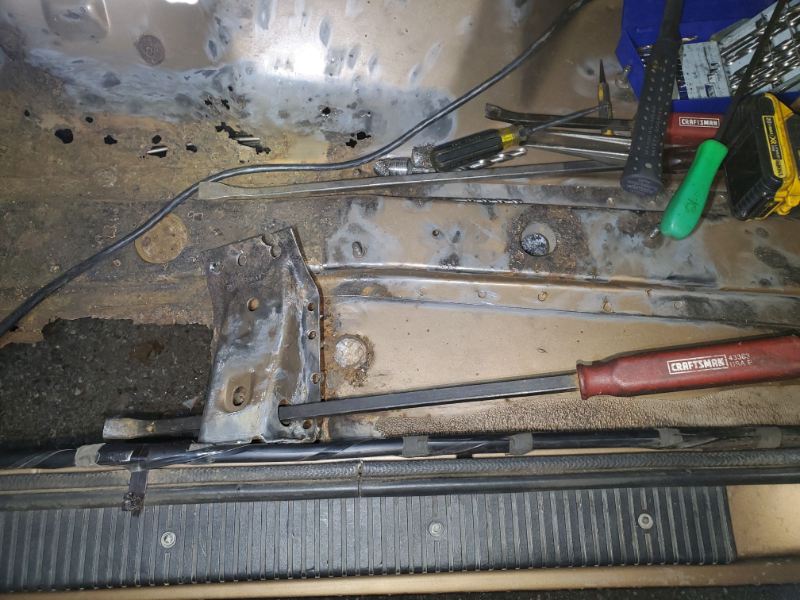
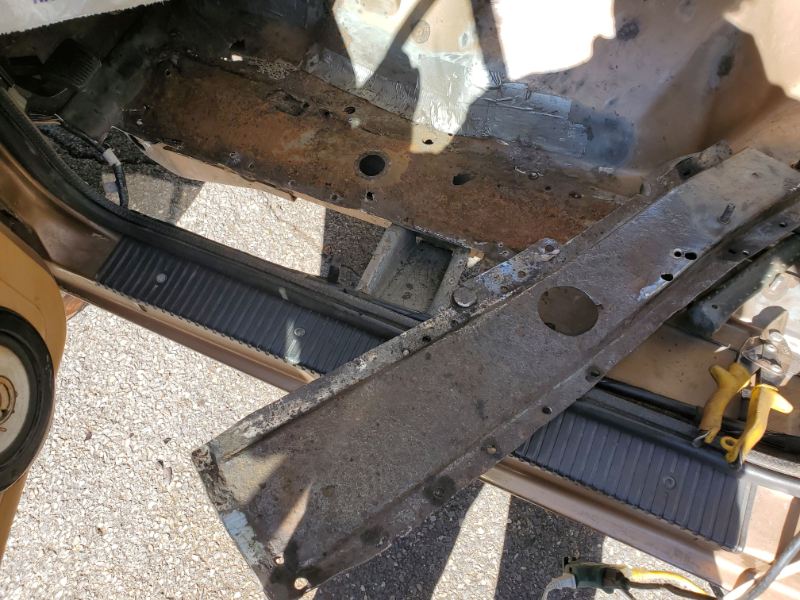
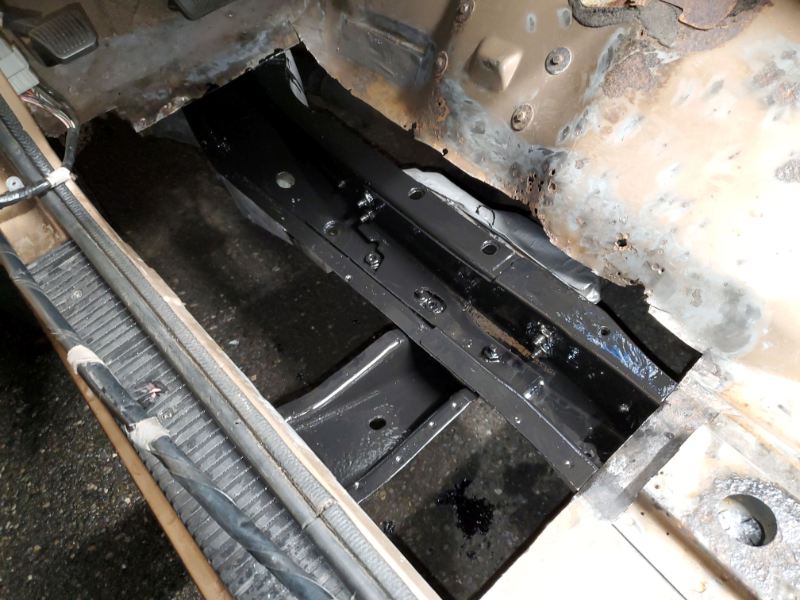
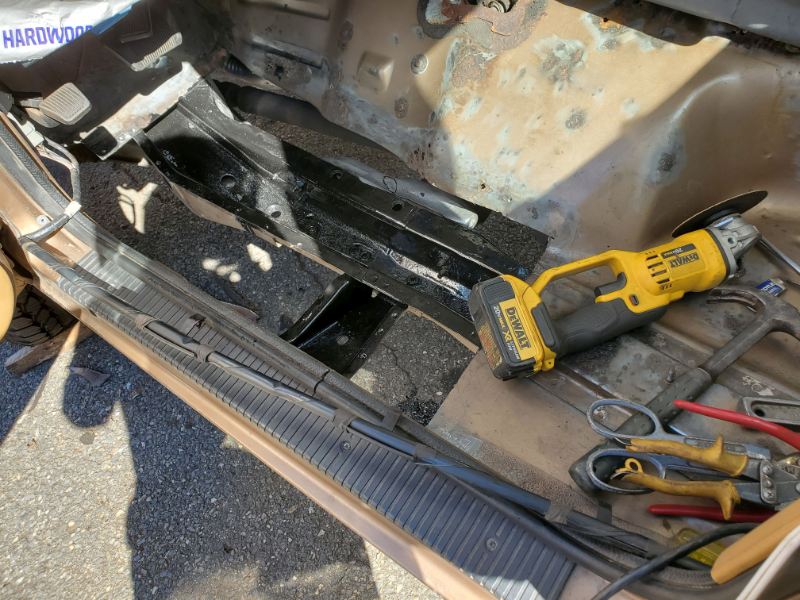
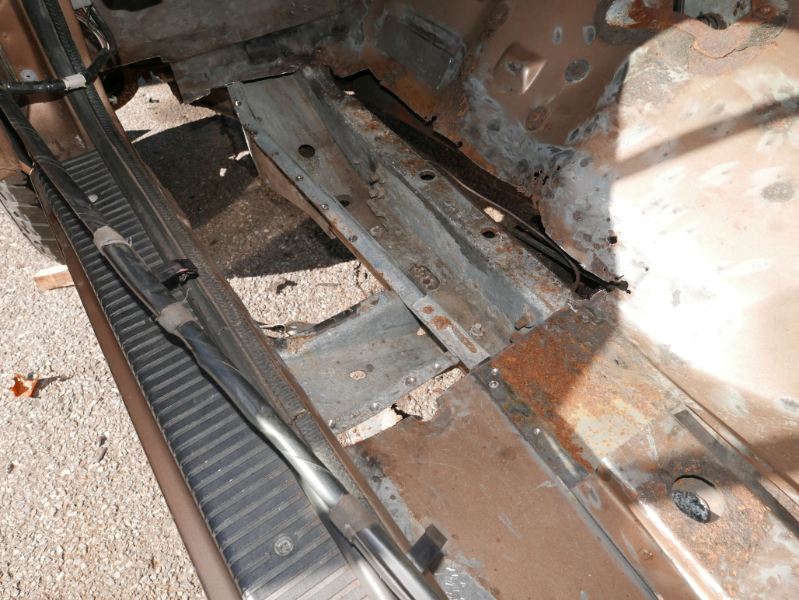
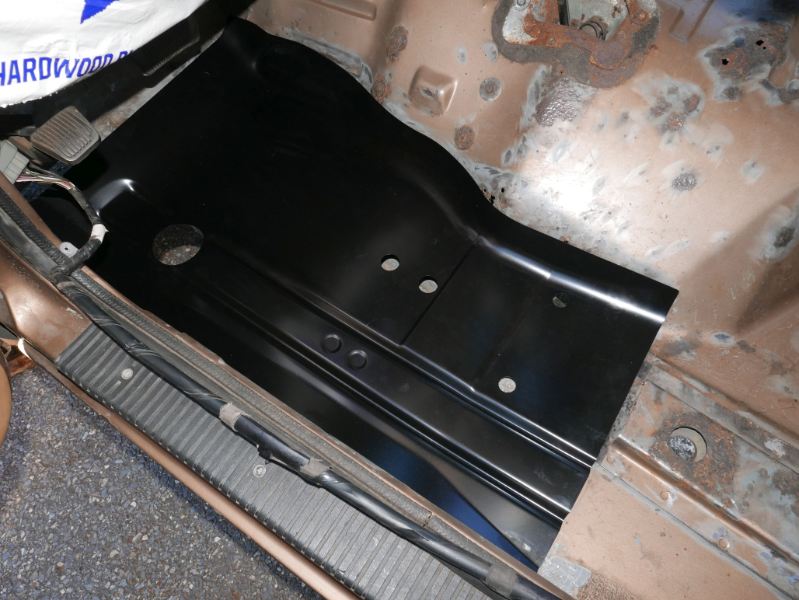
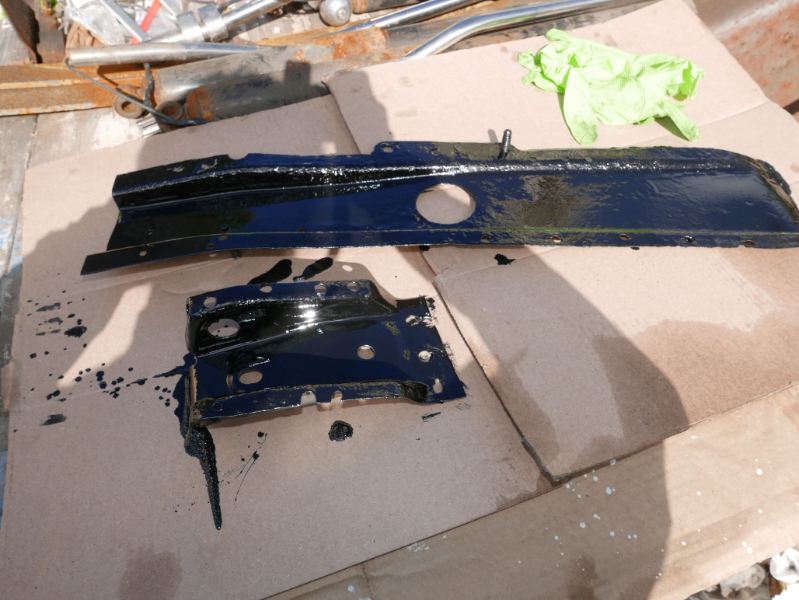
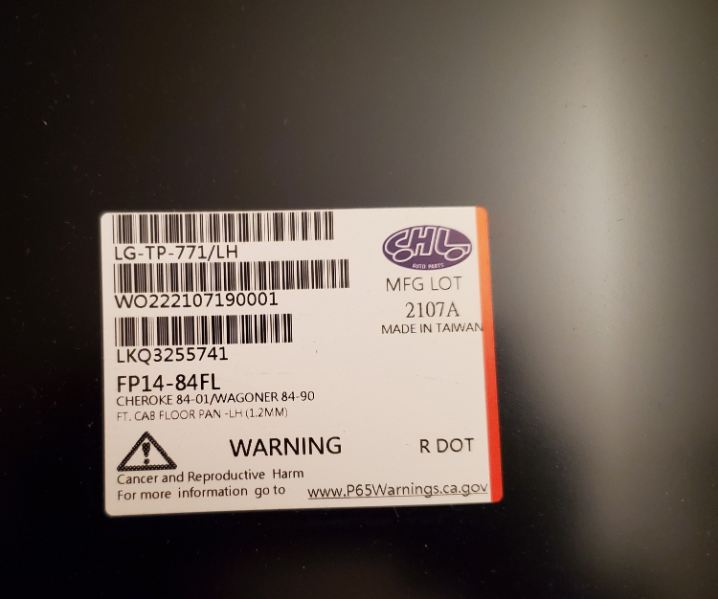
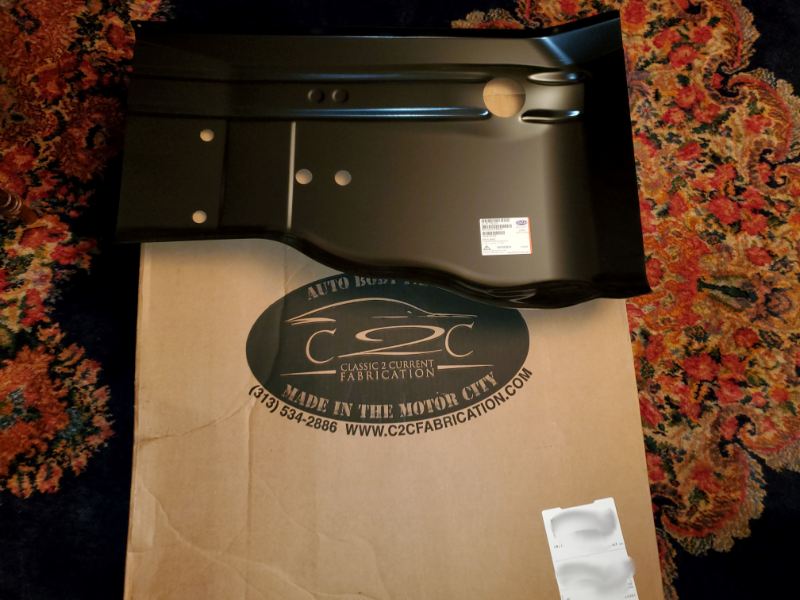
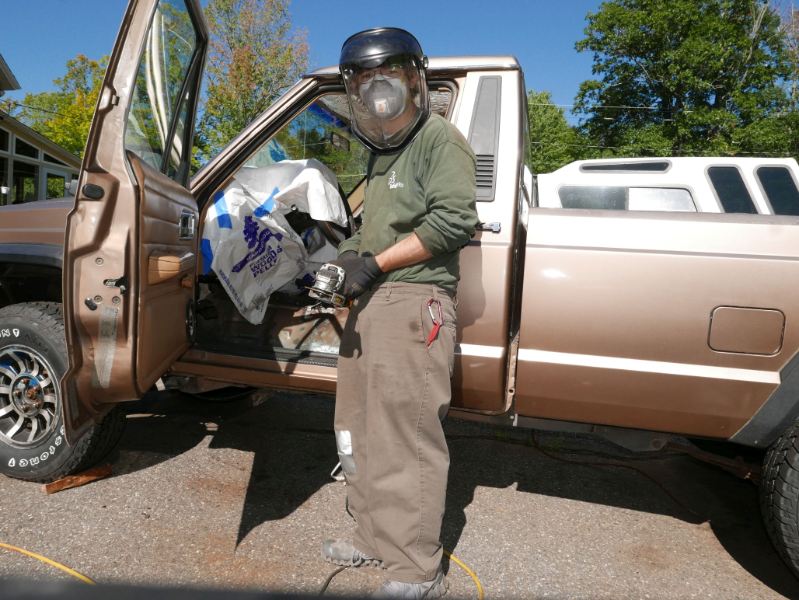
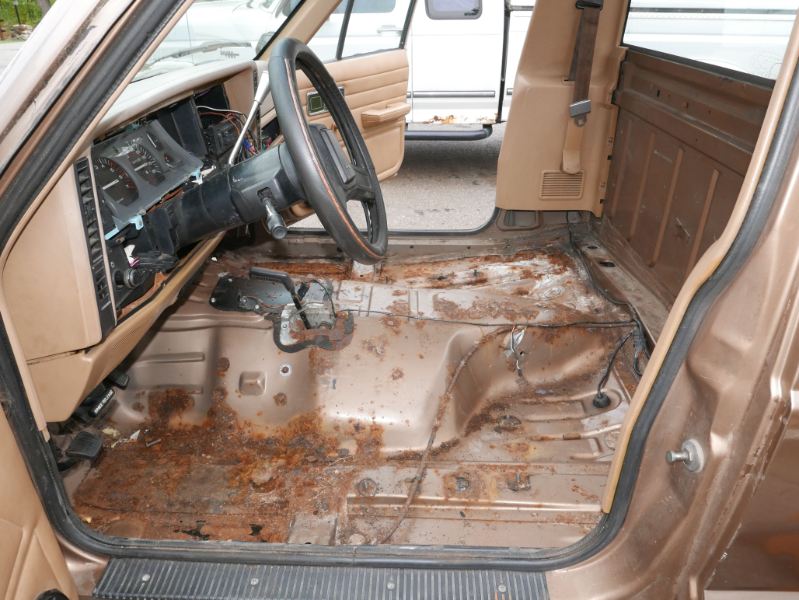
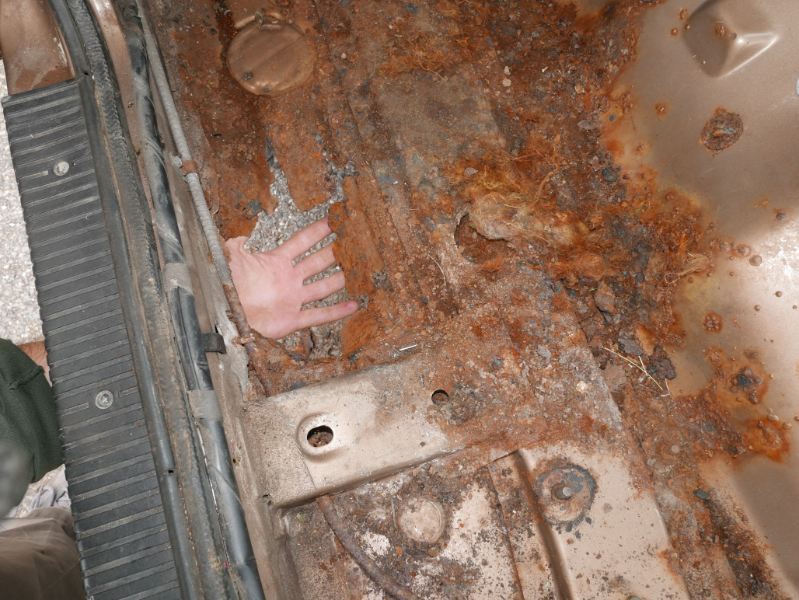
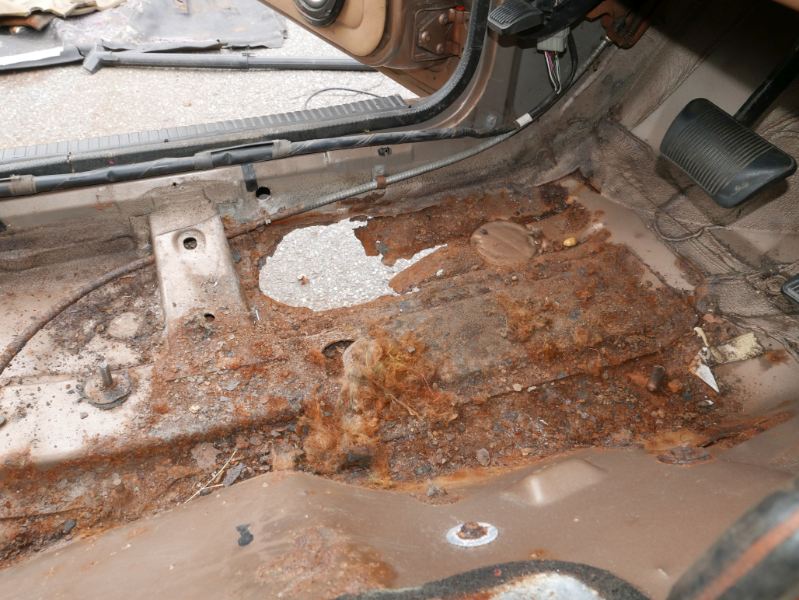
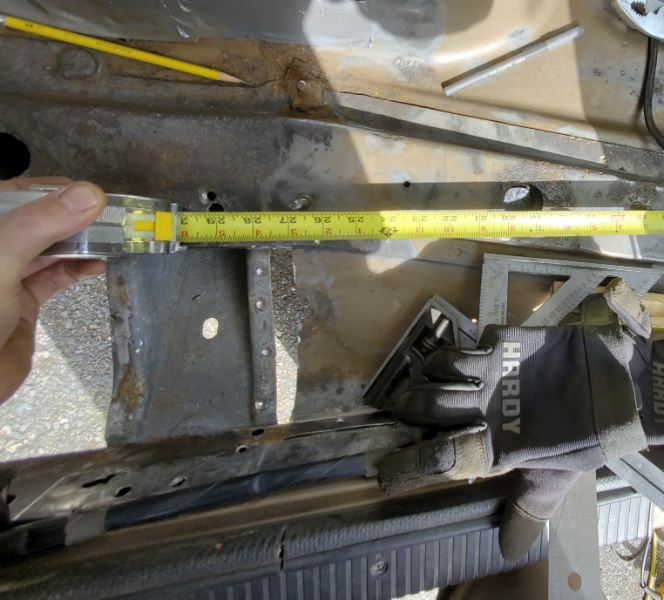
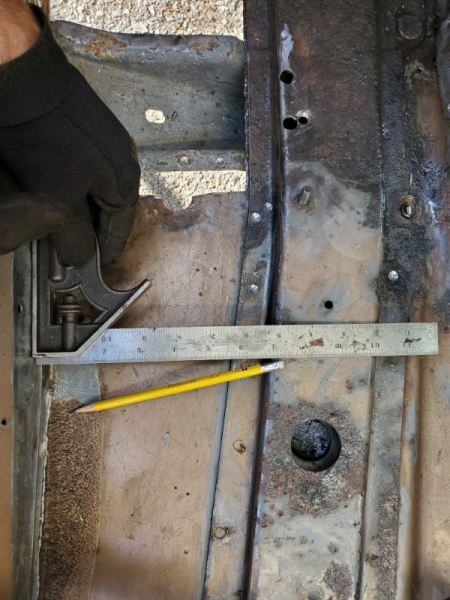
The Floor: Patchwork Collage I started attacking the passenger side first as the geometry was far more straightforward. Most of the metal rot was concentrated to the right of the top unibody cap with just a few small spots to the left. I decided to patch instead of replace here and I'm glad I did so, as the results were pretty excellent. I cut the entire right side flush to the inside rocker and bottom frame rail. The rockers were solid on both sides of the comanche, which I was so incredibly grateful for. I started with a good ol' thin walled postal service box, grabbed a sharpie and made some creases. Who would have thought medium flat rate boxes made such great Cardboard Aided Design templates I transferred the template onto the steel, cut it out with a grinder and began the bending process. A bench vise is a godsend in any workshop. This is the MIG welded large patch. It just hugs the inside rocker. It truly fit like a glove. If it fits it ships! For small holes, my brother came up with this excellent method of using elevator bolts and welding up around the damaged areas. This way you are not blasting larger holes into material that is already thinning in spots. The cut down elevator bolts work swimmingly and as an added bonus hold themselves into place. All you have to do is wire wheel them and cut them down in length. Well worth it. You can see the end result to the left of the passenger unibody top rail. A huge productivity boost was tie-wiring a $10 led work light to the back half of the cab. It worked wonders at night. The driver's side needed a lot more attention. The rot was pervasive. The top uniframe had to come out. This member sits above the floor and sandwiches the floor to the bottom frame rail. The top uniframe is a pain to remove, and the method I chose was not particularly wise, but it was my first time redoing a floor so I have to cut myself some slack. Purchase spot weld cutters yall! I went with a drill bit and a chisel. It worked but caused a lot of frustration and yielded one very mangled top cap. The top cap was pitted badly but just barely recoverable. At the time I did this, keyparts did not duplicate this part, so I had no other choice. I would have gladly paid their price to not have to bead blast, weld, straighten and repaint mine. I used a beefy prybar to remove the side braces. The steel flooring underneath was so thin, it prompted my to remove a considerable amount of flooring and patch away. Here's the final cut before patch work. It's not too pretty. What I was amazed by was the state of my frame rails. It's like they were untouched. Completely nuts! Toyota owners eat your heart out. No high impurity recycled steel here. Bonkers! I vacuumed the inner frame rails, lightly hand wire brushed the surface, blew it out and prepped for paint. My brother had spare por-15 left over from another project so I prepped the surface with the phosphate coating and painted it. Might as well do something while you're in there. I also did the same thing to the inside of the top uniframe and inside side bracket. This was the perfect time to test fit the replacement driver side floor pan I ordered from c2c fabrication. It's nicely formed, wide, and decent quality but was inadequate for the extent of the floorboard rot. Patch work was needed well into the wheel well. Ironically, c2c fabrication claimed "made in the motor city" (Detroit) but the panel has a very legible "made in Taiwan" by CHL. Quite misleading to say the least, but I'm thankful the part exists, especially at the very reasonable ~$75.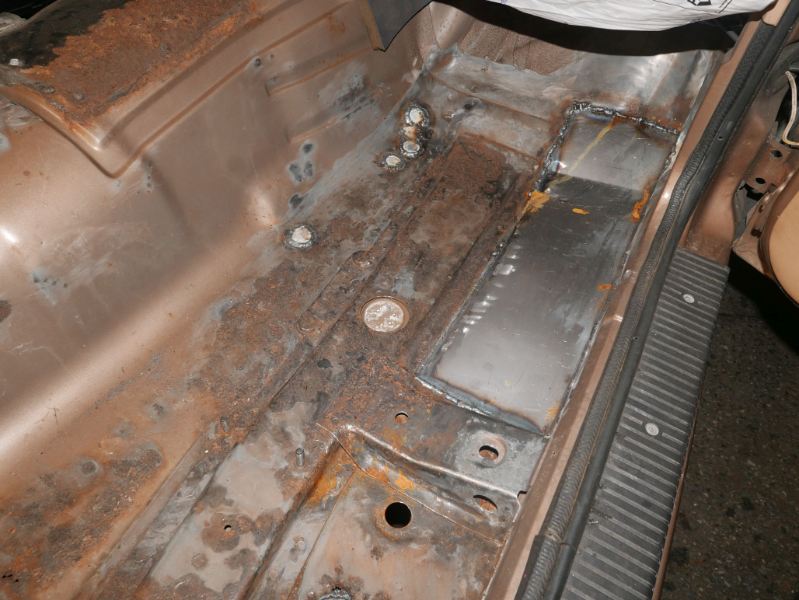

-
1988 Golden Brick
Salvagedcircuit replied to Salvagedcircuit's topic in Member Projects: Your Comanches
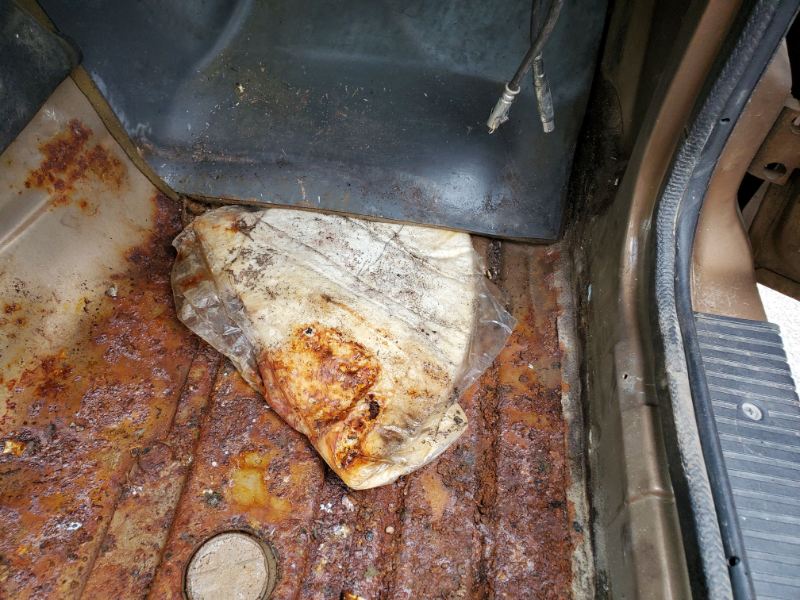
Hahaha. It was a white pouch in the shape of a pita bread you would find on a gyro at a greek restaurant. It was likely some kind of covering that was supposed to be adhered to the bottom side of the floor. The assembly folks must have been busy reading the latest issue of sports illustrated....It certainly would explain some of the passenger side welds in my engine bay. Notice something present on the drivers side but missing on the passenger side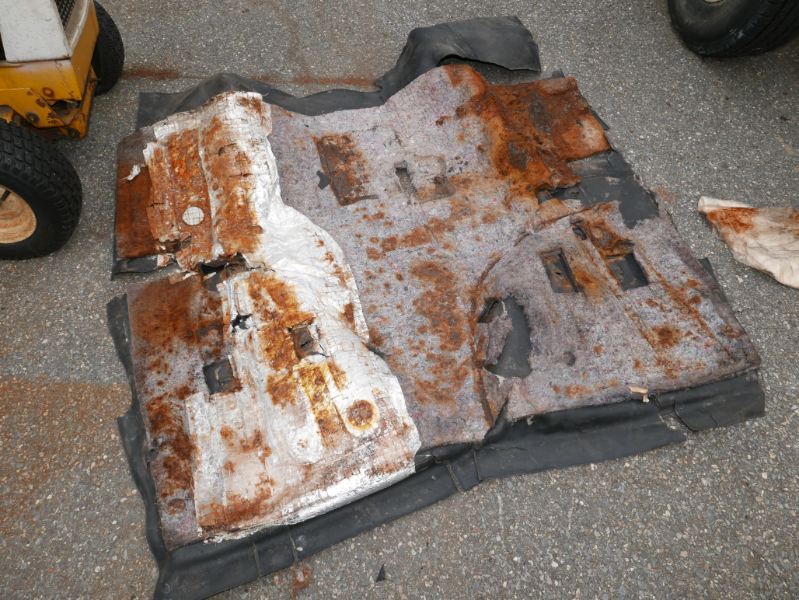
-
88 MJ, "she's for the streets"
Salvagedcircuit replied to Car Enthusiast's topic in Member Projects: Your Comanches
Aww yeah, the 10 slot family goes wild -
1988 Golden Brick
Salvagedcircuit replied to Salvagedcircuit's topic in Member Projects: Your Comanches
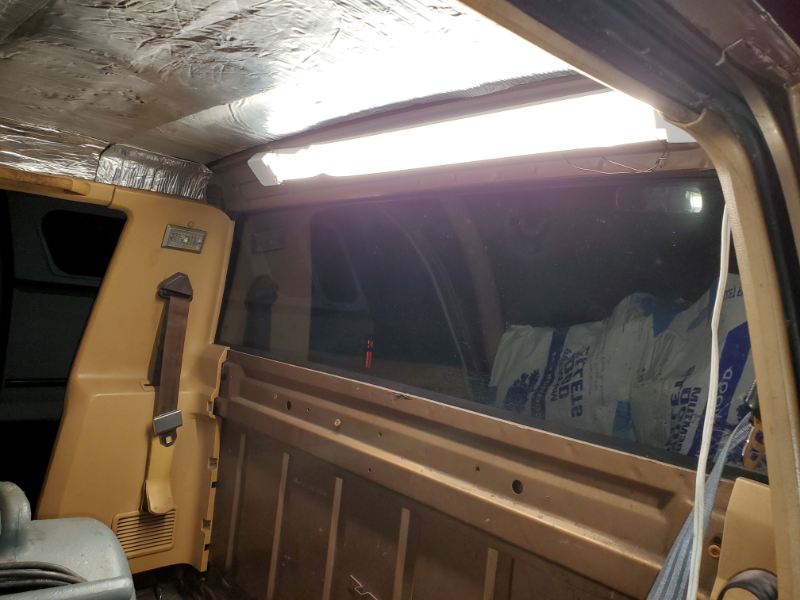
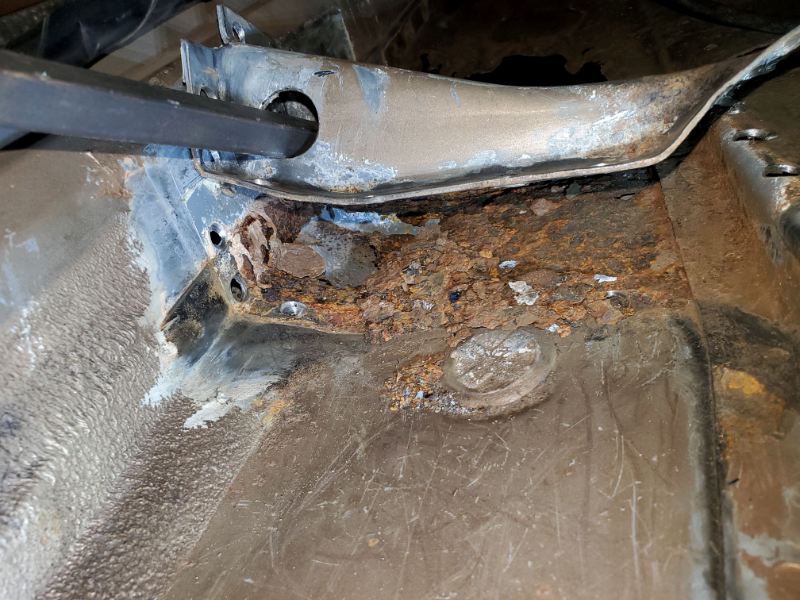
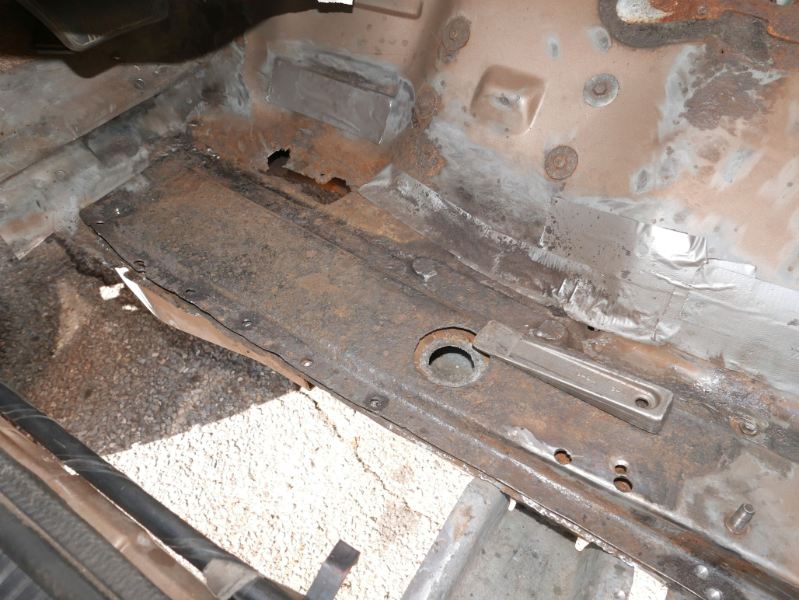
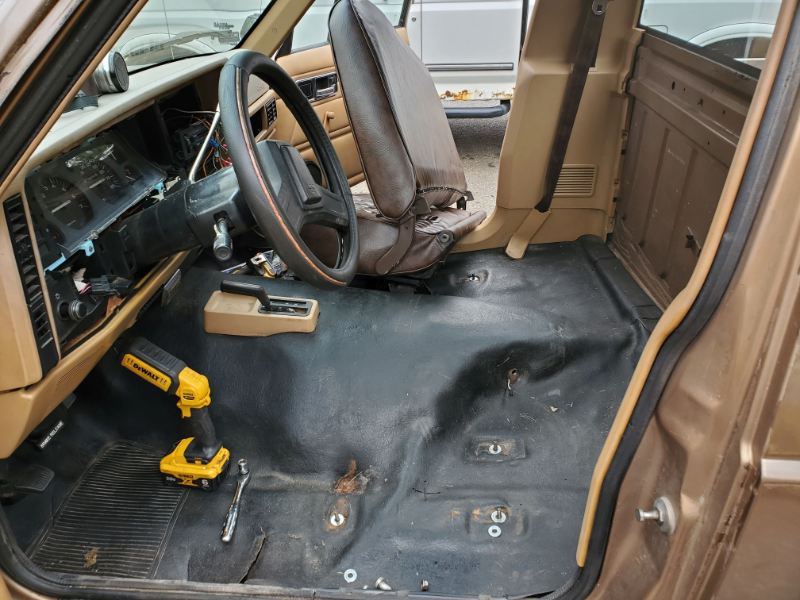
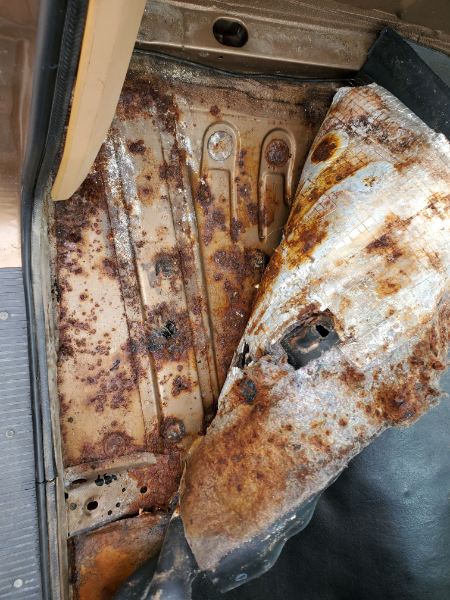
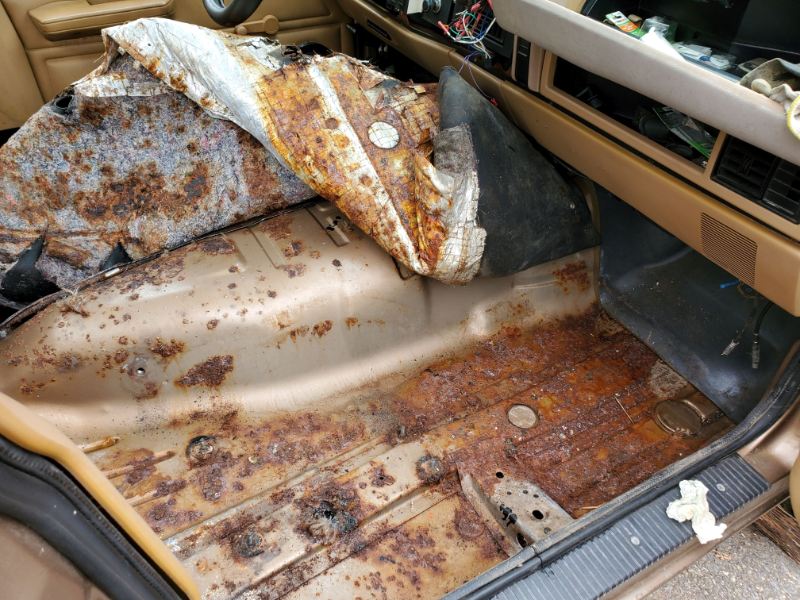
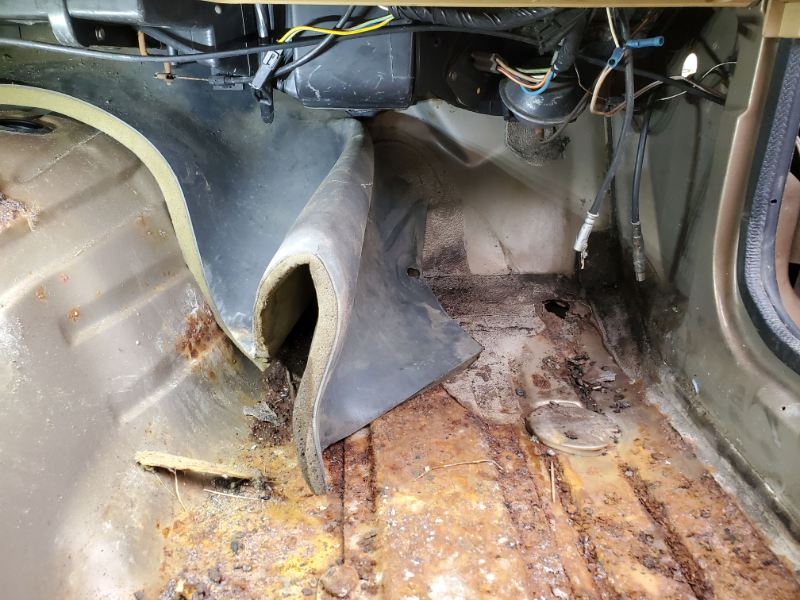
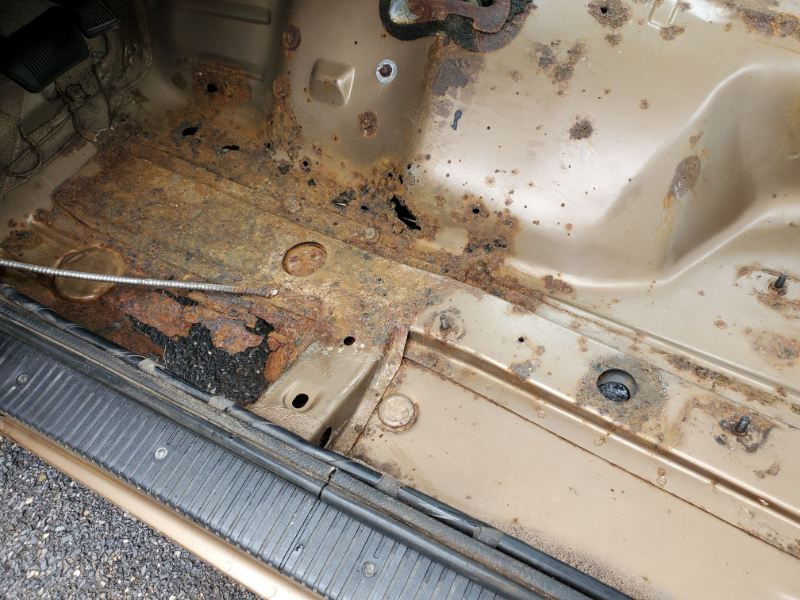
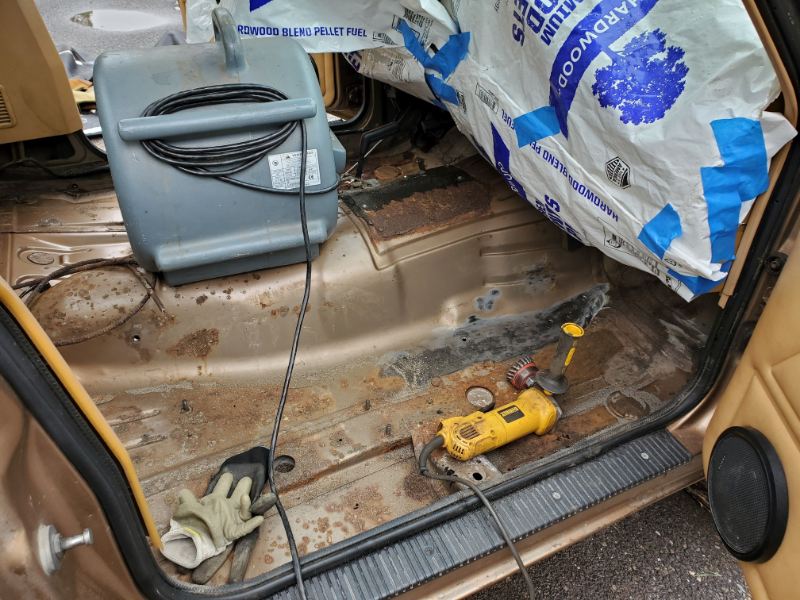
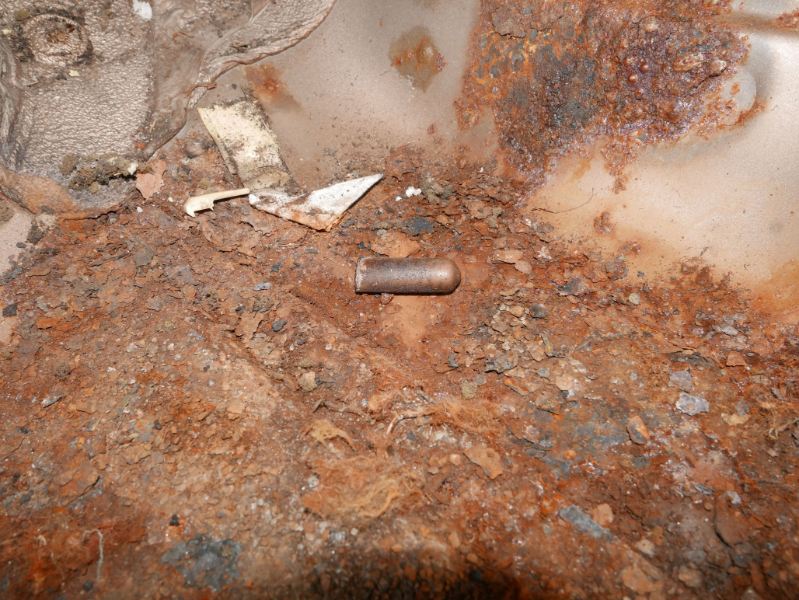
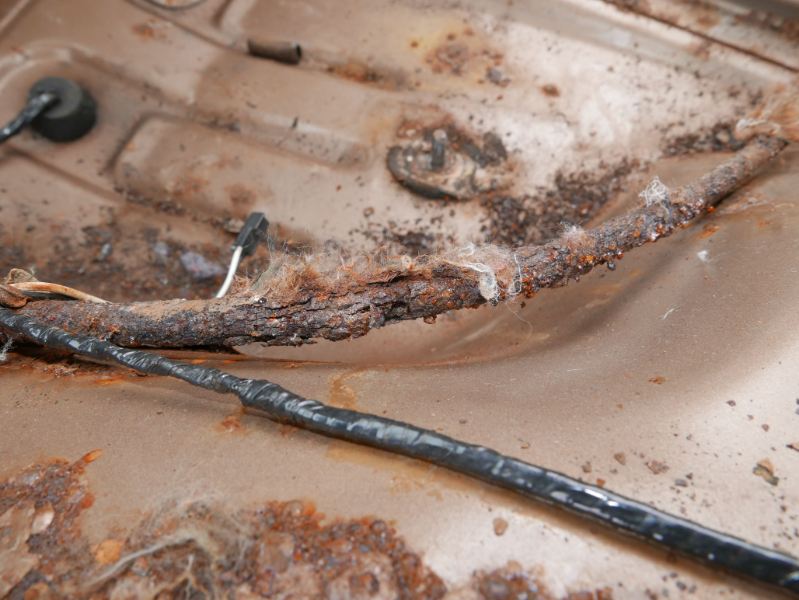
The Floor: Analysis The saga continues! Here's everyone's favorite part: the floor! My mj featured a work-truck specc'd vinyl floor. It was cracked and cut in many spots, especially by the foot wells. Luckily, ACC carpets still makes a replacement which is awesome. I didn't have to worry about saving this heap of a floor. I started by pulling up the back passenger corner. Boy, it didn't look good even from there! Oof Bobby, she ain't lookin' too good. The floor was rusted out so bad the carpet adhered to the steel sheathing of the parking brake cable. 35 years of trapped moisture transformed the bx-clad style parking brake cable into the consistency of a rotten tree root. Now I know why it didn't work.... Poking around a bit more revealed an untold secret by the Toledo assembly late night crew: a 35 year old gyro sealed in plastic underneath the passenger side heat shield. I'm guessing they were taking dibs on how long it would take for someone to find its molding carcass. Sliding away the passenger heat shield revealed a lovely hole towards the passenger wheel well. The MJ was sold with mention of poor condition floor boards, but boy does lifting the floor tell the entire story. Look at the poor 4x4 selector. No exposed metal was spared. The transmission tunnel cover was dissolving at the edges and whatever seam sealer used was the consistency of kids-toy kinetic sand. I pulled up the remainder of the vinyl and filled a shopvac full of plastic, rubber, dirt, metal and shotgun shells. The driver side floor was so bad the shopvac aided in sheet metal rot removal. Here it comes, the money shot: Welcome to the drivers side. Half a day of wire wheeling the floor and old seam sealer from the footwells, I finally was able to get a good idea of how bad the damage was. To sum it up: I needed a patch job on the passenger side and an entire floor pan on the drivers side. The floor fan was invaluable to my work as it pulled all of the fumes from inside the cab outside. Also, removing dried seam sealer makes an absolute mess. I found that a cup wire wheel on a grinder was the only way to quickly remove the hardened spackle like material. A blade and scraper was too much effort and took far too long. When I was finished my n95 was light gray and the asphalt outside had a nice dusting of rust and abrasive soot. Captain video would be proud. If someone else does this, make sure to tape over the rear glass window, several wire strands from the cup wheels hit the back glass and melted in tiny divots. Not a big deal, but save the glass folks!


-
1992 Jeep Comanche "Maria"
Salvagedcircuit replied to MariaManche's topic in Member Projects: Your Comanches
If you removed all the spot welds in the top uniframe support, you can always try using a large prybar and prying a bit between the top uniframe support and the floor. It seems that stud is not welded to the uniframe. It looks like something is pressed on over the stud into the uniframe support. Mine looked like a pile of rust, and I could not tell. I tried to remove my stud from the cab and it just snapped clean off. It may be easier to remove the stud from the bottom side, but be careful of your brake and fuel lines. If you plan to reuse them, it's not good idea to heat up brake lines. The fluid does not like extreme temperatures and I'm sure the old lines are not up for it either. There's a few of those plastic fuel / brake line clips around that location. Un-clip them all and try to push the lines out of the way. That should give you more room to work. Obviously moving the fuel lines as far away from the torch as possible is also good piece of mind
-
What Do You Say to "You should Sell the Jeeps"
Salvagedcircuit replied to Drahcir495's topic in The Pub
A jeep is not sold if it stays in the family I don't plan on purchasing any modern FCA/Stellantis Jeep product until ownership changes. They have completely lost the way. -
1992 Jeep Comanche "Maria"
Salvagedcircuit replied to MariaManche's topic in Member Projects: Your Comanches
That is an important stud that holds in the seat. To remove it, apply some PB blaster, grab a map torch, heat it, apply some vise grips and twist. It should hopefully come out. If it snaps (which mine did) you'll have to weld some nuts to whatever bit is left and use an extended length wrench to get it out. It took 2 weldments to get that stud out. -
Chunk, A 1984 XJ
Salvagedcircuit replied to eaglescout526's topic in Member Projects: Other Cool Stuff
Hell yeah! Excellent job. It must have been painstaking to drill and tap holes for some of the sensors. -
Wanted: Broken Ash Tray, Front Bumper Endcap Brackets
Salvagedcircuit replied to Salvagedcircuit's topic in Wanted
@eaglescout526 @schardein You guys are the best! -
This is one of the best builds on here. Awesome job and excellent narration
-
You are one talented dude Jesse, keep on going and best of luck to you
-
Chunk, A 1984 XJ
Salvagedcircuit replied to eaglescout526's topic in Member Projects: Other Cool Stuff
Aww yeah, the wood grain. Mmmmm. So 80s