RuBacon
-
Posts
26 -
Joined
-
Last visited
Recent Profile Visitors


RuBacon's Achievements
Can Spell Comanche (2/11)
-

Project Morris: The 89 to 99 Comanche Long Bed
RuBacon replied to RuBacon's topic in Member Projects: Your Comanches
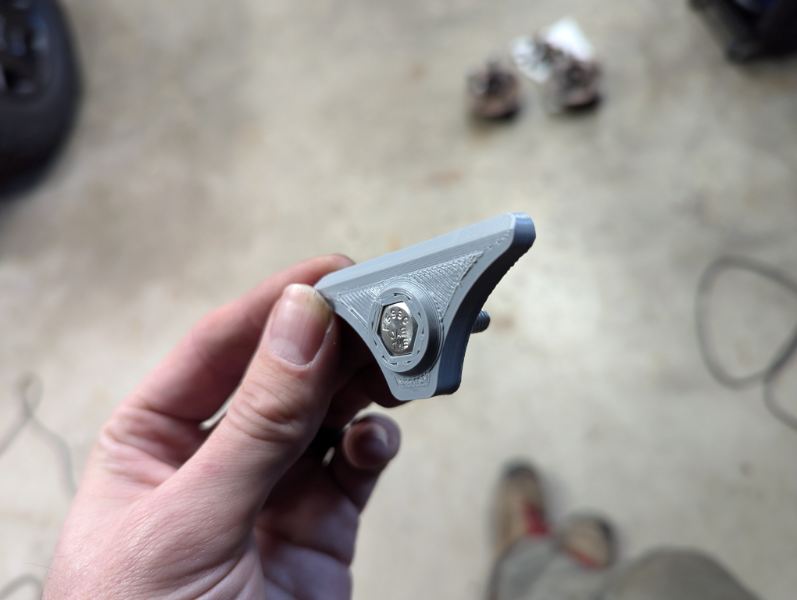
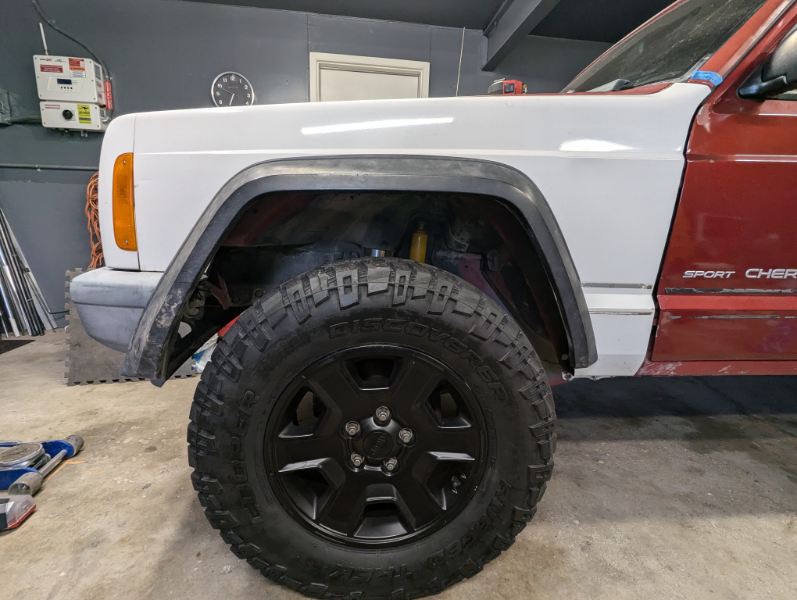
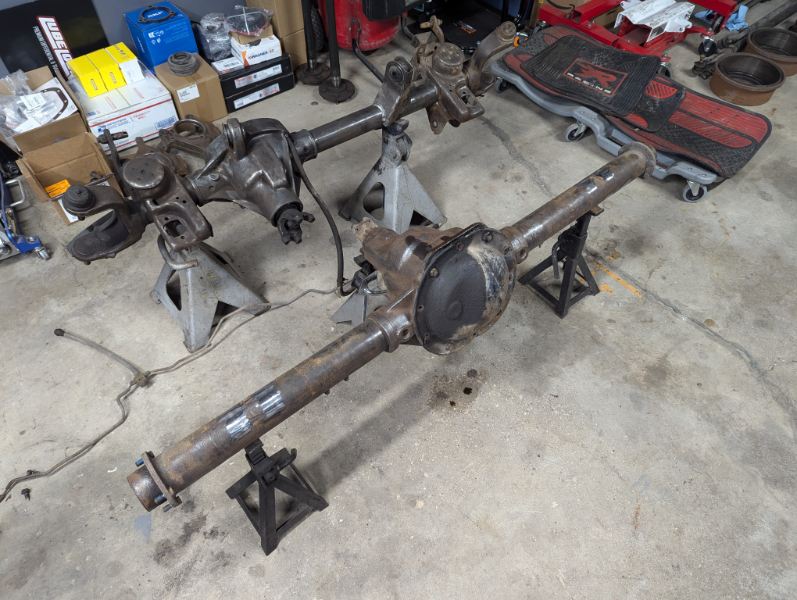
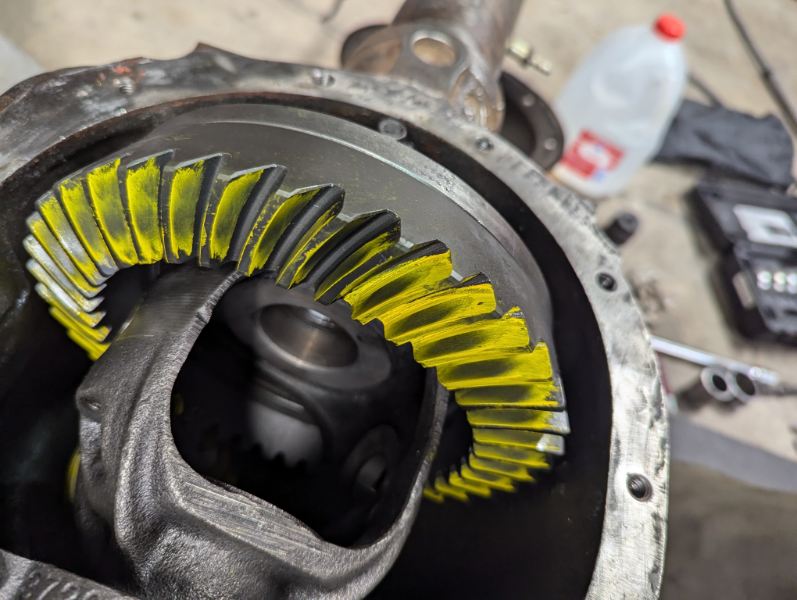
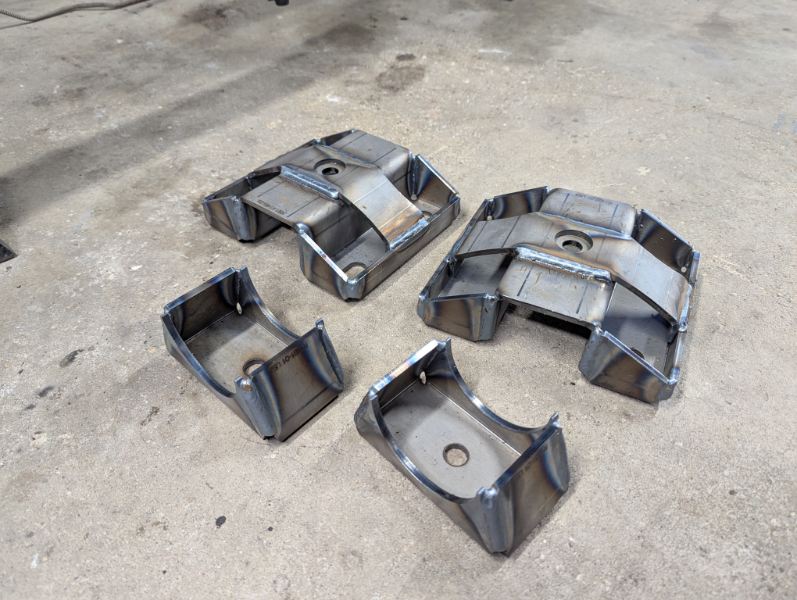
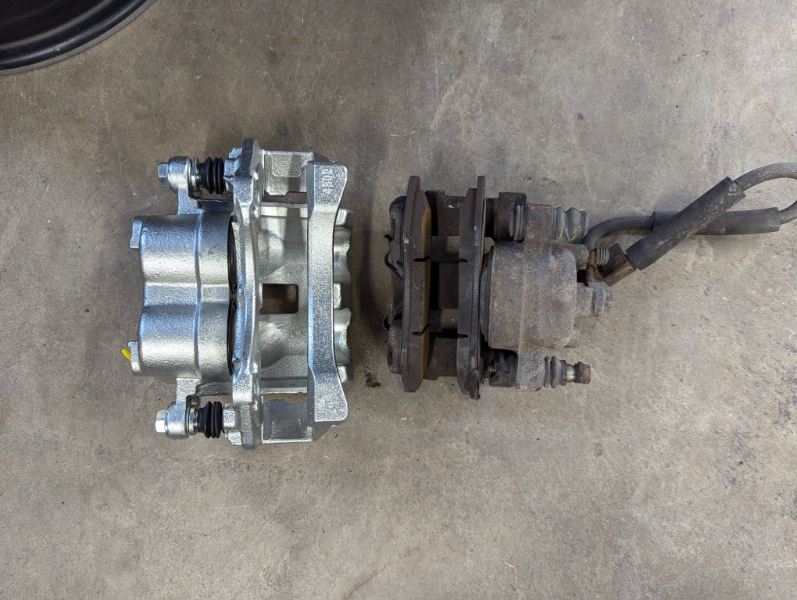
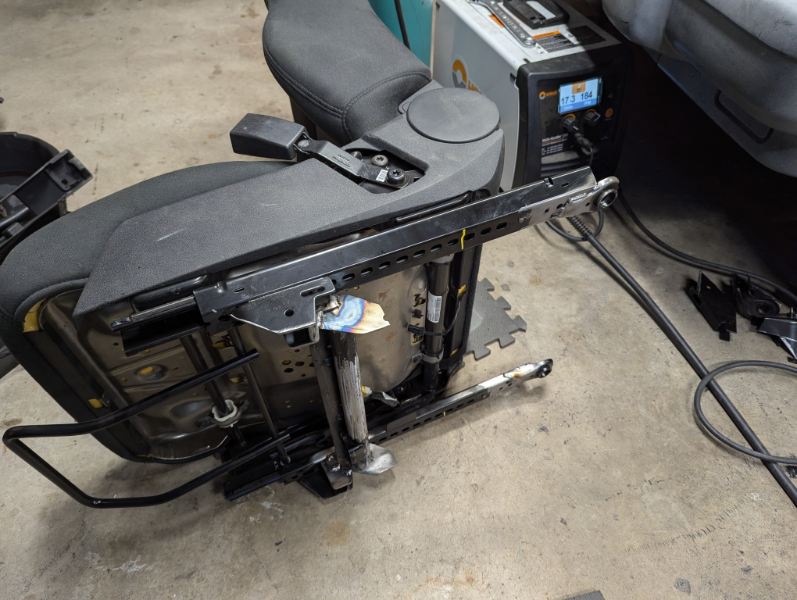
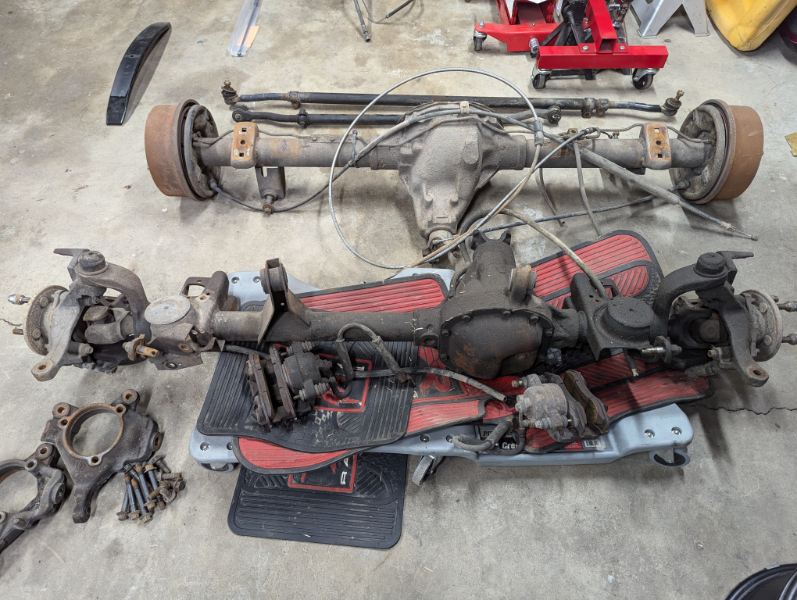
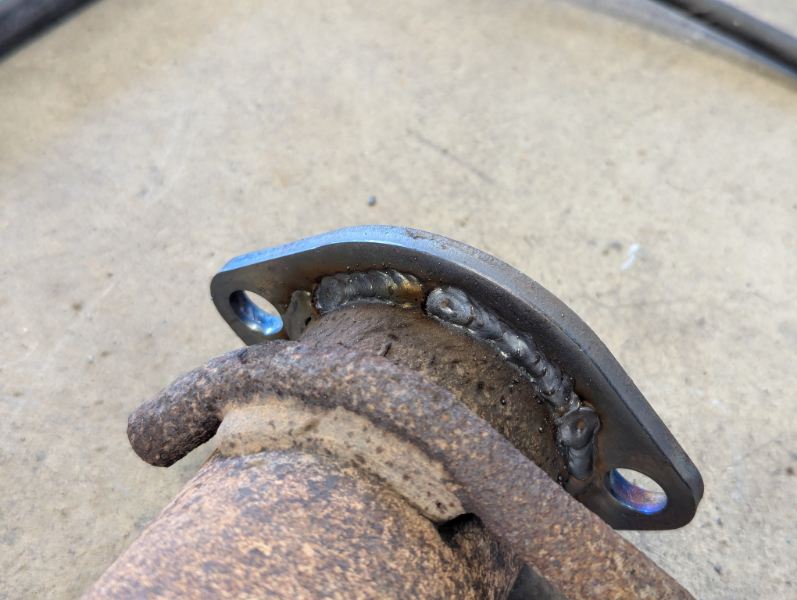
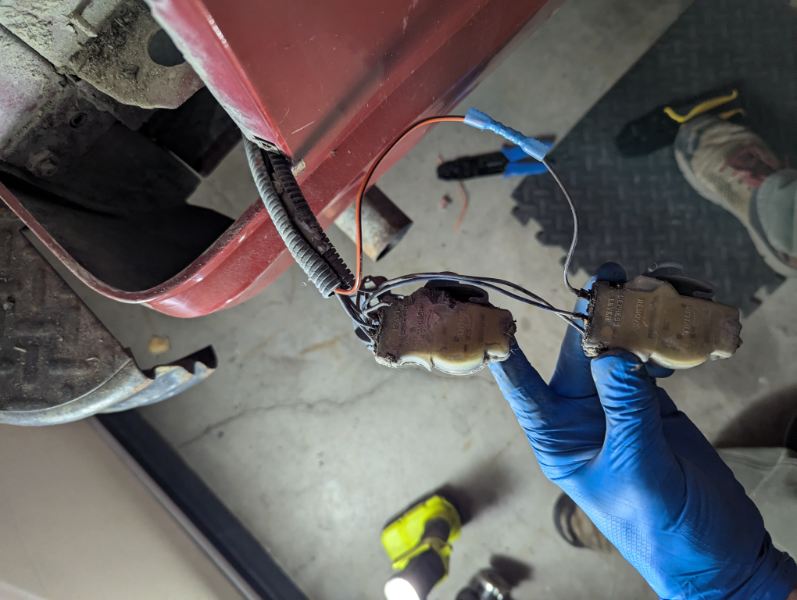
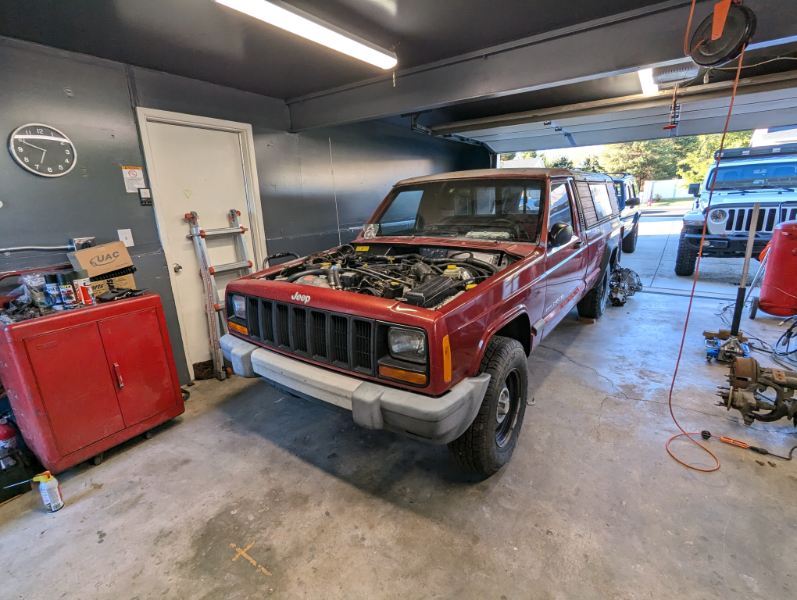
December disappeared way too fast! I've been chipping away at the to-do list, but severely slacking on the updates... It's been great being able to drive the Comanche any time I want to and use it to do all the truck things. I guess I shouldn't be too surprised that an engine and ECU from '99 could pass emissions standards from '89, but it was a huge relief to see those numbers all come in green! I'm definitely jealous of the lack of emissions, not having safety around here has made it nearly impossible to find a used car that doesn't need a ton of work though. It's become readily apparent that most people can't be trusted to keep up on basic vehicle maintenance... XJ prices have been all over the place around here lately, with very similar vehicles ranging from $2500-$6500 with no readily apparent difference in miles, condition, or modifications. The days of the $1000 or less XJ feel like a distant memory. Years ago, I even remember being tempted by the occasional $600 running and driving XJ that would be posted for sale. The second parts Jeep we purchased was negotiated down to a miracle price right around $1000 and then we promptly sold the wheels and tires, new shocks, and a few other little things and recouped $700 of our original purchase cost. As we dug into it, we found out mice had gotten into EVERYTHING and left rodent poop and destruction on a scale I've never seen before. I've taken the newer battery, passenger door, fenders, and header panel for the Comanche, we'll sell some more parts to those in need and pull the complete drivetrain, but the interior and wiring feels like a complete loss at this point. We found some bucket seats in decent condition in a junkyard Jeep Patriot and decided they worth worth a $100 experiment. The mounting brackets required some serious modifications, but I was able to cut them down and rework them enough to get the seats into the Comanche. They're decently comfortable and I really like having headrests that are tall enough for my height. I got a great deal on some Cooper Rugged Trek tires in a 265/70r17 size and got them mounted on some super cheap Gladiator Mojave Wheels. I was now in need of some larger front fender openings, but I didn't like the price of the flares that looked good and I didn't like the look of the flares that were priced well...so I grabbed my original Comanche flares from the parts pile and warmed up the 3D printer. I modeled and printed some new retainer clips for the flares, trimmed out some sheet metal, and raised the flares a few inches giving me plenty of room for the new tires. Now I just need to go back and trim the front edge of the flares and fine-tune a few details. After all the Thanksgiving shopping-spree upgrades arrived, it was time to start working through the axle upgrades. I decided to start in the rear and stripped all the old brackets from the 8.25 axle before removing the internals. I was looking forward to re-gearing an axle with threaded adjusters for the carrier preload and backlash settings. Everything went smoother than expected and it's going to be a bummer to have to go back to shims for the front axle carrier adjustments. I also decided to keep my spring-under setup...but I found a beefy, high-clearance, u-bolt plate and perch kit from RuffStuff. I'll have to get some more photos of everything installed, but I'm really happy with how it all turned out! The front axle is next on the list, and just seeing the old calipers next to the new ones has me excited to get it all finished and have a chance to take it for a test drive!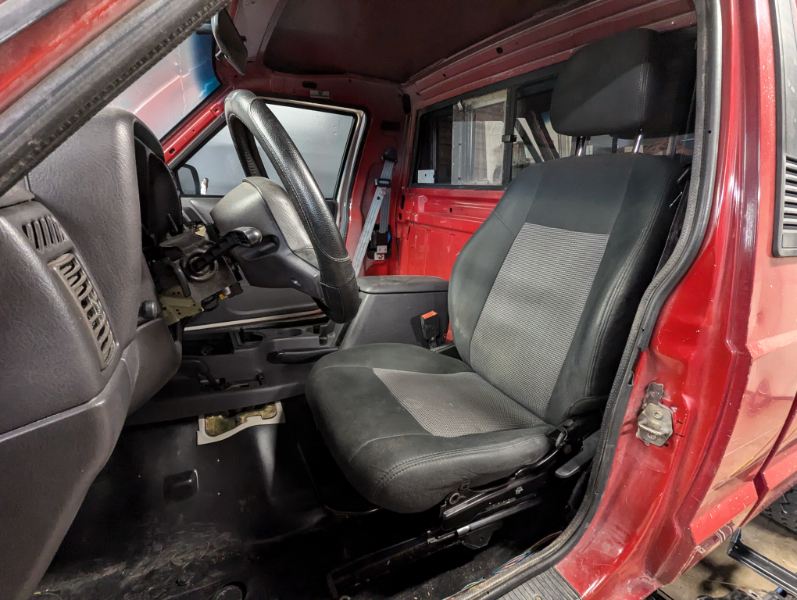
-
Project Morris: The 89 to 99 Comanche Long Bed
RuBacon replied to RuBacon's topic in Member Projects: Your Comanches
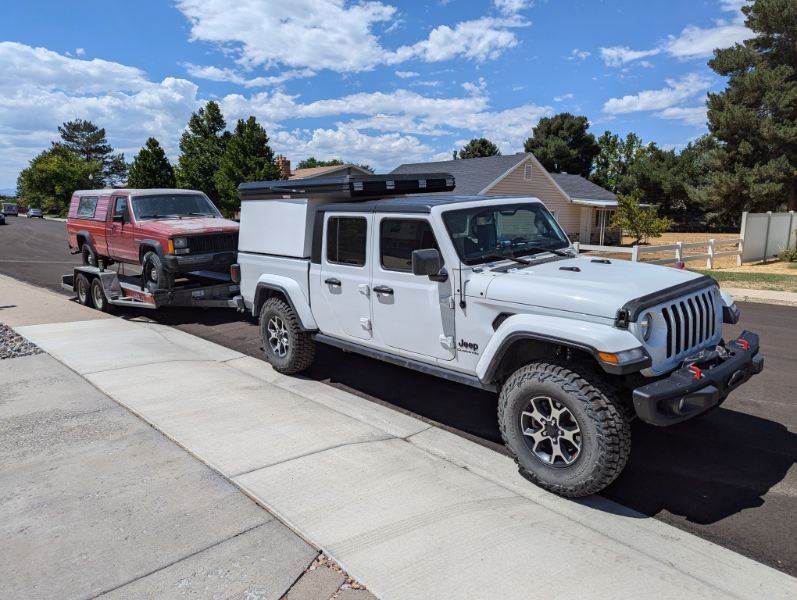
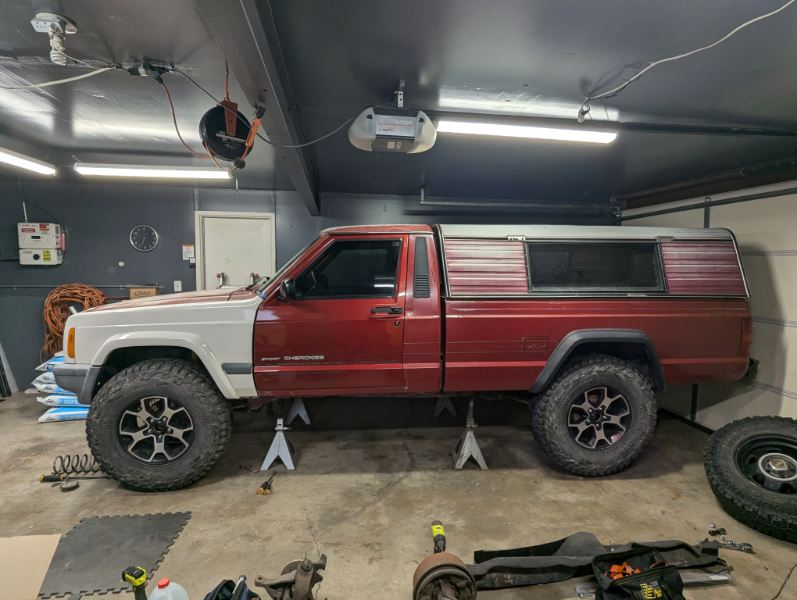
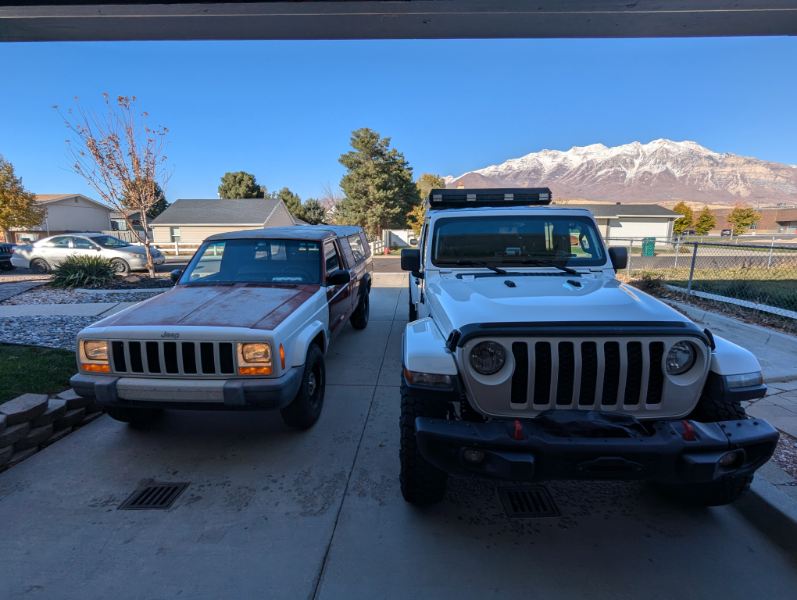
I was excited to finally find out if all the work I had put into the Comanche so far would be enough for county and state approval to legally drive this truck on the road. I had heard various and often conflicting bits of information from everyone I had talked to, so I wasn't too sure how things would turn out. I used the seat belt assemblies from the front of the parts XJ (after trimming the mounting brackets and drilling new holes) and the buckles from the rear bench bolted into the stock Comanche locations. I decided to modify the bottom frame and cushion of the original bench seat so I could take my time finding some bucket seats. Even though they don't do yearly safety inspections around here any more, I wanted to make sure the horn worked, windows rolled up and down, the power mirrors were adjustable, and all the lights and blinkers operated correctly. While we were on our first test drive, my wife discovered that the passenger window controls weren't functioning. I did a little troubleshooting and remembered that the lockout button on the driver side controls was a frequent failure point. I removed the switch assembly from the door, opened it up, and found both solder joints for the switch were broken. I got the soldering iron out and reflowed all the connections I could see, reassembled everything, and the problem was fixed! My wife was kind enough to run the Comanche down to the shop we usually use for our yearly renewals while I was working on some other projects and came back with our successful emissions results! She said the guy walked around the truck, pulled it into the bay, ran it through the tailpipe emissions test (even though it has obd2 now, they test it to the '89 VIN requirements), and printed out the paperwork for her. I was looking over all the numbers and the measured values for all the different tests were less than half of the allowable limit! It was great to finally see the Comanche on the road after looking at it from no more than 15 feet away for so long. After completing our registration process and having some licence plates in hand, I finally felt like I could start working on all the less necessary things I wanted to upgrade... I couldn't resist test fitting the 35s from our Gladiator just to see how it would look. I have to admit, it was a pretty awesome sight...and even though it got a bright green light from my wife even after she tried to climb in and out of it, tires of that size will have to wait for a future round of modifications. For now, something in the 32-ish inch range would be great and I'd really like to build and test the Dana 30/8.25 combo I wish I could've built for my first XJ. Then when it's time to upgrade, that axle combo can be transferred to our current XJ and the Comanche can level up. Our local pick-a-part yard was having a sale, so I spent my morning after Thanksgiving pulling some WJ knuckles and other various bits to help with the axle upgrades. These XJ axles will be cleaned, torn down, and completely rebuilt over the next couple months: New tires and piles of parts have been ordered from all over the country while the holiday sales were in effect, phase two has official begun!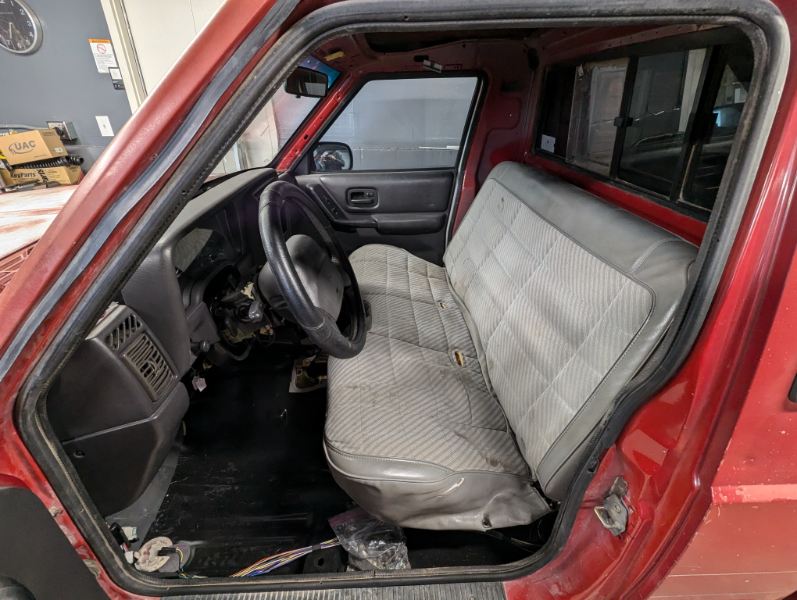

-
Project Morris: The 89 to 99 Comanche Long Bed
RuBacon replied to RuBacon's topic in Member Projects: Your Comanches
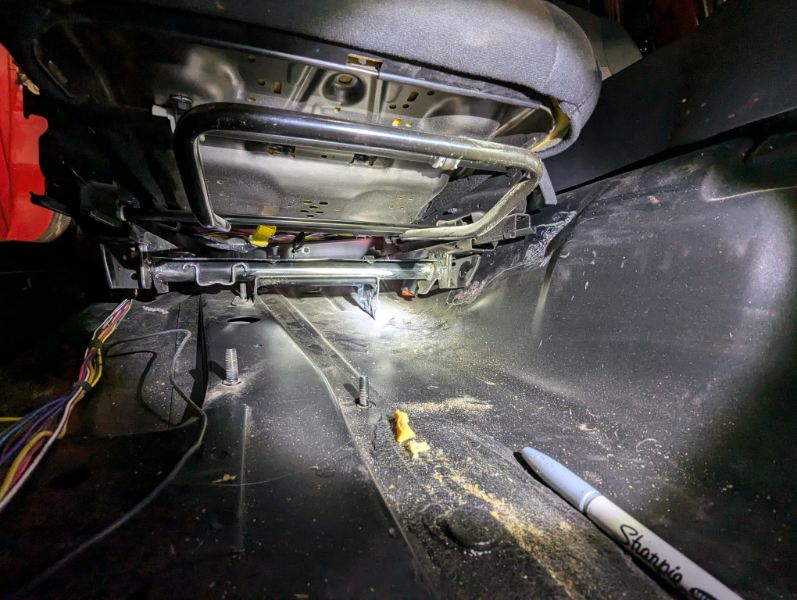
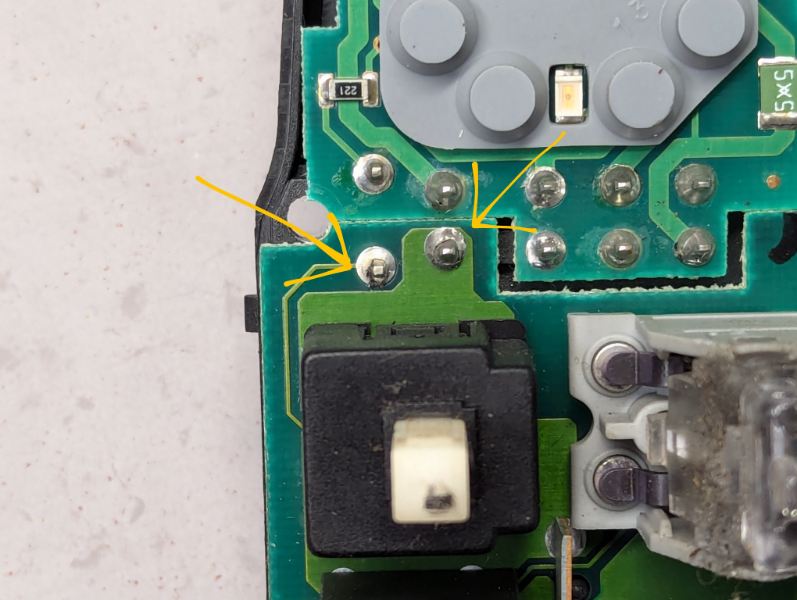
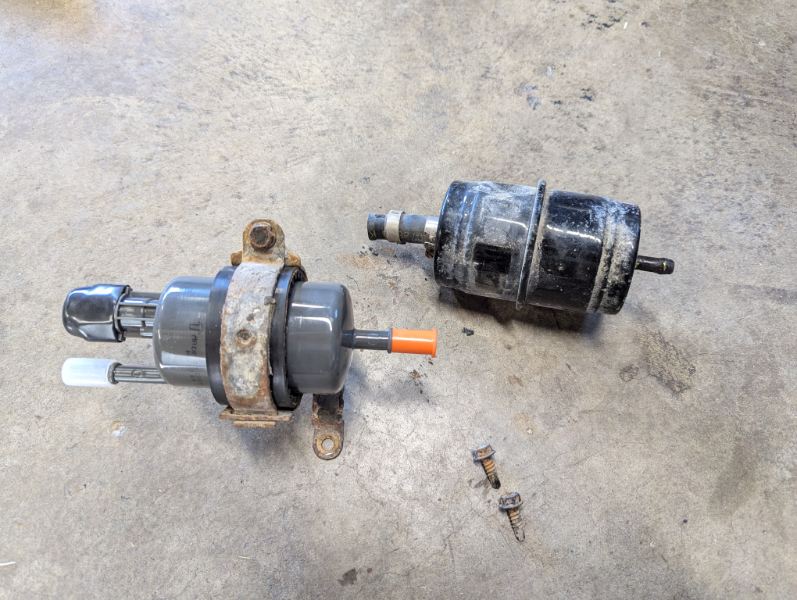
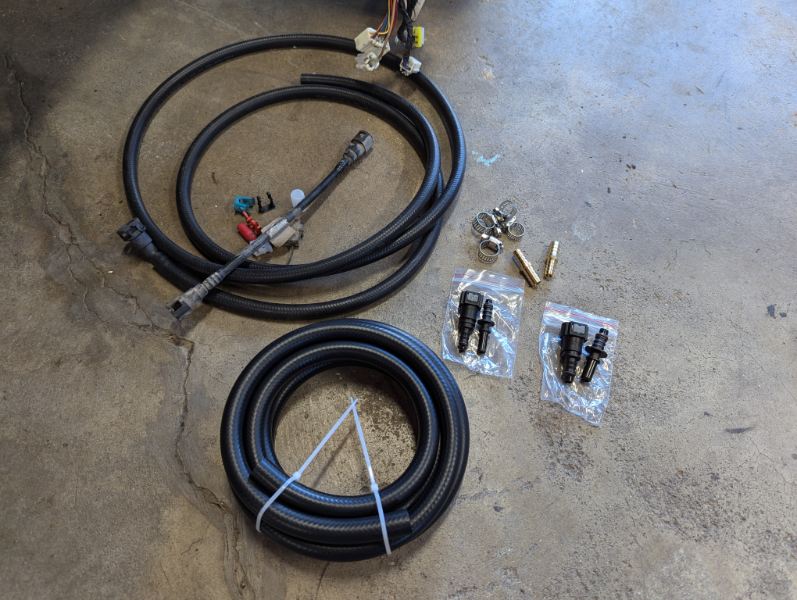
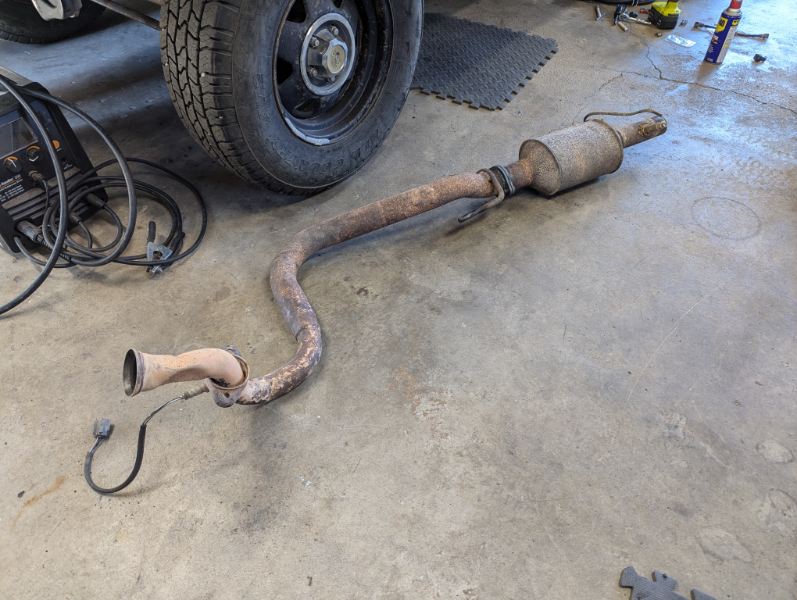
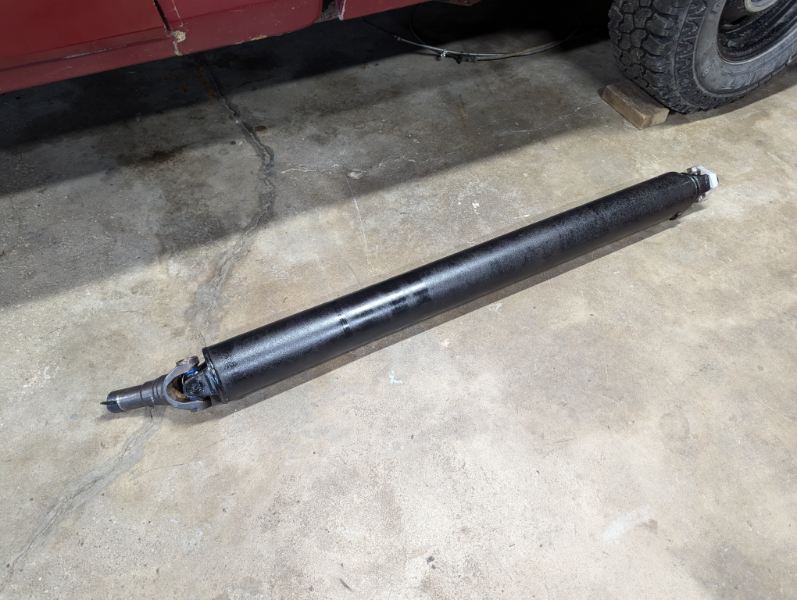
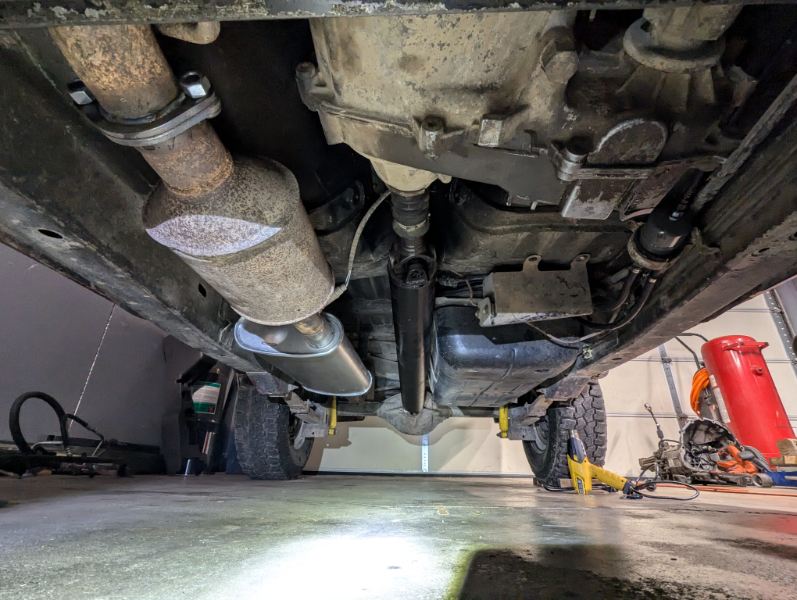
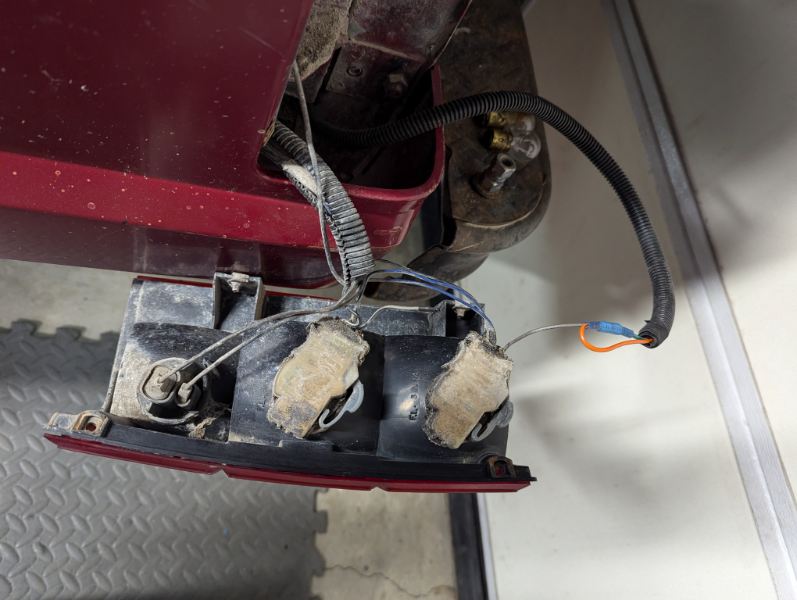
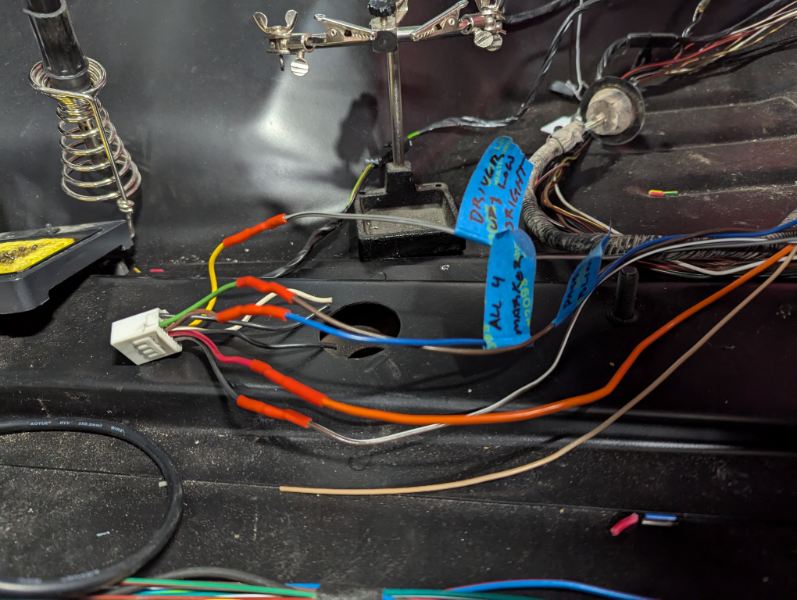
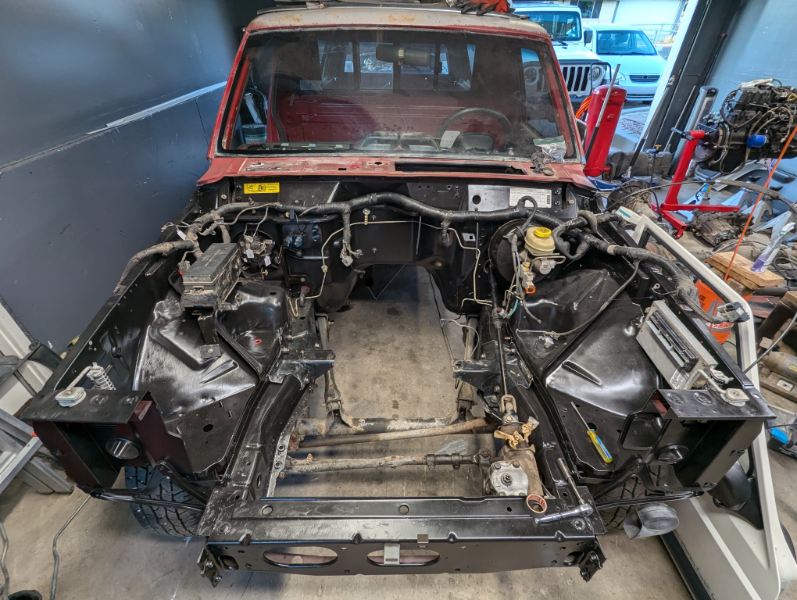
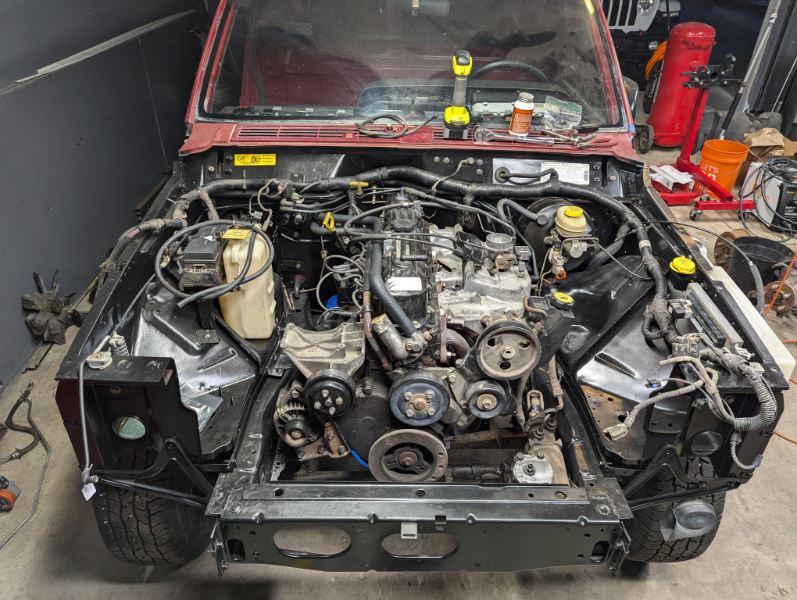
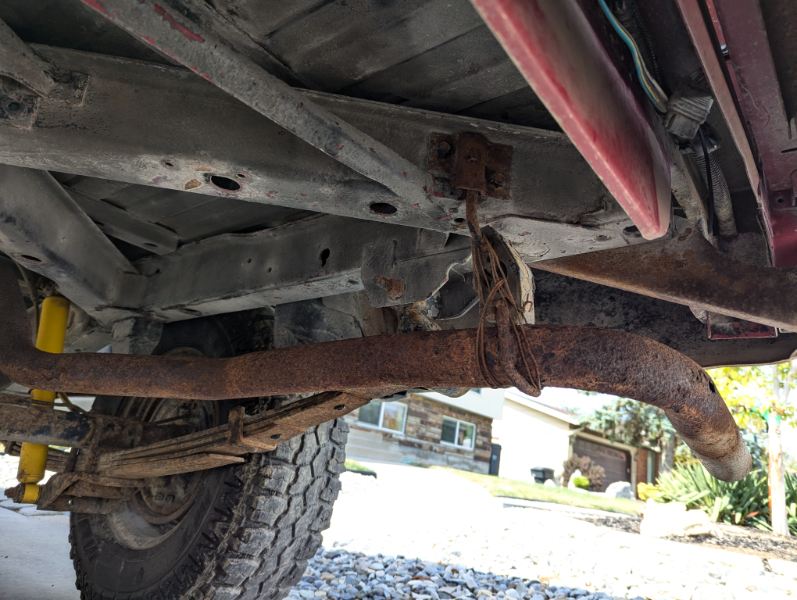
Thanks for following along with the progress so far! We found another great deal on an XJ, so we decided to make the drive to see if it was worth fixing and flipping or if it was better just to part it out. When we met the owner to pick it up, they had driven it a decent distance to meet us and it was running and idling well, there weren't any crazy leaks, and all the fluids looked good...so we exchanged some cash for the keys and title without so much as a test drive around the parking lot. My wife and I joked that it would be pretty funny if everything was in working order, including the AC, for the price we paid. I hopped in our newest Jeep to drive the hour home and decided to turn the switch to max AC and see what happened. I completely forgot that you could have the fan speed set to maximum and have the system turned off...and I was instantly reminded of that feature as a cloud of mouse nest confetti launched out of every vent. I turned the fan off as quickly as I could, but it was too late. The odor that filled the cabin necessitated windows down freeway driving for the entirety of the journey home. After looking it over closer, it was clear that parting out would be the right choice, so I started transferring over the better parts to our Cherokee and Comanche... I like supporting local businesses whenever possible, so after measuring at least seven times, I took the stock rear driveshaft to a shop I've been going to since I had my first Cherokee over 10 years ago. I had already swapped over the slip yoke from the donor XJ and I needed the 2-wheel drive shaft shortened to fit with the transfer case I had added. He did a great job as usual and everything fit perfectly. After getting the driveshaft back and installed, I started working on the exhaust. I was able to cobble together a complete exhaust with used parts from 3 Jeeps and a few new components to finish things out. A full new exhaust is on the future to-do list, but this will get it driving for now. Then it was time to turn my attention to fuel delivery. I wanted to keep the stock long bed tank if possible, but realized I had a few challenges to overcome. The first being that the '89 fuel line makes a complete loop from the pump, all the way up to the fuel rail where it's regulated and the excess fuel is returned back to the tank again vs. the '99 system that's regulated at the fuel tank and only the needed fuel is sent through a single line at the proper pressure to the fuel rail. I remembered during my WJ days I had replaced a fuel filter and was intrigued by the fact that there was a fuel pressure regulator built into it, then I remembered they also were optioned with a 4.0, so I did a little research and found that the 49psi from the Grand Cherokee was exactly what I needed. It just so happened that the Comanche already had a great bracket and location for a filter near the tank, so I ordered a WJ fuel filter and some fuel injection rated hose and fittings so I could begin my experiment. When it all arrived, I found that the regulated filter was a decent fit and just needed a timing belt scrap wrapped around it to keep things tight. My pressurized fuel line connects to the outlet on the stock pump in the stock tank and travels to the WJ filter that's mounted about 6 inches forward of the original filter location. From there, a line returns the excess fuel right back to the stock inlet on the pump, keeping that loop short and tidy. Then a single, regulated fuel line runs the remaining distance forward to supply the fuel rail. I was also able to mount the XJ EVAP canister in this same area just forward of the fuel tank. As far as wiring goes; I removed the fuel pump power, ground, and level sensor wire from the MJ taillight/fuel pump connector under the truck. I then connected the fuel pump 12+ and ground to the Cherokee wiring harness fuel pump connector. The fuel level gauge is the only thing currently not working with this setup, but I have plans to tinker with a way to convert the old signal into something that will work with the newer gauge cluster, just for something fun to do. This setup is currently working great and supplying all the properly pressurized fuel I need for under $100. I wanted to wire the taillights into the Cherokee harness as simply as possible, so I tried to use the factory XJ trailer wiring harness to accomplish that. I got it mostly functioning, but wasn't happy with the heat the 5 wire to 4 wire converter was putting out at times. I've seen one of these melt and nearly catch fire before, so I decided I'd rather take the time to wire the taillights up without it. I cut all the wires to the converter so I could still use the factory XJ connector. Using this method meant I needed to run one more wire from the cab to the back of the truck. I repurposed the orange 12+ wire that was previously running through the floor to the fuel pump allowing this new wire to run through the stock grommet and keep all the wiring for the taillights in the same connector. I may change things later, but for now I wanted the top bulbs in the housings to function as marker lights on low and brake lights on high, the middle bulbs to be marker lights on low and blinkers on high, and the bottom bulbs to retain their reverse light duties. To accomplish this, I cut the high output circuit link between the mid and upper bulbs on each side of the truck, I then connected the new wire I ran from the cab to the this wire on the driver's side upper bulb and ran another wire from this connection to the same wire on the passenger side upper bulb. This new wire powers the brake lights and the stock wiring powers everything else. My list of future plans for this truck are growing by the day, but I really want to get my emissions test done and finish my registration before I get much further. My current plans are to modify the original bench seat to temporarily fit over the parking brake handle and airbag module that are now mounted to the top of the transmission tunnel and get the seatbelts installed so I can drive to the inspection station!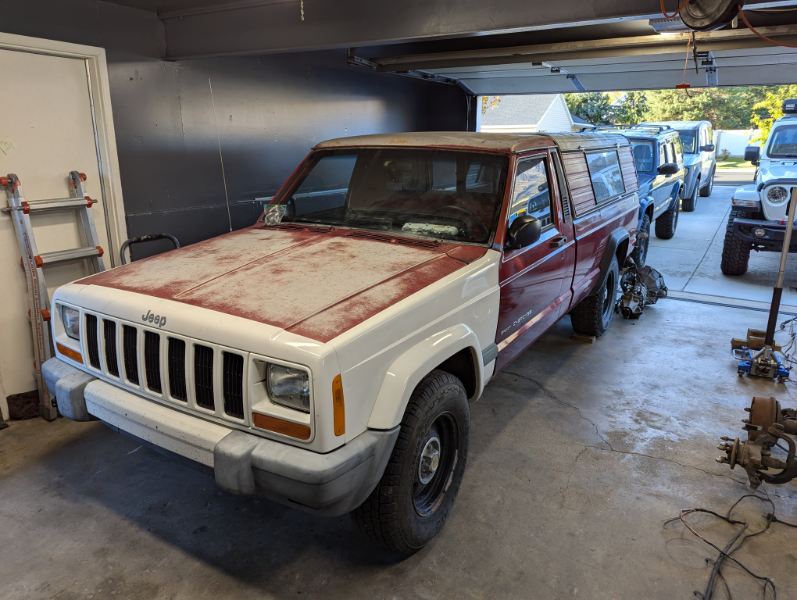
-
Project Morris: The 89 to 99 Comanche Long Bed
RuBacon replied to RuBacon's topic in Member Projects: Your Comanches
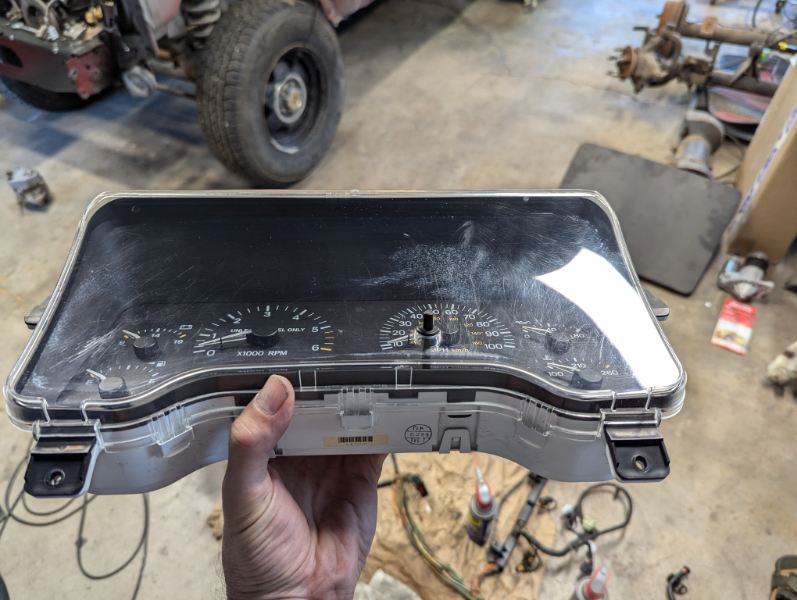
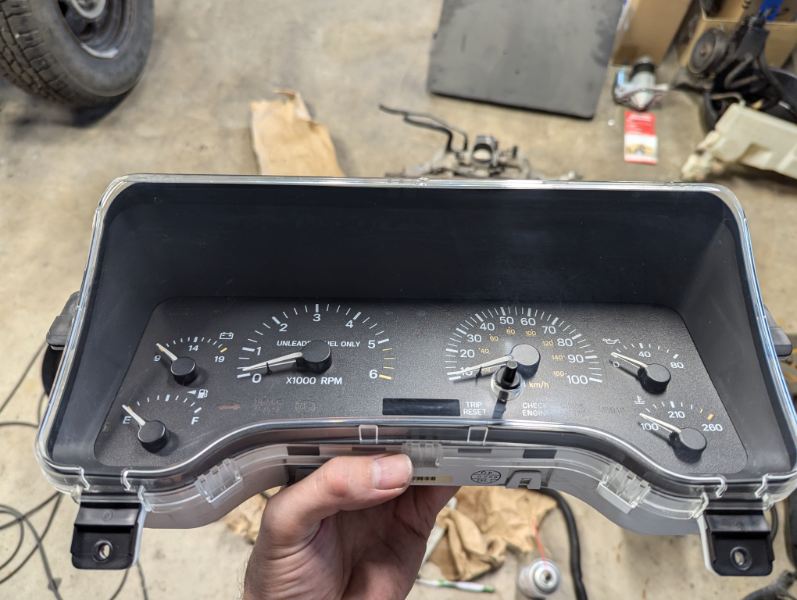
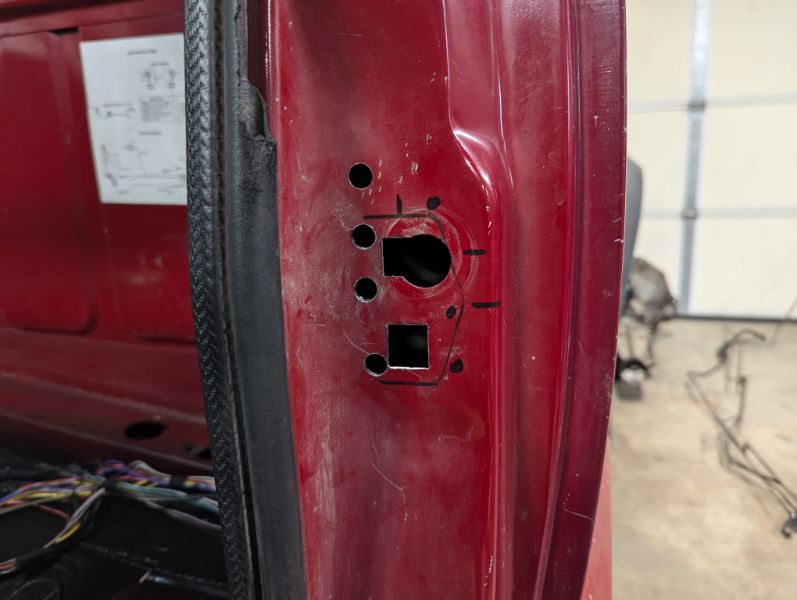
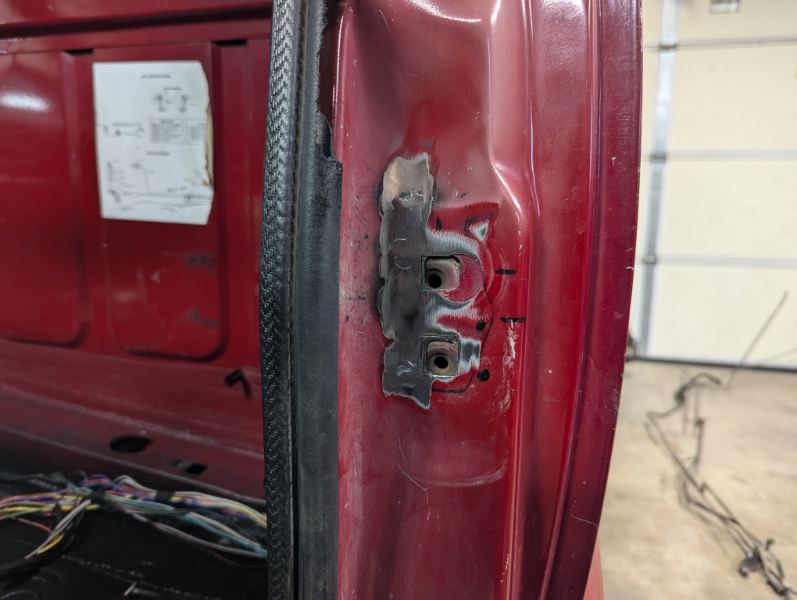
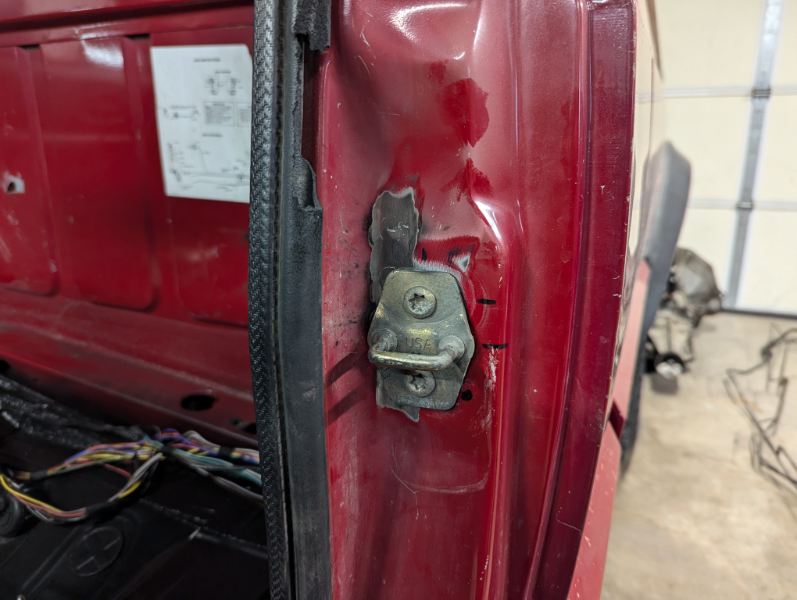
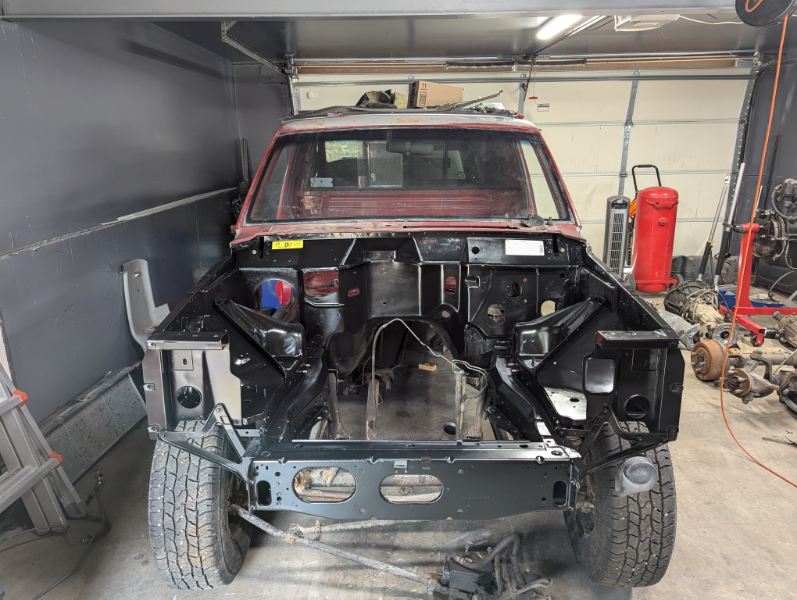
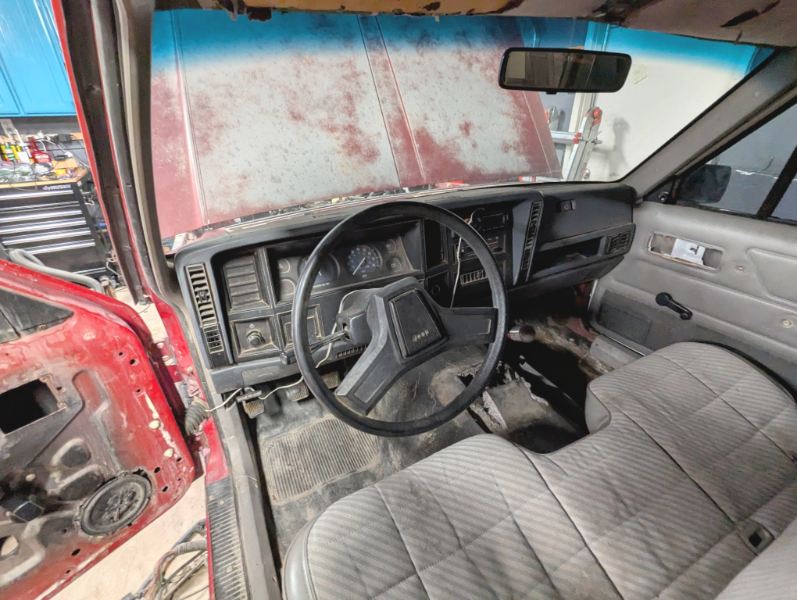
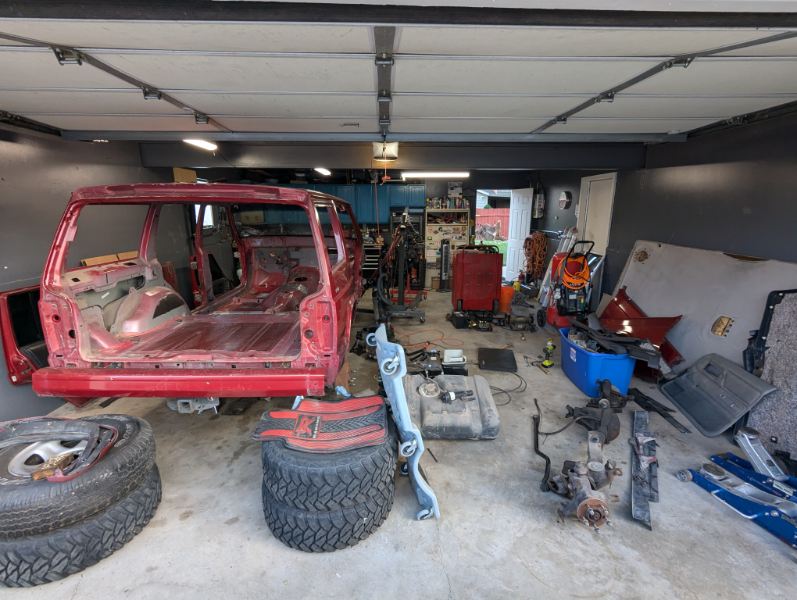
With everything coming together like it is, I'm getting excited too! I'm really looking forward to driving this thing for the first time! I put some effort into cleaning up the engine wiring harness, repairing a few wires with failing insulation, and getting some new loom installed in an attempt to reduce any first start electrical issues. After that was finished and installed, I moved back to the interior. The gauge cluster was a little hazy and thoroughly scratched, so I polished it up the best I could for now. With thoughts of future test drives on my mind, I decided I should turn my attention to getting the door catch situation figured out. Thanks to a handful of great build threads on here, I was able to speed up the process by knowing roughly where things needed to be located before I even started. I drilled out the spot welds on the old catch, temporarily installed the new catch, and got everything marked and cut. I had cut the adjustable nut plates out of the donor Cherokee door frames, so I trimmed the excess off and welded them in place using the factory spot weld locations. The hinges still need some adjustment, but I got the the doors closing, latching, and opening without too many lost hours. Having doors again provided more than enough motivation to get working on installing the fenders and grill. It's looking so good to have a mostly assembled Comanche again! I still need to get some exhaust cobbled together, get the rear driveshaft measured and shortened, and see if my fuel delivery plans are going to work out like I hope.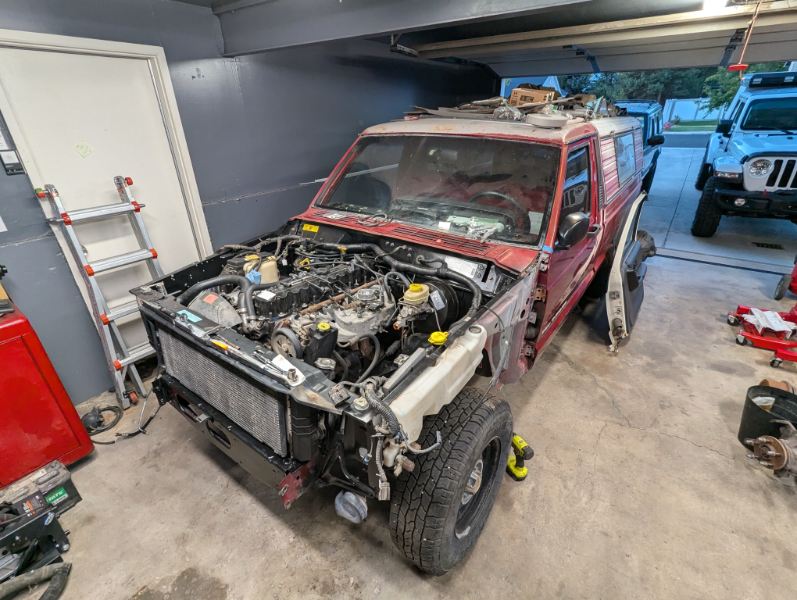
-
Project Morris: The 89 to 99 Comanche Long Bed
RuBacon replied to RuBacon's topic in Member Projects: Your Comanches
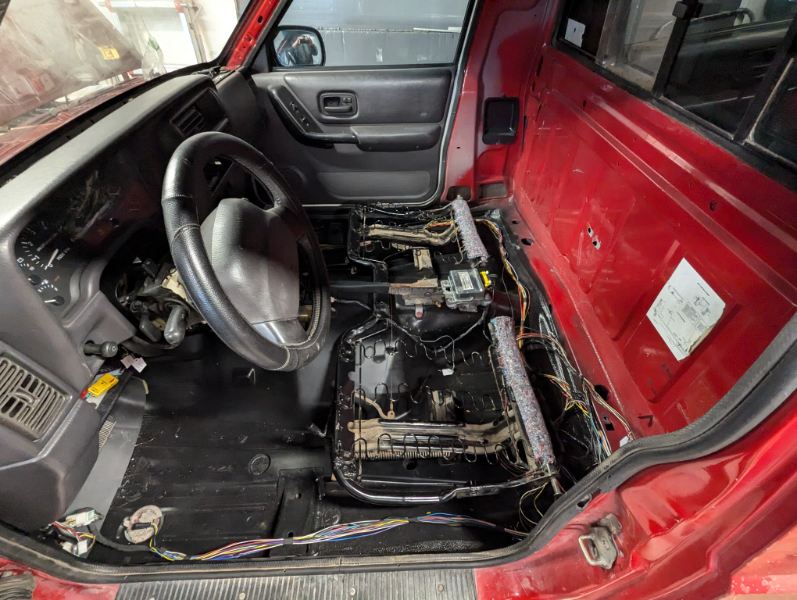
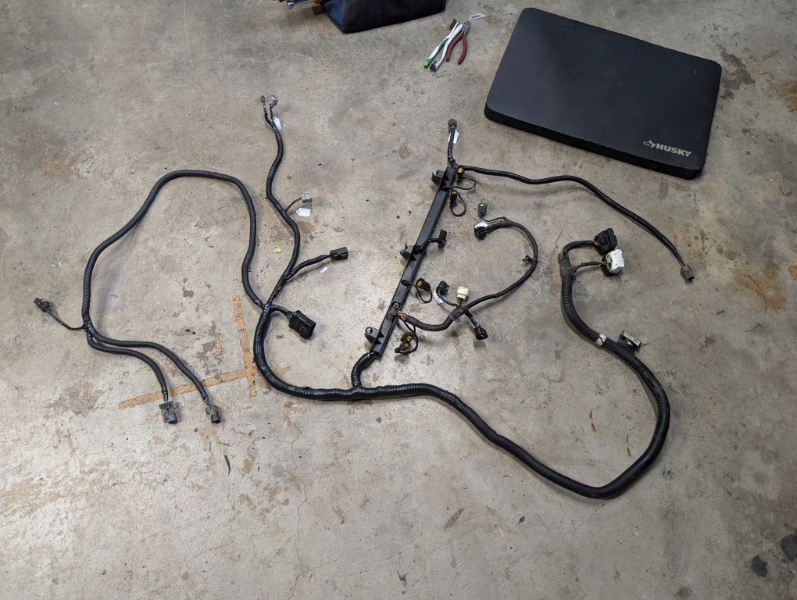
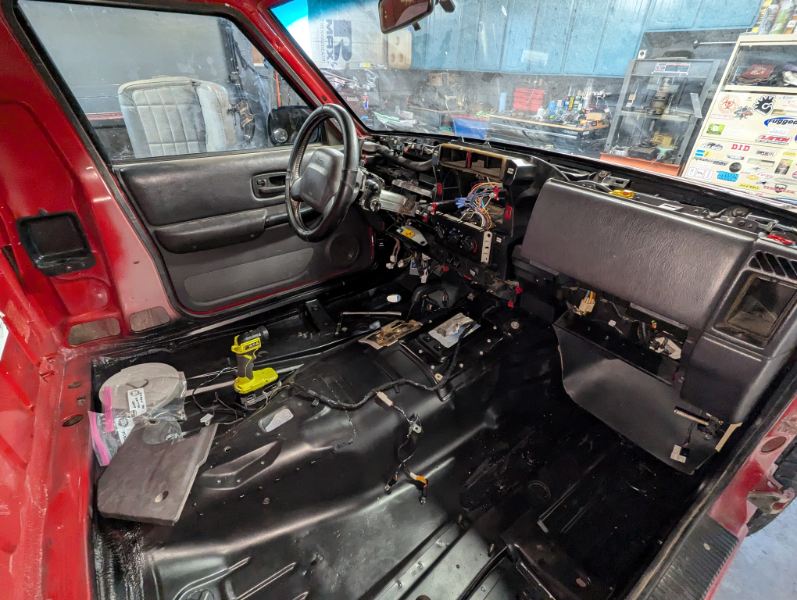
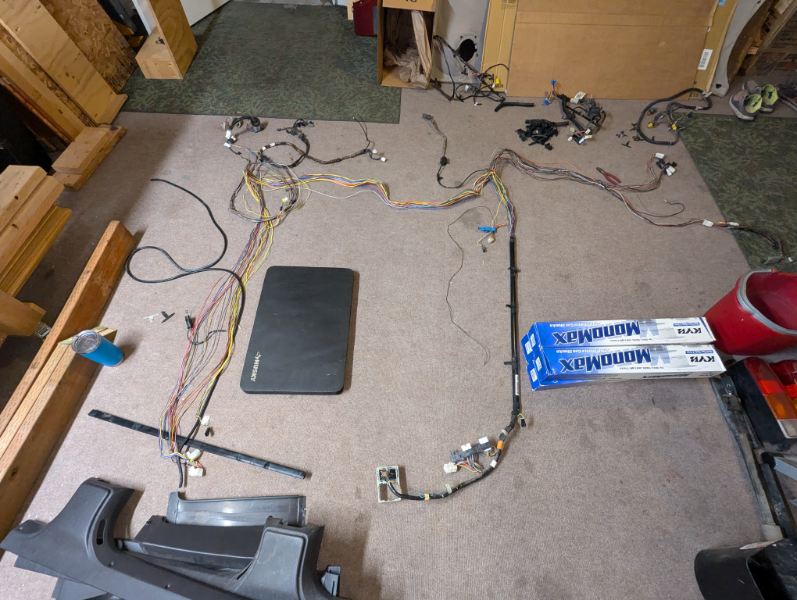
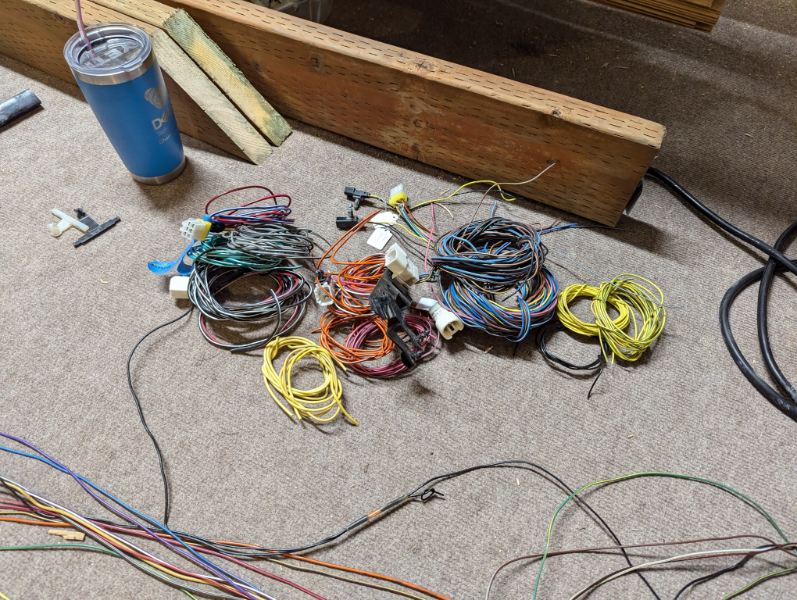
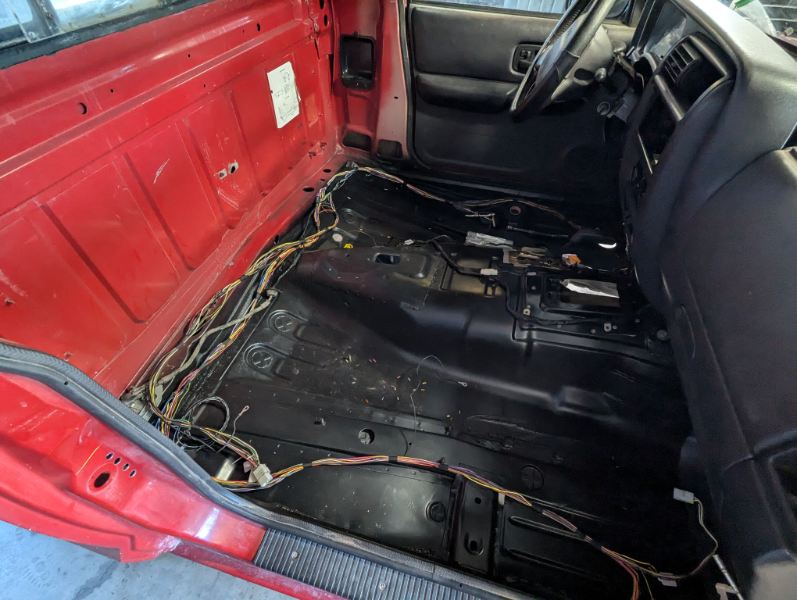
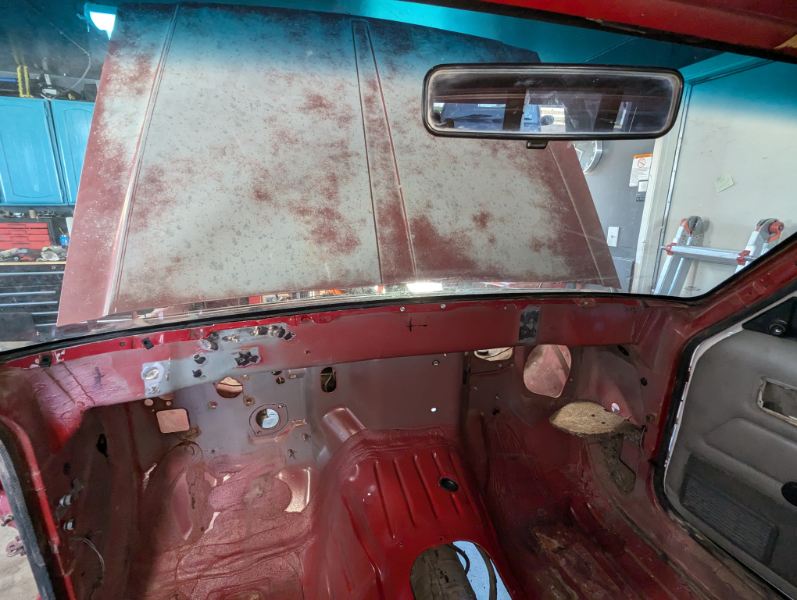
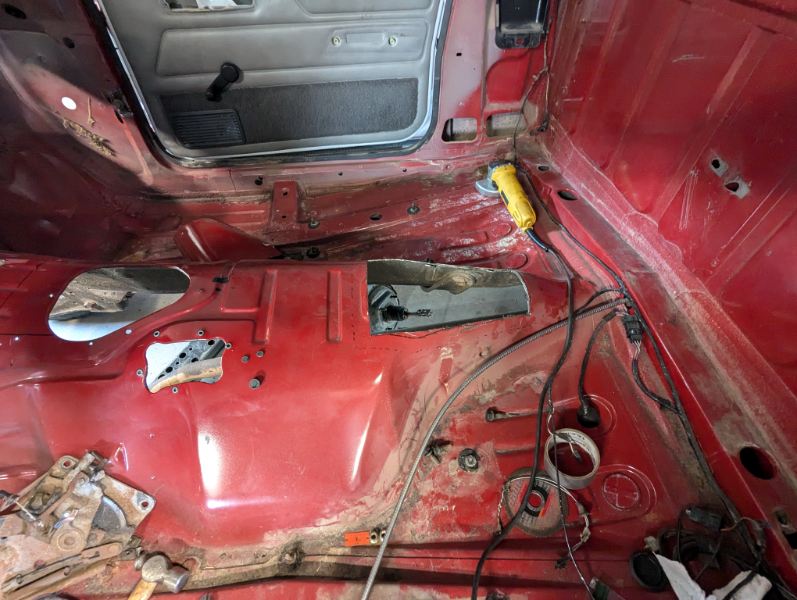
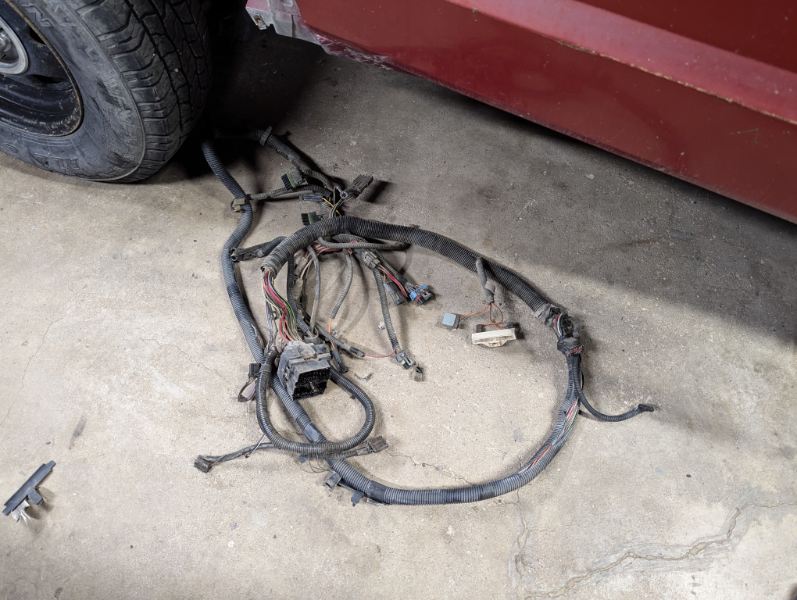
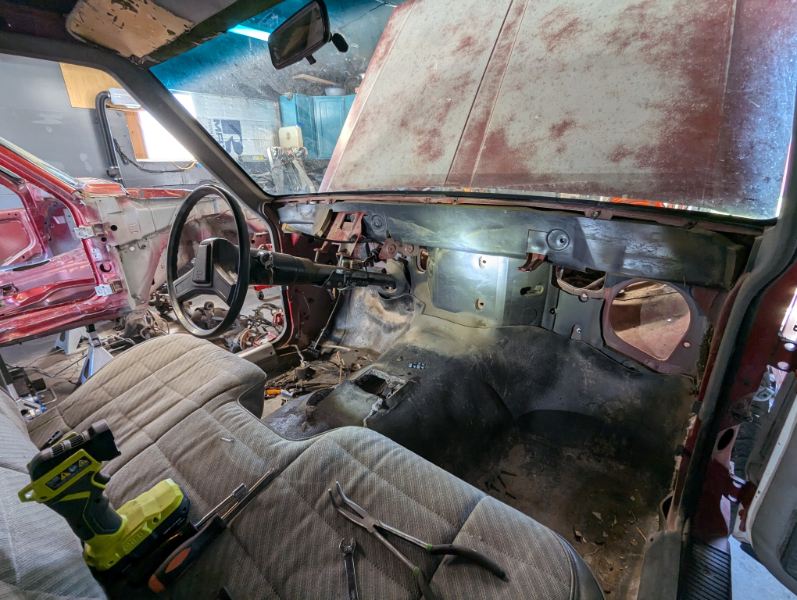
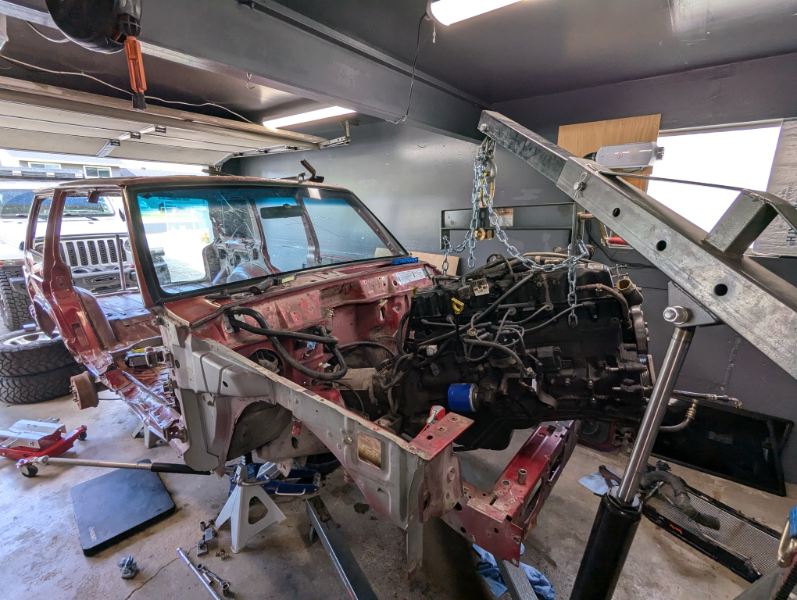
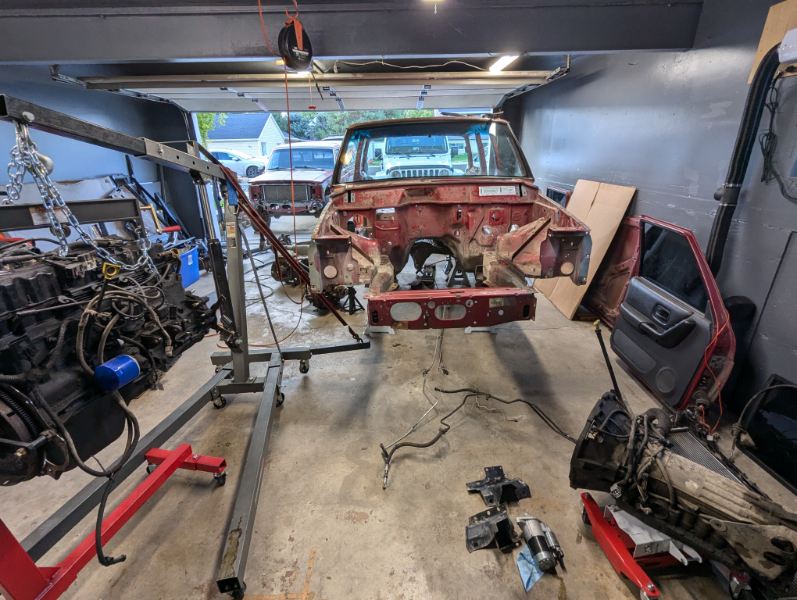
Thank you kindly everybody! It's feeling great to see the steadily shrinking pile of parts waiting to be installed! I got a little nervous about spending my entire winter working on this project only to have it fail the county emissions inspection and turn into a struggle to legally get it registered and back on the road, so I've slightly adjusted the project trajectory for now. I'm hoping to have everything put back together enough to have it driving in the next month, and then when I have all the official paperwork in hand that says it's roadworthy, I can dig into phase 2 of the build. I was getting excited to see the dash and a door in place so I spent some time getting them both test fit. Luckily, measuring four times and welding once worked out better than planned and my dash "test fit" turned into a final install! While I do appreciate an original Comanche in good condition, I'd much rather the new style interior over the trashed interior this came with. With my motivation boosted even more, I decided to tackle the interior wiring harness. I really wanted to shorten all the wires to route neatly through the cab and remove the wiring for the rear doors, the rear hatch, and anything that wasn't going to be used in the Comanche. I laid it all out, downloaded a service manual, and got to work. I was eventually left with this pile of extra wires I had carefully determined I wouldn't be needing anymore: I left some excess length for the fuel pump/sending unit and the lights at the rear of the bed until I could get my plans figured out for both of those situations. The harness now fit in the cab like it was made for it. I plan to get everything tested before I wrap it all and find out there's one wire buried somewhere that needs an alteration of some sort... The next item on the list was getting the engine bay wired and the brake lines run so I would be ready for the engine. I didn't end up getting any photos of the wrestling match that was installing the engine and transmission, but everything eventually dropped into place. I installed new gaskets for the oil pan, valve cover, rear main, and oil filter adapter to hopefully dry up most of the leaks. Then I replaced the intake/exhaust gasket after removing the exhaust manifold to weld up a few cracks for now. I cleaned a small selection of parts while I was at it, but didn't spend too much time because I hope to fully rebuild an engine for this truck in the future. Before I could install the transfer case and transmission mount and bolt everything down, I had to tap the available holes to shift the crossmember farther back. This was originally a 2 wheel drive manual, and for obvious reasons, the automatic transmission and transfer case combo being installed weren't quite lining up with the original mounting location. For future reference, an M10x1.5 tap did the trick. I just cleaned the existing holes out and carefully got things threaded.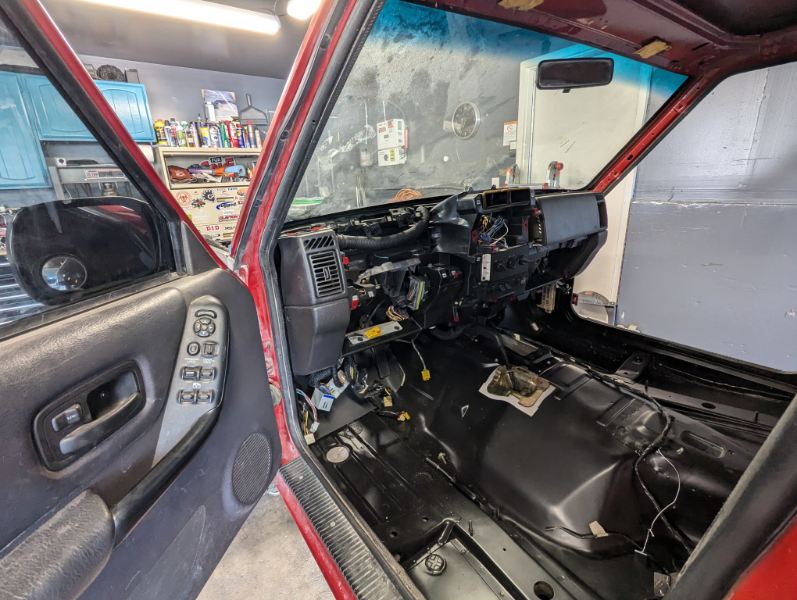
-
Project Morris: The 89 to 99 Comanche Long Bed
RuBacon replied to RuBacon's topic in Member Projects: Your Comanches
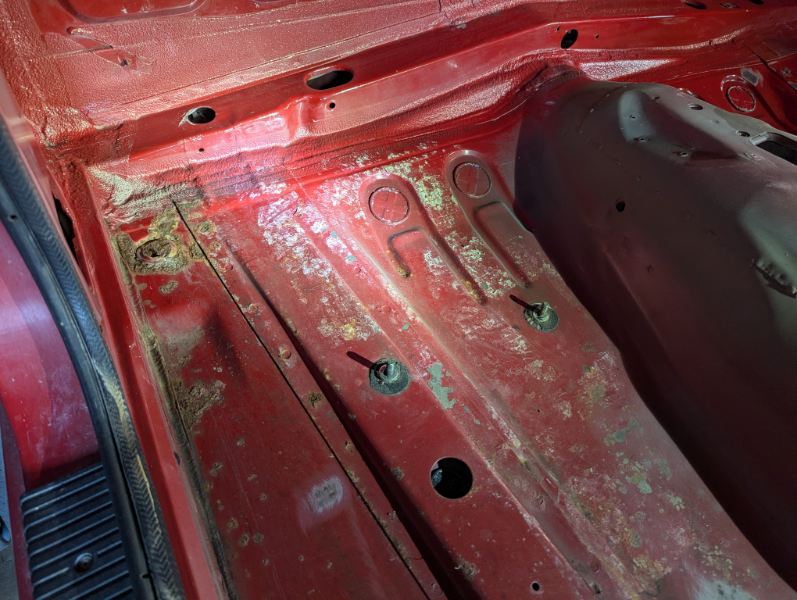
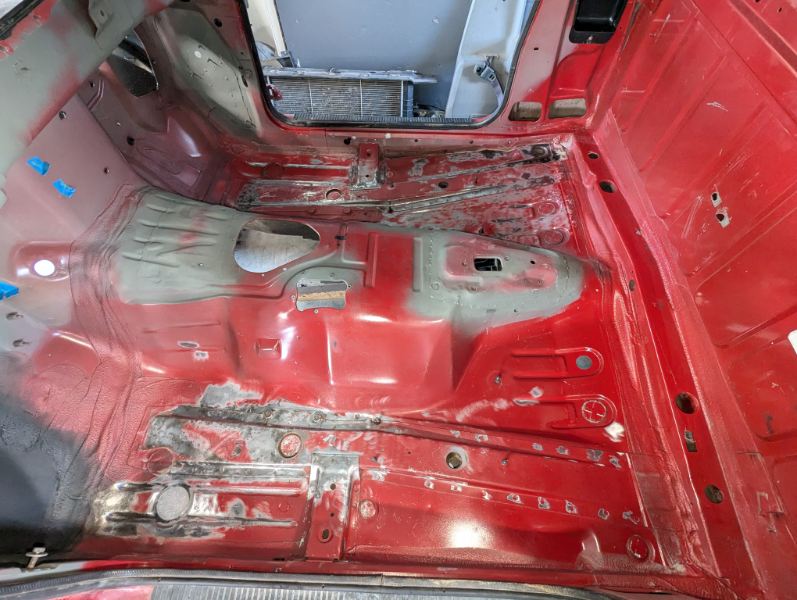
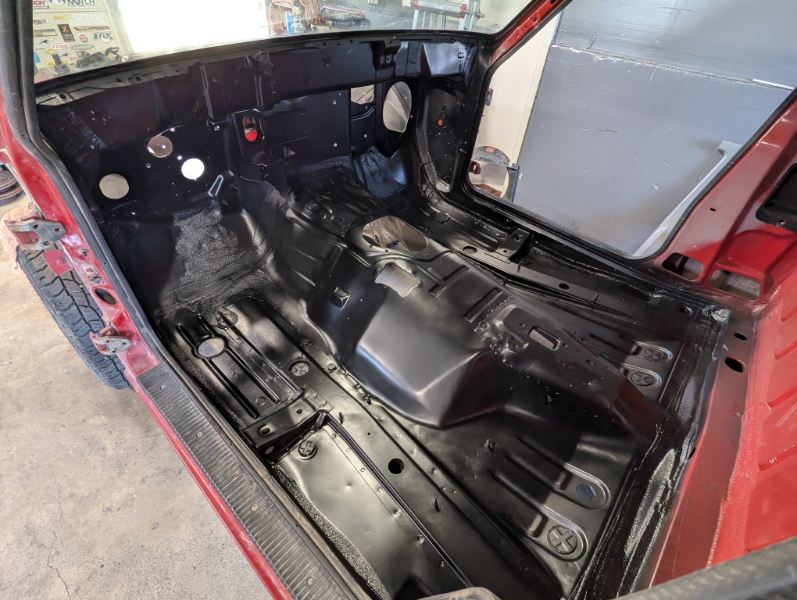
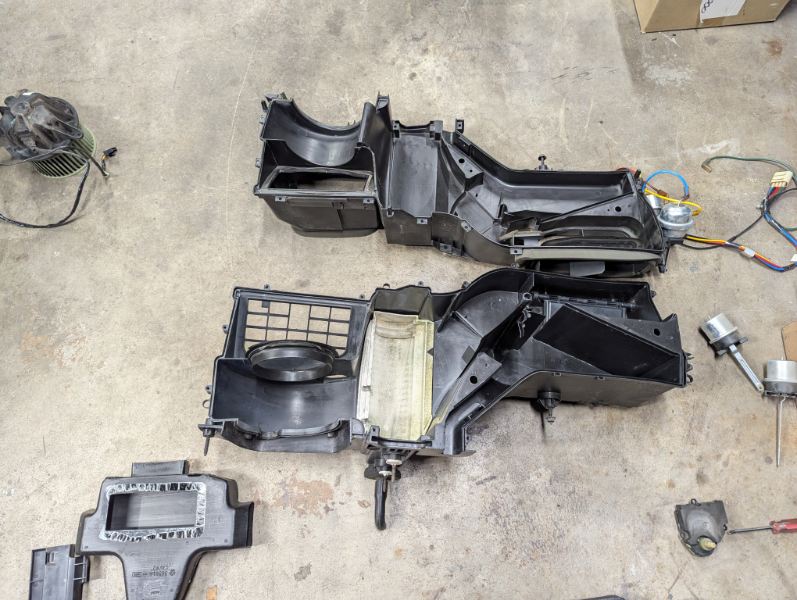
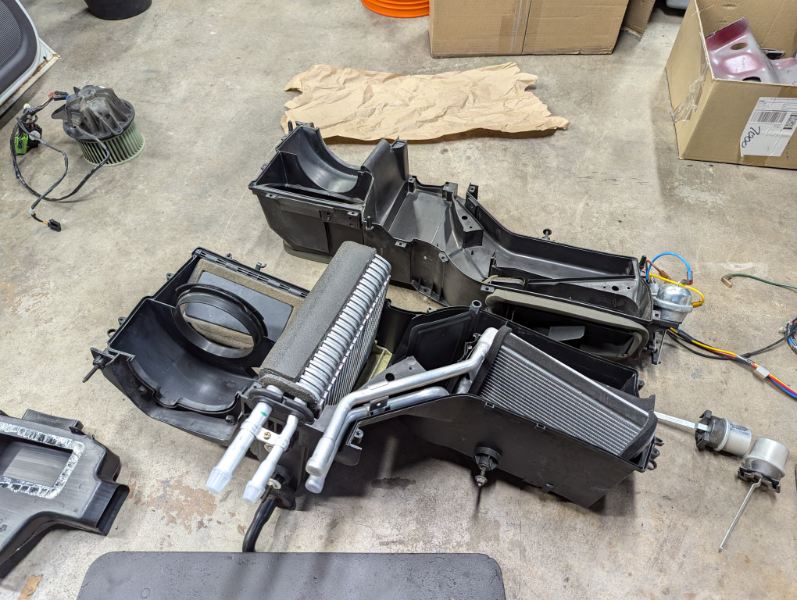
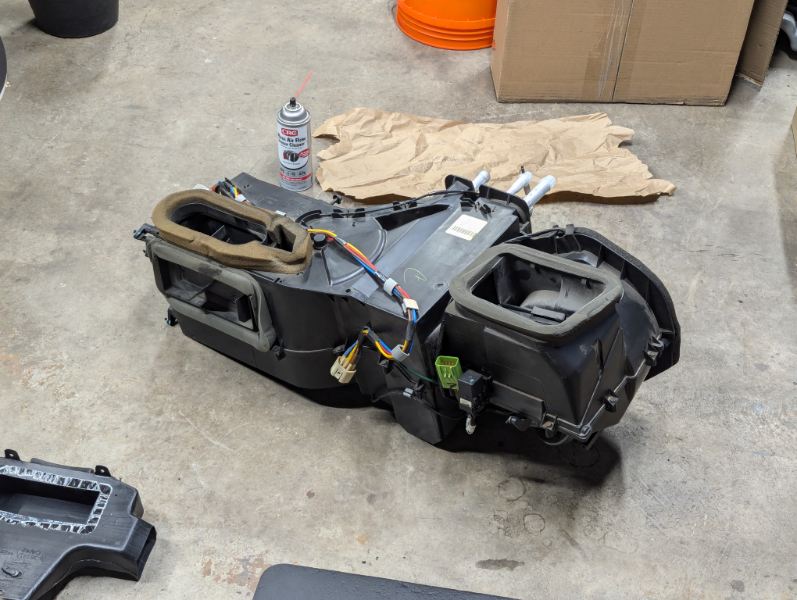
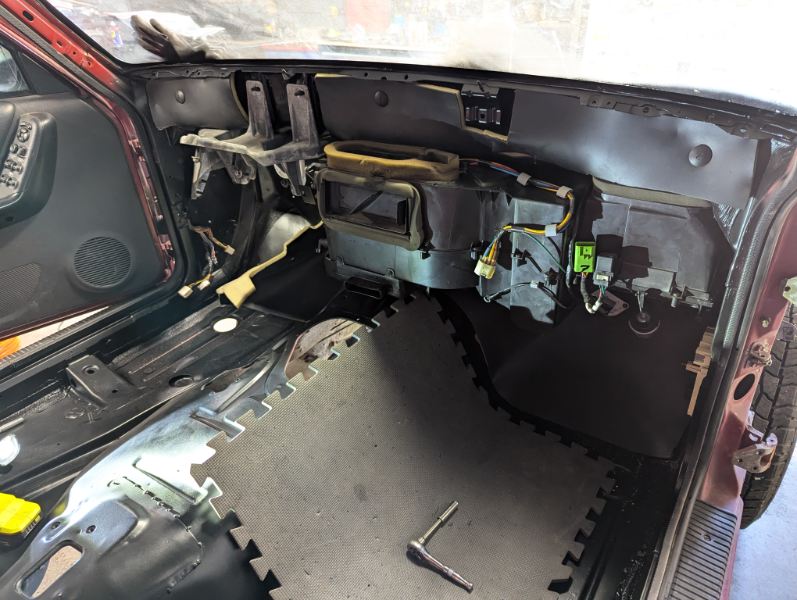
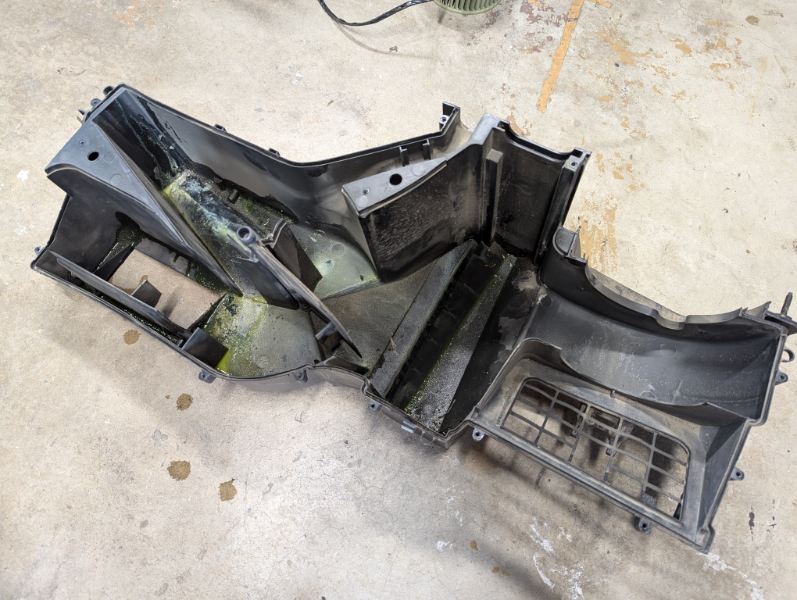
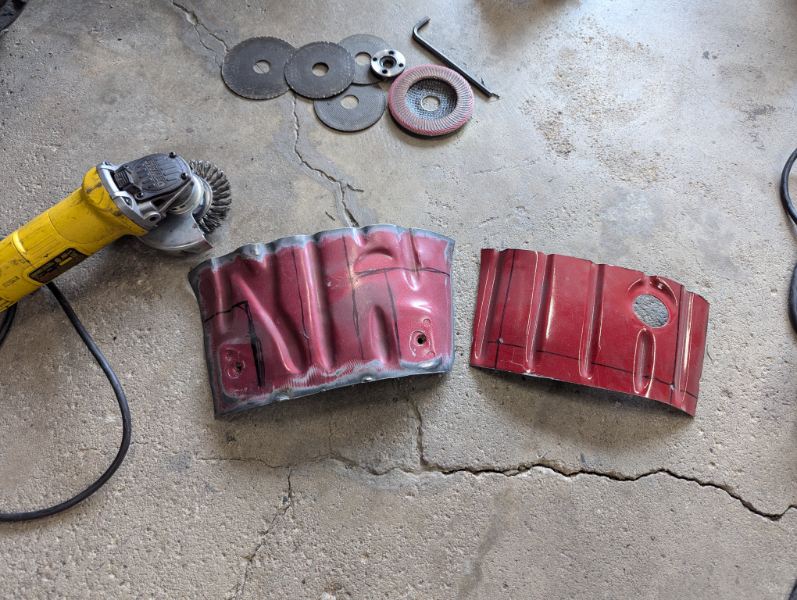
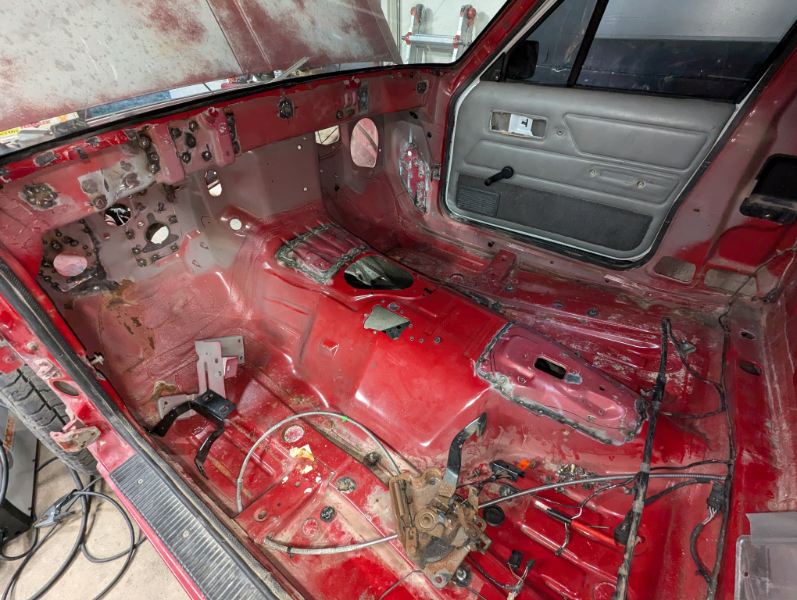
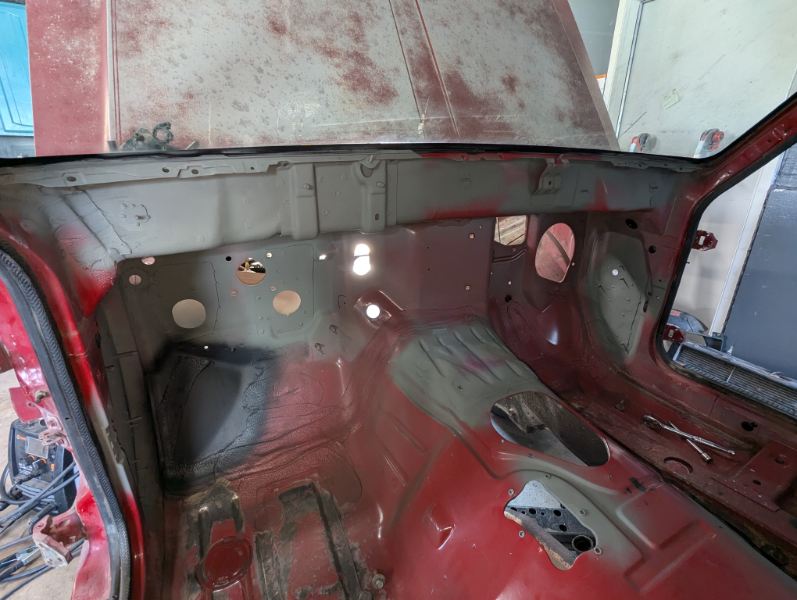
I started working the floors over and ground down all the incredibly sharp spot welds that kept drawing blood while I was at it. I got exceptionally lucky and didn't find any rust that couldn't be quickly wire wheeled away. While I was well practiced and feeling motivated by the interior outcome, I decided to move on to preparing the engine bay for paint as well. Once everything was cleaned and primed, I got a few coats of paint on all the prepared surfaces in anticipation of some reassembly work. While the paint was drying, I turned my attention to the HVAC box that was barely containing the mess from a heater core that had been leaking for some time. I got everything cleaned out and reassembled with a new heater core, air conditioning evaporator, and seals. A few days later it was finally time to start adding parts back into the Comanche instead of taking things out. It felt great to start seeing the beginnings of the interior falling into place!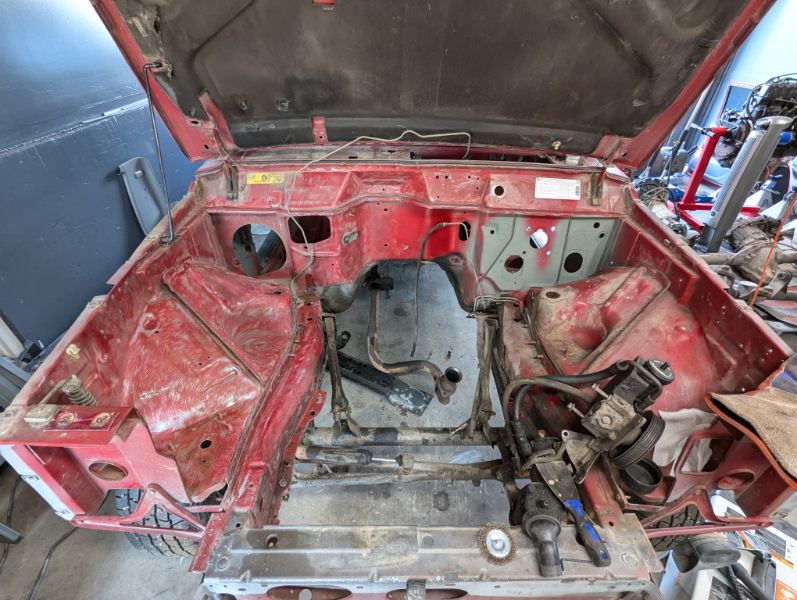
-
Project Morris: The 89 to 99 Comanche Long Bed
RuBacon replied to RuBacon's topic in Member Projects: Your Comanches
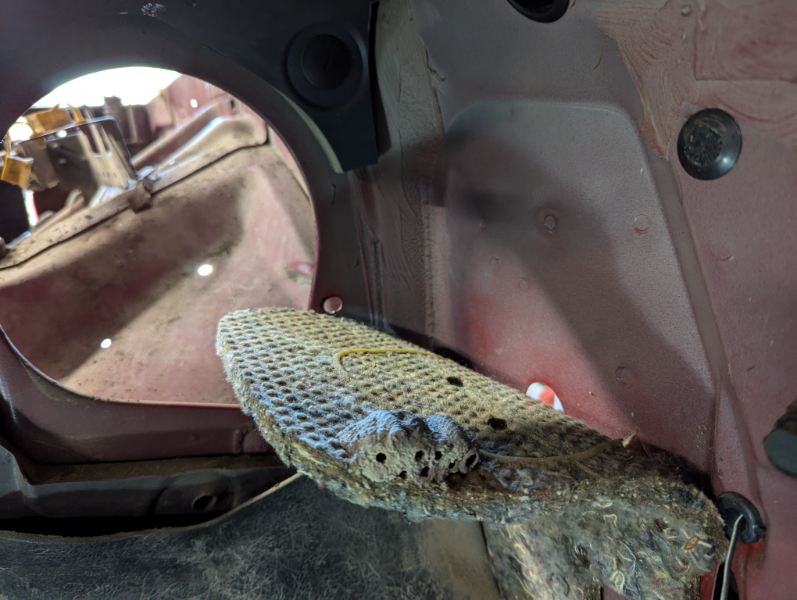
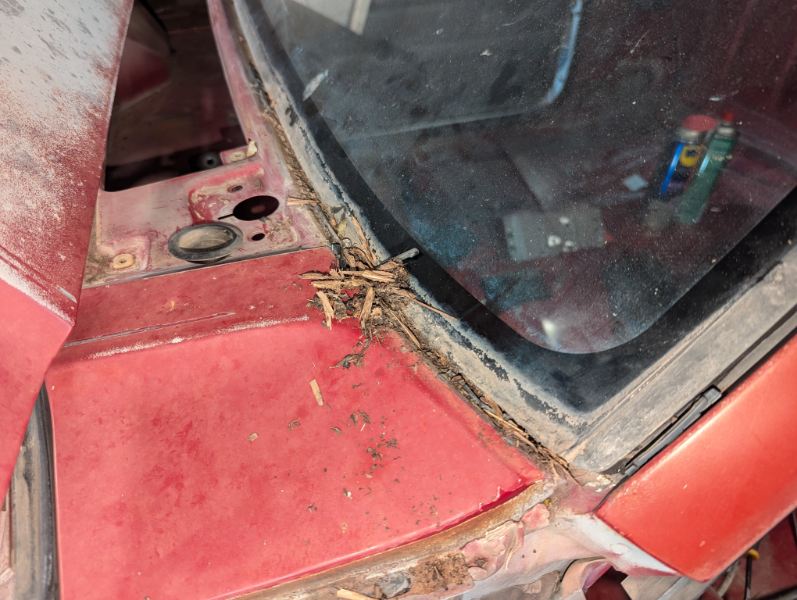
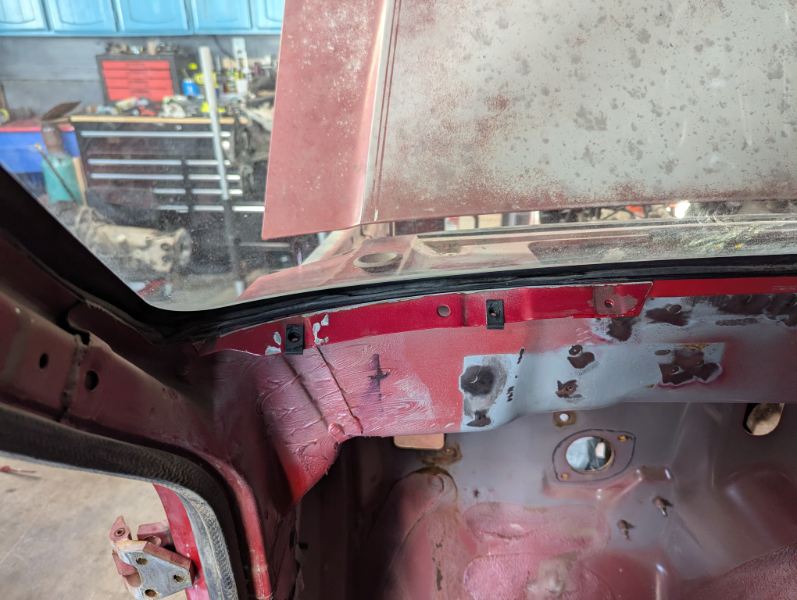
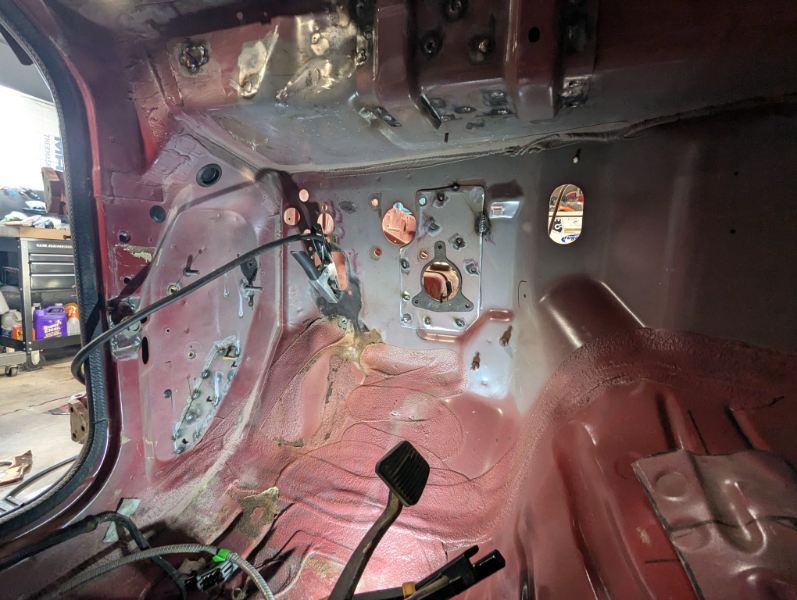
It really would be interesting to know how they're "tested" and what exactly they "replace"... I've made a lot of progress getting everything removed from the Comanche interior and engine bay: I found one more hidden wasp habitat tucked away INSIDE the cab this time: I have no idea how this much dirt and debris can make its way behind the windshield trim, but I feel very lucky that it was just dirty in there and not completely rusting out. I'll definitely be looking forward to having the newer rubber style trim installed after seeing this: I then switched my attention to removing the few brackets and miscellaneous attachment points that were no longer needed on the inside of the firewall: After measuring no less than three times, I began adding in all the firewall brackets and attachment points I'd harvested from the donor XJ: I also decided to bring over the sections of the transmission tunnel where the lower dash bracket attaches and where the parking brake lever/airbag module attach: Once I was happy with the location of everything, I got all of my additions primed and ready for the next step. It initially felt like quite the project to get everything moved over and properly placed in the Comanche, but seeing the pile of cut up parts shrinking and the parts all getting welded in place definitely boosted the motivation! I need to work on getting the floors cleaned up and thoroughly inspected next. There are a handful of spots that I'm hoping turn out to just be nothing more than some surface rust and it looks like the clutch master cylinder leaked briefly at some point and caused some paint damage...it always seems like rust is worse than originally thought once the wire wheels get involved though.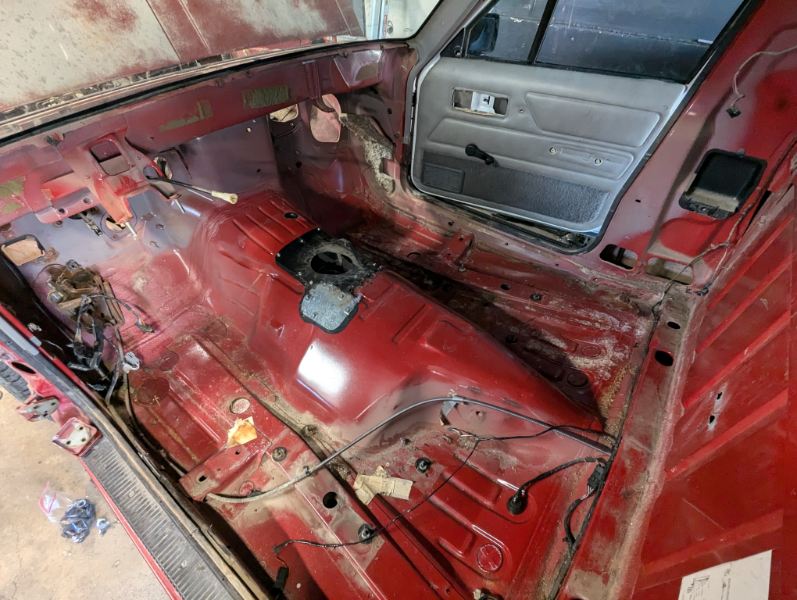


-
Project Morris: The 89 to 99 Comanche Long Bed
RuBacon replied to RuBacon's topic in Member Projects: Your Comanches
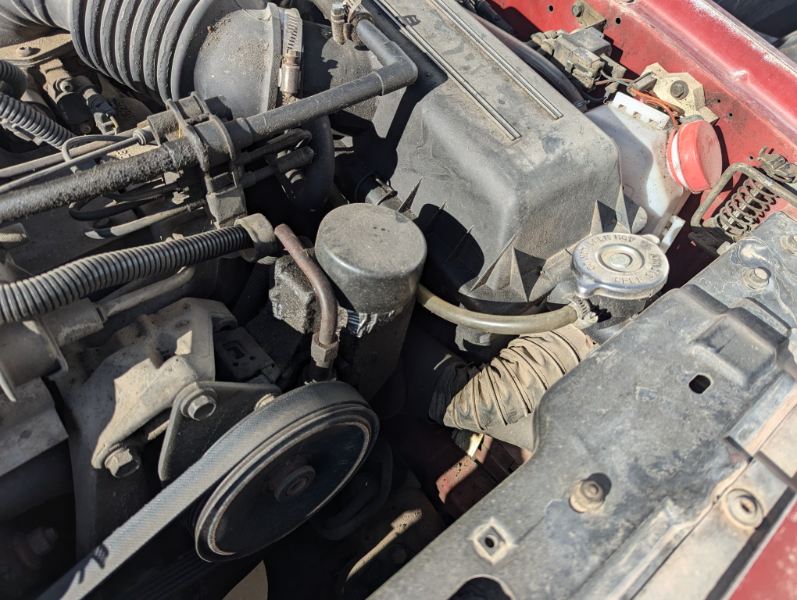
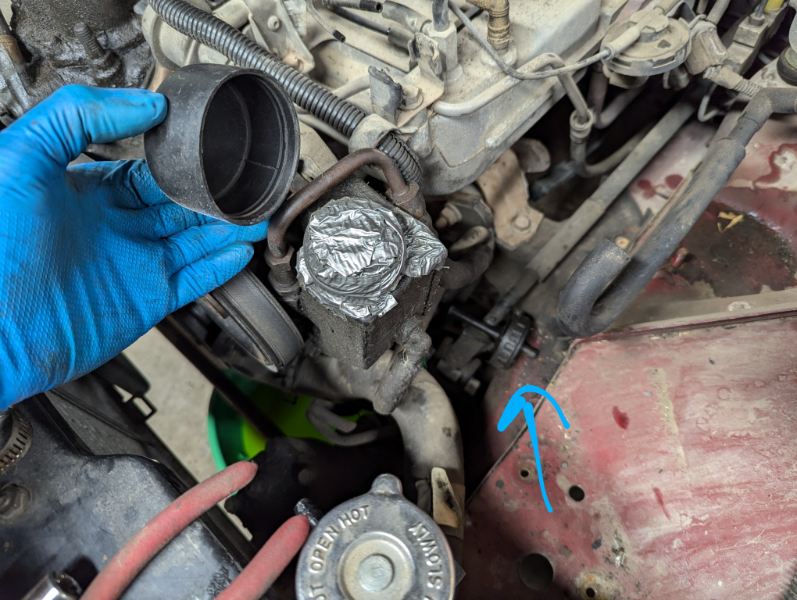
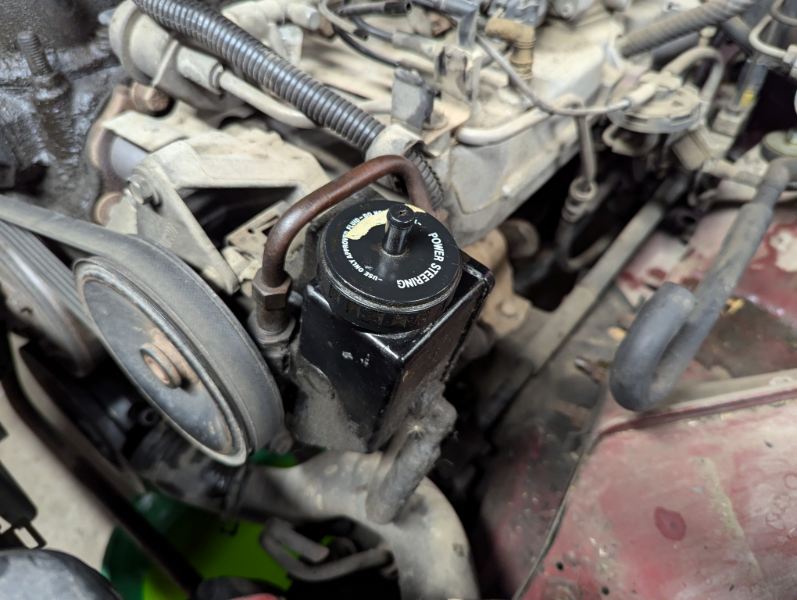
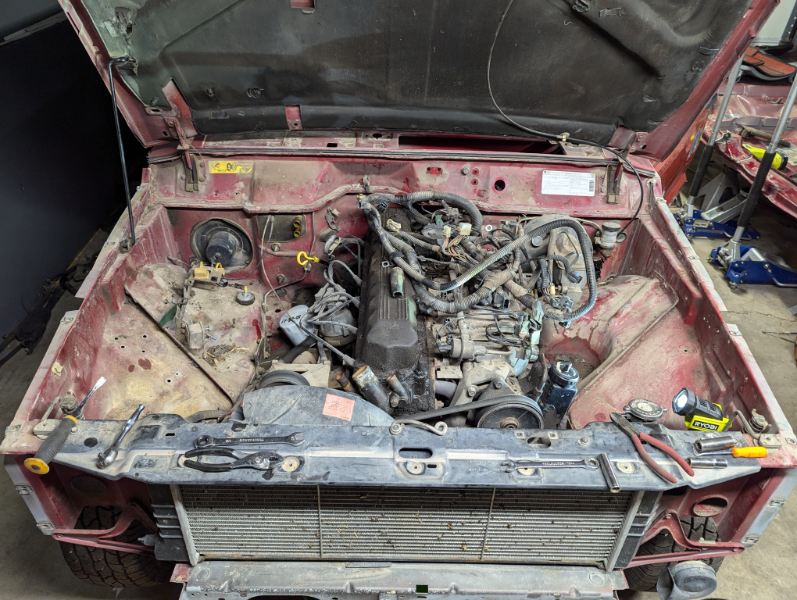
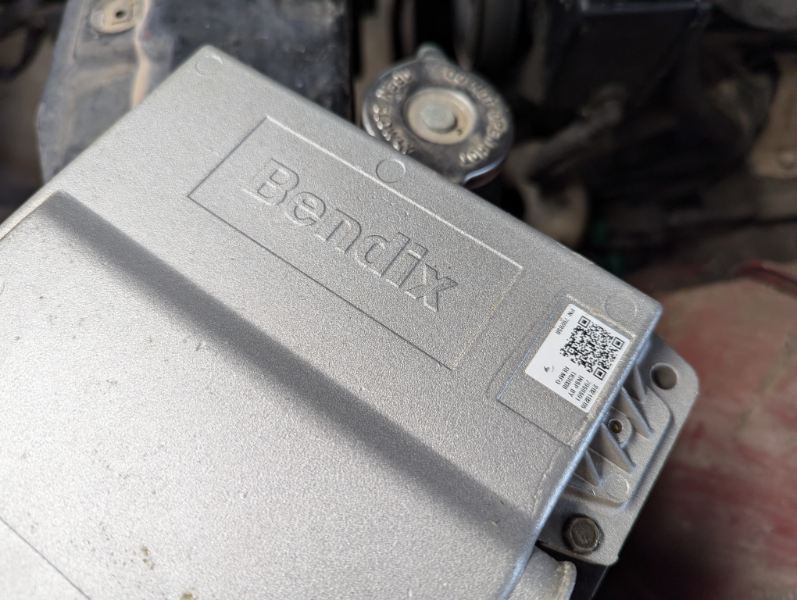
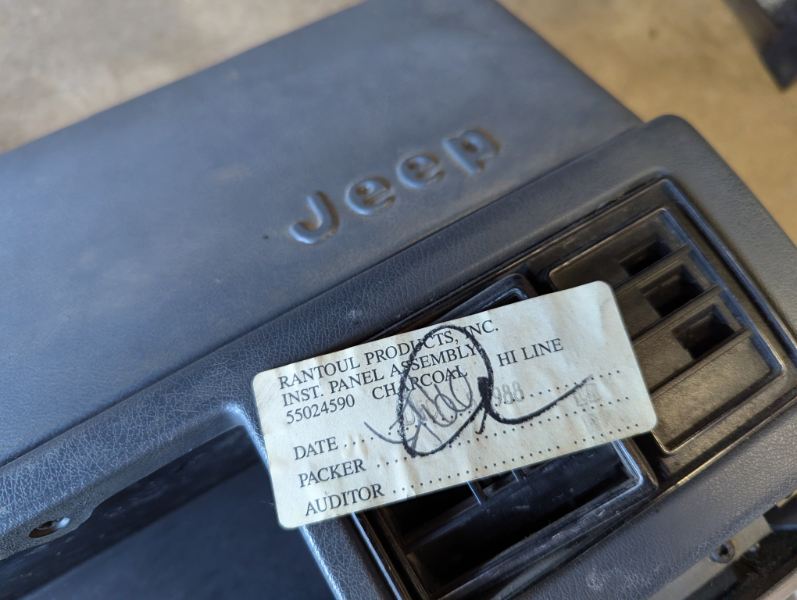
The Comanche engine bay was dirty, but impressively complete and unmodified, the intake pre-heater hose was even in decent shape! The main thing that stood out was the upgrade to a newer style radiator and a Red Green approved steering reservoir cap. Removing the air box gave me a clear view of the original cap that had been dropped and considered lost enough years ago that it had worn through the paint on the steering shaft. Retrieved the old cap, cleaned it and the duct tape residue from the reservoir, and returned it to its original home. Spent some time getting the engine bay cleared out and prepared for engine removal. The wiring was all in much better shape than my last Comanche project started with, hopefully it can go to a good home and help someone get their Jeep back on the road. I then turned my attention to the interior. It was in really rough shape and almost dirtier than anything on the exterior. The more dust I kicked up, the more it smelled like a cattle farm. Luckily, it wasn't long before I had the dash and HVAC assembly removed. Just as I turned the vacuum on to start cleaning up some debris, I noticed something interesting and barely avoided it with the nozzle. It was the original tag from when the dash assembly was manufactured. A quick Google search later, and I found out the company was actually still in business and operating to this day! At the end of a long evening I was organizing all the parts I had removed and got excited that I'd stumbled upon such an old QR code...then my tired brain wondered what kind of archaic technology they used to scan it when everyone lacked the supercomputer cameras that we all have in our pockets these days...then I felt kinda silly when I came to the realization that it was likely just a recently remanufactured ECU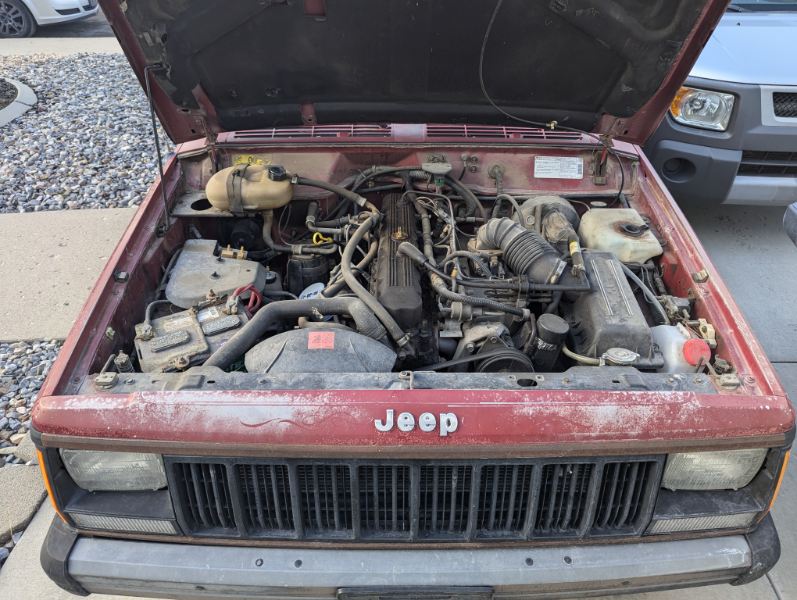
-
Project Morris: The 89 to 99 Comanche Long Bed
RuBacon replied to RuBacon's topic in Member Projects: Your Comanches
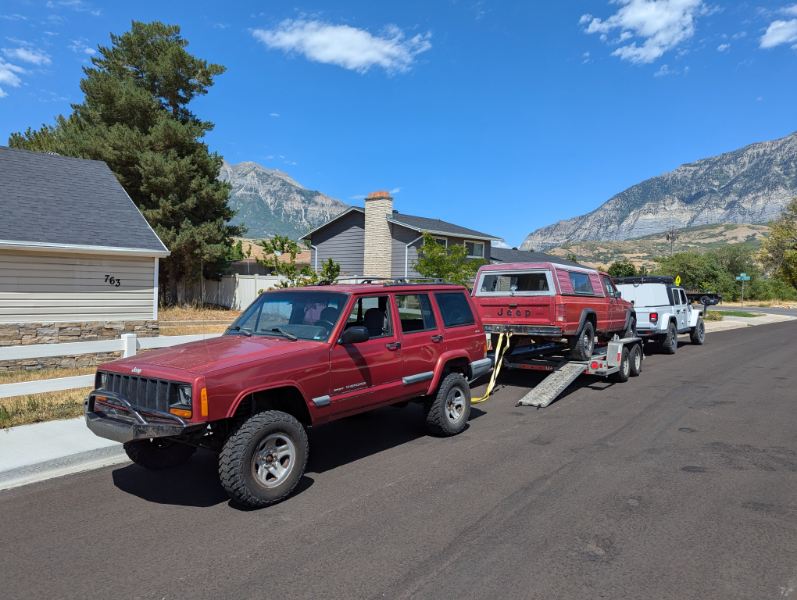
Thanks for all the interest and words of encouragement! Now that I've had a chance to start working on the Comanche a bit, I'm getting even more excited to make some progress. I appreciate the tip! I've been looking through your conversion for ideas, I really like how you managed the fuel tank situation! I'm having similar thoughts at this point that cutting out the entire firewall may have just been better, but I went through the donor XJ and cut out a bunch of random parts I thought might be useful to transfer over to the Comanche and ended up with this pile just for the interior and doors: I can see how it was probably some small-town teenager's favorite first mod, but it definitely won't be making the list of parts to be reinstalled...nor will the bailing wire exhaust hangers: I definitely count myself lucky to have a wife that doesn't just allow a driveway full of Jeeps, but actually helps locate, repair, and enjoy said Jeep projects...the happy times continue!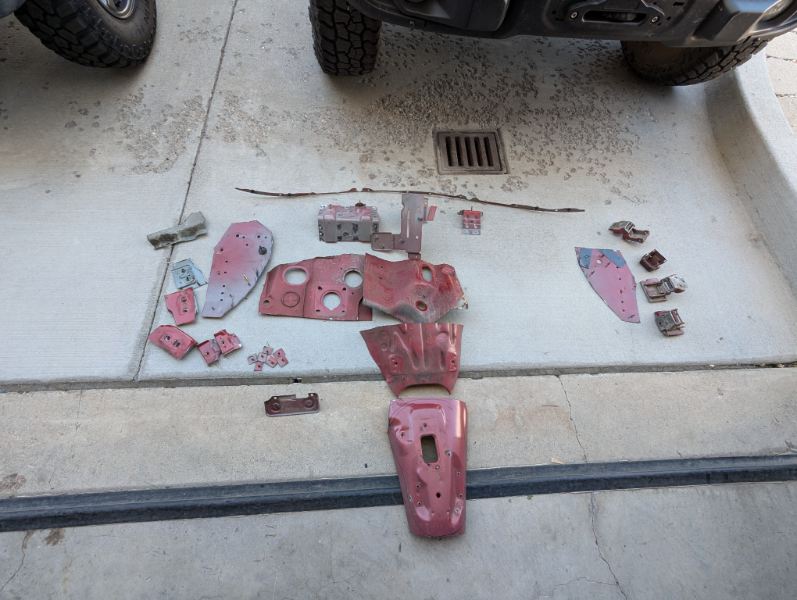

-
Thanks for taking the time to post that! It's fun knowing we've brought it back so close to its original selling dealer's location.
-
Project Morris: The 89 to 99 Comanche Long Bed
RuBacon replied to RuBacon's topic in Member Projects: Your Comanches
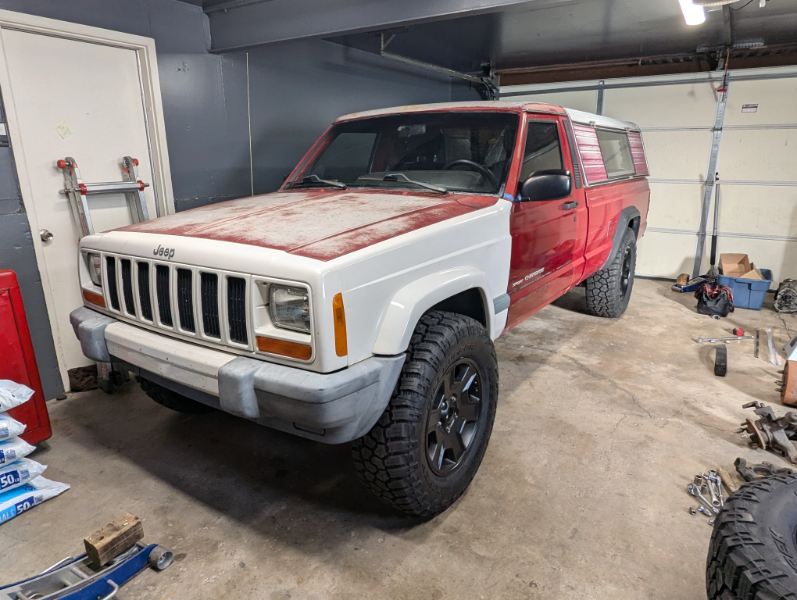
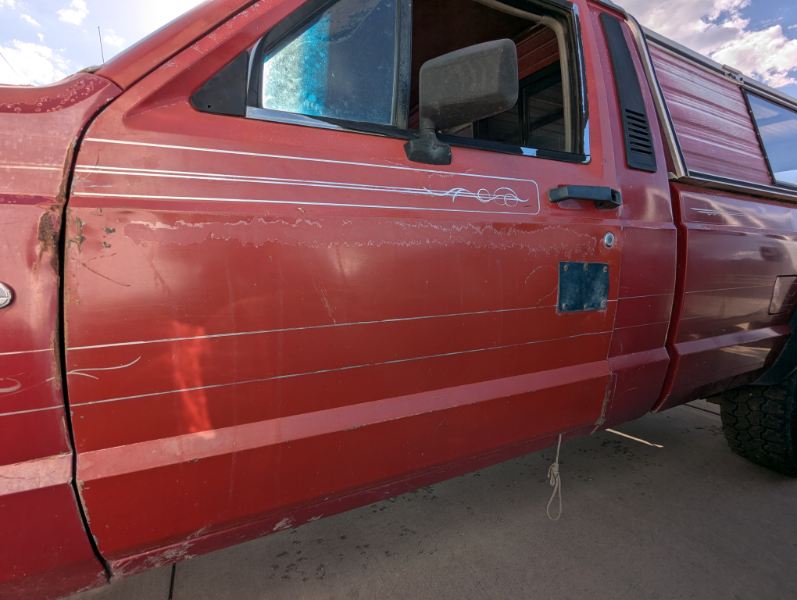
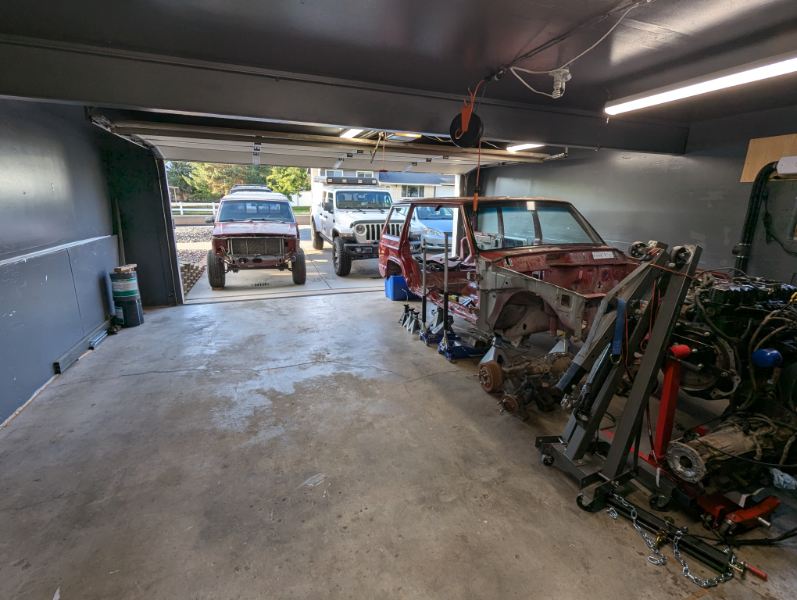
While I would very much like to have a mostly original, reasonably restored Comanche in the collection...this is not that truck. We winched this red, 2wd, broken BA10, wasp nest of a Jeep out of a field in Northern Utah on a hot, August morning. The interior is really rough and smells like a cattle farm, but the Jeep is almost entirely stock and remarkably complete, with the exception of an obligatory cherry bomb muffler and a head unit that was wired externally across the dash to a single speaker in the driver's door... Oh yeah, and the driver's door only opens when you pull down on a rope that was routed through a hole drilled in the bottom of it: I do like the original styling of the Comanche and early Cherokees, but I have a bit of a soft spot for the 97+ model years since my very first Jeep was a 2001 XJ. That was also the vehicle I was driving when I first met my wife, so this Comanche will be a bit of a tribute to those happy times. We found a 99 XJ to use as a parts donor for the swap. It had been t-boned and while being sold as a "clean title" vehicle, it was very clear it should've been totaled and off the road. We got it for a great deal, got all the parts we needed for our swap (except a passenger door), and we were able to sell off a handful of parts to recoup some money and help our fellow Jeepers with their projects! Things started moving along slowly, but before I knew it, most of the parts were stripped, the engine and transmission were out, and then we only had the shell of an XJ remaining: For future reference, an XJ rear hatch fits perfectly in the back of a Honda Element for delivery to its new home! What remained of the XJ was then pushed to the side to make room for the MJ to start it's disassembly process!

-
Project Arvin: The 89 Comanche Short Bed
RuBacon replied to RuBacon's topic in Member Projects: Your Comanches
It's always a bummer to see a build post come to a silent end, so here's a quick summary to tie things up nicely. After enjoying countless hours in the garage working on this Comanche and reading through all the helpful posts here on Comanche Club, I knew I'd want one again...but the current timing just wasn't right. I was happy with the efforts I'd put into improving this Jeep and doing my small part to help keep it on the road, so I set out to find a new home for it. I had to dig a bit, but I found one of the last photos I took of the Comanche before it pulled out of the garage for the final time: A couple years passed and my available schedule and space finally lined up to try again. While I would have happily taken any paint color, another red Comanche just happened to pop up for sale. It was sitting in a field, it was 2 wheel drive, filled with spiders and wasps, and it had a BA10 that had given up on transmitting power to the rear wheels...perfect. Here's the story of Project Morris.
-
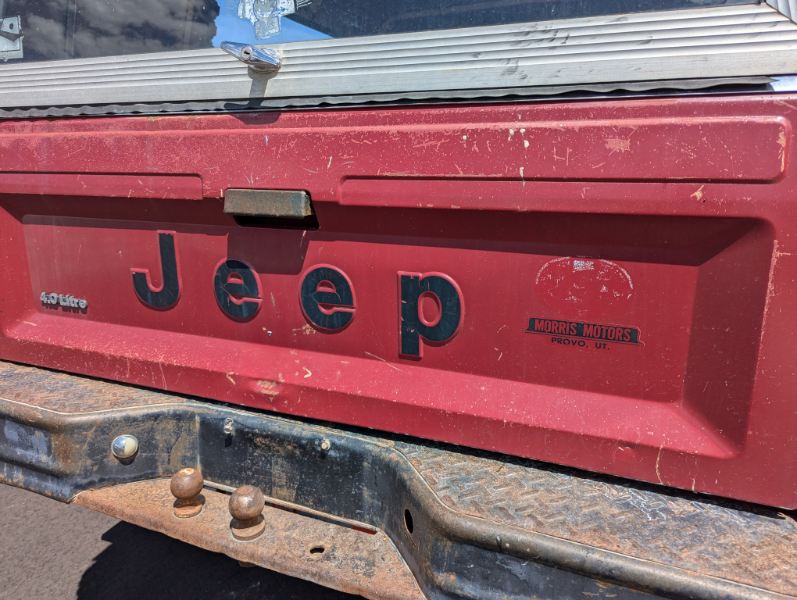
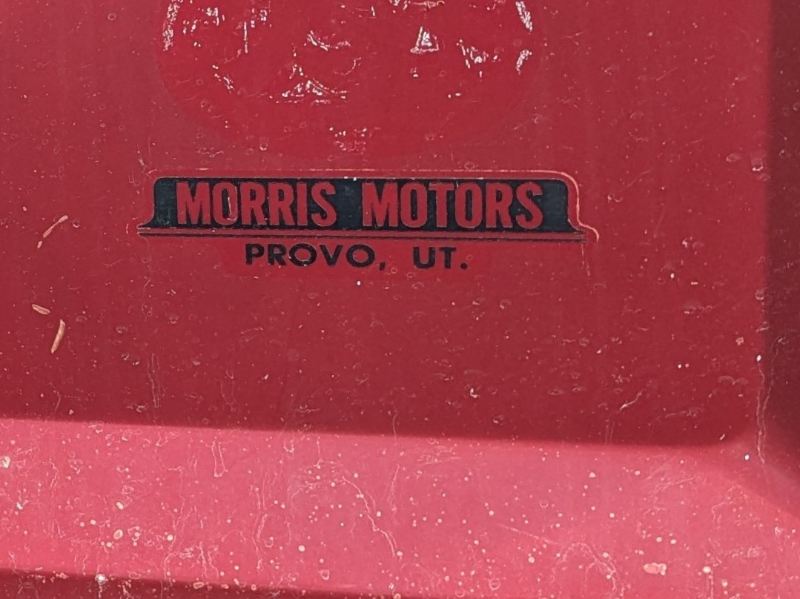
Looked through 4 pages of dealer badges and was getting excited to add a new one to the collection...only to get to page 5 and see this one had been posted a few months back. I figured I'd boost the collection anyway! We started the 250 mile round trip to bring it home, not realizing we were bringing it back to within a few miles of what I'm guessing to be its original sales point. I remember the dealership from living in the area when I was younger, but it hasn't been there for years.
-
Thank you kindly! We're only a mile from Provo and luckily have a blue XJ in the garage to keep the rivalry balanced.
-
More to come...