


cruiser54
-
Posts
9413 -
Joined
-
Last visited
-
Days Won
14
Content Type
Profiles
Forums
Gallery
Everything posted by cruiser54
-
When the CPS bypass was done at the dealership, it specifically stated in the instructions to fold those old and unused wires back and tape them. Rarely happened......
-
Do it. Open system. Napa NR2802 radiator. Has provision for temp switch. Don't worry about springs in hoses. They were there so the cooling system could be filled using a vacuum at the factory. You guys with 20 year old radiators and running 260* need to replace them.
-
Do the CPS mod if you want a little more pep from the 2.5.
-
Be sure of your diagnosis. Poke around some more. And, AMMCO has a free diagnosis which always leads to a very expensive overhaul...... Look at motor mounts, trans mount, exhaust system routing and possibility of contact with stuff.
-
I only had to pay once. That was for the listing on my camo Comanche, which is still for sale there.
-
Have you tested the CPS output? CRUISER'S MOSTLY RENIX TIPS RENIX CPS TESTING AND ADJUSTING OCTOBER 30, 2015 SALAD 92 COMMENTS Renix CPSs have to put out a strong enough signal to the ECU so that it will provide spark. Most tests for the CPS suggest checking it for an ohms value. This is unreliable and can cause some wasted time and aggravation in your diagnosis of a no-start issue as the CPS will test good when in fact it is bad. The problem with the ohms test is you can have the correct amount of resistance through the CPS but it isn’t generating enough voltage to trigger the ECU to provide spark. Unplug the harness connector from the CPS. Using your voltmeter set on AC volts and probing both wires in the connector going to the CPS itself as shown in Figure 2 as Connector A, crank the engine over. It won’t start with the CPS disconnected. You should get a reading of .5 AC volts. If you are down in the .35 AC volts range or lower on your meter reading, you can have intermittent crank/no-start conditions from your Renix Jeep. Some NEW CPSs (from the big box parts stores) have registered only .2 AC volts while reading the proper resistance!! That’s a definite no-start condition. Best to buy your CPS from NAPA or the dealer. Sometimes on a manual transmission equipped Renix Jeep there is an accumulation of debris on the tip of the CPS. It’s worn off clutch material and since the CPS is a magnet, the metal sticks to the tip of the CPS causing a reduced voltage signal. You MAY get by with cleaning the tip of the CPS off. A little trick for increasing the output of your CPS is to drill out the upper mounting hole to 3/8″ from the stock 5/16″, or slot it so the CPS bracket rests on the bell housing when pushed down. Then, when mounting it, hold the CPS down as close to the flywheel as you can while tightening the bolts. Another little tip to save tons of aggravation is to stick a bit of electrical tape to your 11mm socket and then shove the bolt in after it. This reduces the chances of dropping that special bolt into the bell housing.
-
I ended up using a one piece Wrangler cable. 53005084
-

UPDATE: NTK O2 sensor 23553 (RENIX)
cruiser54 replied to fiatslug87's topic in MJ Tech: Modification and Repairs
.jpg.e020d1fbc0aa5d411a29419b04ea3df1.jpg)
.jpg.d7f3faa457b4a118ab4e86990336e344.jpg)
.jpg.2868154f5b4c38f545e83bd72ad8da4f.jpg)
.jpg.ad54b45059deb0f7ba25a520f6a74698.jpg)
.jpg.bdd19e16f1343a2aace6c98e90cc70c6.jpg)
.jpg.d63e51da18bea6ed895199f3bcd90771.jpg)
.jpg.79aa793a9be36bc1f9397d5631740b46.jpg)
-
Mohave green

-
part no Ford oil filter adapter
cruiser54 replied to omega_rugal's topic in MJ Tech: Modification and Repairs
Yes. -
camshaft position sensor
cruiser54 replied to omega_rugal's topic in MJ Tech: Modification and Repairs
FWIW, the only time we replaced the sync generator at the dealership was when we noticed it working intermittently or not at all, while viewing real time sensor outputs with the factory tool. It was never the cause of any running issues. Biggest cause of failure was oil coming up the dizzy shaft and leaking on to the sensor and out of the distributor. -
part no Ford oil filter adapter
cruiser54 replied to omega_rugal's topic in MJ Tech: Modification and Repairs
CRUISER'S MOSTLY RENIX TIPS RENIX OIL FILTER TO SAE FILTER JANUARY 3, 2016 CRUISER54 9 COMMENTS Tired of having a poor selection of oil filters for your Renix Jeep? Limited availabilty a pain for you? 20mm threads? We don’t need mumblemeter threads on our oil filters. Here’s a simple mod that allows you to use the very popular SAE threaded oil filters which are more readily available. The old standard 3/4″ SAE thread. You can purchase a new oil filter nipple from the dealer for under $10 and never be bothered again. Part number 53007563AB. It’s the one on the left. Or, grab one off a 91 and later XJ at the junkyard. Be forewarned though. You need a 7/8 wrench to remove a Renix nipple, but a 15/16 wrench for the later style. And just in case you need to replace your oil filter adapter o-rings, here’s a handy guide. Oil Filter Adapter O-Ring Sizes 87-90 Renix Model O-rings 0.799 x 0.103 AS568 size -117 1.296 x 0.139 AS568 size -219 2.484 x 0.139 AS568 size –230 Dealer Part Numbers for Renix. Sold individually: 33002970, 33002971, 33002972 Renix kit from Crown Automotive-33002970K 91-01 HO Model Orings 0.676 x 0.070 AS568 size -017 0.859 x 0.139 AS568 size -212 2.484 x 0.139 AS568 size -230 -
Another thing to look at when handling the pumps is the spade connectors must be tight and not "wiggly".
-
Sounds like ya got it figgered out. Got a fire extinguisher standing by?
-
HO exhaust manifold on a Renix
cruiser54 replied to JMO413's topic in MJ Tech: Modification and Repairs
-
No. I really don't. I hate the Phoenix area and I feel your pain.
-
Why not try the local folks?
-
Exhaust manifold bolts
cruiser54 replied to 88whitemanche's topic in MJ Tech: Modification and Repairs
They loosened up on both engines. Just more prevalent on the 4 cylinder since there were fewer to loosen before issues began. I have never "torqued" those bolts on any of them. Never had an issue. Just relied on experience. Using an extension screws up/lowers the torque. Can't get a socket on all of them anyway....... The 4.0s at the dealer? 30,000 mile tune up? Part of it was to snug those bolts as they were backing out. -
Exhaust manifold bolts
cruiser54 replied to 88whitemanche's topic in MJ Tech: Modification and Repairs
I think the factory torque spec was too low. Another vote for thread locker here..... What is the torque BTW? -
Dome Light Flip Fixtures 1991 Comanche
cruiser54 replied to Lil' Nize's topic in MJ Tech: Modification and Repairs
And you'll actually be able to see!!!! -
Rough Idle and Running Rich, '90 4.0
cruiser54 replied to mrmel2you's topic in MJ Tech: Modification and Repairs
Glad you found it. Ever see this? CRUISER'S MOSTLY RENIX TIPS THROTTLE BODY TO MAP SENSOR HOSE FIX JANUARY 23, 2016 CRUISER54 29 COMMENTS The Renix throttle bodies have a strange and failure prone connector on the side where the MAP supply originates and then runs up to the MAP sensor located on the firewall. This hose/pipe assembly is no longer available for purchase. The real kicker here is how critical this line is in supplying the correct vacuum signal to the MAP, the most relied upon sensor for the ECU to read regarding air/fuel ratio. Any cracks, melted spots, or loose rubber connectors can cause major starting and driveability issues. There’s a simple fix though. All that’s required is a 1/8” NPT tap, a new throttle body gasket ( Napa FPG 60742 ), a vacuum fitting (Napa 05703-B102), two vacuum elbows (Napa2-670), and a length of new plastic piping (Napa 2-672). Remove the throttle body and take it to the workbench. Using an oiled tap along with a driver, carefully thread the lower of the 2 holes of the throttle body where the old fitting was plugged in. Don’t go too deep. These are pipe threads. Flush the hole with carb cleaner and inspect for any left over cuttings. This is an excellent time to do a complete throttle body and IAC cleaning. See Tip 11. Take the vacuum fitting (05703-B102 ) and apply a LITTLE bit of thread sealer on the threads only. I prefer Permatex #2 but almost anything is fine. . Carefully screw the fitting in until snug. Install one of the vacuum elbows on the MAP sensor so it points toward the throttle body, and the other vacuum elbow on your new throttle body fitting so it points up to the MAP sensor. Cut a length of the new plastic tubing (approximately 13 inches) to fit between the vacuum elbows and install it making sure there is enough slack for some engine movement. Route it according to the photo. We don’t want any rubbing or chafing with engine movement. Not a bad idea to use some contact cement or Gasga-Cinch sparingly on the tubing to elbow connectors. Revised 2-06-2016 -
WJ versus 95 to 96 XJ booster Actually, the WJ booster is in some ways easier than the 95 to 96 XJ. I've done both. XJ, you don't have to mess with the firewall. No big deal anyway. But, you have to move the washer reservoir. And, once the original booster comes out, the bracket inside the cab moves and makes it a bear to install the new booster. WJ you have to bend or cut the firewall lip, but don't move the washer bottle. As an added bonus, the mounting studs of the WJ booster are a bit smaller and it's easier to get in. Another bonus with the WJ is that it has FLEXIBLE lines from the master cylinder that make putting things together MUCH easier. And, WJ boosters are newer and easier to find…..
-
Speedometer cable housing (cover)
cruiser54 replied to Manche757's topic in MJ Tech: Modification and Repairs
I used a one piece cable, kinda long, from an early Wrangler. 53005084 from Crown maybe? -
Rough Idle and Running Rich, '90 4.0
cruiser54 replied to mrmel2you's topic in MJ Tech: Modification and Repairs
Most likely the line from the throttle body to MAP sensor on the firewall is messed up. If it leaks, the ECU richens the mixture big time.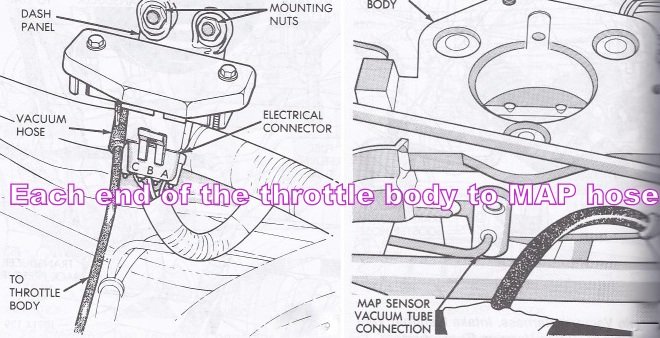
-
HO exhaust manifold on a Renix
cruiser54 replied to JMO413's topic in MJ Tech: Modification and Repairs
And they said it couldn't be done...........LOL Nice write-up!!!
