


cruiser54
-
Posts
9413 -
Joined
-
Last visited
-
Days Won
14
Content Type
Profiles
Forums
Gallery
Everything posted by cruiser54
-
Is it downshifting? There's a few things to do just cuz. I don't think you're gonna find a silver bullet cure. Of my Tips, which ones have you completed?
-
-
CRUISER'S MOSTLY RENIX TIPS REAR MAIN SEAL DIAGNOSIS OCTOBER 31, 2015 SALAD 2 COMMENTS I’d be looking up ABOVE first, and VERIFYING the source of the oil leak YOURSELF. Everybody, who doesn’t own or have to pay for or perform your vehicle repairs, loves to poke their noggin UNDER the Jeep and come out bearing the false bad news that your RMS is leaking. Many mechanics, friends, and good old Uncle Bob seem to enjoy telling you it’s the rear main seal. Has a catastrophic ring to it, doesn’t it? A simple leak at the back of the valve cover or other source could produce the same symptoms. You don’t need to be a mechanic to figure this out. If you have good eyesight and a dim flashlight, you’re good to go on your own. Don’t jump on the RMS/oil pan gasket bandwagon right off the bat. Almost any oil leak on your 4.0 is gonna drip from the RMS area for two simple reasons: First off, the engine sits nose-up and any oil will run back to the RMS area. Secondly, the RMS area is also the lowest point on the engine. Simple physics and the old plumber’s adage apply here: “Crap flows downhill”. Valve cover gasket, oil pressure sending unit, oil filter adapter seals and distributor gasket, in that order, have to be eliminated as possibilities first. A little tip here. Rather than use a dizzy gasket, use an o ring instead. NAPA #727-2024. Tips 12 and 13 will help you get your distributor back in place correctly.
-

Replacing Brake Distribution block
cruiser54 replied to dinghyboy's topic in MJ Tech: Modification and Repairs
You guys who live in the rust belts need to use something better than PB Blaster. That stuff stinks.. Literally and figuratively. Try CRC Freeze-Off. -
Nah.

-
Tranny is totally different.
-


-
-
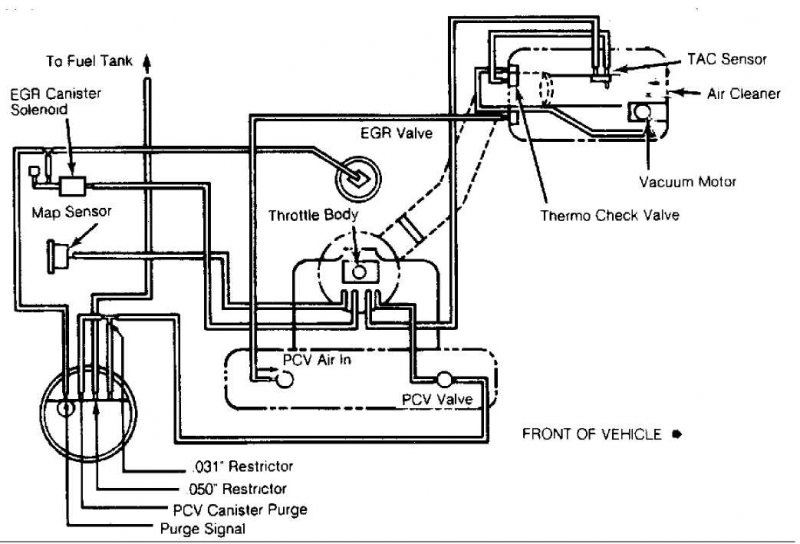
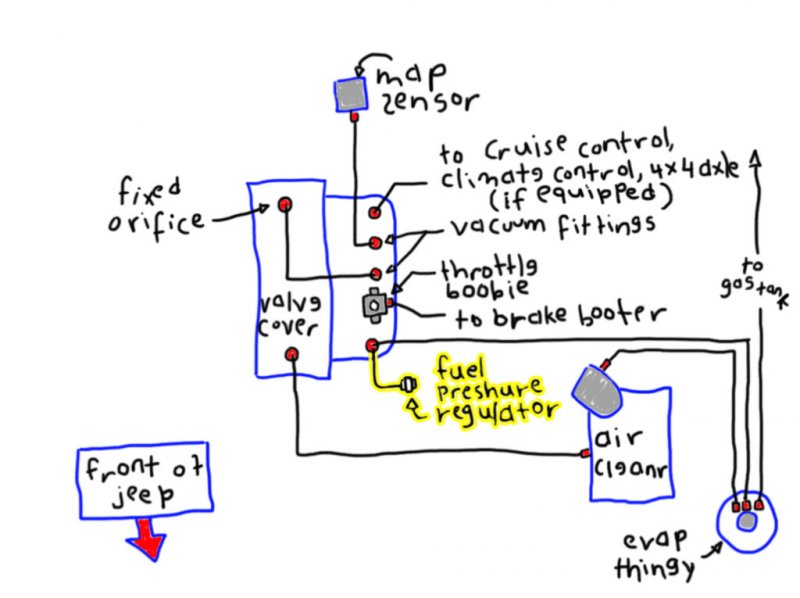
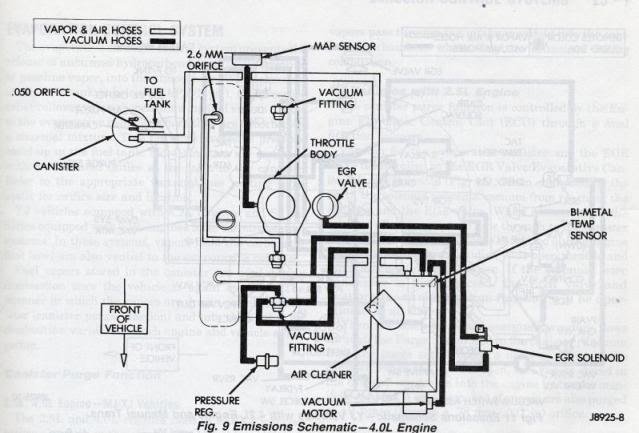
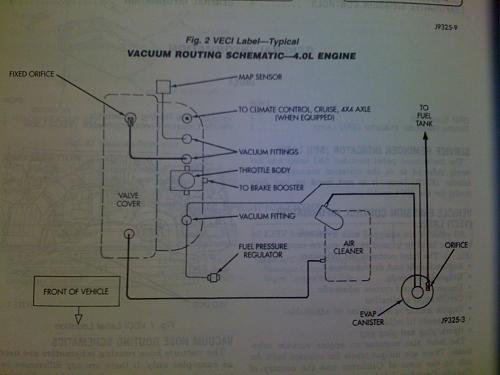
Just for reference.... CRUISER'S MOSTLY RENIX TIPS THROTTLE BODY TO MAP SENSOR HOSE FIX JANUARY 23, 2016 CRUISER54 29 COMMENTS EDIT The Renix throttle bodies have a strange and failure prone connector on the side where the MAP supply originates and then runs up to the MAP sensor located on the firewall. This hose/pipe assembly is no longer available for purchase. The real kicker here is how critical this line is in supplying the correct vacuum signal to the MAP, the most relied upon sensor for the ECU to read regarding air/fuel ratio. Any cracks, melted spots, or loose rubber connectors can cause major starting and driveability issues. There’s a simple fix though. All that’s required is a 1/8” NPT tap, a new throttle body gasket ( Napa FPG 60742 ), a vacuum fitting (Napa 05703-B102), two vacuum elbows (Napa2-670), and a length of new plastic piping (Napa 2-672). Remove the throttle body and take it to the workbench. Using an oiled tap along with a driver, carefully thread the lower of the 2 holes of the throttle body where the old fitting was plugged in. Don’t go too deep. These are pipe threads. Flush the hole with carb cleaner and inspect for any left over cuttings. This is an excellent time to do a complete throttle body and IAC cleaning. See Tip 11. Take the vacuum fitting (05703-B102 ) and apply a LITTLE bit of thread sealer on the threads only. I prefer Permatex #2 but almost anything is fine. . Carefully screw the fitting in until snug. Install one of the vacuum elbows on the MAP sensor so it points toward the throttle body, and the other vacuum elbow on your new throttle body fitting so it points up to the MAP sensor. Cut a length of the new plastic tubing (approximately 13 inches) to fit between the vacuum elbows and install it making sure there is enough slack for some engine movement. Route it according to the photo. We don’t want any rubbing or chafing with engine movement. Not a bad idea to use some contact cement or Gasga-Cinch sparingly on the tubing to elbow connectors.
-
Replacing Brake Distribution block
cruiser54 replied to dinghyboy's topic in MJ Tech: Modification and Repairs
Yeah, but you have an unfair advantage!!! You live in Arizona............. -
That's cuz I bought 4!!! I have 2 MJs. I'm gonna sell my camo one. decided that yesterday.
-
I got some from schardein with LED bulbs. Painted em up and install was a breeze.
-
Yep. I've done it and it works fine. I used the Moroso, but I think the plastic ones might be okay. Ditch the heater control valve and use 97 and later XJ heater hoses.
-
HIGH ALTITUDE renix CPS, do they exist anymore?
cruiser54 replied to CheapXJ's topic in MJ Tech: Modification and Repairs
You get more advance modding the stock CPS yourself, CRUISER'S MOSTLY RENIX TIPS RENIX CPS ADVANCE MOD NOVEMBER 17, 2015 SALAD 25 COMMENTS EDIT The sensor portion of the CPS needs to slide up the perforated bar towards the top of the engine. Mark the perforated bar’s top end with paint or marker. Place the CPS in a vice, just not quite clamping the bar, the sensor resting on the vice jaws, with the Top part protruding. Place a bolt that fits tightly into the hole at the Top part of the bar. With a hammer, tap the Top part of the bar and it will slide through the sensor portion of the CPS. Stop when the sensor portion is about 3/8″ from the edge of the bolt hole. -
HIGH ALTITUDE renix CPS, do they exist anymore?
cruiser54 replied to CheapXJ's topic in MJ Tech: Modification and Repairs
You can also search for a PC307. The patch harness came out way before 1993. On a Renix, if you bypass the C101, you've done pretty much what needs done. CRUISER'S MOSTLY RENIX TIPS RENIX CPS TESTING AND ADJUSTING OCTOBER 30, 2015 SALAD 88 COMMENTS EDIT Renix CPSs have to put out a strong enough signal to the ECU so that it will provide spark. Most tests for the CPS suggest checking it for an ohms value. This is unreliable and can cause some wasted time and aggravation in your diagnosis of a no-start issue as the CPS will test good when in fact it is bad. The problem with the ohms test is you can have the correct amount of resistance through the CPS but it isn’t generating enough voltage to trigger the ECU to provide spark. Unplug the harness connector from the CPS. Using your voltmeter set on AC volts and probing both wires in the connector going to the CPS itself as shown in Figure 2 as Connector A, crank the engine over. It won’t start with the CPS disconnected. You should get a reading of .5 AC volts. If you are down in the .35 AC volts range or lower on your meter reading, you can have intermittent crank/no-start conditions from your Renix Jeep. Some NEW CPSs (from the big box parts stores) have registered only .2 AC volts while reading the proper resistance!! That’s a definite no-start condition. Best to buy your CPS from NAPA or the dealer. Sometimes on a manual transmission equipped Renix Jeep there is an accumulation of debris on the tip of the CPS. It’s worn off clutch material and since the CPS is a magnet, the metal sticks to the tip of the CPS causing a reduced voltage signal. You MAY get by with cleaning the tip of the CPS off. A little trick for increasing the output of your CPS is to drill out the upper mounting hole to 3/8″ from the stock 5/16″, or slot it so the CPS bracket rests on the bell housing when pushed down. Then, when mounting it, hold the CPS down as close to the flywheel as you can while tightening the bolts. Another little tip to save tons of aggravation is to stick a bit of electrical tape to your 11mm socket and then shove the bolt in after it. This reduces the chances of dropping that special bolt into the bell housing. -
Inspect the connector featured in this write up also. CRUISER'S MOSTLY RENIX TIPS CONNECTOR AND RELAY/RECEPTACLE REFRESHING OCTOBER 30, 2015 SALAD 12 COMMENTS EDIT I suggest unplugging EVERY electrical connection in the engine bay you can find, whether engine related or not, and spraying it out with a good electronics cleaner, visually inspecting the terminals making sure they haven’t retracted into the plastic holder, and then plugging it back together. There’s a critical 10-pin connector for the front lighting system located in front of the air cleaner and behind the left headlight assembly. Don’t miss that one. Also be sure that the connectors to the ballast resistor mounted near the air cleaner housing are clean and tight. ALL of the relays should be removed, the terminals wire-brushed until shiny, and the receptacles sprayed out with contact cleaner. Then plug them back in. I do this on every Renix Jeep I purchase or work on for someone else. Revised 1-31-2016
-
-
Here ya go....
-
Heat is controlled by a lever. Look up under the passenger side dash and slide the control lever.
-
Genius had its limits, but stupidity knows no bounds................
-
Simple Injector Troubleshooting
cruiser54 replied to coolwind57's topic in MJ Tech: Modification and Repairs
Double check the integrity of the MAP sensor to throttle body vacuum line and fittings. -
The original poster is long gone. I wonder what happened.....
-
Unicorn Comanche Mods and/or Repairs?
cruiser54 replied to SoCalManche's topic in MJ Tech: Modification and Repairs
Temp SENDER is on the head and is for the dash gauge. Temp SENSOR is in the cooling system for the engine computer. If you can hold your hand on the upper radiator hose with the engine at operating temp for longer than 5 seconds, the engine is not reaching operating temp. Check to see if your intake manifold bolts are loosened up. Check the integrity of the vacuum tube from the intake to the MAP sensor. Refresh the braided cable ground at the firewall. This includes removing, cleaning, scraping til shiny!! Have a peek at the vacuum hoses under the throttle body. VERY prone to failure. Clean the c101 connector. And, the 86 is not a unicorn. The same fuel injection system was used on the 4 cylinders for years after 1986 Almost every critical signal between the engine sensors, injectors, ECU, and some to the TCU, travel this path through the C101 connector. That said, the cleaning described below is a real MUST DO right off the bat for any new-to-you Jeep. But, I strongly advocate eliminating the C101 at some point by following the procedure with photos and video in Tip 27. Soldering skills are required and it takes about an hour and a half. The C101 connector is located on the driver’s side firewall above and behind the brake booster. It is held together with a single bolt in it’s center. To get the connectors apart, simply remove the ¼” bolt and pull the halves apart. You will find the connector is packed with a black tar-like substance which has hardened over time. Take a pocket screwdriver or the like and scrape out all the tar crap you can. Follow up by spraying out both connector halves with brake cleaner and then swabbing out the remainder of the tar. Repeat this procedure until the tar is totally removed. This may require 3 or more repetitions. Wipe out the connectors after spraying with a soft cloth. If you have a small pick or dental tool, tweak the female connectors on the one side so they grab the pins on the opposite side a bit tighter before bolting both halves back together. If you wish to eliminate this connector entirely (highly recommended), see Tip #27 – C101 Elimination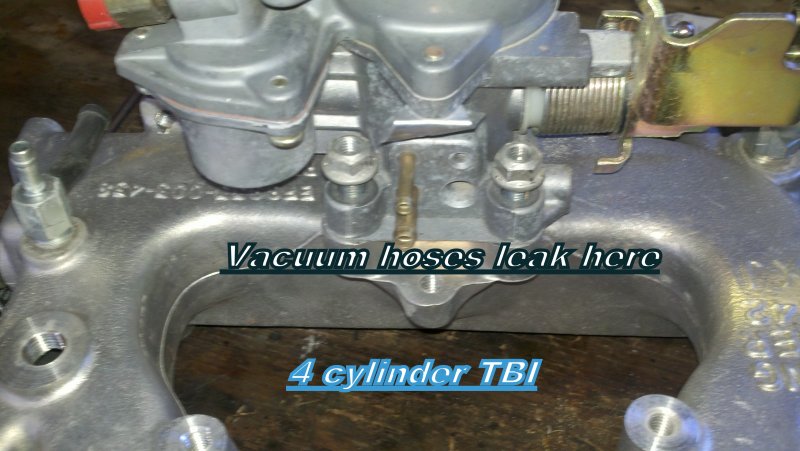
-
wiper arm issues, dang plastic
cruiser54 replied to Submariner's topic in MJ Tech: Modification and Repairs
And while you have the wiper assembly out, take the motor apart. Clean out the dried and hard lube in there. Use a Moly grease inside. Find the ground wire and add another wire to it and run that over under the Torx bolt that holds the pivots in. -
Smoke Coming Out of Defrost Vents
cruiser54 replied to Dzimm's topic in MJ Tech: Modification and Repairs
Good to hear you found it. did the harness then?