

yxmj
-
Posts
1456 -
Joined
-
Last visited
-
Days Won
3
Content Type
Profiles
Forums
Gallery
Everything posted by yxmj
-
Renix or HO, that's the question... Advice needed
yxmj replied to knever3's topic in MJ Tech: Modification and Repairs
I have both right now, for quite some time...IMHO the Renis is a great piece of engineering.......if you leave it alone....it does not take to mods......if you want to mod and put on improvements, to get max out of the 242 platform....start with a HO as your base. That being said I have a stone stock low mile 88 XJ Laredo that will snap your head back when you put your foot into it...... -
No most the hardware is inside There is a cotter pin that connects the plunger to the pedal shaft. then the top bolt and nut....the bottom is the only part you get from the engine bay that nut is just on a stud
-
Vacuum has nothing to do with the operation of the t-case.....the t-case switch is activated when you engage the 4wd and that causes a vacuum that engages your CAD
-
If yo have shrink tubing you can go over top of both then heat it to shrink and good to go
-
He is probably referring to an AX5 or 15......They were both made in Japan and available in some Toyota products.....He just does not realize that the use in Jeeps are what made them famous! Here is some info http://www.jalopyjournal.com/forum/threads/ax15-transmission-anyone-using-one-thoughts.566719/ The Jeep/Dodge AX15 5-speed, the Jeep NV3550 5-speed, the Jeep NV1500, the Toyota R150F, R151F & R155F, the 87-92 Toyota Supra Turbo R154, the Isuzu AR5 and the Pontiac Solstice\Saturn Sky\Chevy Colorado\ GMC Canyon MA5 5-speeds all share the same case to bellhousing bolt pattern (Large Pattern). As such there are a number of possibilities that can be had when a 5-speed is desired: http://en.wikipedia.org/wiki/List_of_Aisin_transmissions
-
With most of mine I did the grind drill replace procedure outlined above....I have a welder so tacking the head of the bolt was always easy. One Sunday I was replacing a set on my daughters XJ and found myself in the situation where I was out of mig wire .....so I came up with this solution that worked great.... I had some 1/4" carriage head bolts (with washers and nuts) After I ground the old ones flat......I drilled the holes out with a 3/16" bit......Then I took a chunk of 1/4" keystock Sharpen the end a bit with the grinder.....Then used it as a punch to punch out the holes to 1/4 square.....removed the burr with the grinder....now the square shoulder of the carriage bolt fits right in......make the holes tight so that you have to tap the bolts in ....now you can re-assemble and re-tighten like the are factory :thumbsup:
-
:hmm: :hmm: :hmm: ......You Just Did....... :dunno:
-
Check the Rockman site and catalogue....they list the R22SE as a Rochester 2 bl carb used on both the S10 2.8 as well as the MJ 2.8 pull the carb and use the gasket as a template to you collection of carbs....one might match...... :thumbsup: Right after I typed this...I thought of something....I had an 85 XJ wagoneer......I am positive it had a ford carb on the 2.8........ :dunno:
-
I used these...grease-able and robust....I like them
-
Ha.....i just watched the first one and the teaser for the second......that guy rock'en the mullet better buckle up......or start wearing a helmet... :doh:
-
Like any Jeep......crawl under it...look for rust or repairs Even if the floor pans look good from underneath see if you can lift the mat or carpet and have a look at them on the inside. You don't list mileage ...... so I would say $1000 top end ( that would be based on an on site inspection and me wanting it bad)
-
If it is external you would have something like this My guess is your is internal
-
Quick question about no heat
yxmj replied to Randy in Maine's topic in MJ Tech: Modification and Repairs
By-pass it and you will be sure that it is out of the equation. (search this site there are a couple of threads including mine on how to do it) Before you take it apart go to the store and get a gallon of vinegar. When you take the hoses off slip them back on in such a way that allows you to fill your heater core totally with vinegar. Let it sit for 10-15 min then flush it with you garden hose (hot water if possible)...repeat 2 or 3 times. now reconnect the hoses by-passing the valve.....heat so good you can weld the holes in your floor pans with it..... :thumbsup: -
Remote starter install on 2001 XJ How Hard is it?
yxmj replied to sinkrun's topic in MJ Tech: Modification and Repairs
I know where to find each of those except for the "Rob". Where do you find that? Lol Pulling or splicing that "ROB" wire......might be a job most would not want to undertake :no: -
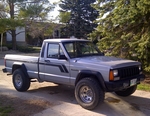
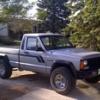
This one seems to have the factory step to allow easy access to the rear seat......which is missing on the first........If I was to guess i would say it (the black patch) is a rock/gravel guard to protect the paint on the front side of the flare from debris stirred up from the front wheel :dunno:
-
X3 :thumbsup:
-
cherokee floor pans in a comanche.
yxmj replied to badazzelanore's topic in MJ Tech: Modification and Repairs
Hard to answer ......not knowing your skill set. After the old pan is cut out it usually takes 3 or 4 "Test fits" with fab in-between to get to the stage when you are happy. :thumbsup: -
cherokee floor pans in a comanche.
yxmj replied to badazzelanore's topic in MJ Tech: Modification and Repairs
From my experience all aftermarket pans need a little "massaging " to get them to fit. I have never gotten an XJ pan that was a direct drop in. Keep in mind you have a 27 year old floor...it has been stretched twisted an banged around. But on the other hand If patching is out of the question and a whole new pan is the answer, I always found it easier to start with a set of pre-fabed and alter them rather than forming my own from scratch. ( I can get them from $50 :Canadaflag: sent right to my door step..I think that is a good deal) -
I sent mine in :Canadaflag: $$ so i hope the exchange is Good! Thanks. :thumbsup:
-
i changed them yesterday mornin, easier than what i thought, but my broken CV axle sound is still around but only when i turn now, i'm thinkin it might be time for ball joints or sway bar links, Redwolf Do you even reai have a CV joint? must be hidden very well in my solid axle :dunno: but a broken CV axle is the sound i'm hearin but the thing is, i don't have CV axles, YES IT ALL MAKES SENSE NOW........EXCUSE ME FOR QUESTIONING YOU..... :wall: look, i know i don't have CV axles or joints, i have ball joints and a solid dumby axle, but the noise i am hear is like a broken CV axle, that's why i had mentioned CV axles, Redwolf Orange, a bicycle, because a vest has no sleeves. :thumbsup:
-
Zip tie the plate to the carrier when you have it on......
-
I have fabed a couple of these carriers in the past......you would have to mod it to solve your problems.....with mine I started with a 4" drop hitch turned upside down (so it moved the platform up) then put the carrier on that.....the bike will sit higher but your clearance is good. (and my whole carrier tilts so that you do not need a ramp.....it is roll on roll off) A simple trailer plug/light set mounted on the carrier will keep the blue lights out of your rear view.
-
i changed them yesterday mornin, easier than what i thought, but my broken CV axle sound is still around but only when i turn now, i'm thinkin it might be time for ball joints or sway bar links, Redwolf Do you even reai have a CV joint? must be hidden very well in my solid axle :dunno: but a broken CV axle is the sound i'm hearin but the thing is, i don't have CV axles, YES IT ALL MAKES SENSE NOW........EXCUSE ME FOR QUESTIONING YOU..... :wall: