


Minuit
-
Posts
5139 -
Joined
-
Last visited
-
Days Won
13
Content Type
Profiles
Forums
Gallery
Everything posted by Minuit
-

Factory cruise control info (91+)
Minuit replied to Minuit's topic in MJ Tech: Modification and Repairs
Clarification: I would not suggest the average Jeep owner take their column apart to install a cruise stalk. This isn't the first time I've been inside the Saginaw steering column. I'm quick enough at taking these apart and putting them back together (and I have all of the tools for them) that I thought it'd be easier to do this than to mess around with any other way. This way I could also make definitely sure that the cruise wire goes exactly where it's supposed to - directly below the highbeam actuator. Also, my stalk has a very large connector on it that pretty much made it impossible to fish it down through the column, even when the column was partially disassembled. I had to sand the connector down a little bit to even get it between the column body and the highbeam actuator. Thanks Dorman. Connector inside jeep: Cable: Shiny bracket: Bracket at coolant bottle: -
Factory cruise control info (91+)
Minuit replied to Minuit's topic in MJ Tech: Modification and Repairs
Closure! Here's the stalk I purchased. It's whatever Dorman one the person at the parts store decided to give me. I have no doubt that the writing on it will wear quickly, but OEM is still available once that happens. The wire is exactly the right length to mate with the connector on the jeep (will post a pic of it later) and the stalk fits perfectly into my tilt column. I decided that partially disassembling the column was the easiest way to install it, not having an old one to use as a pulling aid. I don't have proof, but I think any stalk that has this connector will correctly operate the cruise control: The actuator came from a 1995 XJ. It fit perfectly and the connector was correct. Mine was missing the elbow where it connects to the vacuum tee, but I found an exact match in an assortment at the parts store. The actuator mounts to the passenger inner fender. If your vehicle did not come with factory cruise, the locations are marked by three divots in the metal. The factory screws were self-tappers. I believe they are #10 sheet metal screws. I've already drilled two of the three mounting holes in this picture. I don't have a small right-angle drill, so I removed the battery, PDC and coolant bottle to get enough room to run the self-tappers into the three divots. The bracket and cable are removable from the actuator by removing a pair of 10mm nuts from the actuator body. The cable is connected to the actuator with a small metal clip like you might see on a lawnmower or trailer hitch. The bracket must be installed on the actuator before you attach the cable. My bracket looked very crusty, so I removed it to paint. This is my first attempt at doing a base+clear paintjob on a small part like this, and I think it looked excellent. Hopefully it will look good for a long time. Completed installation: The cruise control works right out of the box as soon as you plug the actuator and stalk in (HO only). A very welcome upgrade for long drives, and one more factory option box ticked off.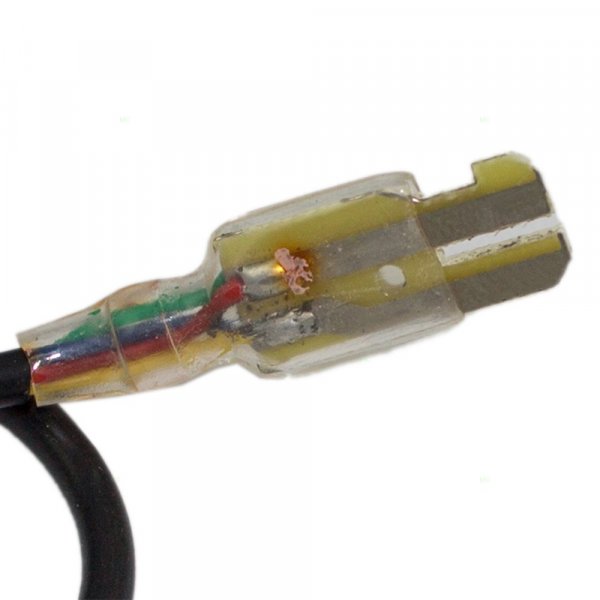
-
Lets see some pictures of your stick shift interiors
Minuit replied to Deleted's topic in MJ Tech: Modification and Repairs
Maybe not something you'd want to use as inspiration, but here it is. -
O2 sensor replacement woes...
Minuit replied to Vineyard86manch's topic in MJ Tech: Modification and Repairs
It probably won't run 100%, and it may not run right at all, but it will run until you can get it out of there. You may shorten the life of the catalytic converter due to improper mixture. I don't know how long I drove my '91 with a stuck O2 sensor before I hooked the MT2500 to it and saw that it wasn't switching. I never noticed that it wasn't running right, but if I remember correctly I took a hit to gas mileage. You'll be ok for a while. -
-
Load sensing proportioning valve. It alters the brake bias depending on the height of the rear. When properly working, it gives you more rear braking when heavily loaded and acts as a primitive form of anti-lock.
-
July 2019 Mid-Atlantic CC PowWow / All-Breeds Jeep Show
Minuit replied to kryptronic's topic in Northeast
One last thing - when you registered for the show did you mention ComancheClub as your club? Not sure if it matters but just thought I'd ask. -
July 2019 Mid-Atlantic CC PowWow / All-Breeds Jeep Show
Minuit replied to kryptronic's topic in Northeast
I will be driving my '91 from Columbia, TN to the show. I plan on staying at least one night but probably both at kryptronic's place. I do intend on entering my truck in the show. Haven't decided if I'm going to make anything to show along with the truck yet. If there is anyone along any of these paths let me know. If possible I'd like to drive up there along with someone just in case.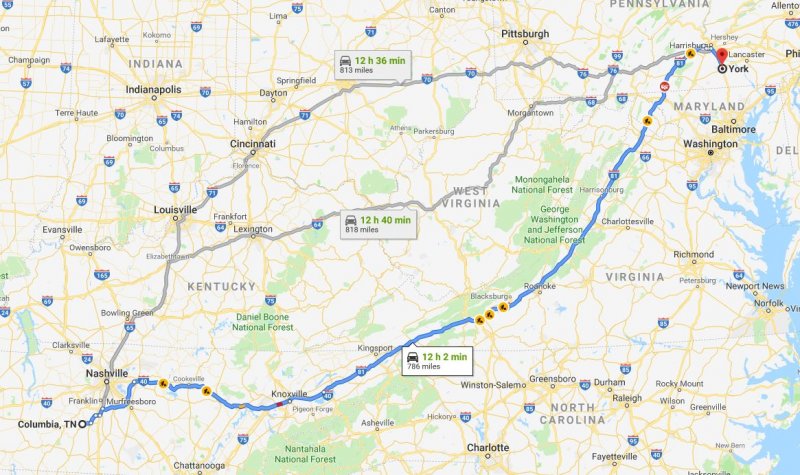
-
Dang, I'm gonna have to do that. And the chrome on the dash bezel on the '89 too.
-
That circuit is drawing excessive current (most likely due to a short to ground in the wiring). Do not bypass the fuse. It is there for your safety and the safety of the truck. You need to fix the problem. For that, you'll need an accurate wiring diagram, a multimeter, and the time to trace through the headlight/parking light circuit. If you don't feel confident doing it yourself, get someone who knows auto electrical to help you. An easy place to start would be at the headlight switch connector. You'll be checking for short circuits to ground on all of the circuits that are protected by the fuse that keeps blowing. I don't have access to wiring diagrams for '87, but there should be someone who can help you with that on here.
-
Yep yep yep yep. A lift will make your truck worse in just about every way except for off-road performance and tire clearance. To get a decent lift you'll be spending a lot of money that's better used elsewhere if you do not do anything with this truck that'd require a lift. For towing and other non-offroad tasks, I'd hardly call adding a lift an upgrade.
-
July 2019 Mid-Atlantic CC PowWow / All-Breeds Jeep Show
Minuit replied to kryptronic's topic in Northeast
Welp, I have officially spoken for Nick's spare D44, which means I have no choice but to come! As we discussed, I will be driving my '91. I currently plan to enter it in the show, but it will not necessarily be in "show ready" condition as I won't have time to prepare it, but come hell or high water I will arrive in my Comanche in York, PA in time for the show. I'm not sure on my arrival time, mainly because I haven't decided whether or not I'll be driving up in one day or not. The answer to that is probably yes. Hopefully I'll be able to add cruise control in time for the show! To those planning to enter their trucks in the show: what materials are you going to bring to display along with the truck? Unless plans change, on the way home I'll be ferrying Pete's Comanche bedliner to TN for him to collect at some point in the future. Looking forward to this. Hope to see all you guys there. -
I'll be acquiring an MJ D44 rear axle soon. It will be going in my '91 4.0 HO with 235-75/15 tires (721 rev/mile). I do not plan on using tires any larger than that size, and I plan on rebuilding this axle anyway, so regearing cost is not a factor I'm worried about. My truck originally came with tiny 195-75/15 tires. I can't even find a solid revolutions/mile number for them so I'll have to use the diameter for my math. With these tires and 3.55 gears, at 70 mph the engine would be spinning at right around 2400 rpm. With my tires, the engine is spinning at 2250 or so rpm at the same speed. Subjectively, the engine feels very lazy under about 65 mph, and there appears to be more power available at higher speeds even after considering drag. According to the dyno charts I've seen, the 4.0 HO starts picking up more torque right after 2250 rpm, and my butt dyno results seem to agree. What's my reason for worrying about this? I have observed that my truck appears to get slightly better mileage at 80 mph than at 70. In fact, there seems to be noticeably more power available at that speed and it just seems happier in general at 80. That's a strange characteristic for an almost 30 year old pickup truck, but hey. My truck is in excellent mechanical shape and I have no problems driving it that fast, but I'd like to bring the optimal mileage point down a little bit. How do I know this? That's the speed I have to go to not get murdered on I-65 heading towards Nashville in the morning. What are my goals? I'd like the best highway mileage possible. Any butt dyno improvements are a bonus. My truck is capable of 19 mpg at 80 mph, verified over several tanks. About 1-1.5 mpg less at 70. The 4.0 HO is not the tractor engine people think it is, and likes to rev a little bit. That's why I'm thinking I might get a little bit better mileage with slightly deeper gearing. I also think playing with axles might be fun. So, that leaves me with a few options as far as gears. - 3.55, the "correct" ratio for my truck. BORING! Would make my life the easiest of all, but it would leave me slightly undergeared at 70, according to my butt dyno. I could just slap in any Dana 30 from a 4.0/automatic vehicle later on and be good to go gear-wise. - 3.73, which is a closer but not exact match to the original gearing. It's also the numerically highest ratio that does not require either a new carrier or thick-cut gears. Would make my life harder in the long run, since there would be absolutely no bolt-in D30 options for the inevitable 4wd conversion. This would result in a 5% increase in rear-wheel torque and engine RPM. Enough to be worth the trouble of regearing a D30 later on? Was there any factory offerings of 3.73s at any point in the XJ or MJ? - 3.92 would return me almost exactly to the factory gearing with the 195-75 tires. This is not an actual option, since I have to be able to build a matching D30 and calibrate the speedometer. - 4.10, which might be a little too much for my tire size. With a 15% increase in rear-wheel torque and engine rpm, the truck is sure to feel a bit quicker. However, that might be enough to reduce highway mileage. A D30 from most 4-cylinder vehicles would be a direct bolt-in later on. Any thoughts?
-
The heater control valve exists to cut flow to the heater core when the temperature control is in the full cold position. The end result is slightly lower cab temperatures (due to there not being a heater core full of hot coolant just behind the dash) and a drop in A/C vent temperatures of as much as 7 degrees Fahrenheit. If you don't have A/C or don't care about a slightly warmer cab, throw the valve in the trash and plug the vacuum line to it.
-
Sport Bar Installation Question
Minuit replied to fiatslug87's topic in MJ Tech: Modification and Repairs
I'd think some neoprene foam rubber would be a good match for this material. Of course, I've never seen the real gaskets in my life but I have used foam rubber for all kinds of gaskets with good results... you just need a very sharp blade to cut it with any precision. -
The 90 and older (with 4.0L engine) used a "closed loop" cooling system with no filler neck or radiator cap. The '91 and later used a totally conventional system. That's the only real difference. You can install a later model radiator on a '87-90 4.0L engine vehicle with no problems as part of a cooling system upgrade. The 2.5L radiators as far as I know had no change from '90 to '91. Aftermarket part numbers show that they're interchangeable.
-
It's all fun and games until your truck is a burning heap next to the road. As someone who has played with wiring and electronics on one or two occasions, nothing about that picture you've posted is funny. Every single wire in that hacked together harness needs to be traced out and compared with both the original harness and the donor vehicle. The splices need to be done with insulated heat shrink crimp terminals at a BARE MINIMUM. Soldered or uninsulated crimp connections backed up with adhesive-lined heatshrink are better. Even better is to not have splices at all, even if it means replacing the connector and running new wiring. The crimps in that picture are barely suitable for interior work, let alone mission critical wiring under the vehicle in close proximity to a tank full of fuel. I don't see the strain-relief crimp either, so chances are those connections were made with a pair of pliers. Also, if you're going to post a help thread, we need to know every detail you can tell us about this truck. We can't help you if we have to beat every detail out of you. We are here to help, but you've gotta give us what we need to help.
-
As much as I like having real books, it's so annoying trying to flip through a massive FSM while my hands are nasty and I'm trying to get something done. With a digital manual I can just print out the pages I think I might need beforehand with no worries. Plus I won't have to go looking for the damn things every time I get curious about something.
-
R12a Evacuation/Recharge
Minuit replied to caseyrstewart's topic in MJ Tech: Modification and Repairs
It's totally normal for AC to work better at speed than at idle. A factory style condenser will make this even more noticeable as it's less efficient than a parallel flow one. For a supposed "R-12 substitute" as a refrigerant 53 isn't very impressive, but it's better than nothing. This is the phase where you can easily make things worse trying to make it better. For what it's worth, that's about what my original system did with all of the old parts and a subpar R134a retrofit. I would've been fine with it if the system was reliable, but it wasn't. That led me down the path that got me here. At the end of the day, you've got to ask yourself if the AC works well enough to satisfy you. If the spray test causes a large pressure drop, investigate your fans. The refrigerant has to turn from a gas to liquid in the condenser, and if it doesn't, the system won't cool worth a damn. The airflow over the condenser is what pulls the heat out of the refrigerant after it gets pumped up (getting hot in the process) Leave the charge alone. The number I gave you is based on Red Tek's numbers. -
R12a Evacuation/Recharge
Minuit replied to caseyrstewart's topic in MJ Tech: Modification and Repairs
Got a probe-type thermometer? Stick it in the center vent and tell me what it says both sitting still and driving. I know for a fact my R-134a system always produces air in the mid to low 40s at highway speed. Sometimes it feels like it's about to freeze my hands off, sometimes it doesn't. Put some numbers to the situation and we can know better for sure. For R-134a, that pressure is approximately correct. I would've thought it should be a little lower on 12a, but who knows. Try spraying some cool water on the condenser and see what happens to the high side pressure. If you see a big pressure drop, there's an airflow/condenser performance problem. -
Last weekend, I... Completed step 1 of my heater control valve un-deletion: putting the vacuum line back where it went. I stupidly tied it off inside the truck last time. Can't tell you how much of a pain in the @$$ it was to pull that back through the firewall without completely removing the dash or discharging the A/C, but I did it. Did a few wiring repairs to bring things up to my standards, including restoring the radio connector to complete stock with the correct original contacts. Did some more wiring harness shenanigans to remove approximately 20 feet of wire from the radio wiring harness while improving modularity. Should've done it that way to begin with. Filled up the tank. The "full" level on the gas gauge has been steadily dropping, and now it's just over 3/4. Float has a hole in it. AGAIN. Today on the way to work, I... Lost all stereo sound about 15 minutes into a 90 minute drive. Issue behaved very similarly to thermal amplifier chip failures I've seen before. Falsely accused the original radio from kryptronic's 91 of the problem, then broke out multimeter when replacing it didn't work. Found that a dead short to ground on RF+ speaker terminal tripped radio short-protection circuit. Found spade terminal on speaker crossover rubbing on metal dash frame. Hate those damn things. Moved speaker crossover about an inch to the right, reinstating tunes. I think we got a little "stream of consciousness" towards the end. Bed time.
-
After market air-conditioner in your Comanche
Minuit replied to tiltonb's topic in MJ Tech: Modification and Repairs
-
R12a Evacuation/Recharge
Minuit replied to caseyrstewart's topic in MJ Tech: Modification and Repairs
I doubt that you can buy a new compresor with mineral oil in it these days. I'm guessing they are always expecting an R-134a conversion regardless of what the original system was. Drain out as much of the PAG oil as possible and replace it with mineral oil. Turning the compressor as you drain it out will help get more out. You won't get it all, but you'll get most of it. Before you add oil, tell me how much PAG oil came out of the replacement compressor. If it's a full system charge worth (6-8oz), add the 3.5 oz we discussed. -
What about the radiator cap? If you hear bubbling, my first thought would be that the system doesn't hold pressure and the coolant is boiling at too low of a temperature. The radiator cap is what holds the pressure back and if it leaks the system will not pressurize.