

Minuit
-
Posts
5139 -
Joined
-
Last visited
-
Days Won
13
Content Type
Profiles
Forums
Gallery
Everything posted by Minuit
-
 I know your pain. My Duraliner juust barely stays in at speed. Nick, if nothing else, I may be able to be of service there. I've arranged my schedule so that I should have days off around that weekend.
-
My first thought was "you are absolutely out of your mind" but on reflection, I'd go to a lot of effort for a bedliner that doesn't try to fly out of the bed too.
-
The XJ will have a few positions wired up that the MJ won't use, but it's fine. I have a '90 XJ panel in my '89 MJ and everything worked out just fine, even the wire colors were the same.
-
I'll take this opportunity to point out that $10 plus shipping is DIRT cheap for that fuse panel so long as it hasn't been exposed to brake fluid.
-
He's got a 2001 engine in his truck according to the signature.
-
1985 white instrument cluster
Minuit replied to schardein's topic in MJ Tech: Modification and Repairs
Eagle is correct as usual. The later models have a trimmer potentiometer that works as the adjustment. If you can figure out the value and circuit position of this trimmer, no reason you couldn't do some "customization" of the tachometer and add it yourself. Sure you'd have to calibrate it, but no reason it wouldn't work. -
R12a Evacuation/Recharge
Minuit replied to caseyrstewart's topic in MJ Tech: Modification and Repairs
The evaporator is inside your dash, yes. Real fun to replace. Been there, done that. Sanden compressors come pre-oiled for a full system's oil capacity. That is too much in any case other than a fully new system. I don't know about Four Seasons, but you will want to at least know what is in that compressor. Drain and refill. You drained less than 2 fluid ounces of oil out of the old compressor. The FSM states to put in an ounce more than you took out, but I think you'll still be low on oil considering that. I'd probably put 3.5 oz in and not feel bad. Too little oil is really bad, a little too much isn't going to hurt. Remember, use mineral oil for this. Prior to charging, turn the compressor by hand about 10 revolutions. Any and all o-rings you disconnect during this process need to be replaced, always. -
R12a Evacuation/Recharge
Minuit replied to caseyrstewart's topic in MJ Tech: Modification and Repairs
Only 2 oz (plus a little stays in the compressor as a film in the cylinders) would make me think it was slightly low on oil. Closer to 1 oz and I'd think it was quite low on oil. What brand of compressor did you buy? Suggestion: don't replace the drier until you know it holds vacuum. That way, you won't waste the drier if it leaks. Yeah, you'll have to vacuum it again, but if it can hold a vacuum you have a pretty good chance that it'll hold refrigerant too. If it DOES leak, you're going to have to do the "charge with dye" routine until you find all of the leaks. Hopefully none of them are the evaporator. -
R12a Evacuation/Recharge
Minuit replied to caseyrstewart's topic in MJ Tech: Modification and Repairs
Probably not a horrible idea to replace it. Was there anything in the oil that drained out? The 7-cylinder Sanden compressors love to leak out of their front seal. Not sure about the 5-cylinder compressors, but I wouldn't be surprised if you were leaking out of the compressor somewhat. I would never use a reman compressor in my own vehicle, but people do it all the time. If you have $300 to spend, you may be able to find an OEM Sanden compressor and that is what I would strongly prefer. Unfortunately, I have no freakin' clue what part number your compressor is. Is there a label on it? -
aftermarket variable-assist power steering
Minuit replied to omega_rugal's topic in MJ Tech: Modification and Repairs
Might have to give this a shot when I get a chance. Never been happy with the steering feel in either of my trucks. I'm thinking about switching to a ZJ box, but even the faintest hint of road feel would be nice on the stock setup. -
R12a Evacuation/Recharge
Minuit replied to caseyrstewart's topic in MJ Tech: Modification and Repairs
Maybe. The part database I was looking at makes that look like a '90 and newer part. I really don't know. -
R12a Evacuation/Recharge
Minuit replied to caseyrstewart's topic in MJ Tech: Modification and Repairs
(what on earth takes images as a .heic file?) The big hose running from the expansion valve to the compressor is what I assume you're talking about. It's called the suction line. I have my doubts that you'll be able to find it new. My '89 has something that looks similar, but I can't find that part number either. -
1988 MJ Pioneer RWD 4.0/AW4/D35
Minuit replied to floridaftwman's topic in Member Projects: Your Comanches
Buy with confidence. -
If the "front" cable from the pedal to the equalizer is broken, you're in for a treat. Driver seat (if you have a bench, the whole seat) has to come out, as does all of the interior trim that touches the carpet, and the carpet needs to be rolled up at least enough to see the full run of the cable. Once that's done, it's not too hard to replace the cable. Make sure your replacement comes with the rubber plug where it goes through the floor. If you have floor rust, this would be a good time to address it.
-
Of course, if you have certain brands of fuel pump in your truck, it's gonna be loud as hell even with the resistor. I'm in camp "leave it" - they're so easy to bypass that it's no big deal if it fails. Anything that makes the vehicle quieter is a good thing in my eyes.
-
If someone came to me with this question, this'd pretty much be my answer word for word. You're about to do a LOT of work if you want a 6" lift and 35s without fear of death. It's a BIG headache. I've never ridden in a vehicle with that much lift that I thought rode or drove anywhere near as well as my stock truck, although my sample size is fairly limited. So, I'd implore you: do you NEED or REALLY, REALLY WANT a truck built that far? If the answers to either are anything but a wholehearted yes, you should reconsider your plans. If you just think it'd look badass, you better be prepared to do a lot more homework than most people who want a "badass lookin' rig" are prepared to do.
-
I'll be un-deleting my heater control valve very soon, and I felt like this was a good time to ask. I have not had a good record with worm drive hose clamps (most of the ones I've used tend to come loose when they feel like it), and it's enough of a concern that I'm strongly considering going back to the original spring-type clamps. I have some of my old ones, but I'd have to buy a few. Before I try and track down some of the OEM clamps, I was wondering if anyone on here had an informed opinion on the matter. What hose clamps do you guys like? My absolute top priority is reliability. Ease of use is secondary, and OEM appearance is a definite plus.
-
Although I think for these trucks, "mending" will look something like Step 1: Remove license plates Step 2: build new Jeep Comanche Step 3: Installation reverse of removal
-
Do it
-
That's how you're supposed to perform a retrofit. You did good. I'm not really at the stage where I'm ready to start writing it yet, but chances are I'll want a few other knowledgeable A/C people for fact checking, editing, and additional contributions.
-
With these, it's more of a design problem than a "worn out gasket" problem. Many of them leaked when new. Some didn't. I seem to remember Don having a set in his truck that he said never leaked. I also seem to remember a part number change at some point, which might have been a revision to make them less of a flaming pile of $#!&.
-
A few thoughts. You have a choice here. Not a big one, but it is a choice. You can buy the A/C parts for your '91. That kit would get most of what you need, but I have my doubts that the condenser is right. This should present no problems with the '95 parts you already have. Or, you can do what a few of us have done @schardein and convert fully to the '96 R-134a native system. I have been extremely happy with my build, and I had no problems finding parts. The '96 system is basically a slightly modernized version of the '91 system made to accept R-134a natively, and it will all bolt right up to your '91. The lines are run in a straightforward way, and everything is easy to get to. Copper is the better conductor of heat, but I can't tell you what that translates to in terms of real performance. I forgot that math a couple of years ago. A parallel flow condenser is a good choice for any R-134a build, and IMO is required to get the most out of your system. The condenser in that kit does not look correct, though. The '91 condenser should have the lines connect "in line" with the core. The extra lines that come from the condenser and exit pointing down may be removable. In that case, that's no problem, and it will be another PF condenser option I didn't know about. The picture doesn't show the right angle for me to tell, though. I used the APDI condenser available on Rockauto. It's working great for me after 7 months. It wasn't a perfect fit, but it was so close I wasn't even mad - one of the lines didn't quite want to fall into place. Please forgive all the $#!& that was in my bed when I took this picture. As to the rest of the parts kit, here's where your choice lies. With that kit, you'll have a new compressor, which is good. It'll be offshore manufacture, which isn't "run away immediately" but it is "inconsistent." Now, I don't like "inconsistent" in my A/C compressors - that could mean that it's a sloppy build and will start turning itself to kibbles the second you turn the system on for the first time, or it might still be running fine 30 years from now. There are a few reasons I chose to do my build the way I did. I insisted on an OEM compressor, which for this model is a Sanden SD7H15. The Sanden part number is 4727 for the '96 and 7701 for the '91. I have a terrible record with aftermarket parts, so your mileage may vary. On a lot of things, if you get a junky part you just swap it out. On A/C, that is far from the truth, and that's why we have to take this stuff so seriously - a compressor going all glitter bomb on you will take out the WHOLE system, with the possible exception of the evaporator. Of course, this is all dependent on the installer doing a good job too. Also, all of the parts will be specced for R-134a right off the bat - the lines will have the correct service ports already, the pressure switch is set for 134a, and so on. The only part you can't get brand new for the '96 system is the line from the drier to the expansion valve. That shouldn't be a problem to find from the junkyard, but you'll want to make sure it's in good shape. You'll want to have it flushed too. It's the smaller diameter one in the picture below. Really, it's up to you. The big problem with any vintage A/C build is going to be parts availability. Lines are always a problem. I can only find the suction and discharge lines for the '91 system. That means one more part you'll have to source from a nearly 30 year old vehicle or have made from a pattern. Also, no faffing around with R-12 spec components, the manual service valves, or retrofit adapters. If you go the '96 route, there is one thing that you'll need to address, and that's the oil filter. The later engines had the filter facing backwards, so that space was free for the A/C lines. If you do go with the '91 system, let us know how the performance is! I would expect the 96 system to perform slightly better, but I really don't know. As far as the topic of adding A/C to a truck that never had it, that's a gap in my knowledge that I hope someone here will be able to fill. I've always assumed that most of the infrastructure will need to be added. If you or someone else can come up with a list of what all needs to be added, that will be a valuable addition to the final product.
-
Another way to get a factory CPS
Minuit replied to Strokermjcomanche's topic in MJ Tech: Modification and Repairs
I for one am curious about this kit. What's it for? -
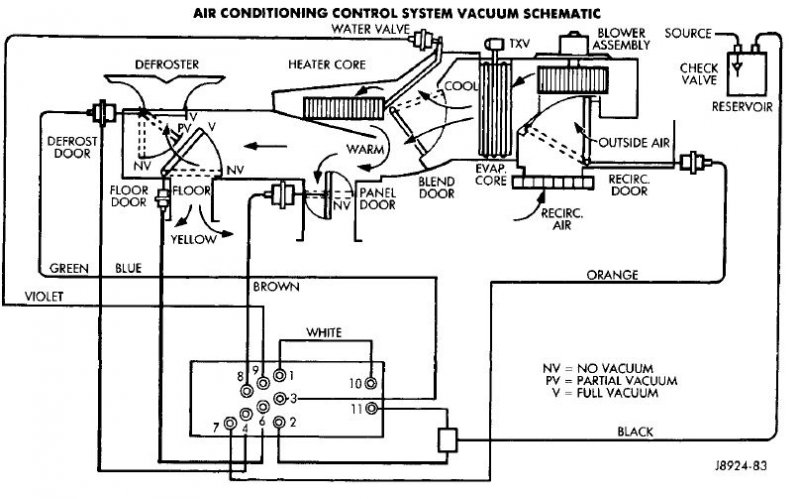
Pete asked about it, so here's a little something. This will be part of an appendix of the final AC writeup. I put this together because I had the time to, and because I personally wanted some answers. This is the writing style I plan to use for the entire thing. If there's any questions, comments, concerns, cries of outrage, or calls to action you have after reading this, let me hear them. My free time is about to take a nose dive, because I'm starting a new job and it's been hectic. I hope to have a table of contents fairly soon. I may release the writeup in chunks, or I might put the whole thing out one day all of a sudden. Not sure. The Heater Control Valve For as long as there have been Jeep forums, one of the most common pieces of wisdom you'll see thrown around is "get rid of the heater control valve and throw it in the trash". It's a 30 year old piece of plastic with coolant flowing through it, so it presents a definite possibility for leaks. I threw mine away several years ago on this advice. However, Jeep wouldn't have installed it for the first 12 years of the XJ's run if they didn't have a reason for it. That reason is very much connected with the subject of this writeup, so let's take a look at it. Why worry about any of this? Let's look at a diagram of the MJ's HVAC system. (source: 1990 Jeep factory service manual) The A/C evaporator is the first thing the air passes through after leaving the blower motor. This is to provide dried air (via the A/C evaporator) no matter the blend door position - very useful when defrosting the windows, and if the driver would prefer to have dry heat in the cab. Unfortunately, that means that everything that happens to the air after it leaves the evaporator is out of the A/C's hands. Even if you want the coldest possible air, the cold air still has to pass through the rest of the HVAC box and out to the vents, in relatively close proximity to the heater core. If coolant is flowing through the heater core, the heater core will be very hot, and it will warm up everything around it. As it flows through the hot ducting, the air will warm up a little. The heater control valve was Jeep's solution to this problem. When the driver commands the coldest air possible, the valve closes and prevents hot coolant from flowing into the heater core, which prevents the heater core from warming up the surrounding duct work. Since even cold air has to pass right next to the heater core, this can and does make a difference to A/C performance. Even if you don't have A/C, not having any hot coolant flowing through the interior will help keep cabin temperatures down. The valve is closed in the "OFF" and "VENT" positions. In all other positions, the valve is closed any time the temperature selector is in the "full cold" position. So, let's put some numbers to this. To simulate a working heater control valve, I bypassed my heater core and went for a ride. To summarize my results, all else being equal the air at the vents with the core bypassed is between 3 and 7 degrees cooler when the truck is at operating temperature. These measurements were taken on two back to back days at a temperature of around 83 degrees. In the world of A/C performance, seven degrees is a big difference. It can separate a "decent" system from a "good" system. In my case, this allowed for air in the high 30s at speed on an 83 degree day. I live in the humid South, and I want all of the A/C performance I can possibly have, so a seven degree improvement is worth the effort. After this test, I've changed my stance on keeping the valve. If you are interested in maximizing your A/C performance, I suggest that you keep the heater control valve, and replace it if it is leaking. The valve is still available in the aftermarket and you may be able to find Mopar valves in inventory. The 1991 and later part number for 2.5L and 4.0L engines is 56005900. The 87-90 part number is 52003226 for 4.0L engines, 56002522 for 2.5L engines, and J3222290 for the 2.1L diesel engine. For an open cooling system, use the later part.