


Minuit
-
Posts
5139 -
Joined
-
Last visited
-
Days Won
13
Content Type
Profiles
Forums
Gallery
Everything posted by Minuit
-

Steering rack and pinion
Minuit replied to SeasToSwamps's topic in MJ Tech: Modification and Repairs
To be more specific, the ZJ box makes the steering a lot firmer and will make the truck more responsive thanks to the faster ratio. -
1986 Jeep Cherokee!
Minuit replied to Vineyard86manch's topic in Craigslist/eBay... i.e. Not Your Stuff
All I can do is wish him well and hope he gets his asking price. -
I'll just say this. If you decide to rewire it yourself, if you have previous experience in this field, the hard part will be connectors. Renix isn't as bad about it as Chrysler was, but there's a fair few weird unobtanium connectors. Lots of Weather-Pack and Metri-Pack, but still a lot that you can't get anymore. You'd have wiring diagrams and splice locations in the FSM to work to, so if you're familiar with the principles of wiring harness construction it wouldn't be the worst job ever. I am not aware of any aftermarket manufacturers making new engine bay harnesses for any year of XJ. Having one custom made will be eye-poppingly expensive. "Better off to buy an entire donor truck just for the wiring harness" expensive for a true OEM quality harness, not the low-grade crap most aftermarket wiring harnesses seem to be in my experience. If the damage is isolated to a handful of circuits, it may be better to deal with the devil you know. You'd want a donor harness that has not been messed with and contains no backyard mechanic hackjobs, which is very rare for something over 30 years old. For example, some genius bypassed the A/C high pressure switch on my 89. You wouldn't want any surprises like that when transplanting a harness. Do you have any pictures of what you're dealing with?
-
90-96 footwell light connector
Minuit replied to BeaterComanche86's topic in MJ Tech: Modification and Repairs
The '91 and up (this is an early example of this starting) wiring harnesses are littered with Chrysler proprietary connectors that have absolutely no information available for them. That looks like another one of them. I haven't been able to find the bare contacts for any of the ones I've looked for. Are there any markings molded into the plastic of the connector? -
I really hope you just connected the alternator with spade connectors and hot glue as a quick bench test and don't plan on actually installing it in your truck like that.
-
My sticking point would be the fact that that looks to be a mechanical oil pressure gauge - i.e. you have pressurized oil going directly into the cab through a line several feet long. If that line breaks or leaks there's all kinds of things that could go wrong. I'd hate to have a catastrophic oil loss because of an aftermarket gauge. I have had no reliability issues out of the factory gauges with a Mopar sender. That last part's the important bit - the factory gauges were designed to work with the OE senders, and accuracy suffers with the cheap parts store garbage. Just make sure all connections (particularly the ground on the lower left of the dash) are clean, the sender is firmly plugged in, and you don't have voltage drops in your dash harness, and don't worry about it IMO. An aftermarket part is not magically better just because it's an aftermarket part. Except for car audio speakers and amplifiers. That's my one exception. I'd just get a Mopar 53005218 or 56026782AC sending unit for the factory gauge and upgrade to your preference of the 1987 blue or 1988-1990 black/red full gauge cluster.
-
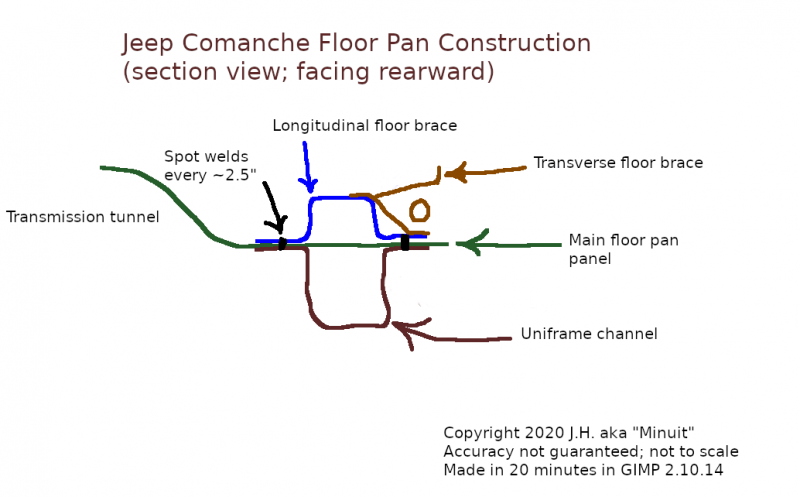
I, however, tend to go with "the engineers designed it that way for a reason" and will be putting it back in, pain in the @$$ that may be. I already pretty much know I'll be fabbing it from scratch on the driver side. I want to end up with a truck that is just as rigid if not more rigid than when it left the factory, and putting just the single-skin floor pan back in won't cut it for me. Caveat: most people don't spend much time thinking their floor pan jobs through, and their trucks generally don't end up folding in half. I, however, currently have nothing but time to think things through and I want to end up with a nice looking floor pan at the end. 1. For REALLY invasive repairs, my go-to suggestion would be to weld in some temporary bracing. However, if you are only cutting out small sections of the floor - I wouldn't worry too much. Your truck doesn't look too bad based on what you've shared. That's maybe a 3/10, with a 1/10 being a perfectly pristine floor and 10/10 being nothing left. This is what I have to work with, and I'd call it a 6 or a 7 on that scale. This looks really bad, but the uniframe channel is still good underneath. Here it is right now. I still have quite a bit of rust to cut out before I can begin building back up, but the uniframe channel is still in excellent shape, thankfully. What you see inside of it is mostly just rust flakes from the layers above crumbling. My next move will be to finish drilling the longitudinal brace's spotwelds, remove the rest of it, and see what the condition of the metal is underneath. Also, most of the transmission tunnel and the lower firewall behind the pedals needs to be cut down to good metal. You have less work to do than I do. 2. You won't be "pulling" the lower uniframe channel - it's connected to the suspension at either end and really not a removable part. You'll be removing things FROM it, not removing it as a unit. Unless your truck is REALLY rusty, the most common thing to find is a totally destroyed floor pan but an otherwise OK uniframe with a bunch of nasty rust flakes sitting in it. That was the case on my 89, which had it much worse than your truck does. On my 89? Those flat sections on either side of the uniframe? Gone. The interior of the uniframe channel looks perfect. 3. Get a set of Blair Rotabroach spot weld cutters. The 7/16" size has done well for me. The most common size is 3/8", but I've found that's a little too small for the spot welds on this truck. It's more accurate to say you drill "around" the spot weld, and you do not go all the way through. You just drill until whatever you want to take off is free to move. Repeat that for every spot weld on the panel and afterwards the actual spot welds remain attached to the truck. You grind those off, do whatever you need to do underneath the piece you took off, and then plug weld the panel back on where the spot welds were.
-
No easy way around it. All of the seam sealer needs to be scraped up (it loves to trap water), all of the pieces that make up the floor assembly need to be separated, each needs to be evaluated separately, and the underside of every panel needs to be thoroughly de-rusted and primed+painted. Get a borescope camera to look inside the uniframe. If any rust is found on the bottom of the main floor pan panel or the interior of the uniframe, the main floor pan is going to have to be cut out to gain access to the interior of the uniframe, the rust dealt with, and the piece you cut out welded back in. Once that's done, the interior needs to be waterproofed - that most likely means pulling the HVAC box and making new gaskets, packing the wiring bulkhead connector with waterproof grease and maybe running a bead of RTV silicone around it, and addressing any other leak points as necessary. There are no short cuts and no steps that can be skipped. It's invasive, but less invasive than replacing every bit of metal in the floor in a few years if you ignore it.
-
Oh boy, you bought an 84-85 radio and you're in for a treat. The plugs in your jeep are bog standard Metripack 150 series unsealed. The stupid 84-85 plugs are unobtainium Pack-Con II plugs. If you don't have proper tooling to crimp up a harness, I can switch the connectors without any splices, or you can buy a Metra 70-1000 kit and splice it to your radio. Otherwise, eaglescout would be able to furnish the same information I have on those plugs. I assume he got his right since his radio seems to work just fine.
-
-
Steering rack and pinion
Minuit replied to SeasToSwamps's topic in MJ Tech: Modification and Repairs
DO NOT blindly adjust the steering box with it in the vehicle. It must be adjusted to the FSM's specifications. You need a beam style inch-pound torque wrench to do this correctly. Any other method is unacceptable. The adjustments are very, very sensitive and the difference between "too loose" and "binding up the box" is small. If the box has a lot of miles on it, adjusting it to the tightest safe limit (if I remember correctly, that's 18 inch lb of drag over center) might still not get it perfect. I bought an unknown mileage ZJ steering box for my 91 for its faster steering ratio, adjusted it per the FSM, and the original box in my 89 is honestly a little tighter after following the same adjustment procedure - another clue in my mind that that truck doesn't have as many miles on it as I thought. I've heard bad things about the parts store reman boxes, and I've recently heard some REALLY BAD things about a fellow Jeeper's experience with AGR, a "boutique" steering box shop. You may just want to try adjusting yours per the FSM procedure and see if that gets you what you want. Keep in mind that you are never going to have the responsiveness and feedback of a modern car with rack-and-pinion steering. The technology in your steering box dates back to the 60s and will show its age if you're used to modern cars with their extremely tight steering. There will be a small amount of play in the steering no matter what you do. That, and thanks to the complicated steering linkage on one of these, a small amount of play in a tie rod end can cause a lot of play in the wheel. -
Cargo light & switch panel
Minuit replied to fiatslug87's topic in Craigslist/eBay... i.e. Not Your Stuff
Not gonna lie, I'm really considering doing a cargo light on my '89. That's a really nice piece and hopefully whoever gets it does something cool with it. $150 is a little out of my range for an unimportant part though. -
My parents got their Trump Bucks a couple of days ago. Still nothing for me. I filed my 2019 taxes right before the bill passed, so
-
Saw a kinda rough looking early model SporTruck near my house yesterday. Naturally now that I can't drive mine for a long time, they'll start coming out of the woodwork now.
-
Fuel gauge running in reverse.
Minuit replied to Dickinson County Comanche's topic in MJ Tech: Modification and Repairs
A fuel gauge potentiometer (if you wanna be picky, a rheostat) is actually a very simple thing. It consists of a strip of resistive material and a conductive "wiper" that is free to move along this strip. On a Jeep sending unit, one end of that strip is connected to ground (note that I didn't say which end), current is passed through the wiper, through the resistive strip, to ground. Depending on the fuel level, the position of the wiper along the resistive strip varies. The actual resistance between the ends of the potentiometer's resistive strip is a fixed number that depends on the design of the potentiometer. That number happens to be 88 on a Renix sending unit and 100 on an HO sending unit, keeping in mind that "0" for a HO sending unit is still 5 ohms to ground. The variable resistance is created by the position of the wiper along the strip. Let's say you have half a tank of fuel, so your fuel sending unit is in the middle of its sweep. Let's also pretend that the resistance sweep is linear from full to empty. It might be, it might not be. The highest resistance to ground of an HO sending unit is 105 ohms, which occurs when the tank is empty. Half of 105 is 52.5, so let's say there is 52.5 ohms to ground. - - 105 ohms - - - - - - - - <- wiper, connected to gauge. R = 52.5 ohms. - - - - - - Ground The amount of resistance between the sense line and ground is indicated by the amount of dashed lines between the wiper and the ground terminal which I have arbitrarily placed at the bottom. Here's the big difference between the Renix and HO senders, besides the difference in full range sweep. The ground is connected to the "empty" side on a Renix and the "full" side on an HO. What this means in physical terms is probably that there's a ground wire soldered to one side of the strip on an HO sender that's soldered to the opposite end of the strip on a Renix sender. It might be possible to switch this around. Electrically, it's as simple as that, but I don't know if there's enough room for you to desolder the ground wire from one end and solder it on the "wrong" end to correct the gauge polarity. I don't know if switching the terminals on the gauge cluster will work. Never tried it. If I come across a broken gauge cluster I might try it. Here's a way I know would work, assuming the potentiometer is designed in such a way that the resistance strip is accessible: Wait until you're almost out of gas. Pull the fuel pump hanger assembly from the tank. You don't have to drop the tank or pull the drive shaft. Gently remove the potentiometer from the assembly and let it dry. One end of the potentiometer's resistance strip will be connected to ground. Use a multimeter to identify which end has continuity to the fuel pump ground wire on the 3-pin connector. If you're lucky, that ground is provided by a wire soldered to the potentiometer that you can desolder and solder to the other end. If you're super lucky, it's just a spade connector you can switch from one position to the other. That'd flip around the polarity of the gauge, so you'd have 105 ohms at full fuel and 5 ohms at empty. Still not quite what the gauge expects, but at least it's the right way around and it would be accurate-ish. Now, the all important question: can you actually do this? I have no idea! I want to say the HO fuel potentiometer has a pretty open design, so it's probably possible with only minor frustrations. I'd hate to see someone do this to a real HO Comanche fuel pump assembly though. To be honest, I'd probably just take the HO hanger out and sell it for big bucks to an HO Comanche owner and just get the correct part for your truck which, by the way, are available as new productions now from MTS Company, but that's just me. You could also buy a used Renix fuel pump hanger for your engine and tank, switch the float out with one of these, get a new Bosch fuel pump, and you'd be in business with an OEM part that's going to fit right, an accurate gas gauge, and all without hacking up an extremely rare and very expensive 2-year-only part. Even if you do commit murder on an HO sender, your gauge is still going to be off. -
Slow cranking, good battery & alternator
Minuit replied to hakukamana's topic in MJ Tech: Modification and Repairs
My bet is the starter itself. That was the case on my 91. Very slow cranking with near-0 voltage drop through the cables was my symptom. -
Flashing lights have never been a trigger for my particular symptoms. I've done a lot of welding in the past and had absolutely no epileptic effects from that. Doc thinks the main reason this became a "real" seizure was hard physical labor combined with sleep deprivation.
-
A standard open barrel crimper will do an OK job on the Pack-Con terminals. I don't know how to do the bus bars - my guess is you'd have to either find the OEM crimper for those or bend them out of the way for clearance on the ones you aren't crimping.
-
Alright, got back from the neurologist. TL;DR: I'm epileptic as all hell. No driving, shooting, heavy physical labor or any other activity considered fun dangerous for a bare minimum of 6 months, starting from my most recent seizure which was on April 8th. They're starting me on medication immediately and I will probably have to look for a different line of work. If I am found to be driving or operating machinery during that time, I could be prosecuted. I'm also prone to something called "staring spells" where I'll just space out for about 5 seconds. Those are actually a small seizure only affecting part of the brain. A particularly rough couple of 12 hour days at work combined with some sleep deprivation and possible dehydration allowed one of those to escalate into a full-blown "shaking on the floor" seizure - what happened on Wednesday. This was always gonna happen, it was just a matter of when. SO - here's what's going to happen with me and my projects. My life is going to get a pretty radical restructuring temporarily. The jeeps are safe. Nothing is getting sold, and nothing is getting abandoned. You radio customers will probably end up being very happy with this development. Not being able to drive my trucks (and not being able to go back to work) means a lot of good things will probably be happening to them. I reckon 6 months will probably be plenty long enough to get new floor pans and an interior in the 89, although the process of getting its prospective new engine to me just got a lot more complicated. I'm not in any danger of running out of money, and I'll likely be opening the doors back up at the Radio Emporium at near full capacity fairly soon. At this point, about all I can hope for is that the meds work and put an end to this.
-
Clarification: I wouldn't want to swap a 4.0 into an 86 truck either. I'd just buy an 87+ truck with a 4.0 in the first place. If I had to buy an 86, I would only want the 2.5, and I don't think that's a very controversial opinion on this site.
-
Mmm hmm. I'm even more of a hardliner on this. I would have absolutely no interest in swapping a 3.4 V6. All of that work to still end up 30 hp short of a 4.0 HO, and that's if you do the work to swap in the fuel injection. Supercharged 3800 if you HAVE to put a GM V6 in there, otherwise it's a square Jeep and square jeeps should have an inline 6. The 4.0 swap isn't really worth the work on an 86 either, when you could just go spend $8k on a clean '87 or newer 4.0L truck in the first place. I'd love to get a close-up look at this paint job. At least they didn't even bother putting the Comanche badges on the fenders in the wrong place. That's usually the first sign of a low rent paint job. I'm sure this one isn't much different. "Rust free" - give me an afternoon with a spot weld drill and I'll tell you how rust free it really is. Chances are I wouldn't even need the spot weld drill to find the rust. WTF is up with that carpet? I don't believe the V6 ever came with a 4 speed transmission, and even if it did I definitely wouldn't expect it on an XLS. That means either their description is wrong, they don't know where 5th gear is, 5th gear doesn't work, it just has the wrong shift knob, or the transmission was swapped out with a 4 speed. None of those things are a good sign, some of them worse than others. Clever repair to the seat covers, I guess. I still hate the porno red interior. I bet it smells like cheap booze, Vaseline, and cigarette smoke. With a little of the signature musty old car smell mixed in. I don't like the 90s style aftermarket wheels or front bumper. I consider an aftermarket rear bumper to be excusable on all but the pickiest restorations considering the scarcity and price of quality original rear bumpers, but I'll be completely honest when I say that I think almost all aftermarket front bumpers are ugly. A third of the description is talking about how good of a used car dealer they are.
-
what year did the bench seat get headrests?
Minuit replied to Pete M's topic in MJ Tech: Modification and Repairs
As a side note, what was AMC thinking in 1984? (shown is an '84 Wagoneer Base with the ultra-rare "Almond" interior color that might just be "Sand" that we're all familiar with. No idea, I've never seen any parts from this interior color in person. In '84, and '84 only - you could get bucket seats without headrests on the Cherokee and basic Wagoneer. If you wanted to not break your neck being rear-ended at parking lot speeds, you had to shell out extra. Mandatory headrests may have been a running change at some point during the 84 model year, as I went back and looked and @eaglescout526 has an 84 Cherokee with headrests. -
That speaker bracket mod is really makin' me think. Might be possible to get some stealthy bass in there after all. A master class in how to do a Jeep build properly, as usual.
-
When we bought this house, it had el cheapo "brushed aluminum" door knobs on all of the doors, interior and exterior. The exterior door knobs and deadbolts are now brass.
-
what year did the bench seat get headrests?
Minuit replied to Pete M's topic in MJ Tech: Modification and Repairs
My 1991 Sportruck had headrests. Still does, too. No idea on my 89. It had already been converted to buckets when I got it.