ghetdjc320
-
Posts
5079 -
Joined
-
Last visited
-
Days Won
1
Content Type
Profiles
Forums
Gallery
Everything posted by ghetdjc320
-
4.5 lift will be a bit dificult to accomplish with the GS springs. 3” will keep better control arm and steering geometry overall. An AAL will likely not change the free arch of the 1250 springs. Those leaves are thick.
-

Higher revving on warm start
ghetdjc320 replied to hgeranium's topic in MJ Tech: Modification and Repairs
The remflex don’t cost much more you just have to order them in. -
Higher revving on warm start
ghetdjc320 replied to hgeranium's topic in MJ Tech: Modification and Repairs
For manifold gasket, grab a Remflex. They seal up exceptionally well. -
Here's my .02. keep a 1" overlap all the way around. take it down to clean metal and then use 3m panel bond with some clamps or whatever else you need to get it to form a good tight seam (this is crucial to keeping water and moisture out of that seam going forward). Once cured per TDS, add all your welds around the perimeter. If you can pre-drill the new floor pan where the frame support is, you can rosette weld into the hole. If you have access to a deep jawed spot welder, definitely go that route. Also, I'd not use any one part (air dry) seam sealers on the floor pans. You want two part mixing seam sealers ideally. SEM and 3M make excellent medium bodied seam sealer that will stay in place. once seam sealed with 2 part, you can brush on some seam sealer as factory did. Once complete, get a few cans ok 2K epoxy primer (most auto paint stores carry this stuff in rattle cans that have a hardener you puncture before mixing) then use raptor liner, monster liner or any good 2 part coating. Lizard skins is also a good option. 2K basically means there is a hardener that cures the finish vs just air dry. 2K paints and finished tend to be superior in almost all regards. POR15 also works to get down in and seal up thin gaps in seams. You can mask off the back side of the seam then use a brush and brush it down into the seam. One little trick I found to remove the factory seam sealer is a multitool with a caulk cutting blade. Works wonders! Edit: generously brush some POR15 into that open frame cavity as best you can and as far as you can reach while it's all open. AMC loved to overlap metal without sealing in-between leaving all sorts of rust prone areas. You have great access to it now.
-
Ideas Wanted: Softer Release of Parking Brake
ghetdjc320 replied to NickyV's topic in MJ Tech: Modification and Repairs
It might be worth noting that adding the rubber bumper will not change the speed at which the brake releases. The bumper just keeps it from hitting your fingers as it returns and provides a little bit of cushion. It’s been my experience that improperly adjusted brakes tend to make the parking brake issue worse. Your parking brake should be engaging solidly without having to press it to the floor. If the drums (or parking brake shoes for disk swaps) are adjusted properly, the pedal travel will not go so far so as to wind up the return spring as harshly. Always thought it would be neat to retrofit one of the electric brake actuator kits. Looks like it would work pretty well for an MJ. -
I see you referenced 1250lb springs. If you’re considering General Spring, that’s an option but don’t use SOA less you are ok with 7+ inches of lift. There is no lift difference between the 4 leaf and 5 leaf pack with general spring, it is only the load capacity which is different, and 1250 is plenty for most MJs. My current springs have full length BDS add a leafs in them. You’ll see varying info on add a leafs as there isn’t a one size fits all approach here. if you’re running original 4WD leaf springs, most full length add a leafs (which tend to be for Cherokee's) will have about the same free arch meaning they are only really adding load capacity. This does however, still net out a small lift. From my bds setup I saw about 1.5” after driving it around the block a few times. Also consider that the Comanche has a factory rake to it. So if you’re aiming for a level stance, the front needs to be approx 2” higher than the rear. One perfectly viable option is to run the General Spring 4 leaf (1250) pack along with 3” front coils (metal cloak is a nice option but there are many others). That has a very nice stance. After some settling, you may decide to add a little bit of rear shackle lift and or front puck lift to adjust further or dial in the stance exactly how you want it. Add a leaf is another option albeit a lot more work. Disassembling the leaf pack can be a pain. In my case I wanted a very custom spring setup so I disassembled and measured each leaf free arch then rebuilt the pack to get a perfectly even match. The center pin for XJ add a leafs also needs to be redrilled for MJ’s if done properly. 3” of lift is fine on short arms as mentioned though I wouldn’t go any higher on short arms. This lift level is really a sweet spot overall. If budget allows, the absolute best setup is a custom leaf pack from Alcan or similar. Ruff stuff and Rusty’s have…issues…
-
Not sure what the thread size is but a helicoil should work fine if you can find one that fits. I didn’t know the HO block had a boss that could be tapped for a knock sensor. If it’s not in the stock location, you may be able to simply relocate it by taping another unused boss in a similar location.
-
Power stuttering contiuned...
ghetdjc320 replied to Muncher's topic in MJ Tech: Modification and Repairs
Sounds like CPS though I’d throw fuel pump/filter in the mix. Might be worth checking your major ground connection as well if you haven’t already, but specially the engine block and the fuel pump ground behind the left tail light. -
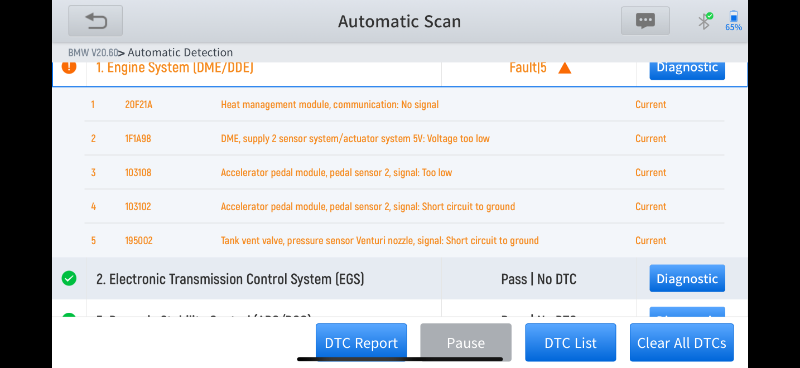
In a major departure from the norm, I picked up a really clean 2019 X3 about two months ago. Has been a really comfortable daily driver for my wife. Had 55k miles on the clock and zero issues. It’s the 4cyl and gets around very well for its size. Othe night driving home, it went into limp mode with reduced power. I also noticed I lost my temp gauge on the dash. Fortunately, I was almost home. There wasn’t any overheating, but the codes I pulled up show no communication with the “heat management module”. From what I gather, it’s like an electronic thermostat that also provides temp sensor and many other functions. However, I also get two other recurring groups of codes: one for the accelerator pedal sensor and another for the tank vent valve. Since these all came up at the same time, I’m trying to determine if there is a common cause. My thoughts lean towards replacing the heat management module but wondering if possibly anyone here has any knowledge of these that could point me in the right direction. The Bimmer forums seem to be just advertisements, and the Facebook groups don’t let me post the issue for whatever reason.
-
Get the ACC carpet kit without mass backing. As for color, ACC can get you a color swatch to compare. I ended up preferring the darker gray for interior on my last MJ. The XJ oe carpet will fit poorly as the XJ doesn’t have the side braces for the rocker panels nor the floor bracing for the frame
-
Engine bay cleaning methods?
ghetdjc320 replied to hgeranium's topic in MJ Tech: Modification and Repairs
Same, use a good chemical to loosen up the grease so you’re not relying so much on the water pressure to remove it. That way you can “rinse” the engine bay. Just try to stay away from seals and wiring along with firewall ports -
I’d suggest doing all of Cruisers wiring mods. Most of the copper wiring itself should still be usable but I’d unwrap the harness, replace those duct taped factory splices, clean up all the connectors and terminals, then rewrap it all with tesa harness tape.
-
Agreed, you can keep the nostalgic look, feel and even performance, but add an aux or Bluetooth input and not just a cassette adapter as that relies on the cassette player working properly. No reason to limit your selection to only radio or tape.
-
Dynamat FTW. The recipe looks simple and easy to duplicate but few get it right. I’ve use Noico, killmat, dynamat and sound skins. Sound skins is top notch, dynamat is as well. Noico and killmat don’t dampen as well. And removing them is absolutely horrific. They will outgas as well when heated up. For something as labor intensive as sound dampening, I’d definitely suggest the “cry once” approach.
-
Add dynapad on top of the dynamat if you want it quieter
-
New carpet is never fun and takes a lot of time to get right. The ACC carpet without mass backing is the way to go.
-
Pics: Wheel Spacers + No Lift
ghetdjc320 replied to NickyV's topic in MJ Tech: Modification and Repairs
Not sure how common they are but they are good swap candidates. 3” .25 wall axle tubes, factory disks, 29 spline shafts and side adjusters for the ring gear. The wheel bolt pattern and width are excellent for a Comanche. -
First consider the size. There really isn’t room for a double din full depth radio. Even with 3D printing, the underlying dash and defroster duct would need to be heavily modified. It’s not impossible, but it’s a ton of work. If you’re keeping single DIN, a clean stock unit fits the bill. Though I would add an aux input so you can keep your options open. Retro is nostalgic but functionality is key. You don’t want to have to convert your favorite tunes to cassette to be able to listen to them. When you spend 10 minutes fast forwarding and rewinding to find your son on a 15minute drive, it gets old…
-
Project “Tomahawk”
ghetdjc320 replied to ghetdjc320's topic in MJ Hardcore Tech: Epic Journeys to Greatness
Are you referring to the single digital dash setups? I prefer analog gauges, the HDX is analog gauges with digital displays that are expandable to read a great variety of things. My stock gauges are just dying on me one by one. -
Project “Tomahawk”
ghetdjc320 replied to ghetdjc320's topic in MJ Hardcore Tech: Epic Journeys to Greatness
I've been disappointed with the OE gauge cluster for some time. Seen a few options out there including digital dashes but nothing really looked too clean imo. So I found I nice condition gauge cluster and sent it off to Dakota Digital for a custom HDX series build. The build takes about 4 months but looking forward to a clean, updated, and most importantly, accurate set of gauges. -
I did it, and wouldn't hesitate to do it again. Best brakes I ever had. I did need to upgrade my pump and add a cooler to the system but the breaking was phenomenal. I went with Talon Hydraulics but this was several years ago. Hydratech also makes a model that works well. The Vanco units are some type of OE applications and not quite as nice as the Hydratech units. Get some nice AN lines and they look like a work of art under the hood. Much better looking and performance than vacuum boosters. I liked running them with just a slightly oversized Wilwood MC for the application to bring the pedal travel up a bit.
-
Congratulations!!
-
Keep 89 Renix, or swap to 94 HO engine?
ghetdjc320 replied to jakesmog's topic in MJ Tech: Modification and Repairs
I’d keep things renix. The HO doesn’t have much in the way of support for stroker builds. The OBD1 ecu which is and SBEC2 unit, can be chipped and programmed but only by a select few people. The renix system with its knock sensor has proven itself in basic mild strokers. If your after tuning performance and flexibility, aftermarket efi is you’re best bet though later model obd2 systems have a bit more tune ability and can use HP Tuners. Still not the same as a true stand alone efi system though. Strokers and custom efi for the 4.0 get you in the realm of engine swap territory As for the AX15 tranny, on internal slave models (pre 94), they had a 5/8 pilot tip. 94+ are 3/4 pilot tip. No appreciable difference strength wise but you may need to swap pilot bushings as mentioned. You can trim up using the DPG method with decent results and probably clear 33’s. The trick is to be able to fully stuff them and keep your turning radius. -
Door handle gaskets / seals
ghetdjc320 replied to farmboi's topic in MJ Tech: Modification and Repairs
Awesome! Thanks for making these. Will definitely be grabbing a set -
Pics: Wheel Spacers + No Lift
ghetdjc320 replied to NickyV's topic in MJ Tech: Modification and Repairs
Here is a 1.25” front andapter along with a KJ liberty rear axle which is 2.5” wider in the rear plus a 3/4 wheel adapter. So basically rear is 2” further out in each side and front is 1.25. I have zero issues with this setup and a great turning radius.