
Kedosp
-
Posts
20 -
Joined
-
Last visited
Kedosp's Achievements
Can Spell Comanche (2/11)
-
I’ve had JKS disconnects for about a year and they’ve been great. I greased then when I installed and haven’t had to re lube them yet. No rattles at all
-
No issues other than needing a block off plate for the egr valve. They’re easily made, or bought for cheap.
-
Hanson Offroad Comanche Rear Bumper
Kedosp replied to Kedosp's topic in MJ Tech: Modification and Repairs
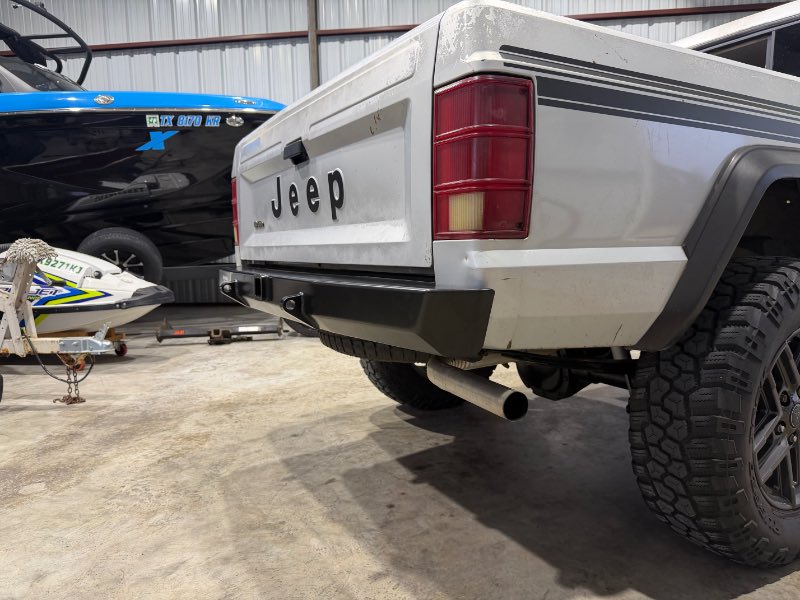
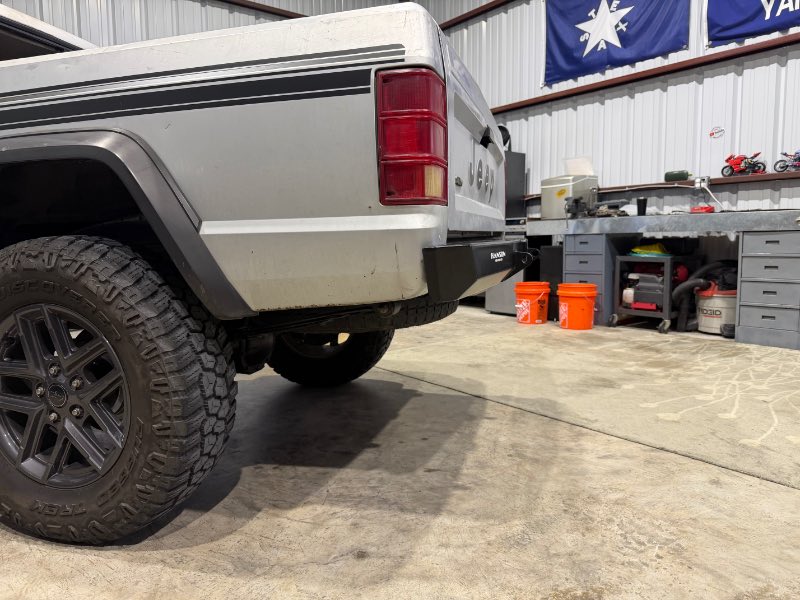
There is plenty of clearance behind the bumper to reach under and insert the pin and the clip from the back. Easier than I thought it would be -
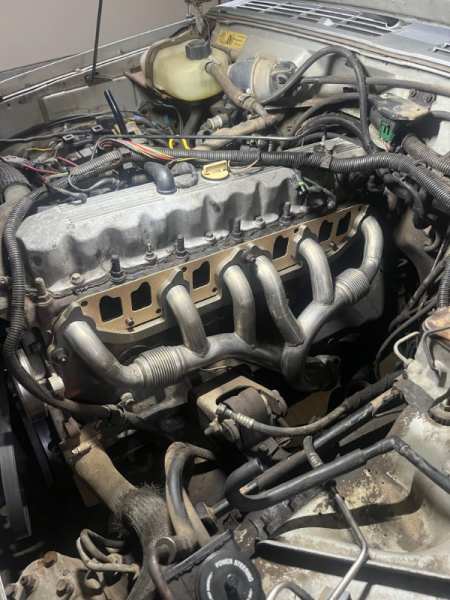
I had to replace my entire exhaust system including the manifold when I bought my truck. I used a 91+ HO manifold and downpipe and blocked off the EGR port on the intake. The new downpipe also eliminated the restrictive oem dent in the renix downpipe. Getting rid of the egr cleaned up the engine bay a bit and it has to flow better now with the newer parts
-
Hanson Offroad Comanche Rear Bumper
Kedosp replied to Kedosp's topic in MJ Tech: Modification and Repairs
Yes, planning to mount the license plate on a receiver hitch bracket of some sort. For now it’s in my rear window which won’t make the law very happy, but is better than no plate. -
Hanson Offroad Comanche Rear Bumper
Kedosp replied to Kedosp's topic in MJ Tech: Modification and Repairs
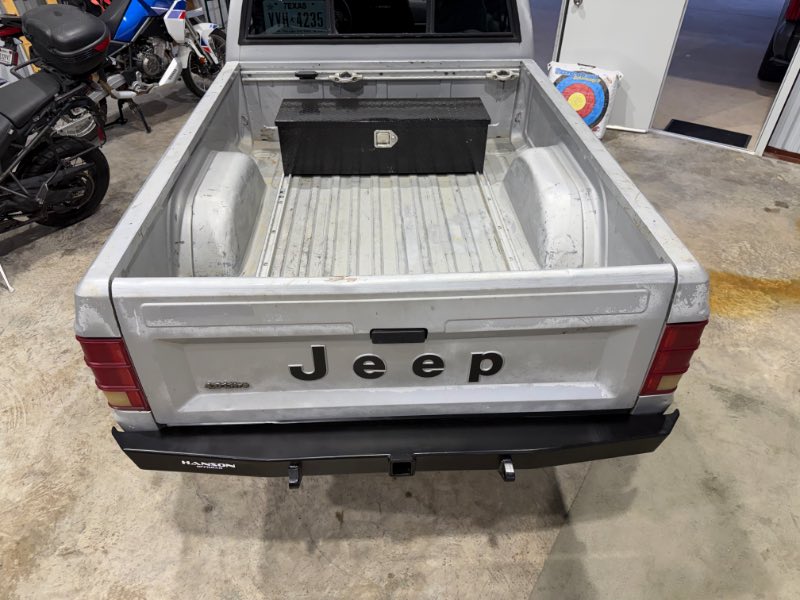
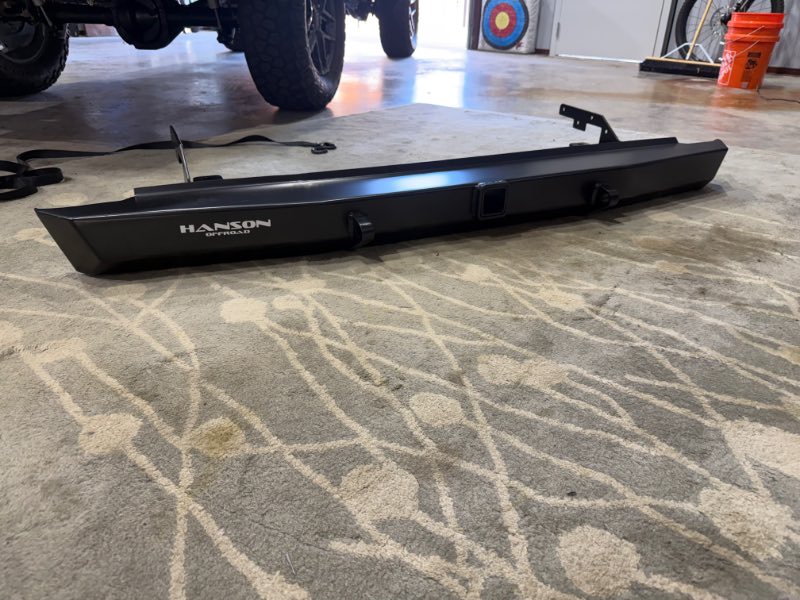
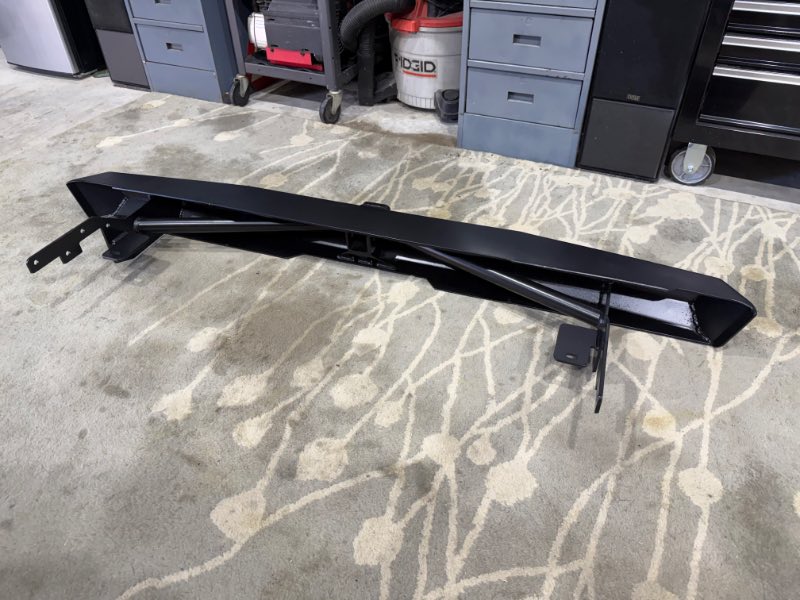
I finally had time to remove the broken factory bolt install the new bumper and I gotta say, it’s pretty awesome!!! I’m very happy with it and love how it cleans up the rear of the Jeep.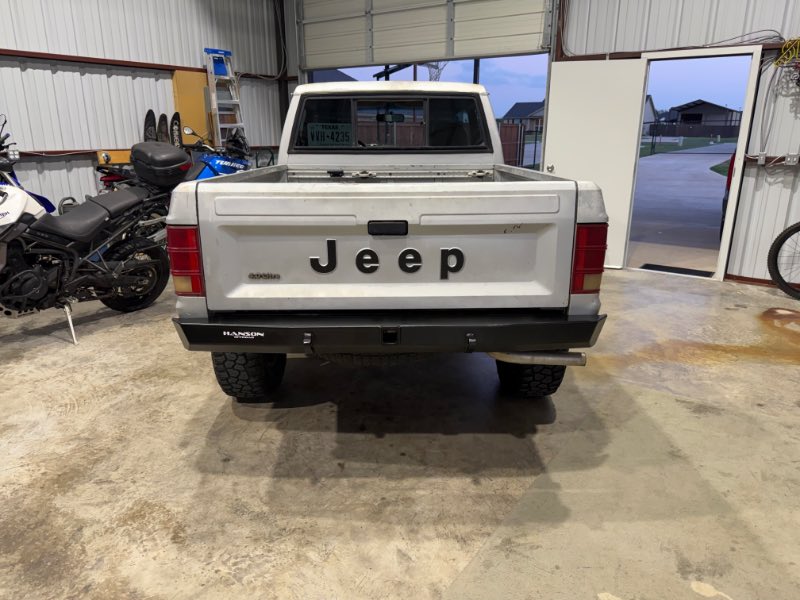
-
Hanson Offroad Comanche Rear Bumper
Kedosp replied to Kedosp's topic in MJ Tech: Modification and Repairs
It took about 5 months, which is longer than normal. Shipping is also expensive since it had to go by freight. As far as I know though, this is the only company that makes a heavy duty, offroad style, assembled rear bumper for an MJ. Now that I have the bumper, it was worth the wait and I would order from them again if I needed a 2nd bumper. -
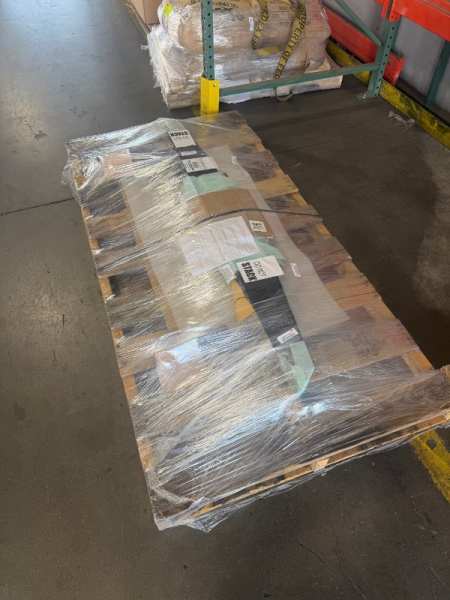
I bought a JCR front XJ bumper a year ago and intended to buy a MJ rear bumper from them as well, but JCR and my 2nd choice Dirt Bound Offroad have both stopped production of their assembled bumpers. A third option that I didn’t find at first was Hanson Offroad, who still makes an assembled and powder coated rear MJ bumper that seemed like it would complement the JCR front bumper nicely. I spoke with the owner Steve (who is also a Comanche owner) when I placed my order and he warned me that it would take several months to receive the bumper since they were such a limited production item. I wasn’t in a hurry so I sent payment and placed my order. There were a few delays along the way, sometimes I had to call more than once for an update, but most of the updates I received came directly from the owner Steve who was good to work with. Last week I was notified that the bumper was finally ready and had been shipped. I picked it up Thursday and was very satisfied with how well it was packed and strapped to the pallet. Once I got it home and unwrapped, I was very impressed with the build quality and overall look of the bumper. It seems like it will fit well comparing it to the original bumper mounting points, but I haven’t been able to install it just yet. When removing my original bumper and receiver hitch, I broke one of the 15 or so bolts holding them both on. Hopefully, I’ll be able to get that out in the next day or so and get the new bumper installed, but I wanted to show off this beauty and let the community know about this rear bumper option since it doesn’t get much attention. Overall, I would say as long as you’re not in a hurry and are patient with Hanson Offroad this is a great option and I’m glad I ordered it. I’ll post a follow up once I get that broken bolt out and have it mounted up.
-
I have an Alpine UTE-73BT single din head unit. JBL’s best 5.25” door speakers (forgot model), and a bazooka 6.5” tube sub with built in 250w amp. This sub fits perfect behind the passenger bucket seat with it all the way back and is not tall so I can still put a small tool bag, or similar on top of it. It sounds great and has enough bass for the small cab. I Definitely recommend sound deadening in the doors, back wall, and above headliner if you ever take it out. If you want any decent bass, get a small sub. Even 6.5’s in the door aren’t going to cut it. EDIT: Forgot to mention, I set my fader all the way to the front and don’t use rear speakers.
-
Adding AC, need details for Dealer AC harness
Kedosp replied to Kedosp's topic in MJ Tech: Modification and Repairs
Htchevyii - You’ll definitely want to pull the sub harness for the ac controller from a Cherokee of similar year. When you pull the dash to swap in the AC heater box that wiring swap is very easy. Plugs right in when you remove the harness for “non AC” After installing that you’ll be able to use the dealer AC harness 4 pin connector under the hood by the washer fluid reservoir. -
Adding AC, need details for Dealer AC harness
Kedosp replied to Kedosp's topic in MJ Tech: Modification and Repairs
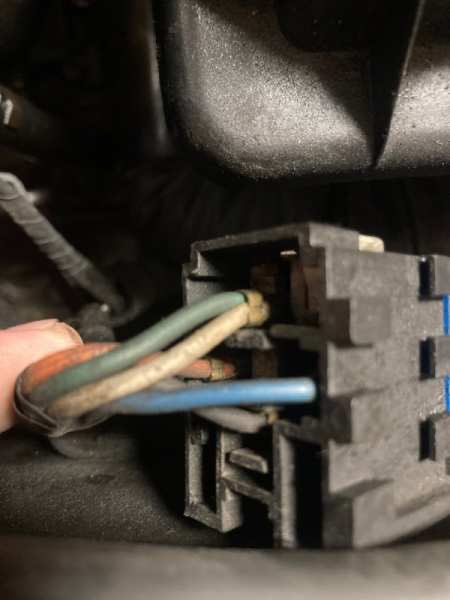
I tried wiring it using the pictures from Eagles NOS dealer harness for the 2.5L and built a replica harness but it would not work. Power was not getting to the relay terminals how it should. Below is how I wired it which has been working great. Only thing I may eventually try to figure out is the ECU doesn’t know the AC is on so the RPM’s drop a bit with the AC on. If the engine is not warmed up it will occasionally die. I only used 2 wires of the dealer harness connection: Orange wire with black stripe in terminal B is the 12v power source for the relay. Green wire with black stripe in terminal A sends power when the AC controller is moved to an AC position. I used this as the trigger to turn the relay on but first ran the wire to the low pressure switch and back to the relay. (This will prevent relay from turning on the compressor with low pressure) Then I ran a single wire from the relay output terminal to the compressor. Don’t forget to ground your relay or it will not function My new compressor already had a diode inline with the short single wire that came attached to it so I didn’t add one in my wiring. -
Adding AC, need details for Dealer AC harness
Kedosp replied to Kedosp's topic in MJ Tech: Modification and Repairs
Then that has to be a diode taped to eagles harness. Searching google for “Jeep Cherokee electric fan diode” comes up with a few results showing an orange version of that component. Pic below My truck doesn’t have the heavy duty cooling. I do have an OEM electric fan that I installed, but haven’t started on figuring out how to wire that yet. Was planning to use stand alone relay and a temp sensor in the newer style thermostat housing I added when upgrading my cooling system. I might just leave the white wire disconnected from the AC relay if it feeds the stock fan relay that doesn’t exist in my harness.
-
Adding AC, need details for Dealer AC harness
Kedosp replied to Kedosp's topic in MJ Tech: Modification and Repairs
I’m familiar with how diodes work, and I believe my compressor has one in the short section of wiring that came attached to it. Seems to match this part of the wiring diagram. The part that is bothering me is the “breaker” labeled 7Y02 in Eagle’s harness. I almost think that’s a diode as well since the white wire it’s inline on and the green wire both feed the 12v trigger terminal of the relay to engage the AC clutch. Seems odd there would be 2 wires feeding that, and I don’t think 12v flowing back into the other trigger wire seems right. What are your thoughts? Obviously you know your stuff Eagle, and your AC has worked for years. Just trying to understand how this harness works and make sure I get it right.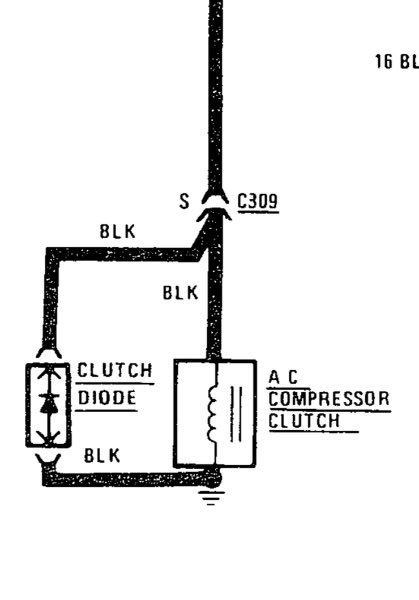
-
Adding AC, need details for Dealer AC harness
Kedosp replied to Kedosp's topic in MJ Tech: Modification and Repairs
Thanks pizzaman09! I hopefully have the under dash wiring sorted out already. It’s the engine bay harness that I’m missing and with Eagle’s pictures I should have that built soon. I’ll post updates once I do. -
Adding AC, need details for Dealer AC harness
Kedosp replied to Kedosp's topic in MJ Tech: Modification and Repairs
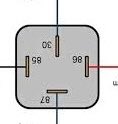
I think I have most of it figured out, can you confirm if I’m on the right track with where the wires run to? I used your relay picture and the other one below to hopefully figure out where the wires go for the relay. The numbers are upside down, but I think that’s the same orientation as your relay in the picture. Where in the harness is the inline diode? 4 pin connector wires Green - pressure switch, then to relay 30 White - breaker then to relay 30 Orange - to relay 85 Black/blue - to relay 86 Relay wiring 30 green & white (2 wires) 85 orange 86 black/blue 87 grey (output to compressor)