

SVPete
-
Posts
344 -
Joined
-
Last visited
-
Days Won
1
Content Type
Profiles
Forums
Gallery
Everything posted by SVPete
-

Factory Spare Tire Jack Question
SVPete replied to AZJeff's topic in MJ Tech: Modification and Repairs
The tapered end of the lug wrench works great too. I find it easier to use than the jack handle.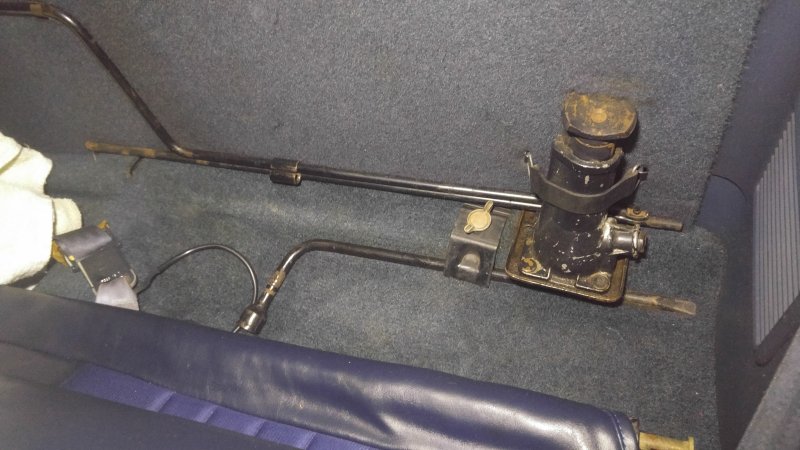
-
Door hinge pins replacement
SVPete replied to kill_burst's topic in MJ Tech: Modification and Repairs
Or just use standard 1/4 inch bolts (pretty sure that's the size). I slipped a thin washer in between the hinge pieces and snugged the bolts. It put a good cure on the sag I had. I tried just replacing the pins which I had pulled from the rear doors of a Cherokee in the JY. Figured less wear on the rear doors. But It didn't work out. The bolts were a lot better. -
Loosening the hinge bolts on the door (three on both the top and bottom hinge) and tilting the door inward or outward. Slipping in another spacer (you can make one out of some thin sheet metal also) on the bottom hinge can also help kick the door up to give some relief to the driver's door sag that we can have.
-
I bought and installed the kit referenced by DirtyComanche. It works, but it appears smaller than the original seals. Adjusting the drivers door (and cleaning up the sag) took care of the gap I had at the top rear.
-
No spark on my 86Comanche 2.5
SVPete replied to MrBill61's topic in MJ Tech: Modification and Repairs
Great that you figured this out MrBill61. When we install a new part we make a very big assumption that it is good. So when we get a new part that is bad, we tend to rule out the part we replaced as the problem. That makes things double-tough. -
Left headlights on a few times. Dead Batt
SVPete replied to Manche757's topic in MJ Tech: Modification and Repairs
Classic! -
Removing window handle
SVPete replied to a bum with money's topic in MJ Tech: Modification and Repairs
The Dorman HELP Door Lock Rod Assortment, number 75450, contained two clips that worked for me. Beat $10 apiece from the dealer. Whenever I go to the junkyard I pick up some, if available, along with door panel fasteners. I use a oil type spray on them and then gently pry them off the rod with a 3 - 4 inch long, 1/8 inch wide tip, flat blade screwdriver. Works most of the time, but that's why I snag spares at the junkyard. -
^^Um yeah. That's what death wobble means to me.
-
A rock or something scratching on the brake disk? Brake pads worn? Something loose in the brake drum?
-
I quit for good, cold turkey, five years ago, July 20th. Had many unsuccessful attempts, which were for the wrong reasons...others. If you are doing it for yourself, you will be successful. To echo some of the others: 1. Stay away from the first one. One leads to two, to buying a pack within a week. No celebrations, like...it's been two months...just one won't hurt (I failed once due to that). 2. No BEER or other alcohol. It stimulates the urge the smoke. My mouth would actually water for a smoke. After four years, I could drink a beer without the urge. 3. Cut back on coffee too. A smoke went reeeeeally well with the morning coffee break. 4. You will gain some weight. 5. Don't fall into a trap of substituting another bad habit such as vaping. Be done with anything else other than air. 6. You will be easily irritable. Significant others should know this and accept it for a while without patronizing. We know in a minute we were a jerk and why. But you know all that. 7. Always remember number 1!
-
front fender replacement
SVPete replied to ruralandalone's topic in MJ Tech: Modification and Repairs
I'm pretty sure you have to remove the front grille panel. Although I have never replaced a front fender (quarter panel to me), I have had the grille panel off, which gives you clear access to any screws/bolts.....and the grille panel is attached to studs that are integral to the fender, so you likely have to remove the grille panel anyway. If the 86 is anything like my 88, to remove the grille panel..... Remove the side maker lights (two screws each). Remove the trim bezel around the headlights/turn signal lights (two screws? each). Remove the trim piece (moulding), which is behind the side marker lights (1-2 screws? each) Remove the turn front signal lights (two screws each). Remove the headlights (four screws each). Remove the grille (8 screws). There are 5 torx head bolts under the hood, on top of the radiator crossmember, one of which is helps secure the hood latch striker. Lastly, two nuts on each side attached to the studs on the fenders. There may be a wiring harness attached on the back side of the grille panel. I might have missed a screw somewhere and have something out of order, but it is pretty easy. Then you should be able access the final screws for the fenders. -
Things shouldn't be tight going together. Your emergency brake cables may need to be adjusted. Hopefully they are not frozen. I had that happen once, made trying to put the drum on that side a bear/impossible with new shoes.
-
I look at the pump and my trip meter every time I fill up. Simple math comes out to 21 mpg typically. That said, my tires are 235's versus the stock 205's. When I drive, I use a 10% rule when gauging my speed due to over-sized tires, meaning if the speed limit is 45, I should drive 41 to avoid a ticket. So, what is my mpg really? Since the speedometer/odometer is driven by the gear in the transfer case, am I actually going further than my odometer indicates and my mpg is higher than a simple calculation? Does the same 10% rule apply? Since I've been running 235's for about a 100K, does that mean my actual mileage on the truck is about 10K miles higher than indicated on the odometer?
-
Yepper, middle row captain's chairs. The ones in our 2000 Toyota Sienna fold just like the ones in the photo. Looks they are in a VW Mini-Bus.
-
My issue used to rear its head around 55 mph and was initiated by a hard bump like yours is. I could "feel" it wanting to wobble through the steering wheel when at that speed, it just needed something to set it off. Haven't had a problem for a few years. Things I've done that may have had an impact: 1. Tightened track bar (then replaced it), although it didn't seem loose. 2. Replaced transmission mount (as I think about that when typing this....if the transmission mount is trashed..... I could feel the transmission "twist" through the gearshift when I would release the clutch....and you hit a big bump, which may jolt the whole truck.....how does that impact the driveshaft spinning fast enough to go 55 mph, or 40 mph, with a basically non-existent transmission mount? Somebody smarter than me may know whether that can create the terrible vibration.) 3. New tires and balanced (old ones needed to be replaced, but then I had worn out a couple of sets while having the problem. To clarify, tire wear was normal.) 4. Regular lubing of suspension with every oil change (I realized that the oil changing shops were not really lubing the suspension and u-joints like they supposedly claimed to. The top ball joint is likely impossible to grease without taking the tire off. I had to clean so much gunk off, that I couldn't even determine if there was a zert there. The tie rod ends aren't easy to do with the tire on either. And since you have to move the truck to rotate the rear drive shaft to lube the u-joints, those weren't getting done also.)
-
I "freshened up" the look of my carpet with some fabric dye from Wal-Mart (about $2). I stayed with the original color of blue. I didn't expect a miracle, but it looked a lot better after washing and dyeing, versus the faded look.
-
Maiden Voyage - My List Just Got Longer
SVPete replied to Griff04's topic in MJ Tech: Modification and Repairs
It helps stop oil blow-by which travels through the CCV lines in to the airbox, soaking the air filter with oil. Performing the mod has mitigated the oil saturation for me, not completely eliminated it, but reduced it a lot. -
Maiden Voyage - My List Just Got Longer
SVPete replied to Griff04's topic in MJ Tech: Modification and Repairs
Follow through on your thought to replace the valve cover gasket first. Use a quality gasket and torque to specification. After you do that, suggest that you clean the engine which will assist you in tracking down any other leaks. I used Fel-Pro PermaDryPlus (part number VS50522T), available from RockAuto for about $31. I torqued it, and then checked the torque a couple of times. Nothing leaking from the valve cover now for two years. Since you will have the valve cover off, recommend you perform Cruiser54's valve cover mod too. -
I used Duralast calipers which I ordered on-line, ship to home (it was a good deal), with AutoZone. Got two of the same calipers (both were left side, I think). Boxes were marked correctly, but wrong part in one of the boxes. Went to the local store and exchanged one for the right side......and the left side I kept, the seal was loose on it. So, I went back and got the left side I exchanged. The staff were polite and helpful, so no need to rip the "big box store". After that, I would recommend taking a good look at them before installation. Agree with 75sv1, eyeball your flexible lines to the calipers and see if you should replace them while your at it.
-
Serpentine Belt Replacement
SVPete replied to LittleBoJeep88's topic in MJ Tech: Modification and Repairs
I have had to actually remove one of the rear bolts to put a new belt on....never to remove a belt. 1025 seems to be the belt length I am familiar with. -
Noise after replacing starter
SVPete replied to Lftrn97's topic in MJ Tech: Modification and Repairs
I replaced the starter at least twice over the years with ones from AutoZone. No shims and no problems. -
Mine broke in 1992 at approximately the same location as 8valvehero. The metal was only welded from the factory about halfway around (as visible in the photo above). Obviously, a complete weld would have stopped the pedal from breaking.
-
Mine uses a 7mm allen wrench.
-
Power Steering Reservoir Blowing out Oil??
SVPete replied to Griff04's topic in MJ Tech: Modification and Repairs
We used Dextron II in the power steering pumps for CUCV's (Chevy Blazers and Pickups) and HMMWV's in the Army. Maybe it's just one less fluid to stock. -
Electrical EGR Transducer
SVPete replied to MuchRespect's topic in MJ Tech: Modification and Repairs
If you head to the junkyard, take a little time to separate the transducer to check the spring inside for the diaphragm. They will rust away to dust. Take care not to damage the diaphragm while your at it. Sine you will have it separated, clean the ports since they can get clogged.