DigitalBman Posted July 31, 2017 Author Posted July 31, 2017 On wiring the EXT IDLE switch. I have a manual, obviously the high idle was meant for police package equipped XJ'S with AW4'S. So, I wired in the switch to pin A12 on the PCM. Om the manual there was no Wire coming from this pin. So I drilled it out on the connector and shoved in a pin from a donor plug. ...... And nothing. So I.got to thinking... How does the computer know that it is in park or neutral? Well obviously the NSS switch. Well... I don't have an NSS switch having the AX-15. So... I attempted to trick the PCM into thinking it was getting a signal from the NSS. At pin A6. Well, on an AW4 equipped XJ pin A6 read 1 volt with the ignition on and in park. I tried using some resistors and getting the voltage down to 1 volt. But the lowest I could get was 2.55 volts and that didn't work. So I am currently looking for a way to get 12volt down to 1 volt. Will report back when I have figured something out. In the meantime, suggestions are more than welcome.
cody4359 Posted July 31, 2017 Posted July 31, 2017 I doubt many tie rods are meant to stay straight while being a battering ram on rocks, it looks like you have the teraflex? I liked that kit other than the increased turning radius. I have to currectlink from currie and have replaced the tie rod bar twice Sent from my SM-G900V using Tapatalk
DigitalBman Posted August 1, 2017 Author Posted August 1, 2017 Yeah it's the Teraflex high steer setup. But I am replacing the Tie Rod and Drag Link with slightly longer and solid 1.5" 7075 Aluminum ones from IronMan4x4. That will match my track bar from them as well... Except it's 1.75" solid 7075. And no your right! It's definitely not meant for that and I'm not complaining that it has to he replaced... Just That the circumstance around it sucks.
DigitalBman Posted August 4, 2017 Author Posted August 4, 2017 These came in today! From Krustyballer! He also made my rear winch bumper, which I still haven't installed. UPS put so many dang stickers on these it wasent even funny... Did about 45 minutes of grinding and getting the little bit of surface rust off. Then cleaned with acetone and painted! Those are just the first couple coats of paint on one side. Still gotta paint the other side and out a couple more coats on. Hopefully will get them mounted this weekend. And hopefully next week will have the parts to fix my steering... And on September 8th, 9th and 10th my dad is gonna fly up and he and I are gonna road trip out to MOAB for the weekend. Supposedly there is a meet up happening with a bunch of MJ'S. But we will see how many people show up! Will be fun regardless!
DigitalBman Posted August 5, 2017 Author Posted August 5, 2017 Got one of the sliders installed today! Well... partly, it is held in by two bolts and the pinch seam clamps until tomorrow when I can finish it. But wow... just with the two bolts and the clamps it's sturdy enough to support some weight! I had to get a little creative in order to get it held in place before mounting... my jack wouldn't go up high enough, by itself at least. Haha I didn't have a block of wood or anything sturdy enough to use or I would have. Removed the one jack and this one just decided to hang out! 7 total mounting points. 3 legs and 4 clamps! I will post some more pictures when they are fully installed
kansashogan Posted August 7, 2017 Posted August 7, 2017 I seen this truck this weekend and when it is done it will be a beast. Oh, and those sliders are a work of art. Good job, Crusty. I will be ordering a hitch pretty soon.
DigitalBman Posted August 10, 2017 Author Posted August 10, 2017 Thanks guys! I appreciate it!:] Got the drivers side slider mounted over the weekend. Also received my new drag link and tie rod from IronMan4x4 today. They are 1.5" solid 7075 aluminum. Will post pics soon.
krustyballer16 Posted August 12, 2017 Posted August 12, 2017 I seen this truck this weekend and when it is done it will be a beast. Oh, and those sliders are a work of art. Good job, Crusty. I will be ordering a hitch pretty soon.I'm ready when you are! Sent from my HTC One M9 using Tapatalk
DigitalBman Posted August 14, 2017 Author Posted August 14, 2017 Got the OR-FAB bumper with my Warn M8000-S and rigid hyper spot lights and cheapo eBay (for now) light bar mounted today. It's got a few bolts in it but iv still got to do some tweaking to get the rest mounted. I love the way this bumper looks, but in my opinion, the measurements for the mounting was garbage from the factory. All kinds of gap and space between the front clip and the bumper. Looks like a half @$$ job to me. So I fixed the mounting holes and it is literally as tight as it can possibly be to the jeep. Looks much better in my opinion. The light bar is floating inside the hoop between a mount that my dad and I designed and CNC machined. That is also what the winch box is mounted on (for now). Eventually the solenoid box will be mounted elsewhere hidden with a wireless capability. The wires are dangling Cuz I haven't routed them yet. Sorry for all the pictures, just thought I'd share since there seems to be a lack of pictures posted with this bumper on MJ'S.
KCsurfer420 Posted August 17, 2017 Posted August 17, 2017 Dude it's comming along awesome.... I love that you still have the EPJ sticker on the window.... Sent from my SM-G900T using Tapatalk
DigitalBman Posted August 20, 2017 Author Posted August 20, 2017 Dude it's comming along awesome.... I love that you still have the EPJ sticker on the window.... Sent from my SM-G900T using Tapatalk Thanks I appreciate it! I like the EPJ sticker, kind of a reminder of the life the jeep has had! Driving a jeep with a Florida tag, El Paso Jeepers sticker, in Kansas. Just seems fitting:] Until the windshield needs replacing it will stay.
DigitalBman Posted August 23, 2017 Author Posted August 23, 2017 Just small but cool update today.I took my Shortened overhead console to a hydro dipping place here local. Brought him the dash bezel for the wood grain pattern. And he did a pretty good job matching it up!Between this stage with the bondo came more fiberglass, bondo Hair, JB weld and a lot of sanding! Before I took it to him it was down to 1200 grit sandpaper smooth and as polished good as my time would let me get it.I don't have any pictures from right before I took it to the guy, when it was the final product, but that ^^^ is as close a picture I have to what it looked like.It's not a 100% match, but I think he did a pretty darn good job! And the slight differences won't even be noticeable when it's mounted to the ceiling!I'll get the guts installed into it this week and post up some more pictures!
DigitalBman Posted August 25, 2017 Author Posted August 25, 2017 A little taste of what the Shortened overhead console looks like with most of the electronics in it
jeeppapa Posted August 25, 2017 Posted August 25, 2017 Got a console for mine. It's going really dress up the cab. What is the plan to mount it? Sent from my iPhone using Tapatalk
G00SE Posted August 25, 2017 Posted August 25, 2017 DigitalBman, can I bring my 89 to you and leave it with you for as long as it takes to do what you've done to your MJ? That's the SWEETEST MJ I've seen! Great job...G00SE Sent from my SM-J727P using Tapatalk
DigitalBman Posted August 25, 2017 Author Posted August 25, 2017 Got a console for mine. It's going really dress up the cab. What is the plan to mount it? Sent from my iPhone using Tapatalk The lip on the rear of the console goes through the fiberglass lip of the headboard and then is scooted back against the fiberglass bondo Hair which makes it snug against the headliner. The front holes are screwed into where the visor holes are. This was an early test fit.
DigitalBman Posted August 26, 2017 Author Posted August 26, 2017 DigitalBman, can I bring my 89 to you and leave it with you for as long as it takes to do what you've done to your MJ? That's the SWEETEST MJ I've seen! Great job...G00SE Sent from my SM-J727P using Tapatalk Lol Bring it on by!! We I'll give ya a hand with what I can! Just few more teaser pictures! Got the final assembly of the Overhead console done. Also got the RKE board mounted I'm there for the key Fobs.
DigitalBman Posted August 26, 2017 Author Posted August 26, 2017 Just another small update today and no pictures. But I got the bumper mounted the rest of the way. 5 bolts on each side. Also got the winch wired up. Fixed a nick in my battery isolator power wire. Also ran the 5 switched wires from the auxiliary fuse box to the interior. I have found that running wires to cab can be done pretty cleanly by drilling a hole in the firewall to the cowl area. Then another hole through the cowl area and drop the wires right in behind the dash. Using grommets in the holes around the wires creates a pretty factory look and it just works well. Tomorrow I'll try to get the headliner in, the console wired and installed, and the front LED lights wired up.
DigitalBman Posted September 15, 2017 Author Posted September 15, 2017 So this past weekend I attended MJ MOAB Takeover! Tackled all of Hells Revenge, including Hells Gate and The Escalator! Also went up to MOAB Rim and to Top of the World!
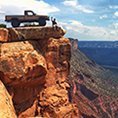
Dzimm Posted September 16, 2017 Posted September 16, 2017 That would have been fun! Wish MOAB wasn't so far away. When I first saw the picture of the blown tire, my brain instantly thought holy crap you put tracks on it.. Ha. Love the picture on the edge of the cliff. Super cool!
DigitalBman Posted September 21, 2017 Author Posted September 21, 2017 That would have been fun! Wish MOAB wasn't so far away. When I first saw the picture of the blown tire, my brain instantly thought holy crap you put tracks on it.. Ha. Love the picture on the edge of the cliff. Super cool! Lol yeah It kinda looks like that for sure! But nope... Just a broken valve stem that hot ripped off by a rock and of course I didn't have a spare with me... I drove my jeep and my dad drove my tow rig to the trail head on our way back to the interstate. This was our last trail on the last day. But to get back down the mountain I had to drive on that tire all the way till it fell off totally. Destroyed the wheel. It also ripped off a brake line. Got within 4.5 miles of the tow rig, we were making such little progress my dad took off jogging. And I made it about another mile before I couldn't drive it any more due to the wires that make the bead in the wheel coming lose and wrapping around the knuckle, it also took out that brake line. I was working on cutting them off for about 30 minute and my dad rolled up in the tow rig. So we loaded it up and towed it the rest of the way down the trail / gravel road at this point. I picked these up really cheap and I had adapters laying around. So these will get me buy until I get my method race wheel beadlocks and I'm prolly gonna go with the 35 x 12.5 x R17 Baja Claws.
Dzimm Posted September 21, 2017 Posted September 21, 2017 Nice haha. Definitely a good story to tell.
DesertRat1991 Posted September 22, 2017 Posted September 22, 2017 Wow. I thought the Takeover got cancelled because the link went dead ages ago. I googled it a few weeks back and nothing came up. Looks like you guys had fun! How many MJs showed up?? And can you tell us where that cliff pic was taken? That's a great shot!
DigitalBman Posted September 22, 2017 Author Posted September 22, 2017 Wow. I thought the Takeover got cancelled because the link went dead ages ago. I googled it a few weeks back and nothing came up. Looks like you guys had fun! How many MJs showed up?? And can you tell us where that cliff pic was taken? That's a great shot! Lol that link still works for me! But see for yourself!:]

Recommended Posts
Create an account or sign in to comment
You need to be a member in order to leave a comment
Create an account
Sign up for a new account in our community. It's easy!
Register a new accountSign in
Already have an account? Sign in here.
Sign In Now