88whitemanche Posted February 20, 2018 Share Posted February 20, 2018 4 hours ago, DigitalBman said: Dorman RNB-610-449 This link might work to summit racinghttps://www.summitracing.com/parts/RNB-610-449 Cool thanks bud Link to comment Share on other sites More sharing options...
DigitalBman Posted February 20, 2018 Author Share Posted February 20, 2018 Got the flares painted and installed until I’m ready to construct inner fenders and actually fiberglass them to the body. Just trying to get things together for the Frostbite event this weekend! Here’s How she sits now:I also got the Ironman cross member welded today. She drives sooooo much better with the long arms and the axle stretched a few inches! Link to comment Share on other sites More sharing options...
Trailhawkmj Posted February 21, 2018 Share Posted February 21, 2018 Really digging your setup Link to comment Share on other sites More sharing options...
DigitalBman Posted February 22, 2018 Author Share Posted February 22, 2018 Really digging your setup Thank you sir!! These edited ones do her a little more justice Link to comment Share on other sites More sharing options...
DigitalBman Posted February 23, 2018 Author Share Posted February 23, 2018 Getting to the bolts on the transfer case side with the new cross member is dang near impossible without an extra set of hands to install the front drive shaft.Had to enlist the help of my buddy to get it installed, but she’s in and one step closer to Kansas Rocks! Link to comment Share on other sites More sharing options...
DigitalBman Posted February 25, 2018 Author Share Posted February 25, 2018 Had fun at Kansas rocks frostbite today, but man it was muddy!!!! I had some carnage... due to the mud and the tight technical trails I slid into a couple trees and dinged my bed up some.... Then while pressure washing the dirt off some of the paint began coming off... But, the jeep did absolutely amazing and I did every single trail, even the washed out expert ones. I didn’t do the slab because it was just too slick for anybody to get up so I didn’t try. I tried out the ramp again this time and made it half way up the large one!!! The new front four link system is absolutely killer... I am so impressed with how much my on road and off road handling has been improved! I highly recommend the IronMan4x4 front cross member and link system! For comparison, this is How I did at last years frostbite on the ramp. This one is the small ramp and I didn’t even make it half way up! With the IronMan4x4 front suspension and the 7075 links, I made it half way up the big ramp and had more to go!! But the 37’s were tucking in the fenders and rubbing some. So I didn’t push it to hard. Link to comment Share on other sites More sharing options...
DigitalBman Posted March 8, 2018 Author Share Posted March 8, 2018 Started working on the rear bumper from Krustyballer, finally!!! Will finish mounting it next week, waiting on a couple final pieces of the puzzle to arrive. Link to comment Share on other sites More sharing options...
DigitalBman Posted March 10, 2018 Author Share Posted March 10, 2018 Got the bumper from Krustyballer prepped with the accessories. Waiting on a couple more things before I install it. Got the Lund Moonvisor installed tonight. Just have to finish buttoning up some wiring on the interior. Link to comment Share on other sites More sharing options...
Darth_Giger Posted March 15, 2018 Share Posted March 15, 2018 This truck is awesome! really making me want to tear mine apart and rebuild it back up! Link to comment Share on other sites More sharing options...
DigitalBman Posted March 18, 2018 Author Share Posted March 18, 2018 I really like the bumper!!! But I'm gonna have to make a skid plate for the winch to protect the clutch lever and the rope from rocks Link to comment Share on other sites More sharing options...
DigitalBman Posted March 26, 2018 Author Share Posted March 26, 2018 So I got the wiring done on the Moonvisor. Wired it so that it operates off the headlight switch and comes on when the parking lamps / interior guage lights come on. XJ'S that do not come with a factory fog lamps still have the wiring. It is attached to a blank spot behind the switch bezel. I used the orange illuminated and grounding lead off of that to wire the visor. This way I didn't have to wire to a separate switch, it is on a factory fused circuit, and it is on an ignition circuit. I also gained the ability to dim the visor lights! I was pleasantly suprised that I was able to go from full off to full on by twisting the dimmer knob. Link to comment Share on other sites More sharing options...
Dzimm Posted March 27, 2018 Share Posted March 27, 2018 man that visor looks soooo good. Link to comment Share on other sites More sharing options...
Joeyv12503 Posted April 4, 2018 Share Posted April 4, 2018 That rear bumper is awesomeee def one of my favorites. Link to comment Share on other sites More sharing options...
88whitemanche Posted April 6, 2018 Share Posted April 6, 2018 If I’m not mistaken I think you can rotate the side of the winch just gotta buy a new gasket I’m sure there’s a lot of YouTube vids on that.... Link to comment Share on other sites More sharing options...
Swampy Posted April 6, 2018 Share Posted April 6, 2018 Dang that truck looks awesome. I love it, I didnt ever like those flares but your truck just makes them work and makes want to order a set. If mine could look half as good as yours I will be happy Link to comment Share on other sites More sharing options...
DigitalBman Posted April 6, 2018 Author Share Posted April 6, 2018 If I’m not mistaken I think you can rotate the side of the winch just gotta buy a new gasket I’m sure there’s a lot of YouTube vids on that.... EXCELLENT idea!! I didn’t even think of that!! This is why I love these forums... lol Link to comment Share on other sites More sharing options...
DigitalBman Posted April 6, 2018 Author Share Posted April 6, 2018 Some pictures from Tuttle creek! Link to comment Share on other sites More sharing options...
88whitemanche Posted April 10, 2018 Share Posted April 10, 2018 Just noticed you have window vent visors do you have a part #? Link to comment Share on other sites More sharing options...
Strokermjcomanche Posted April 10, 2018 Share Posted April 10, 2018 6 minutes ago, 88whitemanche said: Just noticed you have window vent visors do you have a part #? https://m.ebay.com/itm/1985-88-Jeep-Comanche-Pick-Up-Truck-Stainless-Steel-Vent-Shades-/302531476725 Link to comment Share on other sites More sharing options...
DigitalBman Posted April 10, 2018 Author Share Posted April 10, 2018 Just noticed you have window vent visors do you have a part #? These ones by weather tech are my favorite! I have run them on almost all of my vehicle. Instead of sticking to the outside of the vehicle they seat to the inside of the window channel. The ones on my Comanche now were already on there. But I highly recommend the weather tech ones. Link to comment Share on other sites More sharing options...
88whitemanche Posted April 10, 2018 Share Posted April 10, 2018 3 hours ago, DigitalBman said: These ones by weather tech are my favorite! I have run them on almost all of my vehicle. Instead of sticking to the outside of the vehicle they seat to the inside of the window channel. The ones on my Comanche now were already on there. But I highly recommend the weather tech ones. Thanks I’ve been wanting some that hug the body 16 hours ago, Strokermjcomanche said: https://m.ebay.com/itm/1985-88-Jeep-Comanche-Pick-Up-Truck-Stainless-Steel-Vent-Shades-/302531476725 Thank you but I guess it was sold before I got to look at them Link to comment Share on other sites More sharing options...
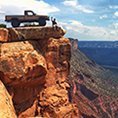
DigitalBman Posted May 6, 2018 Author Share Posted May 6, 2018 So, quick little update. I have been super busy with life... been working 20-30 hours at my second job and being a dad as well as going to school does not leave a lot of jeep time here lately! But I went to Tuttle Creek Kansas a few weeks ago with my buddy. Not 10 minutes after having it off of the trailer the transfer case was spewing fluid, the steering gear box was leaking all over the place, fuel was leaking from above the fuel tank, and a nail was in my passenger rear tire. My NP231 will not engage in any position. The Comanche is dead in the water... So my buddy had to tow me back to the trailer and I had to put a concrete anchor D-Ring in my garage to winch the Jeep out of the street and up the drive way... My goal is to get the issues diagnosed in the next couple weeks and the rear tire de-mounted and patched from the inside soon after. Not looking forward to undoing that bead lock wheel... Soon to do list: - Diagnose NP231 fluid leak and engagement issue - Diagnose steering gearbox leak - Patch passenger rear tire - Fix fuel leak Shortly thereafter to do list: - Wire rear winch - Wire rear flood lights - Mock up rear 4 link - Weld 4 link truss on rear axle Before October MOAB trip: - Mount spare tire - Mount Jack - Mount tool carry solution - Hydro Assist (hopefully) - On board air (hopefully) Eventually: - Finish my dang headliner, needs subwoofer enclosures finished and upholstery - Wire winches to steering wheel radio controls - On board Power Pro welder - Rock crawl cameras installed and wired to radio screen - Rock Crawl lights - Strip and repaint with actual paint or bed liner - Construct new front inner fenders - Create fiberglass enclosure for windshield washer fluid relocation - Wire the EXT idle switch to work while in gear with AX-15 - Install a bed cargo light Here are a few pictures from Tuttle Creek that I got. We went straight to that tree to take some pictures and that when my Jeep started showing all the problems.. There are a couple pictures showing the use of my garage anchor and then one more showing the struggles of only having a single car garage... Bless my wife for letting me have it. Link to comment Share on other sites More sharing options...
Pete M Posted May 7, 2018 Share Posted May 7, 2018 that sucks. I feel for you. the first time I took my newly re-assembled 88 it overheated 10 minutes into the dunes. Link to comment Share on other sites More sharing options...
DigitalBman Posted June 11, 2018 Author Share Posted June 11, 2018 Picked this up local on Friday! 2000 XJ Limited. Interior is on pretty decent shape. Stock axles, all electronics work including windows and door locks, and only has 2,000 miles on the new motor. It isn’t perfect, but it is a daily driver and it is going to be my wife’s project rig / family rig. Needs a little TLC but one day soon she will be a gem! The kicker though is, the motor is 4.7 Titan Stroker. The same engine in the JCR XJ minus the aluminum heads but with bigger exhaust valves and a performance cam and a new fully welded exhaust and some other nifty tricks below the hood. :] Link to comment Share on other sites More sharing options...
DigitalBman Posted October 17, 2018 Author Share Posted October 17, 2018 So finally had time to yank the transfer case. And wow! Let me tell ya it sure is a pain to get that center section dropout piece removed from the IronMan4x4Fab long arm kit. Once removed, I could hear something rattling around and moving inside the T-Case. Turns out one of the Shifter forks broke. Ruined all of the gears. The T-Case is trashed. On a side note, when I bought the Jeep I was told it had a 6 pinion planarity, HD gears, and a wide chain. There is absolutely nothing special about my transfer case... nothing has been done to it internally. I have a spare NP231 ready to throw in. But I wanted to see if any of the “upgraded” parts were able to be salvaged and just see what’s up. So i split the T-Case open and found out that it’s all ruined and no internal upgrades have been made. So, it’s all just gonna get trashed. You can see in this picture the lack of pinions... And here you can see it is the stock 1” wide chain. Finally, here you can see one of my most utilized and favorite tools! My cordless Dewalt Impact! I love this thing.... Will update when I have the new one installed! Link to comment Share on other sites More sharing options...

Recommended Posts
Create an account or sign in to comment
You need to be a member in order to leave a comment
Create an account
Sign up for a new account in our community. It's easy!
Register a new accountSign in
Already have an account? Sign in here.
Sign In Now