cruiser54
-
Posts
9413 -
Joined
-
Last visited
-
Days Won
14
Content Type
Profiles
Forums
Gallery
Everything posted by cruiser54
-
That's the early XJs and MJs that used the British cylinders. Another bit of info: The rubber line from the master to slave deteriorated internally due to the wrong fluid being in the British system. You could replace masters and slaves quite a few times and have them go bad because of the abrasive crap that developed in that hose. Once they went to the Japanese cylinders, all was fine. Ya know, if folks bled their clutch fluid every 30,000 miles along with their brake fluid, those components would live longer lives.
-

Renix 4.0 Low Oil Pressure
cruiser54 replied to nknapp16's topic in MJ Tech: Modification and Repairs
Test the oil pressure with a gauge. You can rent one from a parts store. -
Snapped engine mount bolts
cruiser54 replied to IronManche87's topic in MJ Tech: Modification and Repairs
Left handed drill bit also. You guys ever see this? https://www.jeepforum.com/forum/f11/warning-all-4-0-owners-check-your-motor-mount-block-bolts-594902/ -
Renix fuel system.
cruiser54 replied to Wounded_Fighter's topic in MJ Tech: Modification and Repairs
This. And then you can lean burn your engine, get a new one, and not have saved a dime. -
Renix fuel system.
cruiser54 replied to Wounded_Fighter's topic in MJ Tech: Modification and Repairs
Propane enters the engine as a vapor, not a liquid. -
This^^.
-
Renix fuel system.
cruiser54 replied to Wounded_Fighter's topic in MJ Tech: Modification and Repairs
What is your goal? -
Agreed. LOL. Or needed valves adjusted. Points replaced.
-
You leave it together and use the 1/2" on one end or the 9/16" on the other. The one you're not using becomes the lever and you can rotate it to the best spot.
-
Need help troubleshooting misfiring
cruiser54 replied to Jack15379's topic in MJ Tech: Modification and Repairs
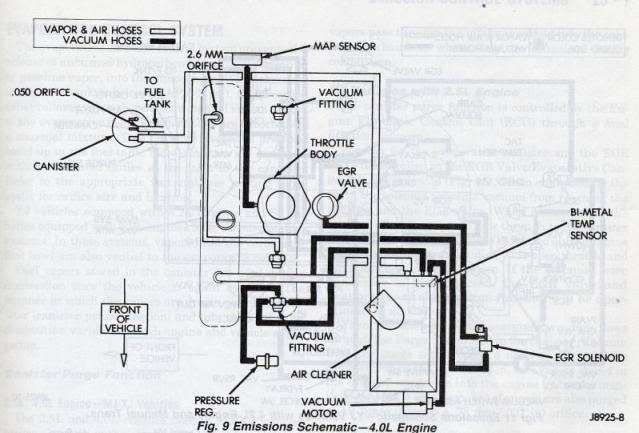
Tips 1,3,4 and 5 before doing anything else. Make sure your intake manifold bolts haven't loosened up and the vacuum line from the throttle body to MAP sensor on the firewall isn't cracked, melted, split. -
Motor Starts, Runs for 5 Seconds, then Dies
cruiser54 replied to Phillip Gwin's topic in MJ Tech: Modification and Repairs
Pun intended? Funny either way.
-
Just ADD a large gauge wire to a convenient spot on the motor.
-
master cylinder/ brake booster upgrade
cruiser54 replied to dj5's topic in MJ Tech: Modification and Repairs
If it's for double flares, yes. -
But, the ground from the head to the firewalll is super important on the 4 cylinder models!!!
-
It's much easier to remove bracket and all with the 10mm headed bolts. enjoy that ECU!!
-
Female End Seat Belts
cruiser54 replied to Ls2xjcomanche's topic in MJ Tech: Modification and Repairs
ejection seat. -
the real issue with those motors was the back of the intake manifold leaking because they used no gaskets, but used rTV, on 2 flat surfaces. Be sure and check there first.
-
The 3 pin connector with 2 wires is CPS. I bet someone went around the C101 with those wires. Good idea really. Wanna teach your son soldering skills? CRUISER'S MOSTLY RENIX TIPS C101 ELIMINATION NOVEMBER 17, 2015 SALAD 43 COMMENTS Revised 3/6/2014 As noted in Tip #2, Renix C101 Connector Refreshing, in 1989 the factory wiring harness no longer included the problematic connector. For a long-term fix that will avoid many problems in the future, it is a good idea to just get rid of the thing entirely. A helpful video can be found in the link below: Unbolt the 2 halves of the C101 using a ¼” socket. On each half there is a plastic cover where the wires enter. They are removable but you’ll probably end up busting them off. Lightly bolt the C101 back together, away from the firewall. Peel back the split-loom covering from the body side of the C101 connector down to where the harness splits and goes toward the firewall, pretty much below the MAP sensor. On the engine side, remove the split loom about the same distance. Now you can see from one side of the C101 to the other. Beginning at the top row, closest to the motor, be absolutely sure you cut the matching wires on each side of the connector off to about 1/2 inch. This will allow you to verify the original position of each wire color in case of mistakes or confusion. CUT AND SOLDER ONE PAIR AT A TIME. The wires may be wound a bit in their looms. See the first photo. Get them unwound neatly and do the following, ONE AT A TIME. Slide your shrink tube over one wire. In a well ventilated area, solder the wires together and then slide the shrink tubing over the solder joint. Heat the shrink tubing so it seals your completed solder joint. Keep going until you’ve done all 22 or so connections. Both sides of the C101 connection have a wire that is brown with white tracer. Follow each of these wires back until you come to a point where three wires are crimped together. What you want to do here is cut the crappy factory crimp out of each set of three and bring both sets of three wires together and solder them together, using shrink tubing as well. All 6 wires. These particular wires will not end up in your normal C101 elimination loom. The sensor ground upgrade is found in Tip 6. After all the soldering and shrink tubing is done, bundle the wires together in a new piece of 3/4″ split loom. Tape it up and secure it to the C101 connector’s original bolt hole or somewhere else along the firewall so it will be protected.
-
1986 Comanche X Slave Cylinder Bleeding issue
cruiser54 replied to LTZ_3's topic in MJ Tech: Modification and Repairs
Are you getting any pedal at all? If so, with the bleeder closed, pump the pedal about 50 times and walk away for 10 minutes. Or, stare at the master cylinder reservoir and watch the bubbles come up..... -
Auto ECU has better idle stability. Just grab one from a junkyard. I have no faith the the "refurbished" ones.
-
-
The one I got for my 86 was made in Italy. Maybe that's the LUK?
-
Here's why the bolts broke off: Beginning with the HO blocks in 1991, the factory did not tap the holes deep enough. Therefore, you had tight bolts not clamping things together. So, they broke off.
-
Renix 4.0 high warm idle
cruiser54 replied to RustyRodder's topic in MJ Tech: Modification and Repairs
CRUISER'S MOSTLY RENIX TIPS RENIX SENSOR GROUND TEST OCTOBER 30, 2015 SALAD 14 COMMENTS EDIT The sensor ground circuit affects the CTS, TPS, IAT, MAP, ECU and diagnostic connector grounds. It’s very important and not something to overlook in diagnosing your Renix Jeep as it is common for the harnesses to have poor crimps causing poor grounds. If any or all of the sensors do not have a good ground, the signal the ECU receives from these sensors is inaccurate. Set your meter to measure Ohms. Be sure the ignition is in the OFF position. Using the positive (red) lead of your ohmmeter, probe the B terminal of the flat 3 wire connector of the TPS . The letters are embossed on the connector itself. Touch the black lead of your meter to the negative battery post. Wiggle the wiring harness where it runs parallel to the valve cover and also near the MAP sensor mounted on the firewall. If you have an 87 or 88 with the C101 connector mounted on the firewall above the brake booster, wiggle it, too. You want to see as close to 0 ohms of resistance as possible. And when wiggling the harnesses/connectors the resistance value should stay low. If there is a variance in the values when wiggling the wires, you have a poor crimp/connection in the wiring harness or a poor ground at the engine dipstick tube stud. Refreshing of the dipstick tube connection is covered in Renix Ground Refreshing, and the sensor ground upgrade is covered in Tip #6 – Sensor Ground Upgrade. On 87 and 88 models, you could have a poor connection at the C101 connector as well. See Tip #2 – C101 Refreshing and Tip #27 – C101 Elimination. -