
500 MJ
-
Posts
3241 -
Joined
-
Last visited
-
Days Won
2
Content Type
Profiles
Forums
Gallery
Everything posted by 500 MJ
-
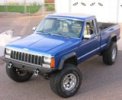
Hey All, Once I got the new gas tank in, I started using the truck quite a bit. I'm getting ready to move to Madison to start my new job on June 1st now that I am gradumatated from college. We used the truck to move me home and also to go get my Dad another project vehicle, what a mess that was. ;) The late snow-melt and a yard full of clay soil made things tougher. Even if I would have had lockers, all 4 wheels spun at the same time trying to pull it out with the truck with the air down in the tires. Had to just block it up and winch it out of its hole. Now that I'm back home, I swapped my aluminum rims back on and I'm getting ready to put the truck away for awhile. I'm not planning on having both MJ's in Madison until I own my own place a few years down the road. When I come home I'll keep it limber by driving it, but the miles will be going on the white MJ for awhile.
-
That front bumper reminds me of an M715 :thumbsup: Looks like fun!
-
Crankcase breather hose grommet
500 MJ replied to 500 MJ's topic in MJ Tech: Modification and Repairs
Yep, those are the parts I am looking for, still don't like the price of them though. All we are talking about here is plastic and rubber, not worth those prices to me. I might see what I can come up with, I'll keep you all informed. Thanks! -
Hey All, I've been quite busy lately, things are coming together though and the '90 MJ is finally on the road (Update to the build thread is coming....) What I'm talking about here is the large hose that goes from the top of the valve cover to the airbox on the Renix 4.0L engines. I'm looking for a place online to buy this new rubber grommet thing. Both of my Renix 4.0L engines are in need of it, the one is so bad that I am losing ALOT of oil out of it and it keeps blowing out of its hole on the valve cover. I stopped by the dealership tonight and the parts guy gave me a $50 quote for this, gotta be off his rocker. :ack: Whatcha got? :typing: Is it a junkyard only thing?
-
XJ looks great! As far as the gauge goes... My startup oil pressure is around 80 :clapping: Basically I just use the gauge as a "reference" for when things are not normal...
-
Keep it up Boss, looks like you are having fun with the rust!
-
97 cherokee swap, wiring issues.
500 MJ replied to JeepcoMJ's topic in MJ Tech: Modification and Repairs
Got this thing yet? -
Undo the nut at the Trans. Then loosen it from the retaining clips on the body (if you still have them). Then just take your dash apart and push/pull the cable down through the firewall. Install it in the opposite order, make sure the Nut is tight on the trans end.
-
x2 - Napa or J/yard
-
:clapping: Just wait until you get into some of the older stuff. Those ones are much easier to understand (CJ-5, CJ-6, CJ-7, CJ-8....)
-
97 cherokee swap, wiring issues.
500 MJ replied to JeepcoMJ's topic in MJ Tech: Modification and Repairs
Best of luck chewing down a doctor for the price Pat... He's probably not really in need of the money right now. -
Glad to see you finally got one Travis, Best of Luck with it! It looks like you have a good assortment of parts. If you find yourself needing something MJ specific though, don't hesitate to ask...
-
A few things I've learned regarding painting vehicles: If you can leave paint on, DO IT. Taking paint off is not a good idea. Leaving paint on allows ease of adhering paint to the body in the future. Thinner paint also means quicker rust showing through (especially in Michigan). The more coats the better! The heat gun and sanding approach would have been my choice for the decals. If you don't have a heat gun, wait for a sunny day and then go after the decals with a razor blade. This should work OK, just try not to cut into the underlying paint. SAND things down before you prime. If you have ANY bare steel showing through, you need to cover it with a self-etching primer multiple times and sand it (wet or dry) before you apply paint to it. Hopefully you used a self etching product when you painted the bed white and sanded things down prior to painting it. If not, you might as well redo the work, it won't be too long and everything will start to chip off. You can only paint on a warm (60 deg F or above) day. Anything colder, you should find something else to do. This factor again regards the ability for the paint to bite into the underlying steel or paint below it. Finally, more expensive paint gives better results. Always apply a tack-coat (you should be able to see through this coat) of paint first to give the next layer of paint something to bite into. After this layer is tacky, more paint can and should be applied. If you let the tack coat dry, lay another one down before you start to spray heavily. Hope that helps. The first time is always a learning experience...
-
lift and tire setup thread
500 MJ replied to 89eliminator's topic in MJ Tech: Modification and Repairs
Left: Stock 2wd 1990 MJ Right: 1988 4wd (Overall sits 11 3/4" Higher than the 1990 next to it) - 33" Yokohoma Geolander AT +2 Tires - (Front) 3.5" RE Coils - (2) 1" spacers - Modified XJ Clayton Longarm Kit - Dana 30 - (Rear) 4" Rusty's Leaf Springs with Stock Load Springs Bolted in - Aftermarket 1.75" Lift XJ Shackles - Dana 44 1988 Same stats - just with some OLD 33" Goodyear Wranglers for the winter months... -
"Roger, Roger" Some people wish they could be so helpful :clapping:
-
Thats all I got, let us know how it goes! - Best of Luck!
-
:thumbsup:
-
I have, its the color your truck is now :yes: Looks like a fun project! If you are concerned about the clearcoat issues you have going on, a simple sanding off of the clearcoat will allow you to keep your base blue paint. Then all you need to do is clearcoat back over it and it will look great. Like Wade said, welcome to the addiction :thumbsup:
-
Looks like lots of work! Where I come from we would consider that old girl a parts truck just cause it would be easier to get something else already together... Hope you plan on spending lots of time to bring it back, do you have a bed for it? :thumbsup:
-
CW, I've got some structural thoughts for you here... Under static conditions, your MJ frame has two types of loads on it. The bottom is in tension and the top is in compression. By cutting out the bottom and virtually losing that section of the frame, all of the tensile forces (albeit small) are transferred to the lower sides of the frame rail. Before you weld in patches (your suggestions sound good) I would try and relieve loads placed onto the sides of the frame rail that used to be on the lower section of the frame. If you don't correct it now, you might see some "sagging" in the years to come. The way I would fix it would be to cut the patches so that they would cover the frame rail, then I would clean the frame section all up and jack the truck up. I would then set a jackstand under the frame rail, insert the patch and let the full weight of the truck back down on the jackstand, under the new patch (leave the tires on so that the truck has some stability points and its safe to crawl under). This is the best way I can see to reduce the amount of sagging that could be directly related to losing that lower section of steel in your frame... Also, I would look at what is caused the problem. If its only on the passenger side, maybe heat from your exhaust contributed to it...? Hows the drivers side look?
-
Also check the wires leading to the CPS. My g/f's XJ was having problems. Come to find out the wires were hitting the exhaust manifold. The insulation burnt through and the bare wires would hit each other once and awhile... A good cleaning of the CPS is also recommended. Buying new is an option but there are testing procedures for the CPS that you should do before you throw cash at a new one. I just looked this up in the FSM quick. I think its what you need: To test it, disconnect the plug from the harness and put an ohm-meter between terminals a and b on the plug. With the engine warm, if the reading is between 125-275 ohms, your CPS is good. Here is the FSM I got it out of: viewtopic.php?f=9&t=12517
-
Looking great as always!
-
IIRC there are 8 bolts/studs that hold the bed on. They were completely independent from the bumper mounting brackets on my '88. You shouldnt have an issue if its welded on there, unless they plugged up the access holes to the bolt heads/nuts on the studs... :dunno:
-
http://www.rockauto.com has one listed on their site. Just go there and follow this in their Menu: Jeep->1990->Comanche->4.0L->Emission->Throttle Position Sensor. If you need the Manual Trans one, their price is $130 :ack: I HAVE one, its used but I would rather not part with it as it is my spare... Please test yours, make sure it is bad and I'll see what I can do to beat their price if you end up absolutely needing one... Thanks to Taz- here are the procedures from the Factory service manual:
-
121,000 on the Blue 100,600 on the White :ack: Both Renix 4.0L setups. I should be golden for years! ;)