ghetdjc320
-
Posts
5079 -
Joined
-
Last visited
-
Days Won
1
Content Type
Profiles
Forums
Gallery
Everything posted by ghetdjc320
-

Tire sizes, lifts and pictures
ghetdjc320 replied to Dammerung's topic in MJ Tech: Modification and Repairs
It's nice having all the pictures for reference. Due to a lack of "complete" lift kits for the MJ in the 1.5-4.5" range, it would be very good to know how each lift was accomplished as there are many different components being used. The GS springs, add a leaf, shackles etc. all are different methods yielding different results. Any chance we could post up the lift amounts based on factory measuring techniques so we could get an idea what the actual lift amounts would be on our trucks? There are so many different factory ride heights it seems so it would be great to get some solid basis for comparison. -
Electric to Mechanical speedo drive.
ghetdjc320 replied to KBRAY88MJ's topic in MJ Tech: Modification and Repairs
No problem. They are available new too it looks like but they're pricey! -
Electric to Mechanical speedo drive.
ghetdjc320 replied to KBRAY88MJ's topic in MJ Tech: Modification and Repairs
NP231J Transfer Case Mechanical 26 Tooth Speedometer Gear New Process OEM | eBay -
Electric to Mechanical speedo drive.
ghetdjc320 replied to KBRAY88MJ's topic in MJ Tech: Modification and Repairs
Just swap to the old style speedo sender for the 231. you will need to use the "long" style speedo gear but otherwise it just bolts in. All those speedo sending units/vss in the MJ/XJ/YJ/ZJ/TJ np231 are physically interchangeable with the accompanying correct style speedo gear -
CR Laurence duo-pane rear windows almost gone?
ghetdjc320 replied to ghetdjc320's topic in MJ Tech: Modification and Repairs
Yep, just confirmed. DK hardware is the only vendor that has remaining stock listed. They sell on eBay, Amazon and direct on their site. Same price everywhere it seems like. 6 left now on amazon as well. -
CR Laurence duo-pane rear windows almost gone?
ghetdjc320 replied to ghetdjc320's topic in MJ Tech: Modification and Repairs
I believe it’s all from the same supplier. They had 7 and I just got one. -
It looks like CR Laurence no longer carries the rear sliding duo pane window. There are exactly 6 left in stock with DK Hardware. There were 12 about a week ago. Just picked one up myself as well. If anyone knows of anyone else who has any inventory left let me know. Otherwise, it looks like remaining stock is about done for.
-
Project “Tomahawk”
ghetdjc320 replied to ghetdjc320's topic in MJ Hardcore Tech: Epic Journeys to Greatness
-
$225
-
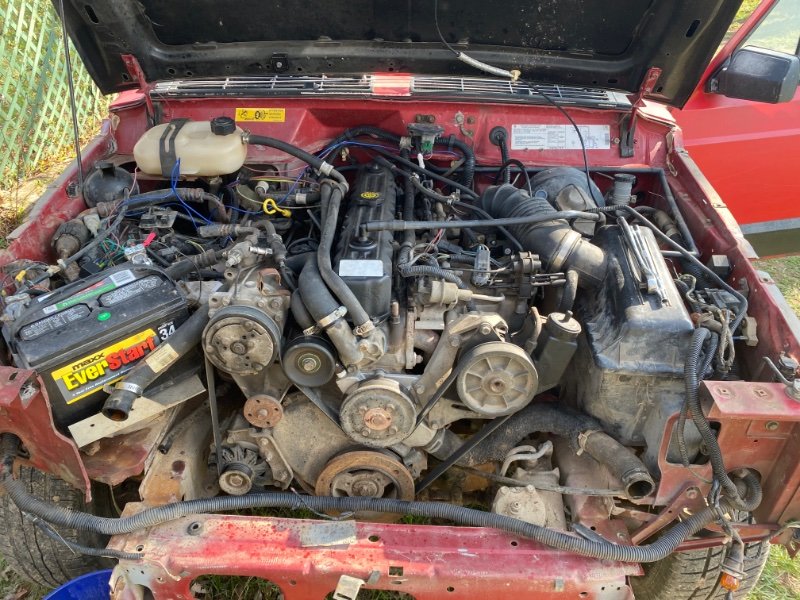
Help Identifying Air Compressor
ghetdjc320 replied to jamcomanche's topic in MJ Tech: Modification and Repairs
The long port sticking out of the back of the compressor is your low side. Looks like maybe you're missing your high side adapter. Just connect the manifold gauge on the low side and see what's going on. The pressure switch may be the culprit. -
I’ll have a set in about 2 weeks
-
New Military Wrap Spring Clicking
ghetdjc320 replied to Parei_doll_ia's topic in MJ Tech: Modification and Repairs
Does it go away if you loosen your mounting bolts a bit? -
Project “Tomahawk”
ghetdjc320 replied to ghetdjc320's topic in MJ Hardcore Tech: Epic Journeys to Greatness
That’s very good to know. I’ve been reading up on suspension tuning from accutune. Looks like they recommend at least a 3” gap between the bump stop and axle. Good info for sure: https://accutuneoffroad.com/articles/guide-to-suspension-design-for-going-fast-in-comfort/ -
Project “Tomahawk”
ghetdjc320 replied to ghetdjc320's topic in MJ Hardcore Tech: Epic Journeys to Greatness
Long awaited goodness:
-
Project “Tomahawk”
ghetdjc320 replied to ghetdjc320's topic in MJ Hardcore Tech: Epic Journeys to Greatness
Front end all removed. Also removed dash and console. Discovered a ton of wiring splices under the dash so I’m scrapping all the wiring on this rig. Went with the Painless stand-alone LS harness and Painless 10413 chasis harness. Will re use connectors as needed for the new harness but won’t be keeping too much. After long consideration regarding lift, tire size, and general suspension goals I have made some concrete decisions. Will be running Acos up front (possibly the pro model with hydraulic bump stops), oem Mopar control arms (they really are a good design, Mopar or TNT track bar, fox shocks and jks rear shackles for an extra 5/16” (the larger axle will use up 1/4” of that height gain). The design of the stock control arms is quite good as they are plenty strong along their length and we’re designed to twist for flex. The are not harsh on the stock control arm bracketry and are very light weight. A well thought out design for stock to slightly lifted ride height. Front lift: 1.375-1.5 from Acos or Acos pro Rear lift: 5/16” via JKS shackles (just enough to offset the larger diameter axle tube Front control arms: OEM Mopar Lower control arm skid from Barnes New clevite axle side control arm bushings Barnes inner c gussets Stock original eliminator 4x4 front and rear springs 235/75/15 tires on refurbished turbines. The goal is to accomplish 6” of up travel and 4” of down. Will bump stop appropriately to prevent any interference. Also trying to keep a tight factory turn radius. I will have air locker front and rear along with a full factory skid package and hidden winch behind factory bumper. Running ZJ steering linkage. The sway bar will be lowered 1” to accommodate the double sheet steering bearing from Boosted tech. Front frame will be reinforced to give the best possible handling.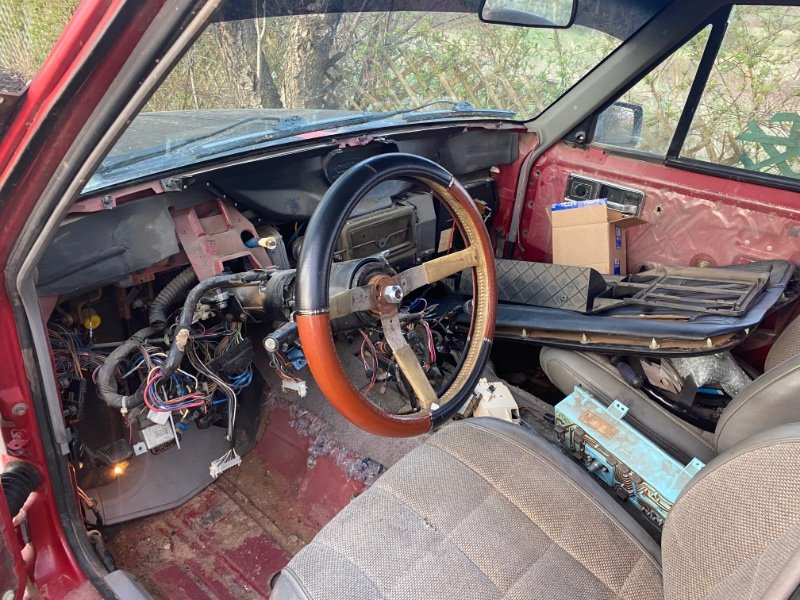
-
I also will need a new cable soon. Haven’t found the right one yet
-
Xj lift kit on mj
ghetdjc320 replied to WranglingManche's topic in MJ Tech: Modification and Repairs
Just for reference, you would need an XJ lift shackle to provide any lift on an MJ. The stock MJ shackle is 4 3/8 from eye to eye. Stock XJ shackles are much shorter. Most XJ lift shackles are 5” eye to eye and provide about 5/16” lift on an MJ. There are many other lengths available though -
-
Speedo sensor wiring issue
ghetdjc320 replied to Axthony's topic in MJ Tech: Modification and Repairs
That doesn’t look like any wire has been snipped. The speed sensors for that year were just 2 wire VR sensors. Does the speedometer not work? -
Xj lift kit on mj
ghetdjc320 replied to WranglingManche's topic in MJ Tech: Modification and Repairs
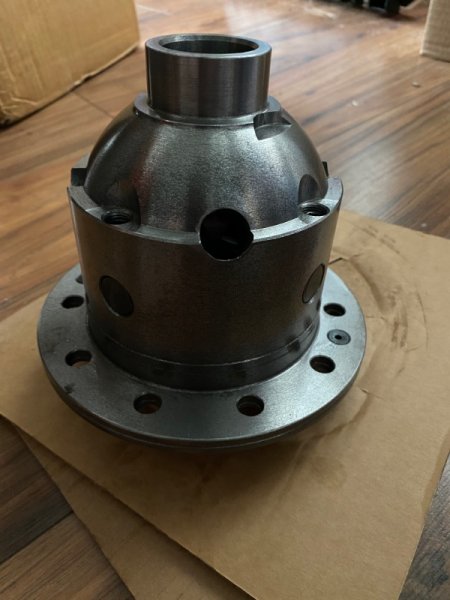
*If* you want to keep the D35 rear axle, there are some practical suggestions that, with a bit of time and money, will make that axle handle 33’s or even 35’s without issue. Just an alternative to the sea of praise you will hear about the ford 8.8. -
The Mopar unit is significantly better than the aftermarket ones. Dorman and SKF both make one also. The Mopar ones used to be on rock auto but like $45 for a while
-
Throw Subaru into the mix. They have some safe, reliable cars that you can still do a fair amount with. The forester is a nice all around vehicle
-
ATF or motor oil in AW-4
ghetdjc320 replied to Rubikahn's topic in MJ Tech: Modification and Repairs
I ran straight 30 weight conventional oil in my 231. Had very good results. That was in the tropics though with consistent high temps year round. It did quiet down the case a bit over atf. Worked great for me -
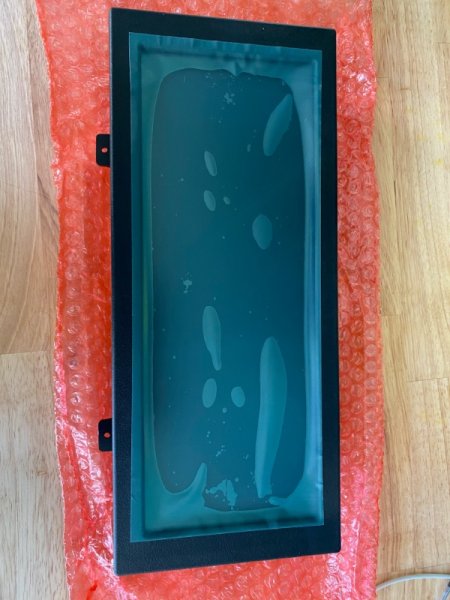
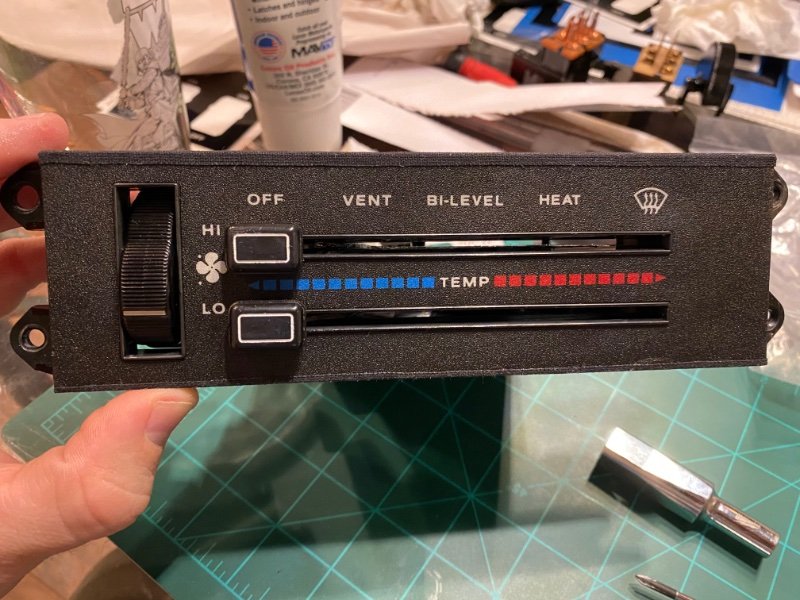
HVAC Control Panels, Finally!
ghetdjc320 replied to ghetdjc320's topic in Vendors- members making products for MJs
Just managed to finish up my first stateside panel. If anyone needs one let me know. Will be building one for myself here also. The AC decks I can do on a core swap, outright purchase or rebuild yours and return. For non ac decks, I will rebuilt yours as long as the face panel is not too severely damaged. For those that send me their original panels, I will try to restore and preserve as many original parts as possible on your unit.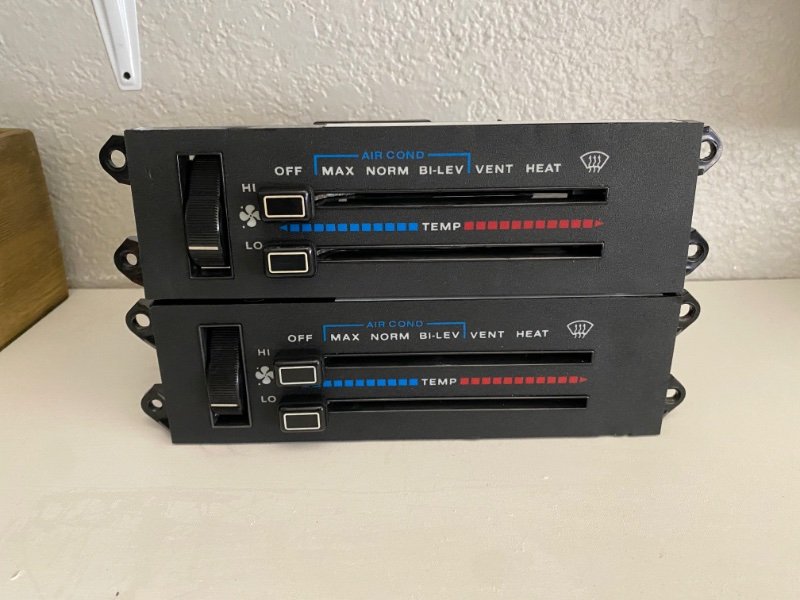
-
Project “Tomahawk”
ghetdjc320 replied to ghetdjc320's topic in MJ Hardcore Tech: Epic Journeys to Greatness
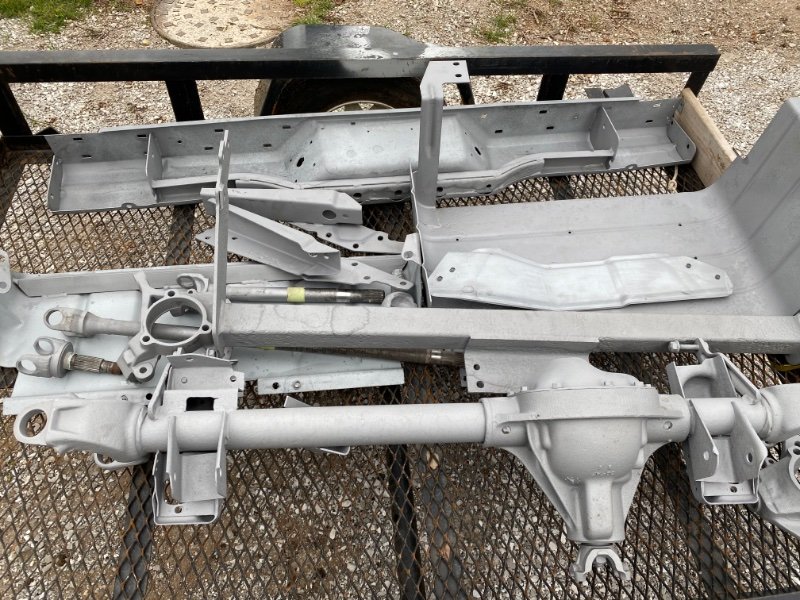
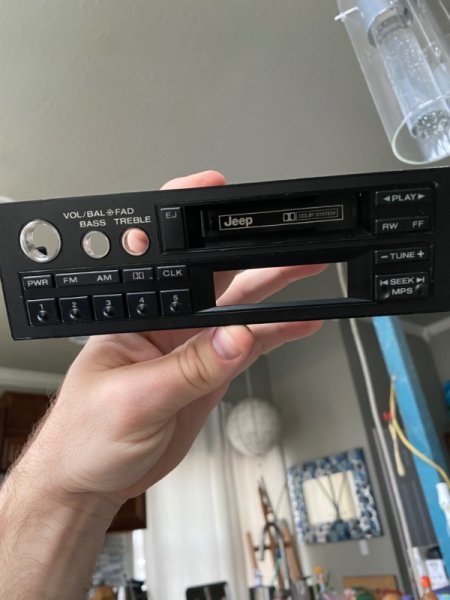
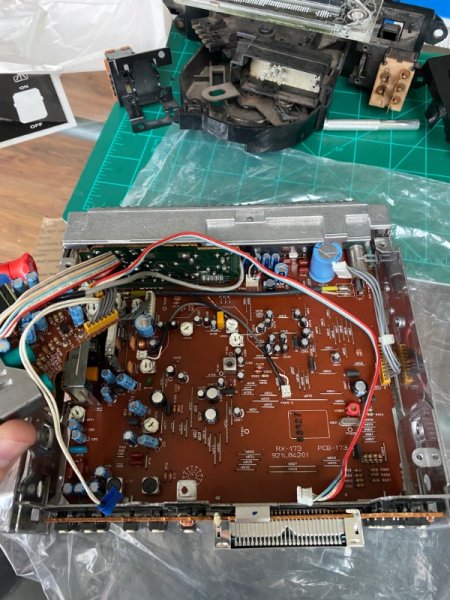
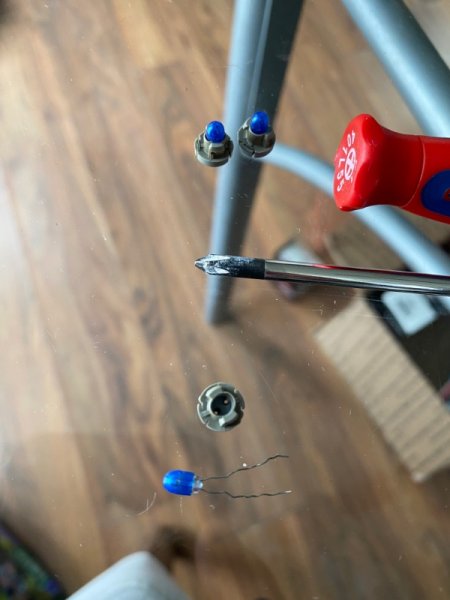
Got the first batch of parts back from blasting yesterday. Also got the air lockers in. Had a chance to crack open the RX-173 radio as well. The layout inside is surprisingly simple. Will be replacing the panel lighting and button foam (need to source the foam still). Also going to add a Bluetooth 5.0 receiver unit. I’m going to try to keep the Bluetooth board inside the radio and use a small external Bluetooth antenna. It really looks like there would even be room for an amplifier board inside with the tape deck removed but I’ll keep that external. Instead of the two existing pins for the aux input as described by Jeremy (much thanks @Minuit for your detailed information on these units), I’m planning on intercepting the radio signal. As has been mentioned before, the radio will bleed through somewhat when unsing the board pins input. Instead I will intercept the 3 pin radio connector to the pre-amp module and establish a pass through circuit that prioritizes the Bluetooth signal. So with the radio powered on and Bluetooth either paused or disconnected, it should play radio as normal. With the Bluetooth signal active, it should completely disconnect the radio signal from the preamp. Hopefully this will eliminate bleed through. The Bluetooth module is also programable via laptop and the EQ can be tuned, hopefully to achieve a good flat response. Also going to add the same finish coating to the buttons as I do to the hvac and switch bezels to prolong the finish as the ones I have are not worn and are in good shape.