


ghetdjc320
-
Posts
5079 -
Joined
-
Last visited
-
Days Won
1
Content Type
Profiles
Forums
Gallery
Everything posted by ghetdjc320
-
I’ve removed 3 so far. I’d recommend taking it to a pro if you plan on reusing the window. It’s easy enough to cut through the urethane but the frame itself is a pinch seam for several panels and has many catch points for the wire to get stuck.
-

1990 Comanche Eliminator
ghetdjc320 replied to pizzaman09's topic in Member Projects: Your Comanches
That’s right. Factory had a blue filter that helped produce a green tint that matched most of the rest of the lighting on the truck. That’s also why there are blue bulb covers in the instrument panel. -
1990 Comanche Eliminator
ghetdjc320 replied to pizzaman09's topic in Member Projects: Your Comanches
You can put another piece of paper there along with a blue colored page on the bottom. That will give you less bleed through and an original greenish glow from that incandescent bulb -
The metal there is quite thin. There are lots of small pieces that will need to be cut but they cut very easily with a disk
-
I’ve also come across some at the hardware stores recently. I bet McMaster would probably have some also
-
My thoughts exactly. I don't think I would have torn it apart but now that you have, replace the bearings. Use plenty of assembly lube. Why wasn’t your oil pump working?
-
Brake lights won't work
ghetdjc320 replied to Rick Jeep's topic in MJ Tech: Modification and Repairs
Remove all the bulbs and check the contacts. Try reinstalling them one at a time and keep testing your lights. Also, lets see if @Pete M can move this to the modifications and repairs section. -
Rear windowshield install
ghetdjc320 replied to Myles Cyncora's topic in MJ Tech: Modification and Repairs
Window urethane is what you want to use -
I believe that is the original package. My NOS coin is just like that
-
Not sure where you’re located but I have a pair of eliminator bucket seats sitting in my scrap pile anyone is welcome to. They will need a thoroughly cleaning and some repair on the drivers side. I’m in northwest Arkansas
-
factory off road package?
ghetdjc320 replied to motownXJdad's topic in MJ Tech: Modification and Repairs
The general spring/sd truck spring 4 leaf pack had the most amount of free arch of their packs. According to general spring, they cross referenced original MJ spring part numbers and went with the highest arch and load capacity available. My truck got about 2.5” lift from them with an empty bed and no spare. Settled maybe a .5” over time but nothing significant. Suffice it to say, it was far too tall for SOA. The 5 leaf MT pack has slightly less free arch but a second overload spring. I suspect it’s somewhere around a 1.75” lift. Then they have a non-advertised military wrapped spring that is supposed to be god for a bit more lift. Hornbrod used to run this on his truck and I believe paired it with a 3” front coil and had a very small amount of rake. Hells Creek and Rustys are the only 2 other companies making whole spring packs for the MJ. The hells creek packs seem to have mixed reviews particularly pertaining to centering the axle in the wheel well. The Rusty’s pack seems like the best off the shelf pack out there. Multi-leaf and made by Deaver originally. Problem is that it’s a 4” lift which is just taller than what most would run with short arms and no steering mods. All other options are going to be either additional leafs or bastard packs. There is a rumor about a late 90’s early 2000’s f150 spring working. I hear it’s 58” long also but not sure about the offset. -
Project “Tomahawk”
ghetdjc320 replied to ghetdjc320's topic in MJ Hardcore Tech: Epic Journeys to Greatness
Much appreciated sir! -
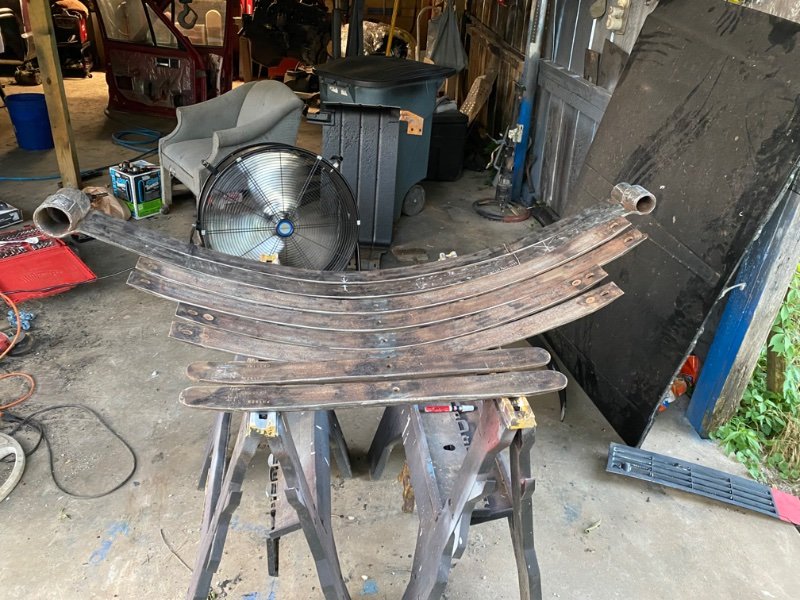
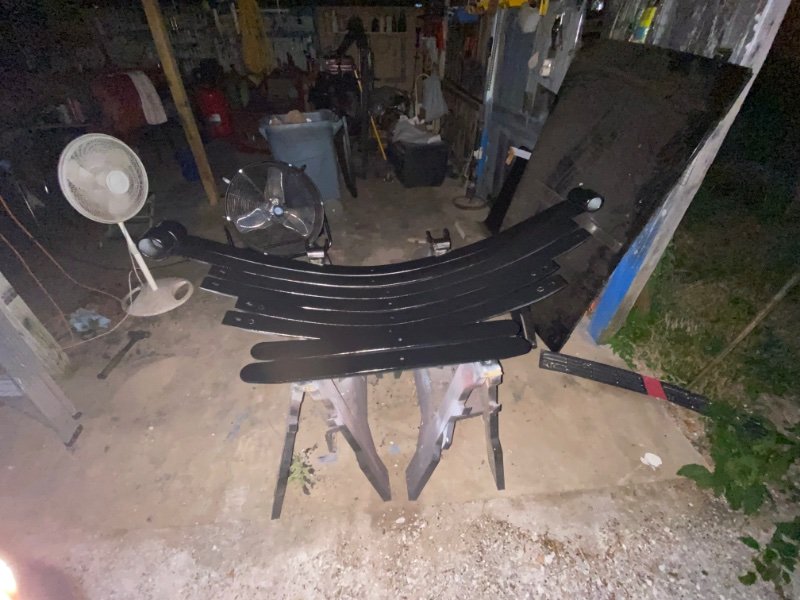
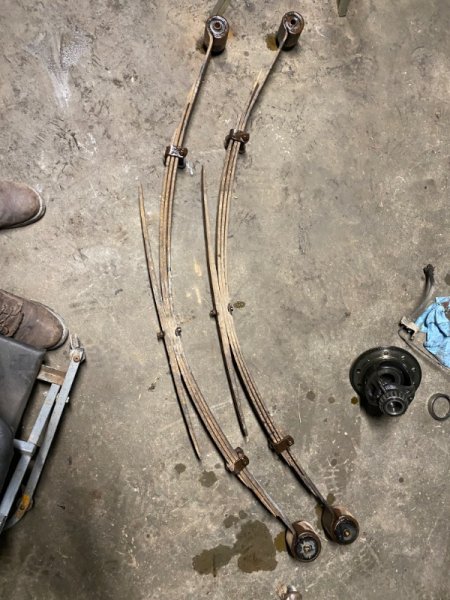
Project “Tomahawk”
ghetdjc320 replied to ghetdjc320's topic in MJ Hardcore Tech: Epic Journeys to Greatness
All the leaf spring hardware was severely rusted and seized. Had to cut off all the hardware. Then I disassembled the springs and flap-disked them all down clean. I noticed that the main spring in one of the packs had about an inch more free-arch then the other. So I spent an hour working on it and straightening it out. I have nice full-length add a leafs from BDS I’ll be using to reassemble this pack. Should net about 1.75” in the rear. I’m adding an air lift in the back also for towing as I want to keep the truck level and I do a fair bit of towing but the loads aren’t very heavy most of the time. A simple bag system will work well for my purposes as long as I can still keep my full suspension travel. Front is getting a 3” BDS coil but with the Warrior bumper, winch and all the reinforcement, i suspect I will not net a full 3”. Thats I asilo adjusted with a small coil spacer though. I really wanted to add ACOS but couldn’t find a good coil spring that could handle full coil bind (no oem spring) with less then 2” of lift to make up for the 1 3/8 from the ACOS. Ultimately quite satisfied with this setup. It’s a full BDS kit with all the options. By the way, has anyone ever re-drilled the BDS AAL to line it up with the offset in the MJ leaf pack? I know a few here run the BDS setup but hadn’t heard if they just installed it as is or drilled a new hole. The BDS MJ kit comes with a AAL for an XJ but nets just a bit less lift on an MJ.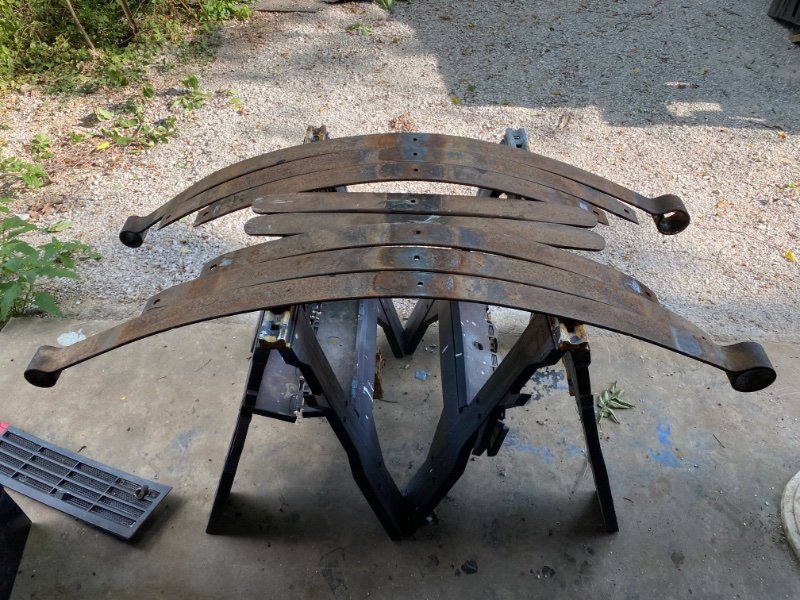
-
Project “Tomahawk”
ghetdjc320 replied to ghetdjc320's topic in MJ Hardcore Tech: Epic Journeys to Greatness
And more carnage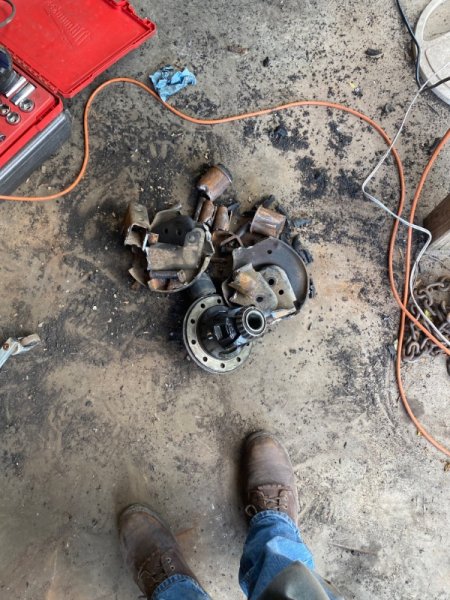
-
Project “Tomahawk”
ghetdjc320 replied to ghetdjc320's topic in MJ Hardcore Tech: Epic Journeys to Greatness
Bushing removal carnage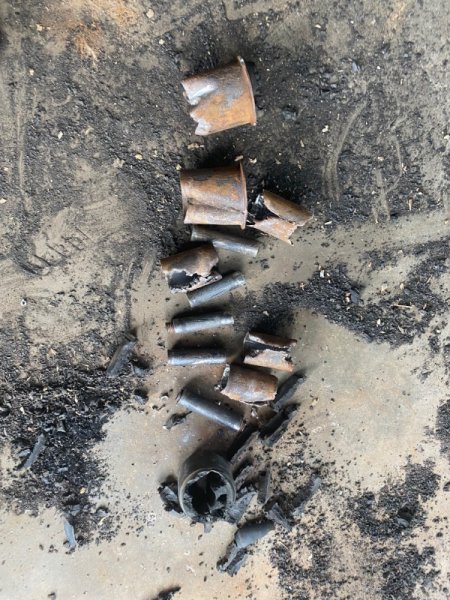
-
Iirc, a pro bedliner shop once told me that they get their product in big drums and heat it up to shoot it out. If there is no hardener element that makes a huge difference.
-
I’ve had rhino and bullet liner installed professionally and both failed by bubbling and delaminating. The pro level stuff is definitely the thickest and therefore the most dent/scratch resistant but I have yet to see a shop properly prep and old pickup bed for it. A tiny it if moisture will wick it’s way under the material and start working it loose. You can then pull it off in sheets. I couldn’t believe it myself but I was able to remove the entire tailgate liner in one continuous piece. Since then I’ve been prepping the beds and parts myself and have had far superior results. The 2 part liners I’ve used (Raptor and Hippo Liner) both have a much harder surface and form a much stronger chemical bond. They will not prevent dents as well since they aren’t thick and rubbery like Rhino or Bullet though. Imo the 2 part diy systems look a heck of a lot better if you spray them out yourself.
-
Or… tow it up here to Arkansas and put it in my shop
-
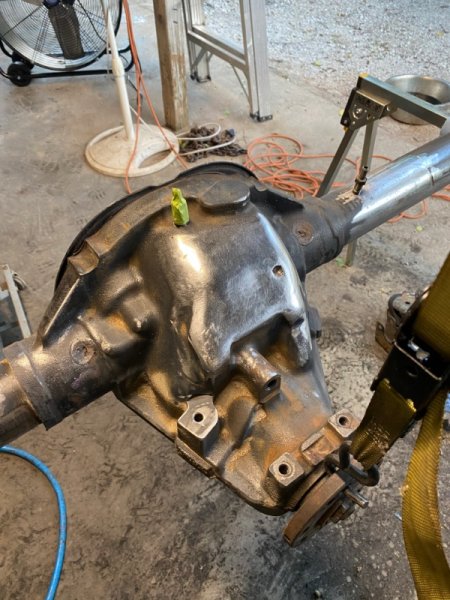
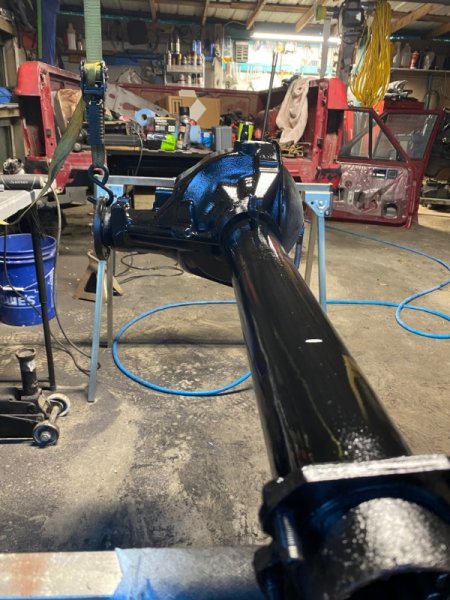
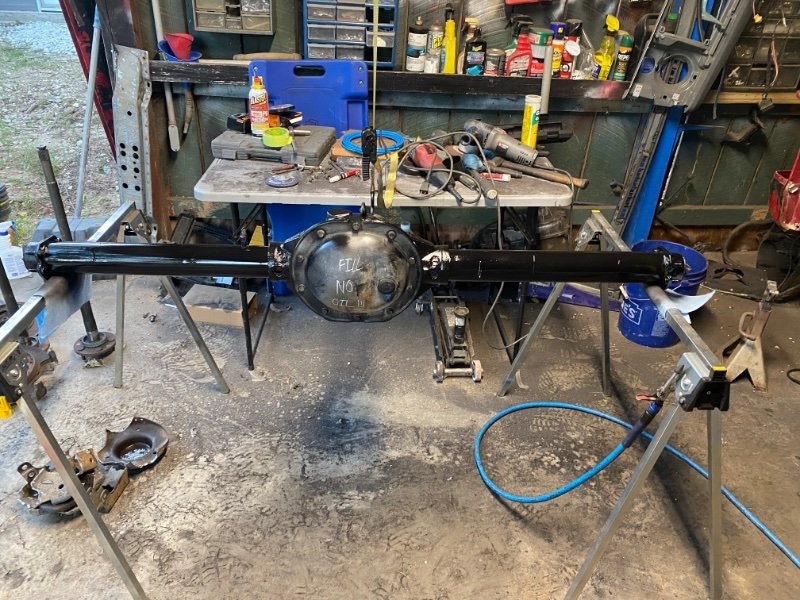
Project “Tomahawk”
ghetdjc320 replied to ghetdjc320's topic in MJ Hardcore Tech: Epic Journeys to Greatness
All bracketry removed and axle tubes polished. Also removed a couple of cast-in tabs on the pumpkin that were part of the KJ link mounting points. 27 grit flap disks followed by 80 grit DA. 3m zinc primer followed by Rustoleum industrial gloss black (easier to touch up and won’t be exposed to UV). Will set pinion angles and weld perches tomorrow. Also prepped the springs for a rebuild. New bushings, paint and and extra leaf going into each side. Please excuse the mess lol. We have a shop for the master dirty work and one for clean work. Suffice it to say, even the dirty shop needs a cleaning after this.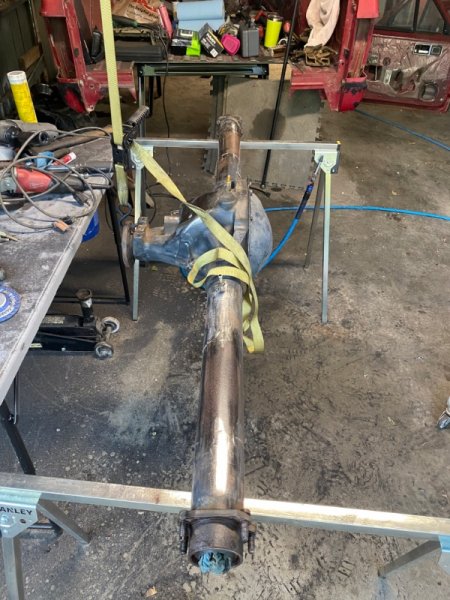
-
89 Jeep Comanche wiper motor problems...
ghetdjc320 replied to Andy in Pa's topic in MJ Tech: Modification and Repairs
I don’t recall but iirc they are all the same -
89 Jeep Comanche wiper motor problems...
ghetdjc320 replied to Andy in Pa's topic in MJ Tech: Modification and Repairs
I have used a YJ module. Worked just like the MJ one -
When AMC designed it, it wasn’t based on an opinion. Those of us who do/don’t want to put it back give opinions . I removed about 30% of the floor bracing on my last build also
-
89 Jeep Comanche wiper motor problems...
ghetdjc320 replied to Andy in Pa's topic in MJ Tech: Modification and Repairs
-
Should be red wire is battery source, orange with black is fuel pump feed. You can verify by referencing the bulkhead connector pinout found here: Disconnect the battery and clean out that connector thoroughly. You can replace the grease with dielectric grease found at auto parts and electrical supply stores. You can get new pins from various sources but I tend to get all my electrical parts from either Mouser electronics or Painless Wiring. The actual bulkhead connector is a standard GM part. Contact painless and they can help if you need new pins. Its the same bulkhead connector they use in many of their harnesses (you can reference part number 10111 which is for a YJ and uses the same connector). I believe there are a few posts on here (check the DIY section) about how to install a pin back into the bulkhead connector. You will need a new pin and a way to crimp it to the wire. As for the clutch master cylinder hardware, the lower mounting point is a stud that is attached to the clutch pedal assembly that goes through the firewall. The upper is a bolt that goes into a threaded insert but you could just use a bolt and nut for the upper mount.
-
I wouldn’t go so far as to say that bracing is inconsequential. We have no hard data to know the actual results of removing the brace based on the usage of the truck. Kind of reminds me of the control arm reinforcement that is MJ specific. XJ’s don’t have this bracing and most likely any who remove it from their MJ will not notice any immediate ill effects. For the “floor bracing” It can’t be so critical that removing it will cause the car to fold in half, but the effects with a heavy load, a front end collision or even repeated off-road flexing haven’t been really determined as far as I know. It’s good to remember the purpose of that brace: stiffen the unibody rail due to the addition of the bed frame which starts inside those rails under the floor. And again, these trucks are not over-engineered by a long shot. There is a definite reason why amc choose to stamp out new sheet metal parts to reinforce that area. It is not an “optional” part that was only on a metric ton mj and so forth. You’ll find that bracing even on a little 4 banger 2wd short bed. If you’re going to remove it, assume that there very likely will be consequences in certain scenarios. If you have a press brake, forming that brace would be quite easy. However, spot welding it all the way through to the lower unibody will be a challenge for any who don’t have a high end long reach spot welder. To the OP, start removing your flooring and see how far the damage goes. Remove that dash pad and look carefully at all the seam sealer. Remove any sealer that is wet or loose. I hate to say it but you may find that the extent of damage is far worse than what is visible in the pics. Hopefully that is not the case.