

kryptronic
-
Posts
825 -
Joined
-
Last visited
-
Days Won
11
Content Type
Profiles
Forums
Gallery
Everything posted by kryptronic
-
Thanks, fellas. Feeling better about it. The SYE was only $180, so the $350 install price is a bit salty in my opinion, and I still have to buy a new driveshaft. May just give it a go and do a write up for it.
-
Hello everybody. I am working on a 95 YJ right now, which I lifted three inches, and need to install a slip yoke eliminator (SYE) to get the proper driveshaft angle back. I'm posting here in MJ tech, as this is applicable to MJs which get the same treatment. I got the SYE from Advance Adapters and have been looking at the install instructions. They're pretty much terrible for anyone who hasn't done this before, like me. I have all the tools I need (I think), and right now the drivetrain is sitting on the frame with the tub off, so it should be an easy job without much trouble. The thing is, I don't want to screw it up. A local Jeep shop will do the install if I bring the transfer case into them for $350. So, looking for advice from members who have done the install. Should I shell out the cash to have pros do it, or is it all simpler than it looks? Does anybody have a link to a definitive how-to that they used? Thanks.
-
HO speedometer question
kryptronic replied to DirtyComanche's topic in MJ Tech: Modification and Repairs
I doubt you're going to have an easy time with it. The HO cluster plugs directly into the dash wiring harness, which routes to the computer, and has wiring going back to the NP231. Your NP231 has provisions for a cable right now, that would need to be converted to an HO/electric unit. I am pretty sure the speedo gears are the same cable vs. electric in the NP231, but you'll be missing the wiring back to it (you have a cable running there now). I couldn't tell you offhand if the wiring runs right to the harness or through the computer first. Just my thoughts, could be very wrong. -
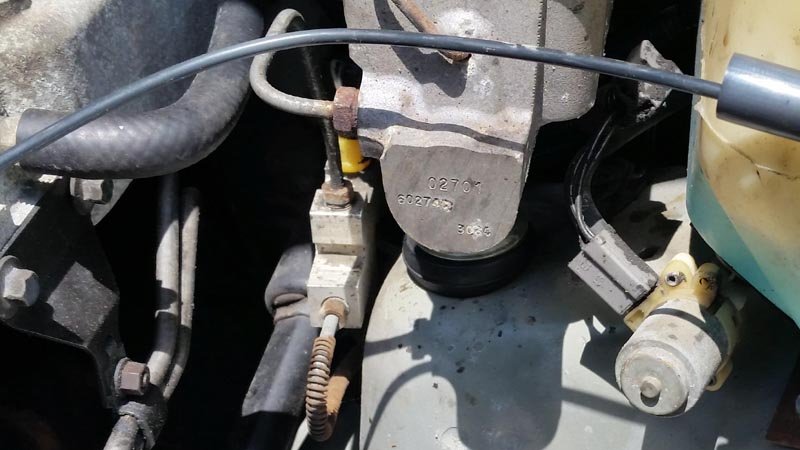
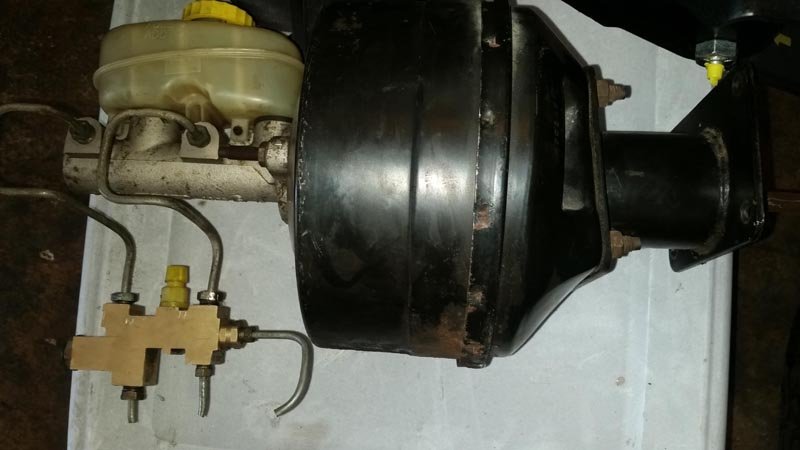
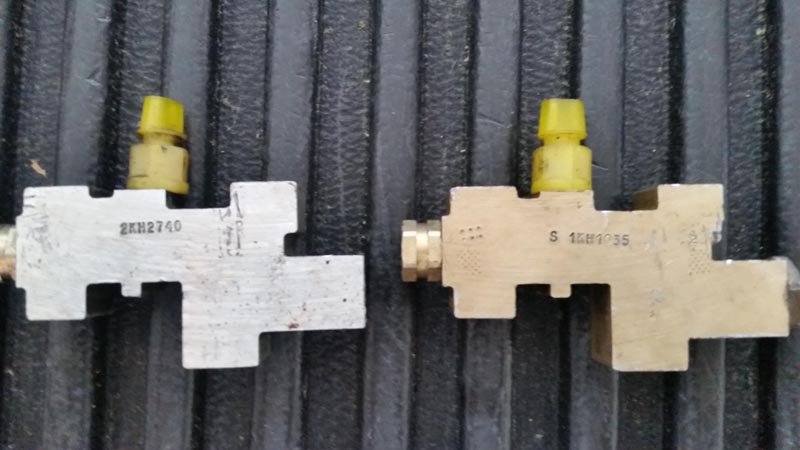
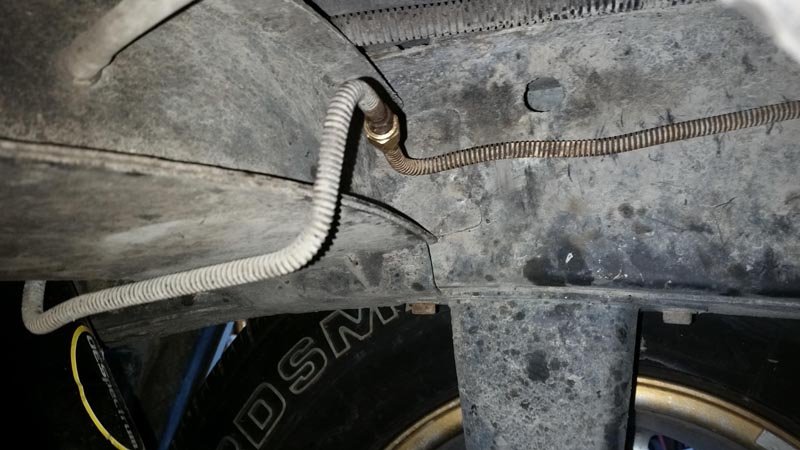
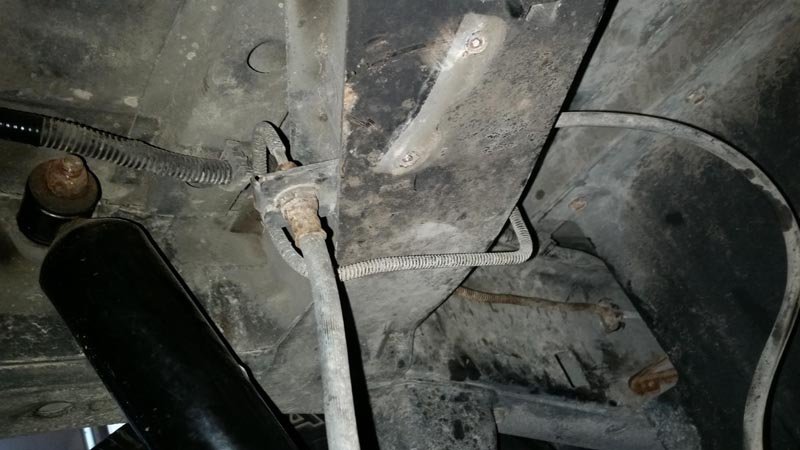
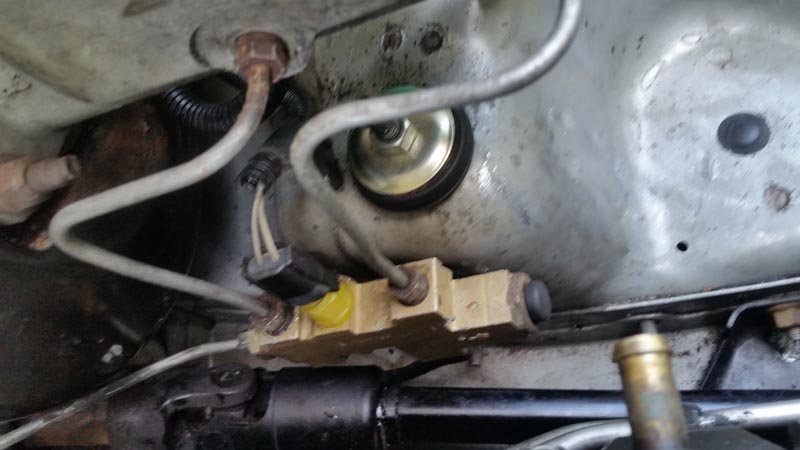
In June 2017, I deleted the rear load sensing valve from my 1991 Comanche, and have documented the process here. Definitions The rear load sensing valve system is comprised of (1) an MJ-specific distribution block at the master cylinder which provides full pressure to the rear brakes; (2) an inline proportioning valve for the rear brakes (load sensing valve) located above the rear axle which is actuated by (3) a bar connected to the rear axle; (4) two hard lines running from the distribution block to the load sensing valve; (5) one hard line running from the load sensing valve to the rear brake drop line. The purpose of the rear load sensing valve is to adjust braking pressure applied to the rear brakes under different conditions. The rear load sensing valve is attached to the vehicle frame above the rear axle, to the driver's side. A bar connects a lever on the valve with the rear axle using a bracket on the differential cover. When the rear axle moves away from the frame (sudden stop, where the front end of the vehicle dips), as the height of the rear of the truck increases, the bar pulls the lever on the valve in a downward direction, resulting in the load sensing valve reducing pressure for the rear brakes. When the rear axle moves closer to the frame (load in the truck bed), as the height of the rear of the truck decreases, the bar pushes the lever on the valve in an upward direction, resulting in the load sensing valve increasing pressure for the rear brakes. Other Recipes, Why a YJ Prop Valve? Some recipes for load sensing valve deletion call for retaining the MJ-specific distribution block and plugging the bottom-front emergency bypass port. This method results in 100% braking pressure being pushed to the rear brakes at all times, and can cause premature lockup of the rear wheels, if too much pressure is applied by the driver to the brake pedal. Retaining the distribution block is generally acceptable for the older drivers who grew up without proportioned braking systems, and know how to apply brakes without proportioning. This recipe replaces the distribution block with a proportioning valve from a 1987-1995 Jeep Wrangler (YJ). The YJ proportioning valve limits braking pressure sent to the rear by 20%, thereby sending 80% pressure to the rear brakes. This proportioning valve is widely accepted to be nearly identical in function to those found in XJ and ZJ vehicles. It has been proven to work efficiently/correctly in vehicles which have rear drum brakes, as well those that have been converted to rear disc brakes. Disclaimer The rear load sensing valve is part of the vehicle's braking system. Modify at your own risk, this documentation is provided for informational purposes only. The Recipe In my case, I decided to delete the valve because it wasn't operational. The bracket the valve mounts to was severely bent, the bar connecting it to the axle was missing, and I had no idea if it actually worked or not. Here's a pic of what I started with: And the MJ-specific distribution block, in stock format is pictured below. Note that the line entering the front port on the distribution block is the main line running to the load sensing valve, and the line entering the bottom-front port on the distribution block is an emergency bypass line which is not proportioned. That line sends full braking pressure to the rear in the event the front braking system fails. Here's a pic of our donor proportioning valve, from a 1995 Wrangler, still attached to the master cylinder it was pulled with. And here's a pic of the MJ-specific distribution block on the left, and the YJ proportioning valve on the right. Don't get them confused, they're very similar looking. The YJ valve has the front port plugged. The first step in replacing the load sensing valve is to bleed all brake fluid from your braking system. There should be no fluid in the system prior to disconnecting anything. Next, remove the MJ-specific distribution block from under the master cylinder. Due to flex in the hard lines attached to it, and how tight the connections can be, I recommend using tools which will provide you the leverage you need, like large vice-grips and a proper wrench. Remove all six of the hard line connections running to the distribution block and remove it. Next, cut the hard brake line that was plugged into the front port of the distribution block (the main hard line) into pieces to remove it. The entire line will be discarded. Start at the front of the truck and work your way towards the rear, cutting a foot or two of the line at a time. You'll want to cut the line in this fashion as routing under the truck and past the gas tank is impossible to follow. You are cutting that line completely out, all the way back to where it plugs into the rear load sensing valve. Once the main hard line is removed, take a look at your rear load sensing valve. There will be two uncut hard lines still plugged into it. One line runs from the front of the vehicle to the load sensing valve (the emergency bypass line), and one that runs back to the rear brake drop line. Disconnect both from the rear load sensing valve using a wrench and carefully bend out of the way slightly. Locate the attachment point for the load sensing valve's rod on the rear axle differential cover and detach it. At this point the rear load sensing valve can come out. Unbolt the bracket it's mounted to from the truck frame. The bolts will likely break rather than come out freely. Discard the entire load sensing valve assembly, or send it to a club member who wants a backup. I got a nice set of lug nuts in trade for mine. Now you have an option. You can either use a coupler to attach the two remaining hard lines where the load sensing valve was, or you can remove both lines and run a single hard line from the front of the truck to the rear brake drop line. My hard lines were in good shape, so I opted to couple them... Next, use a 3/16" brake line coupler, available at any auto parts store (NAPA part number G60693-0303), to connect the two hard lines that you disconnected from the load sensing valve. You are connecting the remaining line that runs from the front all the way to the rear brake drop line. Here is a pic from the front side of the frame crossmember showing the two lines connected with a coupler: And here is a pic from the rear side of the frame crossmember showing the connection to the rear brake drop line: Once you have the rear sorted, return to the front of the vehicle and install the YJ proportioning valve. All of port locations on the YJ proportioning valve match the MJ-specific distribution block's port locations, so connect the hard lines back up the way you disconnected them. You'll be missing the one hard line you removed earlier, obviously. Here's a pic of the YJ proportioning valve installed, with all hard lines connected: When finished, fill and bleed your entire braking system (front and rear), then perform several tests, starting at extremely slow speeds to test proper functioning. Final Thoughts I deleted the rear load sensing valve from my Comanche eight months ago as of this writing. I am happy to report that braking using this recipe is as you would expect, without any problems, issues or caveats. I have only experienced rear brake lockup when using full braking pressure, going downhill on wet surfaces with radial tires. Under the same conditions, the truck stops without locking up the rear brakes when using all terrain tires.

-
Vehicle part question
kryptronic replied to DracoSedentis's topic in MJ Tech: Modification and Repairs
Thank you, I stand corrected. 91 was an HO year for the Wrangler. 92-95 have identical electrical setups. 91 still had some mechanical bits like the speedo. I've owned several 95s and when sourcing those parts, I only ever looked back to 92 due to several differences in 91. -
Vehicle part question
kryptronic replied to DracoSedentis's topic in MJ Tech: Modification and Repairs
Wranglers didn't get the HO package until 92, so add 91 as well. Around here (PA) 2.5L Wranglers and parts for them are plentiful. -
Mine came with a stock rear bumper but it's not on my build sheet. The front bumper is, though:
-
I sent a factory set to Krustyballer in the fall. He's working on replicating them currently.
-
Combustulator: Available as an option on Renix Jeeps to combat crankshaft sensor issues reported under warranty.
-
I thought Minuit was a moderator, but upon checking he's not. I think that's why I had moderators noted as an issue, and reported it. Thinking back, just members and guests had the hard 2MB limit. Moderators did have an overall storage capacity of 1GB, which I did remove figuring those are the people posting approved content in DIY. Sorry for the confusion.
-
You're an admin, so you were exempt from the 2MB limit all along. My test worked for the same reason yesterday. Minuit and WyoCherokee happen to be in the group 'members' which had a 2MB limit on file uploads until a few minutes ago. Basically I had to remove the limit and enable the image resizing. I failed to remove the limit. It's gone now. Reminds me of Superman 3. You tech guys know what I mean.
-
I just figured this out. Admins had no image size limit on uploads, so the forum was allowing uploads exceeding 2MB by admins only, and not allowing them for members, moderators, etc. Forum permissions have been adjusted so that members and moderators both have no limit on file size for image uploads. The forum software will auto-resize the files before they're saved to keep file size reasonable. Guests still have a 2MB maximum on uploads, but are not allowed to create posts in forums.
-
We've tested this a few ways and it appears to be working as intended without any complaints from anybody else. Perhaps the image you referenced as 1.8KB (very small?) is corrupted in some fashion, and that's why it can't be uploaded. Maybe it's not a valid format. I'm not sure. If you could provide more information, we could dig deeper.
-
Uploaded 1600x1200 @ 3.6MB. Saved at 800x600 @ 87KB. Done via Samsung Galaxy using Chrome.
-
Uploaded at 5312x2988 @ 6.1MB. Saved at 800x450 @ 103KB. Done via Desktop using FireFox.
-
Don: What was the original file size for your 3072x2304 image? WyoCherokee: Looking into this. Perhaps we still have a file size limit somewhere.
-
In PA we have annual registration for the title and tags which runs $38.00. In 2017 they stopped issuing new yearly stickers for the tag, citing cost savings and the fact that LE now identifies out-of-date registrations with their computers. We also have an annual safety inspection here in every county, and annual emissions in supporting counties for all OBDII and newer vehicles. That runs $59.00.
-
Steering Column, Tilt? Push me over the ledge.
kryptronic replied to Jeep Driver's topic in MJ Tech: Modification and Repairs
I'm a taller guy at 6'2" and I generally only ever use tilt once, and that's to bump it up one notch above straight to get the wheel where I want it the first time I sit in a vehicle. Then nobody ever touches it. My MJ came with a non-tilt column that sits a little low for my taste, therefore I acquired a rebuilt tilt column which will be going in when my build starts. I'm also a Wrangler guy, and as such am more comfortable sitting a bit higher in the cab, therefore I will be bumping the height on the bench seat, and may need to make one further adjustment to the tilt at that time. If a standard non-tilt wheel put the wheel where I wanted it, I wouldn't need/want tilt either. -
We're here to mess with you. Actually we're working on a number of updates to ComancheClub over the next couple of weeks. New theme, new homepage, etc. Today we got all the forums/subforums/descriptions in line and correctly organized as per previous membership requests. The mandate was cleaner, simpler, easier to use. That's what we're heading towards. Feel free to memorize this layout, it will likely stick for a decade. On that note, we have just enabled auto-resizing of images for uploads. Now members can upload images at any size from any device and the website will resize it to appropriate proportions prior to saving it online. No need to use Photoshop or whatever to reduce image sizes any more. Ah, progress....
-
https://philadelphia.craigslist.org/cto/d/1989-jeep-comanche-make-an/6487648455.html Open to offers. This guy pretty much says all the right things in his ad. Worth checking out if you're in the market for a Renix MJ.
-
Rear Axle Swap, Technical help needed
kryptronic replied to That_Comanche_Guy's topic in MJ Tech: Modification and Repairs
Correct. I was referencing YJs (first gen wranglers). Sorry if I wasn't clear. -
Rear Axle Swap, Technical help needed
kryptronic replied to That_Comanche_Guy's topic in MJ Tech: Modification and Repairs
87 to 95 Jeep YJs with automatic transmissions typically have 3.73 Dana 35s. Nearly all 2.5L engines have that ratio with autos. Most 4.0L engines with auto have them too, but sometimes 3.55 are in there. YJ to MJ conversion requires moving the spring perches and cutting the track bar mount off. ZJ discs bolt right on. For c-clip axles no special tools are needed for the disc brake conversion. It will be harder finding a decent 3.73 D30 front. Look at TJs for that. Good luck. -
99 TJ Harness Question
kryptronic replied to TheDirtyJeep401's topic in MJ Tech: Modification and Repairs
I seriously doubt you can swap an OBDII TJ harness onto an OBDI YJ motor without major issues. I have both types of Jeeps here and off the top of my head the ODBII harness has many more sensors, the cumputer connection is different and there are two ECUs, its a different ignition type, etc. -
what new tech writeups would you like to see?
kryptronic replied to Pete M's topic in MJ Tech: Modification and Repairs
Complete air conditioning delete would be on my short list. -
CAD, Jeep is at it again....LOL........and other info.
kryptronic replied to Jeep Driver's topic in The Pub
Thanks for posting. I just paid off my 2013 JKUR and was torn between building it out, or trading it in on a new JL. The more I see on the JL, the happier I am that I decided to keep the JK.