kryptronic
-
Posts
825 -
Joined
-
Last visited
-
Days Won
11
Content Type
Profiles
Forums
Gallery
Everything posted by kryptronic
-
The forum theme was just updated to force the display of signatures on all devices. If you don't see the change right away, click your browser's reload/refresh button. Thanks for the request. This has been bothering quite a few people for a while.
-
 I've got one of those four pane sliders. Fit is less than impressive. It works but it's thin and flimsy compared to a stock slider. Doesn't leak, though. Just to give you an idea of how thin: One of my panes was replaced with plexiglass when I bought the truck, and I didn't notice it wasn't glass for around six months. The real glass panel on the other side was just as flimsy. I was lucky enough to find an intact stock slider and gasket at a junk yard near here early last year. They're gathering dust now pending my build starting.
 -
Check to be sure the belt is routed straight as well. I had a similar issue where lining up the pulleys better cured it.
-
I've got two available in York, PA. PM me. Mods might want to move this to the Wanted forum in Classifieds.
-
Which wheel studs to use?
kryptronic replied to jeepdude89's topic in MJ Tech: Modification and Repairs
I used extra D30 front studs I pulled off my old hubs. Worked perfectly for a ZJ disc swap onto my YJ's D35. -
Video of my rig misfiring... any ideas?
kryptronic replied to cjomanche's topic in MJ Tech: Modification and Repairs
My experience was rough/eradict idle after reaching closed loop with no codes. No ticking though. +1 on the 94-95 distributor. Thats what I popped in for a fix. -
Video of my rig misfiring... any ideas?
kryptronic replied to cjomanche's topic in MJ Tech: Modification and Repairs
If this is happening only after reaching operating temp, it's computer/sensor related. Had nearly an identical issue with a 2.5L HO YJ. Had to replace the entire distributor assembly to fix as the issue was the Camshaft Position Sensor. Other possibilites are a bad TPS, O2 Sensor or Crankshaft Position Sensor. IAC as well. But I bet its the Camshaft Position Sensor. -
Keep looking and be patient. Here's a nice deal on a pair of D44s from a TJ near me in PA. I'm sure sonething similar would pop up by you. https://york.craigslist.org/pts/d/jeep-dana-44-set/6408452411.html
-
Im in PA and have a spare 4.10 XJ D35 from an 86 with the big brakes. Could pull parts and ship but they're heavy.
-
91 HO Fuel Delivery Issue
kryptronic replied to kryptronic's topic in MJ Tech: Modification and Repairs
No problem. I had actually taken all the pics to do a DIY writeup, but with the mods needed, and me not being sure on differences between HO and Renix sending units, it didn't happen that way. -
91 HO Fuel Delivery Issue
kryptronic replied to kryptronic's topic in MJ Tech: Modification and Repairs
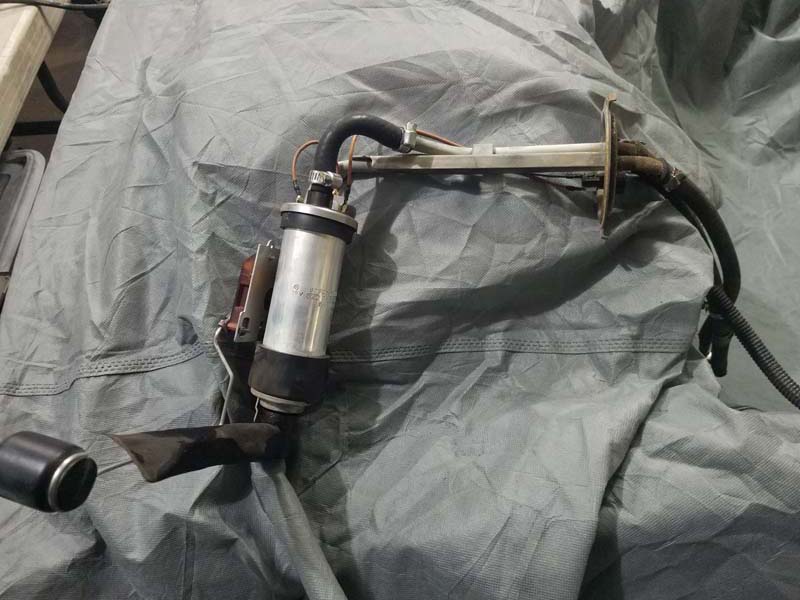
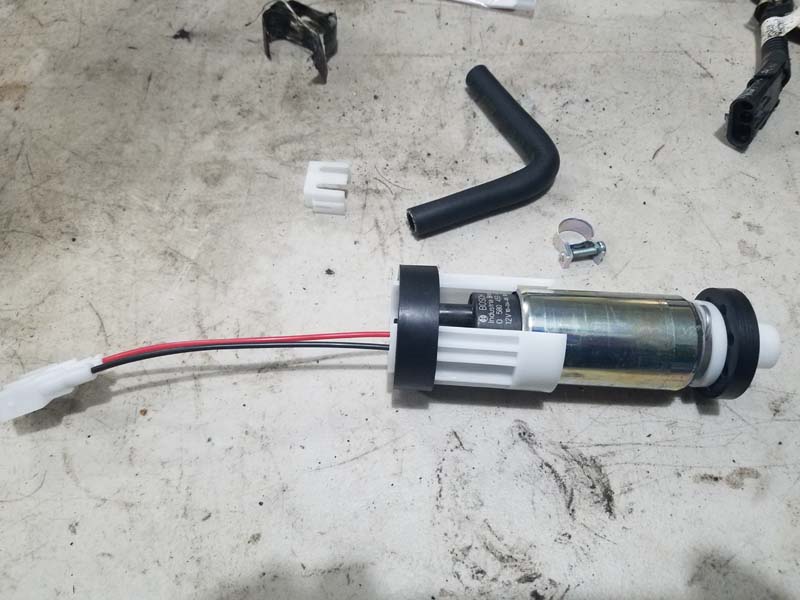
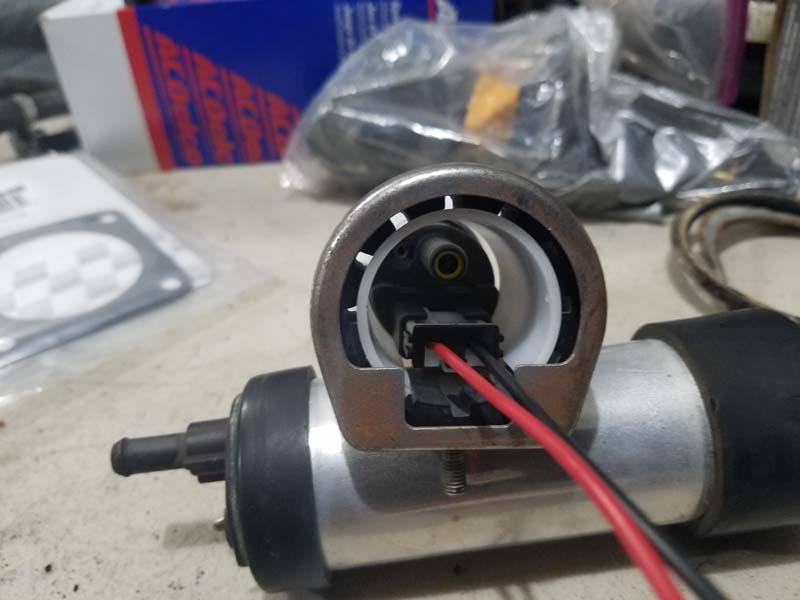
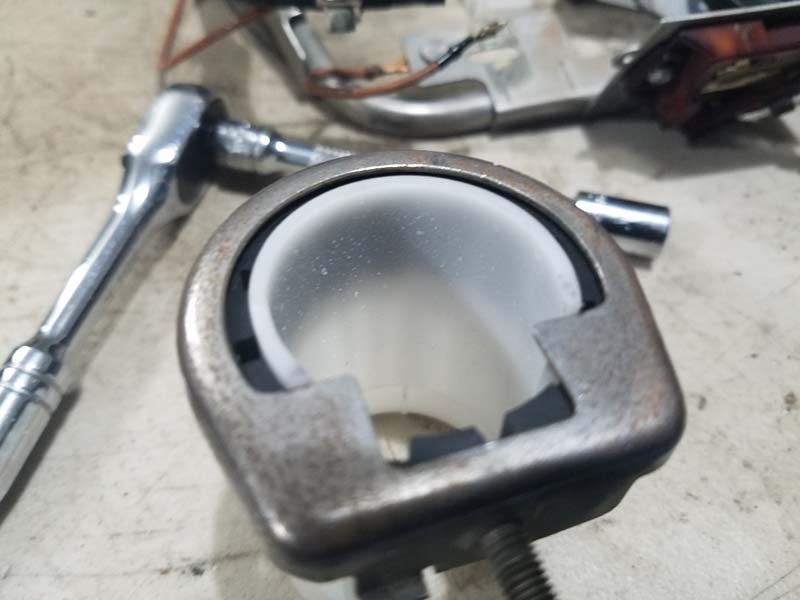
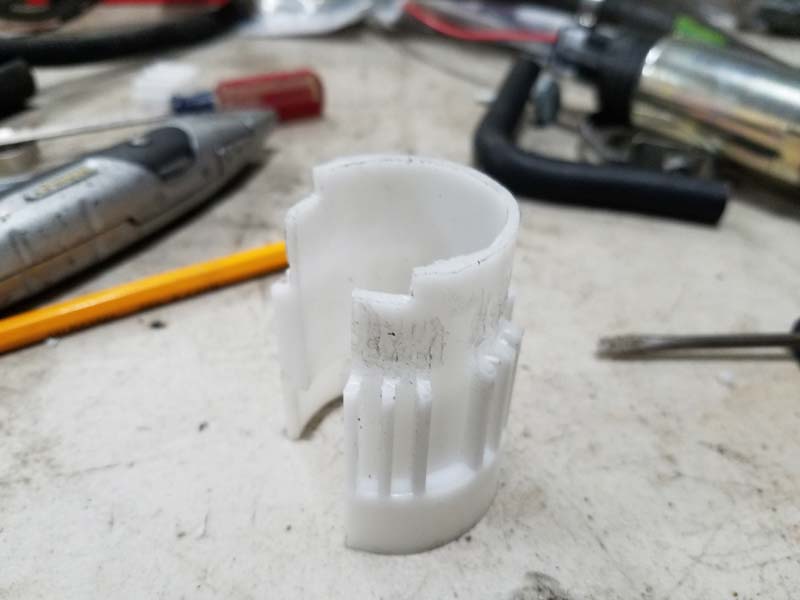
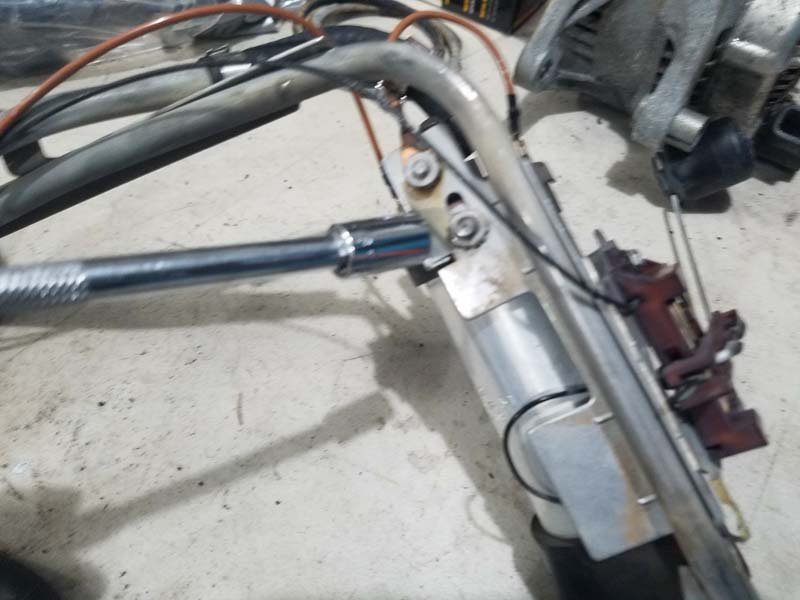
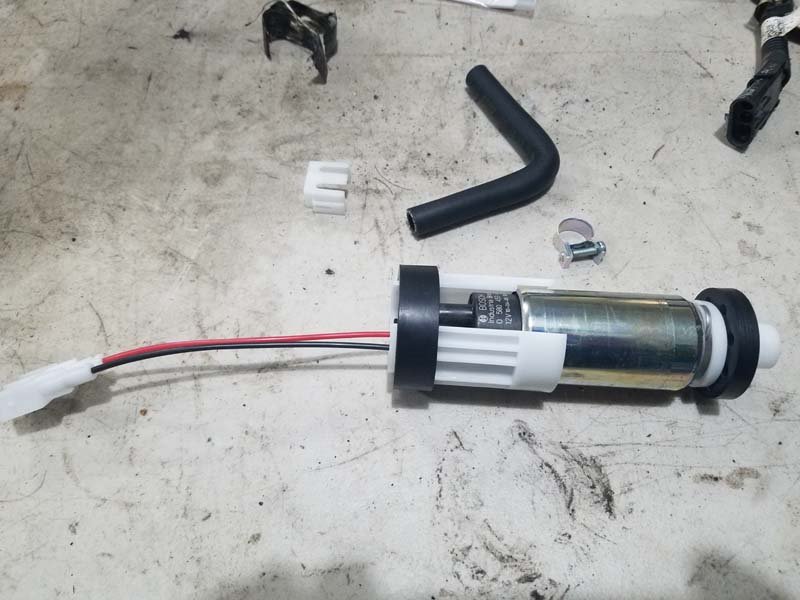
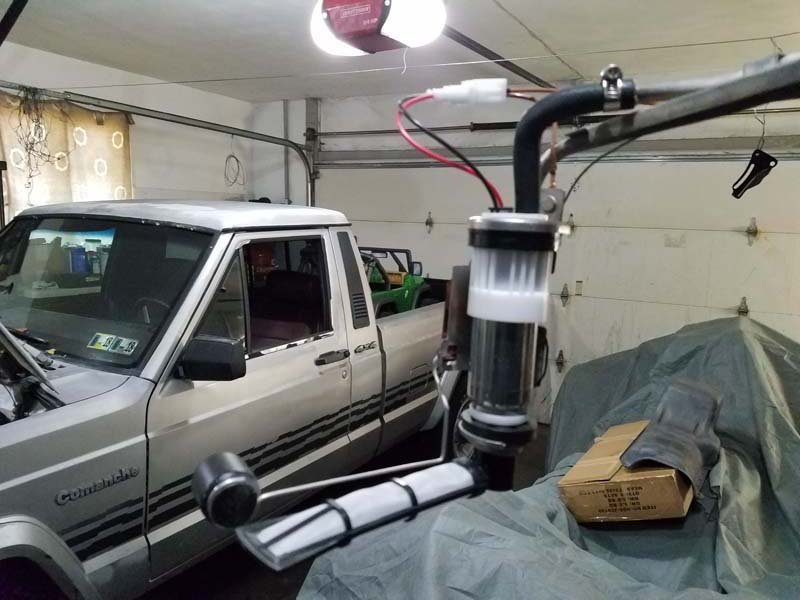
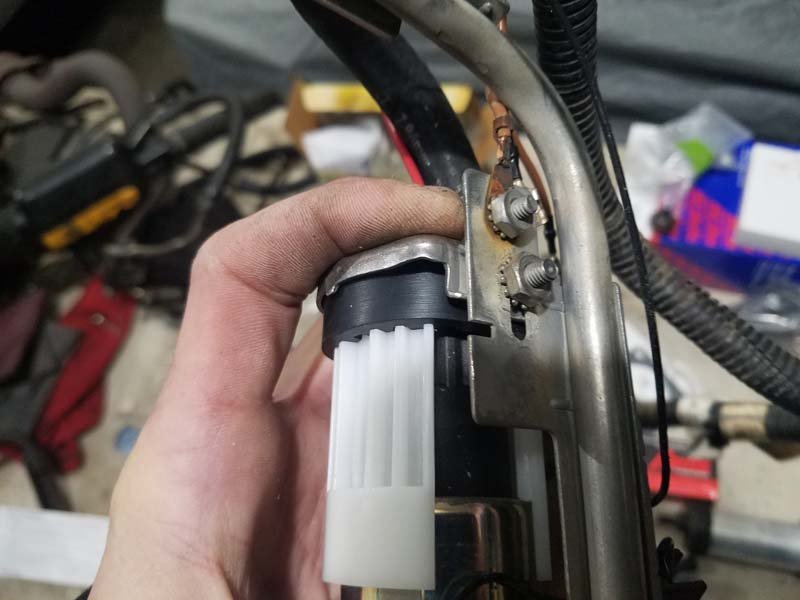
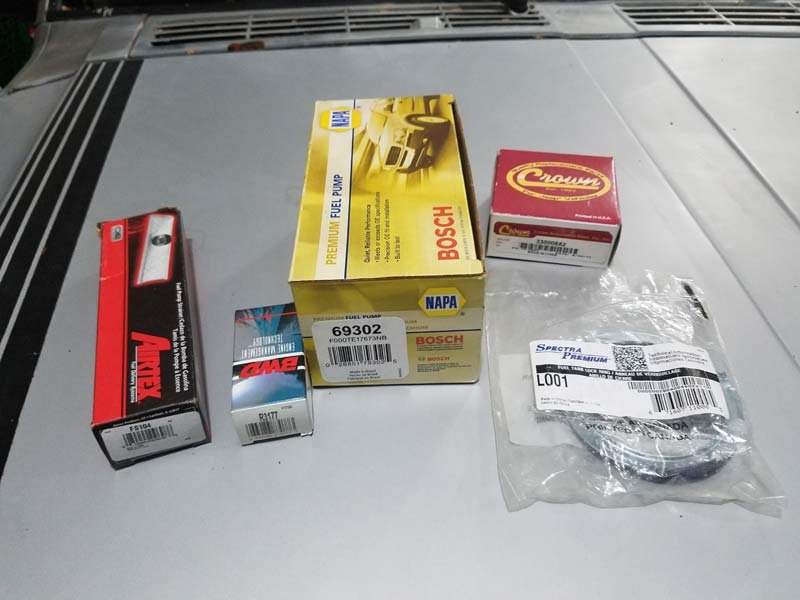
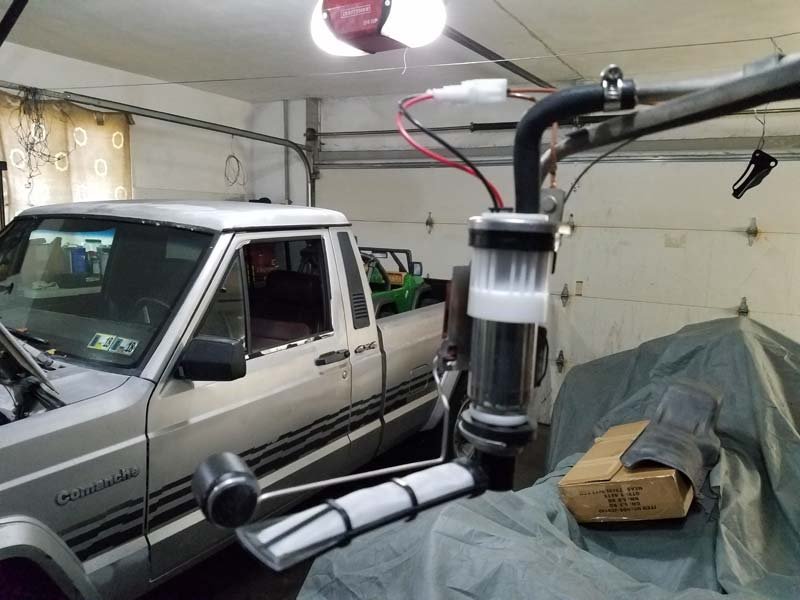
The fuel pump install was definitely interesting. I expected the part to drop in. I'd hate to see what a shop would do during the install. For reference, this is what I pulled from my 91 MJ: The fuel pump, which I believe to be OE (and lasted 231k miles) is labeled as follows: BOSCH 9580810019 12V 927 068-18 Made in USA 31 8935003591 0H18 Notice the alignment tab on the sending unit in which the top retaining bracket is placed. Sorry for the blurry picture. The socket is right above the notch. This fit is the ultimate goal: This is how the Bosch fits together as delivered: And a shot showing the retaining bracket and mounting adapter don't fit quite right: Adding a notch helped: But then fitment was an issue. The unit was sitting 0.20" higher. I could have notched the sender at that point, but I refuse to mutilate a factory part like this to install something that's not. Plus I had already modded the adapter. So, the final cutting on the top plastic adapter was 0.20" off the top, 0.20" off the top of the fins on the sides, 0.30" wide x 0.15" deep notches cut on either side of the opening. Perfect fit achieved: I guess a lot of us have the same pump. There is a noticeable difference (audibly) in both the charging and running of this pump. It sounds like a gun shooting fuel up prior to start, and runs very quietly. And I know it's in there in a solid fashion. I hope this helps somebody else.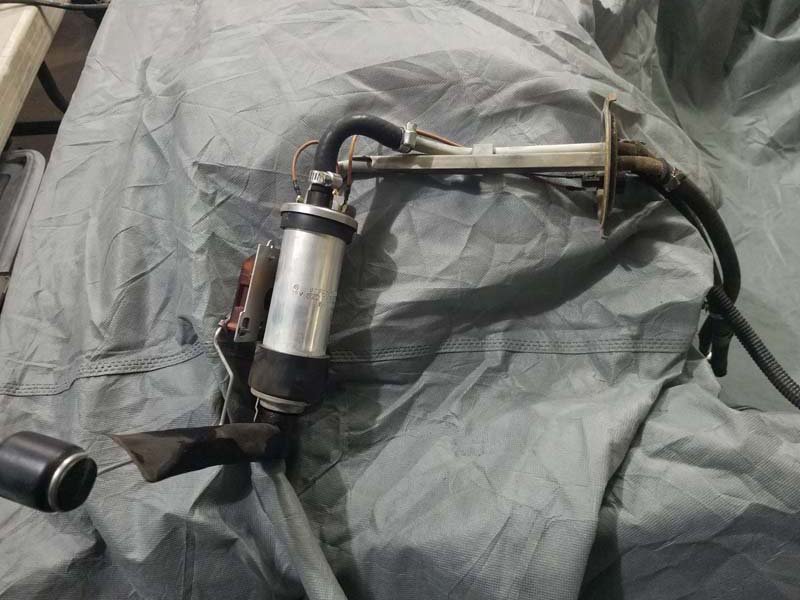


-
91 HO Fuel Delivery Issue
kryptronic replied to kryptronic's topic in MJ Tech: Modification and Repairs
#69302 -
91 HO Fuel Delivery Issue
kryptronic replied to kryptronic's topic in MJ Tech: Modification and Repairs
This is what had to be done to it. 0.20" off the top, 0.20" off the top of the fins on the sides, 0.30" wide x 0.15" deep notches cut on either side of the opening.
-
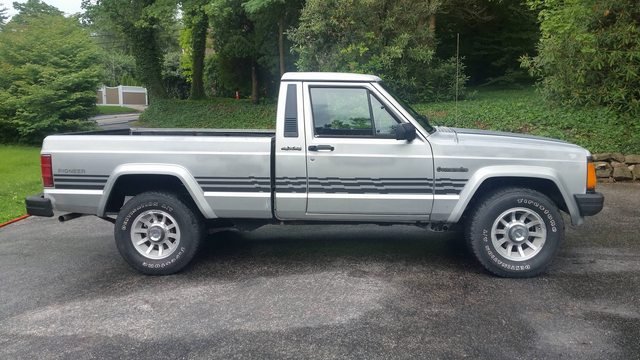
Silver Star 1991 Pioneer Build
kryptronic replied to kryptronic's topic in Member Projects: Your Comanches
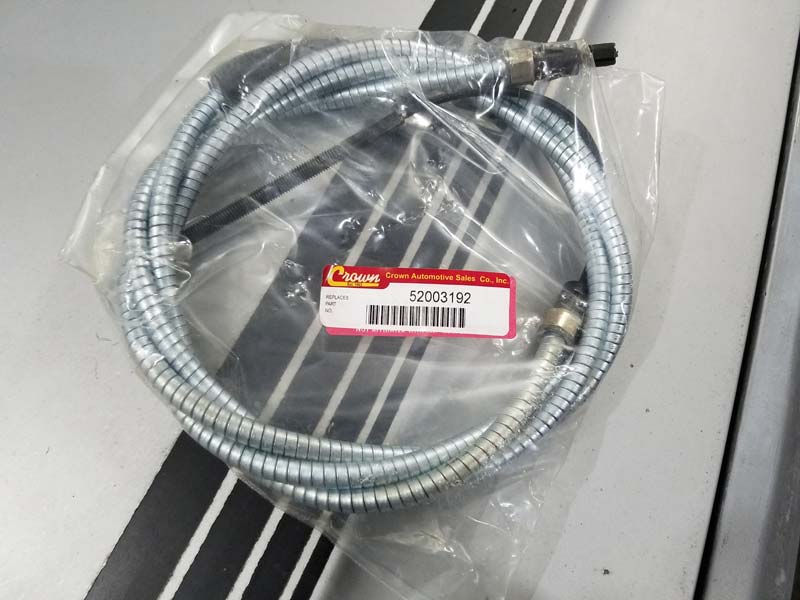
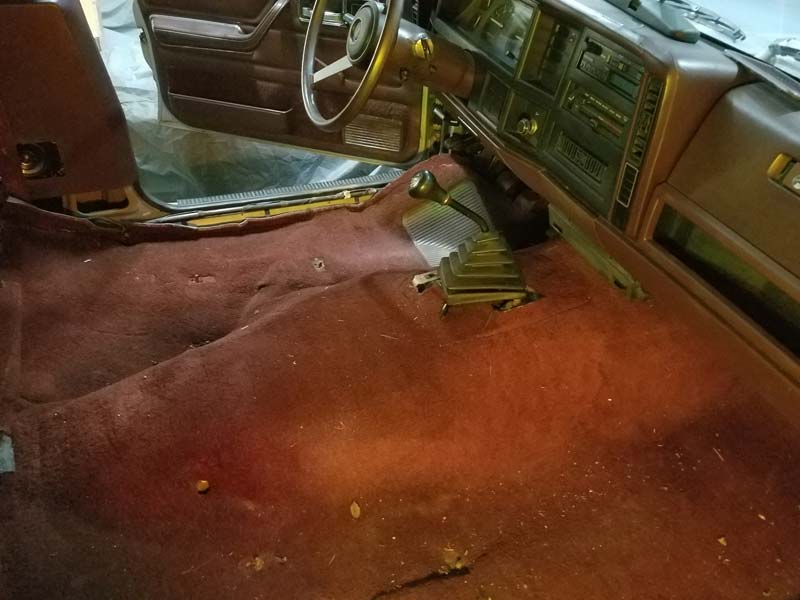
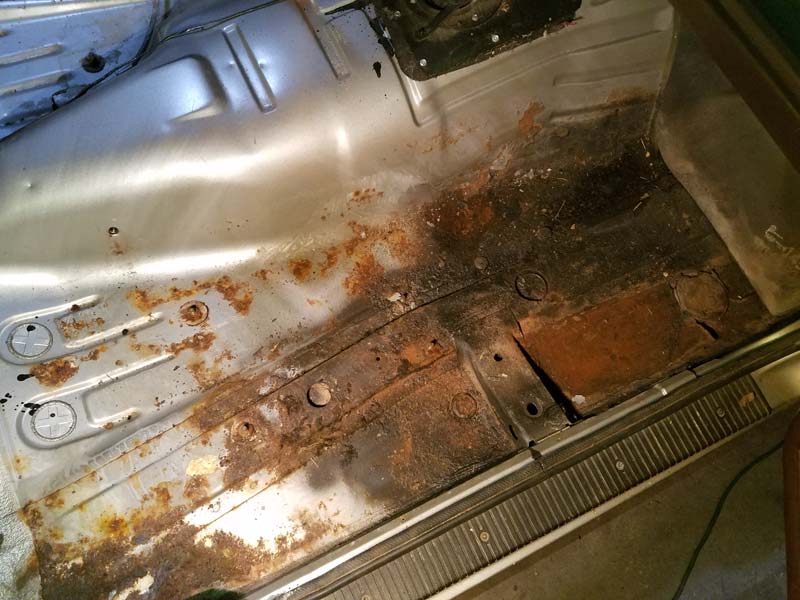
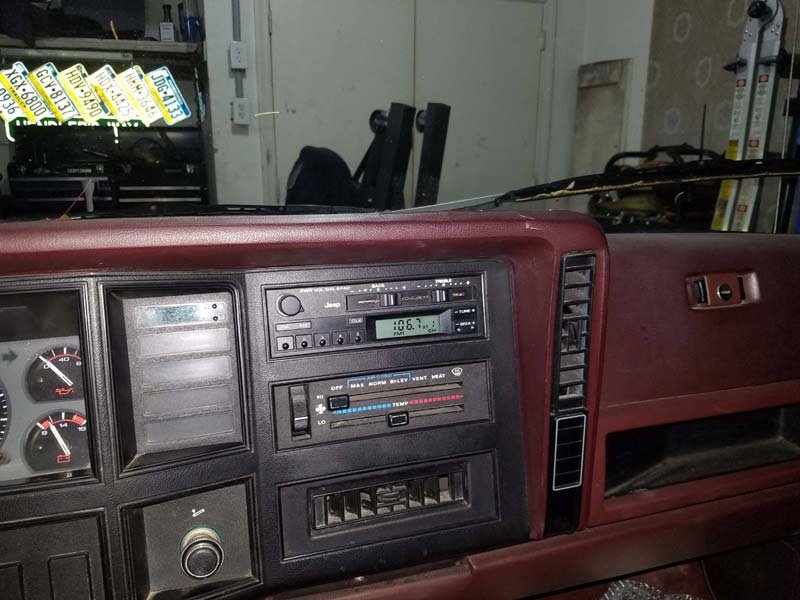
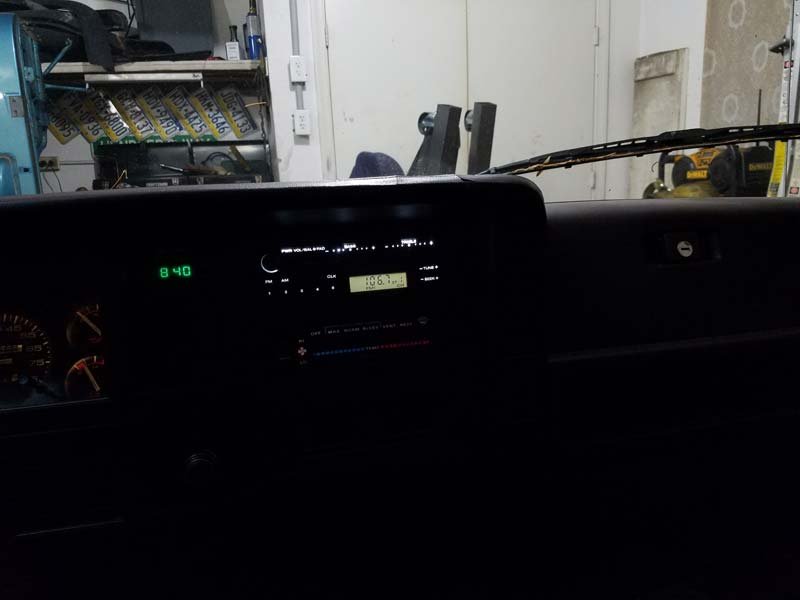
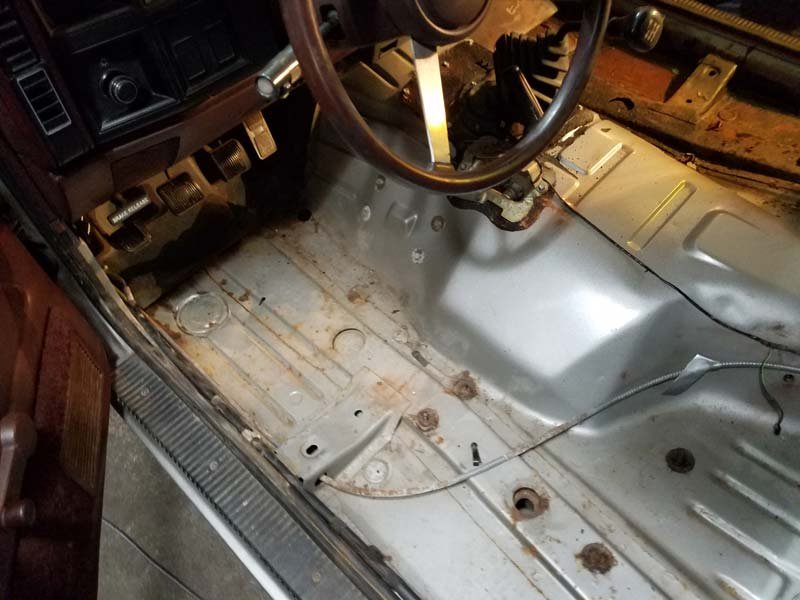
November 2017: Fuel System Refresh and a New Minuit Radio Time for another update. I've been in full swing on the YJ build that's in front of the MJ. Working on the tub and drivetrain now, so it won't be long before that's done and the MJ gets full focus. I've done a few things over the past few months, though. The Comanche made it back into the garage. Here we have three Jeeps in a two car garage: I addressed my belt squeak issue and put that to rest finally. The complete solution ended up being removing grime from and realigning the power steering pump pulley, removing three spacer washers from the alternator and putting on a Continental belt (formerly known as Goodyear Gatorback). When the PO swapped the engine, he must have swapped some of the accessories and never got the belt to line up straight. Through trial and error I was able to finally see all the issues with the alignment and fix it. Crossed off the list! So I was driving along one day and completely lost fuel pressure at the rail. After opening a thread in tech, my suspicions were confirmed - bad fuel pump. I assembled all the necessary pieces to do the job, including a Bosch pump from Napa, strainer, tank lock ring, and for good measure a new relay and ballast resistor. The pump I pulled from the tank was the OE Bosch pump, and it lasted 236k miles. The new pump was supposed to be drop-in, however the top mounting adapter needed to be modified to make it fit. It was modified as follows: 0.20" removed from the top, 0.20" removed from the top of each fin, 0.30" long by 0.15" deep notch added on either side of the opening. I used a dremel to remove all the excess plastic. With these modifications, the pump attached to the sender unit without issues, perfectly. Fuel pressure is at pre-problem factory-approved specs. You should hear this thing charge the fuel rail when it starts. No question it's pushing fuel in proper. Next came installing a new radio. My old head unit cut on and off on the left channel. I was assured by the PO that he tried to address the issue with new speakers, but no dice. The speakers were new but the head unit was less than functional. I send my old unit to Minuit's Radio Emporium for credit on a new AM/FM model with Aux input and white LEDs. Let me say that dealing with Jeremy at the Radio Emporium was awesome. He took time to explain various options, was very customer service oriented, and exceeded his delivery estimate by a good margin. The radio was packaged extremely well and came with a new owner's manual and warranty information. Installation was a breeze. Required removal of the dash bezel and cigarette lighter, then the bracket that held the old head unit. I unplugged the battery as is always a good idea when dealing with any electronics. Unplugged the ground, antenna and harness and it was out. Five minutes later the new radio was in by basically reversing the removal process. Fit and finish are incredible. Sound is out of this world. To say I'm impressed with what Jeremy did is a true understatement. This unit was so nice that I decided to get another identical unit for my YJ to replace the newer Alpine unit in it. The white LEDs are killer. Anyone considering a purchase of a Minuit Radio Emporium head unit should pull the trigger. I can't express how happy I am with it. So, with the radio in, and the fuel issues addressed, I turned to a lingering issue. I had, a while back, broke my emergency brake cable that runs to the pedal. I pressed it to hard and being as old as it was it broke. So I got a new cable - note that part numbers are different for the front cable SWB vs LWB. I am used to YJs, which run the cable up the frame rail, through the frame and up into the tub right under the pedal. All the routing is under the vehicle. For some reason I was expecting the same thing with the MJ. I figured I'd be done in an hour or less. I got under the MJ and disconnected the old cable then came to the shocking realization that the cable enters the cab through the back and runs under the carpet to the pedal. Seriously? So I had to do this: Then I noticed a little rust forming on the driver's floorpan. Knowing Jeeps, and having dealt with severe frame rust issues on my YJ, I couldn't in good conscience install the emergency brake cable and cover this back up. Especially because the carpet and padding was slightly damp, even though the MJ had been garaged for the past three weeks. So I just had to pull the carpet to see the passenger side, which is always in better condition that the driver's side. Right? Wrong. Yes, that is a shoddy patch job. Yes, that is rust all over metal that was not properly cleaned or prep. Yes, that is carpet padding stuck to the floor because it was put back in over wet paint. Yes, that patch panel is epoxied in, not welded. The PO disclosed to me that the original owner hit a stump with the MJ and did a poor patch job with undercoating at the back of the passenger side front wheel well. It doesn't look bad from underneath, but it's covered with a ton of undercoating. Apparently it was much more of a deal that the PO realized. So, this is going to get fixed before the MJ comes back out of the garage. She's been given priority over the YJ for the time being. Will post again with updates as I have them. Thanks for reading.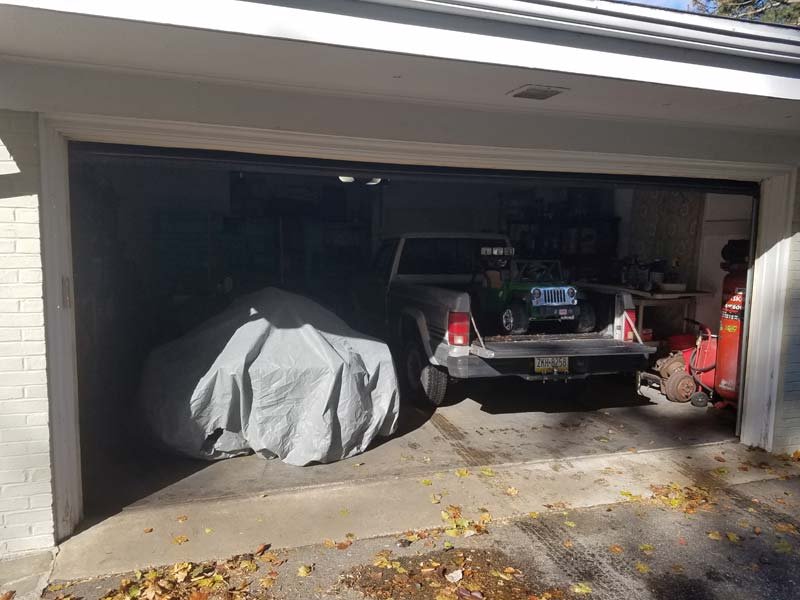


-
91 HO Fuel Delivery Issue
kryptronic replied to kryptronic's topic in MJ Tech: Modification and Repairs
SOLVED: Happy to report that I replaced the fuel pump with a Bosch unit from Napa, and the MJ is running proper again. The upper plastic piece provided with the pump to retrofit it to the MJ HO sending unit needed substantial modification to get a proper fit. I'll update my build thread with pics and specifics on the actual install. Thanks for all the help. -
Will these gauges swap??
kryptronic replied to rylee144's topic in MJ Tech: Modification and Repairs
I need to be on the lookout for this one with a tachometer. Sounds like exactly what I need as I've got an AX15. Wondering if any HO XJ police models would have been manuals. -
Will these gauges swap??
kryptronic replied to rylee144's topic in MJ Tech: Modification and Repairs
I'm interested in swapping an earlier blue Renix cluster into my HO. Am I crazy? I don't mind pulling the clusters apart and mixing and matching parts. The sweep on the faceplates for the tach and speedo look off. Has anybody done this? Just for looks as I'm doing a throwback AMC interior. -
The ones I have are definitely from an 87 and all caps. I've seen late 95 YJs with TJ parts on them from the factory, so nothing would surprise me.
-
4.0L HO Header Fitment Issue
kryptronic replied to kryptronic's topic in MJ Tech: Modification and Repairs
Black Friday Purchase: Banks 51327 Torque Tube System - When I receive it, I'll fit it right away and update this thread. -
All YJs had CAD D30s. You can get a switch from a TJ that installs on the tcase to handle the dash light if your D30 is non-CAD. I'll be doing that when I replace my D30 with a non-CAD version.
-
I have a full set up in the for sale section from an 87 but the COMANCHE emblems are all capital letters.
-
4.0L HO Header Fitment Issue
kryptronic replied to kryptronic's topic in MJ Tech: Modification and Repairs
Seriously considering the Banks right now. The only thing holding me back is a bunch of stuff I'm seeing online about them cracking. But most of what I'm reading is 8-10 years old, and they seemed to change designs several times over the years. Do you have any input on this? Are the Banks headers being produced in 2017 different and more reliable? I'm tempted, and appreciate the offer, but I'll pass. After thinking on it, I'm really not looking to fabricate a new downpipe for this, just want to add a flex joint into the one I have. Curious as to what the solution is for the O2 sensor for this type of setup, though. -
4.0L HO Header Fitment Issue
kryptronic replied to kryptronic's topic in MJ Tech: Modification and Repairs
Also, the Clifford 57-2015 has made the list, but not sure what to do about a downpipe on that one. -
4.0L HO Header Fitment Issue
kryptronic replied to kryptronic's topic in MJ Tech: Modification and Repairs
OK, then. Thanks for that. I was under the impression that Rugged Ridge was a branch of Omix-Ada. I've never had a fitment issue with an Omix-Ada replacement part, so that's why the Rugged Ridge header made the list. Figured there wouldn't be any fitment issue. Two votes against is good enough not to warrant an experiment. Rugged Ridge has been crossed off the list. A flex joint in the downpipe is definitely planned. I figured that would aid in compensating for any alignment issues. Concerning the Mike Leach header, what's the flange thickness at the head? I think you said it had no fitment issues with the older square-style intake manifold as well, right? -
4.0L HO Header Fitment Issue
kryptronic replied to kryptronic's topic in MJ Tech: Modification and Repairs
Thanks for all the info, guys. I did some measuring, which I probably should have done prior to purchase. My stock exhaust manifold has a flange on the head side with a width of 0.5". The header I have is 0.4". The earlier square-style intake manifold appears to be happiest with a 0.5" flange. I am curious as to the flange width on the later horseshoe-style intakes everybody else is running. I have some interest in the reported HP gains, as I understood switching to the later intake style had no effect, other than the potential to decrease horsepower (JP Magazine 4.0L Myths Busted). HOrnbrod is running a stroker. Anybody have any data on a 4.0L and any HP gains switching intake styes? Concerning the header, the eBay seller got back to me about the return and asked about the fitment issues. I just directed them here. So now I'm on the search for a header with a 0.5" flange. I'm wanting to do either 409 or 304 stainless. Looking at the Banks 51327 (409, revolver style), Rugged Ridge 17650.51 (304, APN style), and another one on eBay noted as USA made, and heavy duty (409, APN style). These are the only ones I can find with a reported 0.5" flange. Any others out there? I just want this to be bolt on without mods anywhere, and for it to dump to the stock location. Price is not a consideration at this point.