
kryptronic
-
Posts
825 -
Joined
-
Last visited
-
Days Won
11
Content Type
Profiles
Forums
Gallery
Everything posted by kryptronic
-
WTB: Black Door Panels, Grab Handle, Mini Console, Seatbelts
kryptronic replied to kryptronic's topic in Wanted
Crossing out items in the original post that I've obtained. -
Random MJ Pre-Build and Lift Questions
kryptronic replied to kryptronic's topic in MJ Tech: Modification and Repairs
This combo produces no rub at full stuff, sway bar disconnected? It sounds like I need to go up 4" up front, and probably 3" in the back if I want to run 31s on aftermarket rims. Anybody disagree? Thanks. -
WTB: Black Door Panels, Grab Handle, Mini Console, Seatbelts
kryptronic replied to kryptronic's topic in Wanted
Thanks. Can you post pics and give me a price? Just interested in the pair that's uncut. I really appreciate it. -
I'll be there. It's in my backyard.
-
Random MJ Pre-Build and Lift Questions
kryptronic replied to kryptronic's topic in MJ Tech: Modification and Repairs
Thank you all very much for the input. Sorry for all the questions in one thread, but I thought that was better than bombing the tech section with multiple posts for each one. It's good to know that the cooling system is already open on HOs. I had never heard of converting from closed to open before, and now knowing it's a Renix upgrade confirms why I never heard of it. I appreciate the tips on debugging the cooling as well. Should either expose an issue or put my mind at ease about it. The hood does not have insulation on it. The engine compartment has so much less room in it than a YJ I guess heat build up is a factor of that. I am going to thoroughly investigate, though. Concerning Cruiser54's Renix tips, that answers why I couldn't find a cross-reference, thank you. Mostly non-applicable. I've run through the list to look already to see what's applicable, and will be doing grounds, etc, but most of it was foreign to me coming from strictly an HO background. @Minuit: It is like a hum or whine coming from the fuel pump. Very faint. I thought it might be going, but being where it is, it might just be audible. Anyone else have a faint whining/humming from the fuel tank area? @HOrnbrod: Thanks for the info on that ballast resistor. I had forgotten to ask about it. Was wondering what is was doing there. That, as well as the electric fan are not present on the YJs on which I cut my teeth. For those turbines on your 2" rear / 3" front lift, with the sway bar disconnected, and at full stuff, do they tuck in under the fenders or do you still have room to go? Would a rim with about an inch less backspacing rub? @Tex06: The pic you posted is pretty much dead on for what I'm looking for. Those are D-Window rims, which are very similar to Soft 8s. Can you confirm what your setup is in that pic? It looks like 31s with 15x7 rims and 4" of lift, but only you know. What are the lift components there? I am kind of set on going with aftermarket wheels with 4" backspacing just to push the wheels out a bit further to add to the track width to compensate a little for whatever lift goes on there. I do like the turbines, though. And 31s would be nice. Not sure if I need all that goes with 32s. The desire is to stay under 4.5" of lift in the front (as that seems to be the make or break the bank mark), with a minimum of 3" of lift in the front and 2" in the rear. I know I can run turbines with no lift and WJ control arms. I do want some lift, though. Again, much appreciated. -
I just got my 1991 MJ back to driver status and now I'm the process of thinking about how I want to build it out. For pics, check my build thread. I have a few questions for everyone, and any help is appreciated: (1) Is there a cross-reference somewhere that I am missing that would translate Cruiser54's Renix tips to the later 91-92 HO/Chrysler platform? I imagine some tips are not applicable and others are, perhaps with modifications. (2) My MJ feels like it's running a bit hot. I have yet to go through the cooling system, but was hoping for some info before I get into it. My temp gauge consistently reads 210 degrees, and once or twice I've seen it go above that by 20-30 degrees then cool right back down. I am not sure if my electric fan is working, but assume it is based on the last statement. It's just that the hood is very hot to the touch after running for just a bit. So hot I can't keep my hand on it for more than about 15 seconds. The hoses just seem abnormally hot too. Sometimes I think I smell coolant, but I might just be imagining it. Is this normal? It has never overheated since I've owned it. Coolant levels are good and the radiator looks new as does the water pump. I see references to converting to open cooling on here. Is that even applicable to my 91? (3) My fuel pump is making a whining noise at all times while the MJ is running. I have no idea if this is normal or not. It's not very loud, faint actually. I'm not sure if my YJ does this or not, but on that vehicle with the exhaust so close to the fuel tank, the sound could just be drowned out. Is this normal, or a sign the fuel pump is on the way out? (4) Concerning lift, I am considering either running 31x10.5x15 tires on 15x7 rims, or 32x11.5x15 tires on 15x8 rims. If I go 31x10.5x15 tires on 15x7 rims, I may use stock jeep rims (turbines), or I may go with Cragar Soft 8s. If I go with 32x11.5x15 tires on 15x8 rims, those definitely would be Cragar Soft 8s. I intend fully on keeping the front part of my MJ stock, so this means cutting fenders or fender flares is not an option. A 97 header swap with an offroad bumper is not an option either. In fact, I have the factory air dam / spoiler up front and I intend on keeping that. So with all that baggage between the spoiler and fender flares, how much lift will I need if I want absolutely no rub at full stuff with the front sway bar disconnected, without any steering stop adjustment. I'm OK with bump stopping, if need be. - Lift required and components for 31x10.5x15 tires on 15x7 stock rims - would switch to turbines? - Lift required and components for 31x10.5x15 tires on 15x7 rims with 4" backspacing? - Lift required and components for 32x11.5x15 on 15x8 rims with 4" backspacing? I already have 4.10 axles for gearing, and am not afraid to spend money on this. I would like to do everything lift-wise for reasonable prices, and this does not have to be built for an end-of-the-world scenario (I have my YJ for all that). But I will spend money. This lift is mainly for looks, to get up higher in traffic. I don't want it to ride like crap either. I put Old Man Emu springs with Hydros, on my YJ for instance. I want lift and a nice, soft comfortable ride. Not looking to have my teeth rattled out and like I said, it does not have to be an ultra heavy duty type setup. This MJ will likely see moderate trails occasionally, mostly on camping trips, and will likely never see rocks or anything extreme. (5) I have the football evap canister under my bumper, and I also have another evap canister for the fuel system. I'm not sure if I can just re-route everything from the football to the fuel evap can to eliminate the football, or is this is a very bad idea? Looking to clean up under the hood. This is a 91. I'm not sure if earlier models had a evap can for the fuel tank, or if this was introduced witth the HO and the football was a leftover that engineering forgot to delete. Any info would be helpful. Any input on the above anyone can offer would be greatly appreciated. Thank you.
-
I am in the process of converting the interior of my 1991 MJ from burgandy to black. I have been able to obtain all the factory black original pieces with the exception of the following: (1) Black door panels. I need the door panel and the armrest for both doors. There are two styles: Standard has a rectangular armrest and no carpet at the bottom; Deluxe has a hockey stick armrest and carpet at the bottom. I would prefer the Deluxe, but would take a Standard set. The panels must be in great shape, no holes, scratches, etc. (2) Black grab handle for the top of the passenger side door. (3) Black mini console. I have 4WD and an AX-15 with a bench seat. This is the mini console for the manual. The 4WD switch just inserts into a removable plate. I have a bench seat, do not want a full console. I have a black one, but some of the screw clips are busted and I'm looking for a better one for cheap, otherwise I'll repair this one. (3) Black seat belts. All four pieces needed. I can pay via PayPal. I am not looking for grey or charcoal or aggate or anything but factory black. I believe this showed up only in the earlier AMC made XJs and MJs. Will need shipped to PA 17403, unless you're fairly local in central PA or MD. Thank you very much.
-
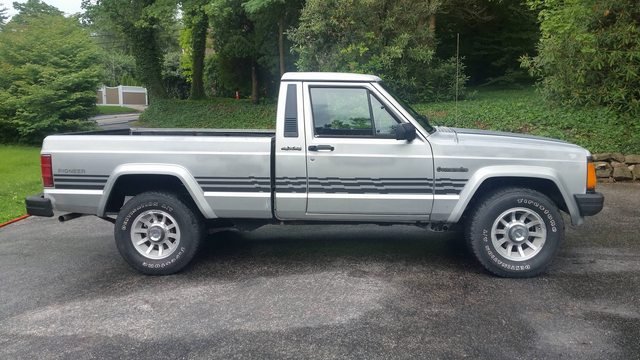
Silver Star 1991 Pioneer Build
kryptronic replied to kryptronic's topic in Member Projects: Your Comanches
June 2017: Pennsylvania Inspection (PASS) Today was inspection day. The MJ passed, for those that want the abbreviated version. About two hours before I had to take the truck in, I decided those horn contacts needed to be looked at because I wasn't really confident in them. I started to remove the horn bezel and felt it realign itself ever so slightly. Without even having taken it off, I cured the horn issue. It blows no matter how or for how long the bezel is pressed. Case solved, going to check that off the list. Today must have been my day, because I am going to check off the exhaust vibration from the list too. As near as I can figure, it worked itself out the other night. After I got the tailpipe installed and I fired up the truck the thing was puffing white smoke from the exhaust like crazy. I wasn't really worried about it because I knew it was either something inside the new tailpipe burning off, or was the WD-40 I used to lube it up to get it into the muffler that was burning off. I ran the engine for about 30 minutes and cycled it through high revs then idle intermittently. Most times I would rev the engine at around 4000 RPM for around 20-30 seconds then let off back to idle and repeat every 2 minutes. Once or twice I got distracted and nearly redlined it. Anyway, I think the vibration I was hearing was just something misaligned in the cat or just some buildup that needed to be blown out aggressively. Reminded me of the old days when my dad would floor the old Nova on the beltway and take it up to around 80 and tell me the carburetor needed to be cleaned out. I always thought that was BS, but maybe something to it. I don't know. All I know is I don't have to track down exhaust vibrations, so I'm happy. Next came PA inspection. I've taken all my Jeeps to the same shop for years. The only thing they do is the annual inspections on the vehicles. They're honest and very fast. The mechanic did a test drive to start out and then pulled into the bay and opened the hood, then came into the office to ask me a bunch of questions about it. Mainly because he was totally stoked to have such a nice MJ to look at. He said it was plenty obvious work had been done to the engine, and it was impressive. He then got it up on a lift and invited me under for a good look. I basically followed him around as he did the inspection and watched and learned. He had issue with the front brake pads and rotors and asked kindly that I replace them as soon as I can. I told him I would do that within the next couple of days, as I have YJ pads and calipers ready to go that I thought I might need to put on the MJ. Should have just done it. He said he had never seen one so nice. I'm sure he hasn't looked very long or hard. Today I learned that all counties in PA have the annual safety inspection, which all vehicles must pass, but only some counties have emissions inspections. Mine, York County, does have emissions inspections, but they are no longer required to run emissions tests on vehicles with model year 1995 or older with OBDI. The emissions inspection is strictly visual, to make sure things like the proper sensors are there and the catalytic converter is present. So that's good news for my YJ build too. The mechanic issued both the emissions and safety inspection stickers and thereby deemed this MJ safe to operate on PA roads. I'm obviously very happy about this. Any I guess the club can celebrate too, as one more MJ is a driver once again. After the inspection I picked up the factory SWB bed liner that Curt in Jacobus was holding for me. It's the factory one that says 'COMANCHE' along the back of the bed. We talked a bit. He's going to try an hunt down some black door panels for me. Might know a guy with a nice set. The bedliner is in really good shape, and now I have a SWB Pendaliner in great shape that will go into the MJ pile for future sale/trade. I am turning my focus back onto my YJ build for the time being, so posts may be sporadic as I do various things, but don't have much planned in the short term. I really want to drive the Comanche and live with it and feel out how I want this build to go. I have the new D30 and D35 that will be built out, and restoration and upgrade work before anything gets very exciting. -
Silver Star 1991 Pioneer Build
kryptronic replied to kryptronic's topic in Member Projects: Your Comanches
Thank you. I was going to research that. With the 91, info is mixed. I'm wondering why I have two separate evap cans. Looking to possibly eliminate one. My YJ only has one, shared by vaccuum and fuel, so I'm looking into it. Will review your build when the time comes to get ideas as well. -
Silver Star 1991 Pioneer Build
kryptronic replied to kryptronic's topic in Member Projects: Your Comanches
June 2017: Engine Testing and Specs It's the eve of the PA state inspection, and I have everything in order. The horn contacts are a little flaky in the steering wheel, but if it will sound, it will pass. It will sound with enough effort, I hope. Tonight I did something that I've been meaning to do since I got the MJ. Whenever I get a new Jeep I like to run a bunch of simple baseline tests on the engine to see where it's at. I had delayed these tests on the Comanche, and have instead just been fixing issues to get it ready to be a driver for a bit. So tonight I ran them, and I'm sharing the results here. * Engine Vacuum (Target: 18 in-Hg): 17-18 in-Hg * Fuel Pressure Vacuum Connected (Target: 31 PSI): 32 PSI * Fuel Pressure Vacuum Disconnected (Target: 39 PSI): 41 PSI * Engine Cylinder Compression (Target: 120-150 PSI, Max Variance 30 PSI): Cylinder #1: 155 PSI Cylinder #2: 165 PSI Cylinder #3: 160 PSI Cylinder #4: 160 PSI Cylinder #5: 165 PSI Cylinder #6: 160 PSI I am very happy with these results. Engine vacuum is just a hair low, which could be pushing fuel pressure just a bit high, so I am going to be checking the entire vacuum system for any cracked hoses or boots and replacing what's necessary. Admittedly, these results are well within the margin of error of the tools I used to perform the tests, so I may not find anything, but it's good to check. The compression test may be my gauge reading a bit high, but all numbers are well within 30 PSI (actually only 10 PSI difference), so we're good there. And I'm sure my gauge is within 10-15 PSI of accurate. The compression test was done on a warm engine at wide open throttle. Each cylinder was tested twice and the results were identical for all same-cylinder tests (did not have to average results). I think it's important to mention, for anyone picking this thread up here, that this is a 1991 MJ. It has a 4.0 L HO with Chrysler electronics, not Renix. These results may only look good to 91-92 MJ owners. I am really not familiar with Renix Jeeps, so I'm not sure. Earlier in this thread I mentioned that the PO swapped in an engine from a 1991 XJ with reportedly 110,000 miles on it as the original engine leaked oil badly. As I said, this is undocumented. I can confirm the engine was swapped, and the PO looks to have done everything right with it. It's got upgraded wires, injectors, the good Felpro gaskets all around, etc. The AX-15 shifts excellent and the NP231 works as desired, and now the 4.0L HO tests out great. My exhaust vibration may be gone too. Not sure, but it might be gone. -
MJ Load Sensing Valve Delete Procedure
kryptronic replied to HOrnbrod's topic in MJ Tech: Modification and Repairs
Your plan B is identical to what I just did with the following exception: I used a YJ prop valve, and you're blocking the front port of the MJ distro block. I can't see how blocking one port or the other on that block makes a bit of difference, for what it's worth. I'm interested to see how this goes for you. I'm having excellent results with the YJ prop valve and the stock D35 with drum brakes. I am anticipating no problems when I change to ZJ disc breaks during my axle swap. If you don't like it with the MJ disto block in there, it will be trivial to put in that ZJ prop valve you have later on. Good luck. I'm saving my MJ block just in case. -
MJ Load Sensing Valve Delete Procedure
kryptronic replied to HOrnbrod's topic in MJ Tech: Modification and Repairs
I'm following this because I just did something similar. I just wanted to let you know that your pics for step 3 (which came from my build thread, glad they were of use) show the connection at the rear for the #1 hard line, not the #2 hard line. The #2 hard line is longer, and gone in those pics. For my bypass I used a YJ prop valve which is plugged at the nose, and has the rear port on the bottom. So I'm using the #1 hard line, and removed the #2 hard line. Opposite of what you're doing, if I read right. If you are plugging the bottom port on the MJ distro block, and using the #2 hard line connected to the nose and removing the #1 hard line, I am almost 100% positive you will not need that coupler at the rear. You should be able to re-bend the #2 hard line and get it to the drop hose. I am almost positive there's enough length on it to do what you want. The #2 line is longer in both the front and rear of the MJ. Also, might I add that it's impossible (at least for me) to follow the hard lines from front to back without getting mixed up. You should start removing the one you want gone at the front and cut it in sections, pulling it out as you go. That way you can be sure once you get to the rear that you're working with the right line. I think they crisscross behind the gas tank and skid plate at least once. I couldn't follow them, so devised the cut until it became clear method. I hope this helps you further develop you plan. -
Silver Star 1991 Pioneer Build
kryptronic replied to kryptronic's topic in Member Projects: Your Comanches
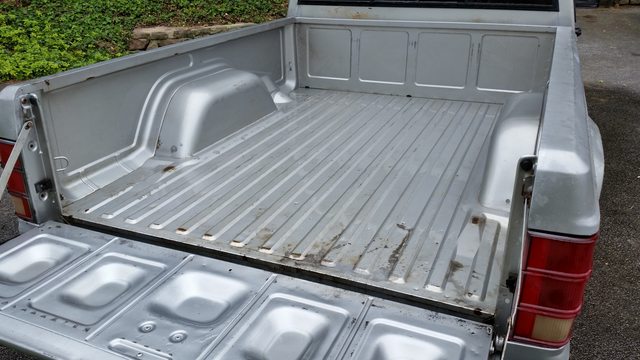
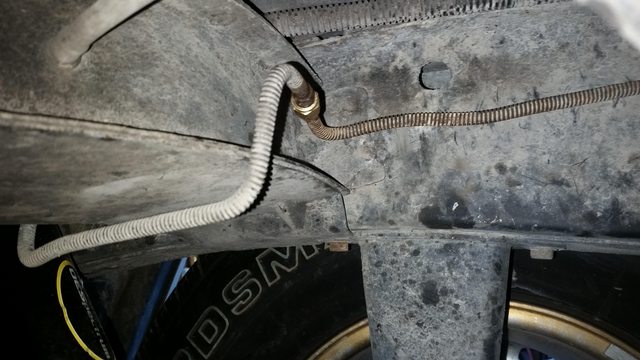
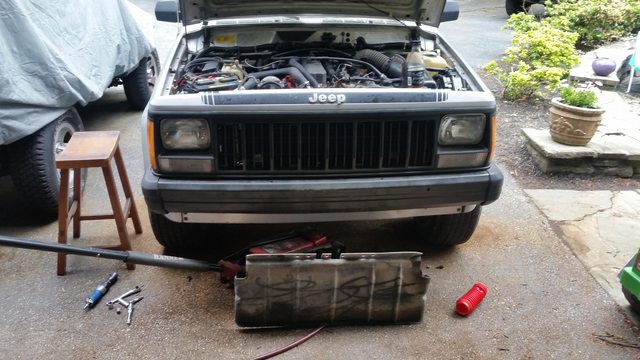
June 2017: Getting Ready for Pennsylvania Inspection Over the last few days I tackled the items that stood in the way of the MJ and getting inspected for safety and emissions in PA. A little bit about me: I have a younger son together, who just turned 4 years old. When I first got the truck, I wanted him to call it a "manche" so I taught him that's what it's called, and he learned to call it that. Then he saw the Disney movie with Eddie Murphy called the Haunted Mansion, He has since referred to the MJ as the "haunted manche". After working on the truck repeatedly, I think he may be onto something. This Silver Star build may be referred to, from time to time, as the Haunted Manche build going forward. Working on this truck has been a test in patience and not much has gone as planned. Each time one repair is made, another or two repairs are noted as needing to be made. And this truck is in great shape. Back to recent work: (1) I repaired the chip in the windshield with a $12 Permatex kit designed for that purpose. I took a pic of the chip prior to the repair, but the pic I took afterward wouldn't show it. It's good, but not great. Acceptable for inspection purposes. At some point the windows are all getting gone over and mostly replaced. (2) Next up was the tailpipe. I used a Walker replacement tailpipe for a SWB Comanche part number 46701. It was a direct match for the tailpipe that was in the truck when compared. The old tailpipe had holes at the very back, and would not pass inspection. There was a new Thrush Turbo muffler already installed, so I was very careful during removal to only cut what was absolutely necessary and to massage the tailpipe out of the muffler without damaging it. I really like the tone of this muffler. It's low and not loud. It gives the truck a meatier sound while not being in any way obnoxious. It does not sound like what I think of when I think turbo muffler. I couldn't figure out a really good way to seat the tailpipe in the muffler. Carefully banging on the forward mount and shaking the tailpipe wasn't doing it. I instead used a limiting strap to pull the two pieces together. Worked like a charm. Unfortunately Walker welded the rear hanger in the wrong spot. Not the best pic, but the mount was welded about 1.5" too far forward and was not rotated on the axis of the tailpipe enough for proper alignment. So I cut off the hanger, ground the tailpipe smooth, took the hanger to the workbench and modded it so it would lay right on the tailpipe. Then I mig welded it back onto the tailpipe in the proper location and position. With the hanger moved, the tailpipe hangs perfectly aligned. While I was under there, I replaced a plastic hanger in front of the gas tank which attaches two fuel lines and an evap line for the fuel tank to the bottom of the bed. The hanger had broken at some point and the lines were hanging. I used a frame mount for a YJ that runs brake and fuel lines. Worked great. (3) After spending three days under the truck, I was tired of being covered in grease left over from the previous motor. I thoroughly degreased the entire underside of the truck front to back using a combination of industrial purple degreaser and a pressure washer. I wouldn't say it is 100% clean, but it's 80% clean, and that's way better than what it was. While under the truck spraying everything, I noticed a bit of rust at the bottom of the passenger side rocker. I was able to remove metal and created a quarter-sized hole before I got to clean metal. Not pleased, but this seems to be the only spot on the truck. I missed getting a pic of it, but thoroughly checked everything else. (4) I then removed the plastic bedliner and feared for the worst. I had been told the bed was in good shape, but had yet to verify it firsthand. After all the other garbage I've gone through getting ready for inspection, I feared the Haunted Manche was going to deal me another hand. Thankfully, I found this underneath: I think the Ode to Joy went off in my mind. And the tailgate seems to have a very nice silver paint on it. After looking further at door jams and other areas, I am pretty sure this is what original factory Silver Star paint looks like. If it is, then the clear coat on the rest of the truck is in way worse shape than I thought, and Silver Star is actually a very nice paint color. Then Mother Nature stepped in to give her approval: I have the state PA inspection scheduled for Tuesday, in two days. Between now and then I would really like to run compression, fuel pressure and vacuum tests, but not sure if I'll have time. When I do, I'll update this post with results. I'll post back with inspection results too. Cross your fingers for me. ---------------------------- Current/Updated List of Known Issues: 1. Harmonic balancer may be approaching end of life. 2. Retighten the new Banks belt after it's broken in and loosened up a bit. Re-tap two of the power steering pump tensioner bolts (appear stripped). 3. Fully research cruise control module removal and verify the PO properly removed everything. The cruise control wire in the steering column was cut at the multiswitch by the PO. 4. Check contacts in the steering column for the horn for corrosion or debris. The horn seem to want to work only when pushed at certain angles. Maybe relay. 5. Refurbish or replace door vent window seals, and continue to look for a suitable rear slider window replacement, windshield replacement. 6. Narrow down intermittent exhaust vibration. 7. Charge the A/C system. Requires full charge. 8. Fix bench seat. It's obviously not right on the driver's side - sinking 3" in depth compared to passenger side. 9. Radio refirb/replacement.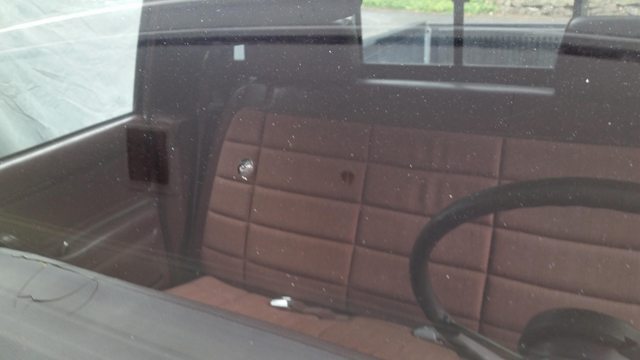
-
MJ Brake Distribution Block
kryptronic replied to HOrnbrod's topic in MJ Tech: Modification and Repairs
I've just bypassed the rear proportioning valve by replacing it with a coupler, using a YJ proportioning valve, and removing the hard line that ran to the front of the MJ distribution block. I have a D35 with rear drums. Brakes are exellent now with no lock up issues. A rear ZJ disc conversion is planned, and I'm sticking with the YJ valve for it. Of the XJ, ZJ and YJ valves, the YJ valve performs as desired on YJs with rear disc conversions, and it's engineered for a vehicle with a weight profile very similar to an MJ. Before I did the bypass, I considered just blocking the MJ distribution block and getting 100% pressure to the rear. I just wasn't comfortable with it. -
Silver Star 1991 Pioneer Build
kryptronic replied to kryptronic's topic in Member Projects: Your Comanches
I really appreciate that you noticed and asked about it. Safety first. Thank you. -
Silver Star 1991 Pioneer Build
kryptronic replied to kryptronic's topic in Member Projects: Your Comanches
Until you asked the question, I didn't realize there was a difference between a union and a coupler. I used a coupler. There is no quick disconnection feature, as there would be with a union. NAPA part number G60693-0303. Cost is $2.09, generically listed in their computer as an 'Adapter'. It will be deleted when I run permanent new hard line from the front to the drop hose. I am in the fix it phase, not quite to the upgrade it phase, yet. On hard brake lines, I ran into my Uncle today. He owns Wells Automotive in Glen Burnie, MD. They do a great business and are fair and honest, if anyone is in that area, FYI. I was talking to him about my recent brake repairs to the Comanche, and he asked what kind of line I ran. When I told him it was the standard teflon coated steel line, he said to try nickle-copper line next time. Apparently they've been using it for the past two years, and it holds up great and is affordable and very easy to work with because it's softer than steel. It doesn't rust, but develops a patina due to the copper in it. We are in the rust belt and his customers are happy because they're not back every five or so years for new brake lines. So I think I'm going to try nickle-copper lines on the Comanche when I run all new lines. -
Silver Star 1991 Pioneer Build
kryptronic replied to kryptronic's topic in Member Projects: Your Comanches
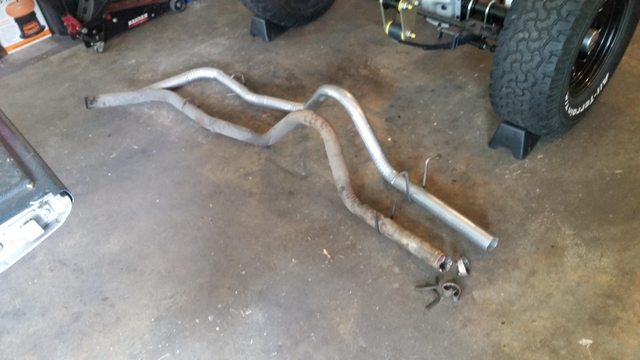
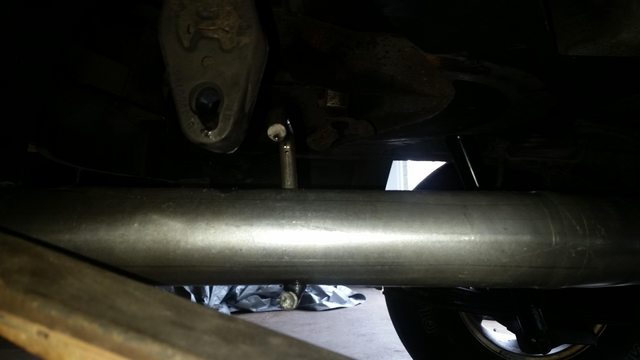
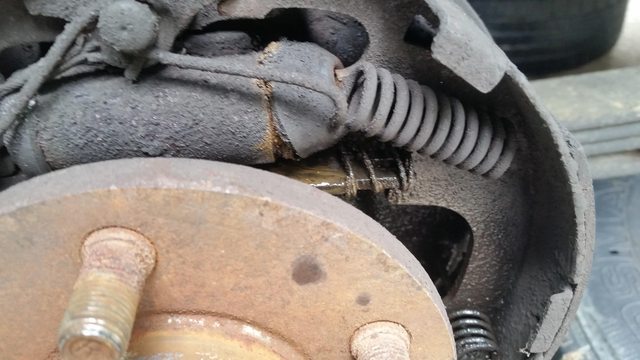
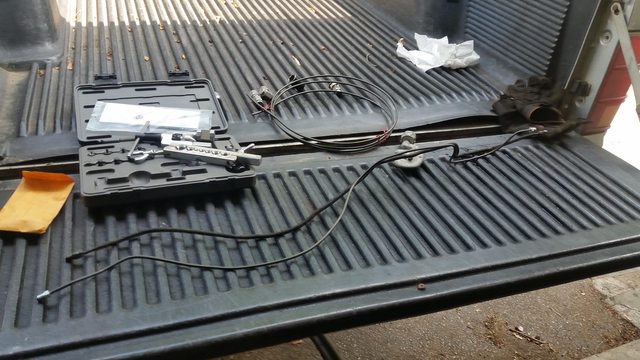
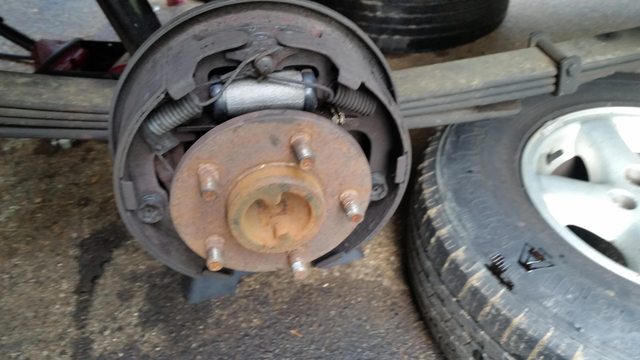
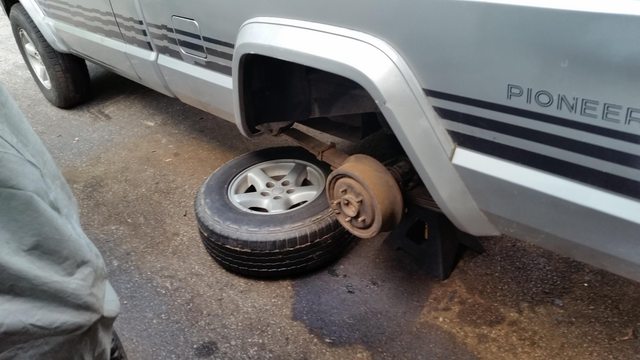
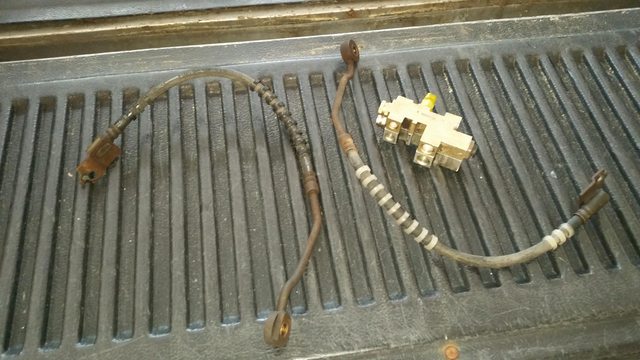
June 2017: Rear Drum Brake and Brake Line Fixes With the rear proportioning valve bypassed and a YJ proportioning valve installed up front, the rear brakes were now getting full braking pressure. On my first test the other night that resulted in a blown hard line on the D35. So I had everything here to fab new lines, and I replaced it. Here's a pic of the old line and new line side by side before install: I then bled the brakes, and afterwards, again upon starting the Comanche and getting full vaccum going, something else went BOOM. This time it was the drum brake wheel cylinder on the passenger side of the D35. In an effort to get it right this time, I decided to replace the passenger side hard line for insurance, and both wheel cylinders. That way in case there was another issue, it would have to be in front of the drop hose for the rear axle. And everything forward of that looks pretty good. So here is the new passenger side hard line: And the wheel cylinder. As I said, both sides were done, but pics would be redundant. Note that Advance Auto lists three different wheel cylinders for a 91 Comanche - two different size lefts and a right. When I pulled the wheel cylinders I matched them up to those from some discarded drums from my 95 YJ. They are identical. Both sides are the same and they match the 95 YJ wheel cylinders exactly. None of the wheel cylinders Advance Auto had for the 91 Comanche are a match, but the 95 YJ part is right in their computer, and it's the same left and right. Please note: This is my experience with a 91 Comanche which has a c-clip Dana 35, which is confirmed identical to the YJ c-clip D35 in every way except brackets. The PO said it needed new hardware on the drums. They looked good inside. Just needed a cleaning. The drums themselves were pretty ugly so I swapped in a nicer set from the YJ. It really burns me up spending this much time and (admittedly not much) cash on an axle that's going to be replaced in the short term just to pass a state inspection. I also realize it may be several months before that axle swap and I need functioning brakes in the interim as I intend on getting acquainted with the Comanche as a driver prior to making final build decisions. All buttoned up and ready for the wheels to go back on: Then I did a final two man bleed. The truck maintained brake pressure on my final test. I took it out in the street and did a few 20-0 MPH type stops and was able to lock the rear tires up repeatedly with full pressure on the pedal. I think mainly because it's wearing worn radials that had brake fluid on them, therefore they a hard time grabbing pavement. Everything looks solid here and I'm signing off on brakes unless the inspection man has any issues. Next up will be tailpipe install and fixing the chip in the windshield. Then I'm going to run through a full barrage of tests on the engine to ensure compression, vacuum, fuel and spark are all as good as they can be so as to ensure emissions are going to be OK. Then inspection, which is both safety and emissions. Will update again in a few days when I make more progress. Thanks for reading.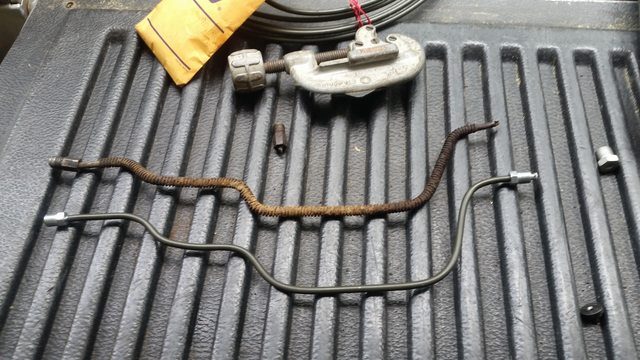
-
Silver Star 1991 Pioneer Build
kryptronic replied to kryptronic's topic in Member Projects: Your Comanches
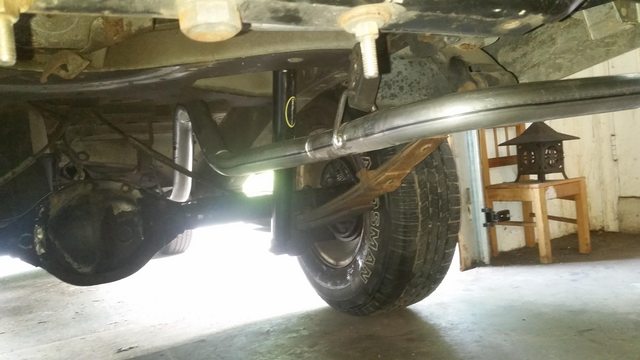
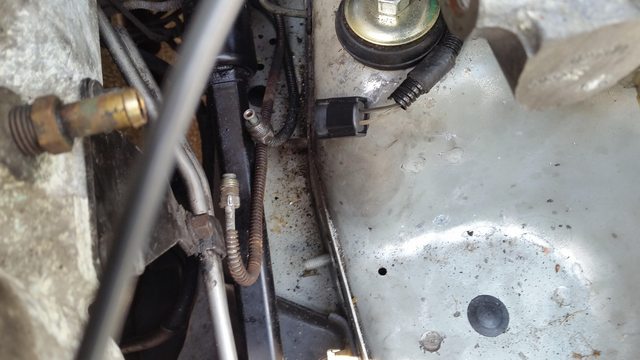
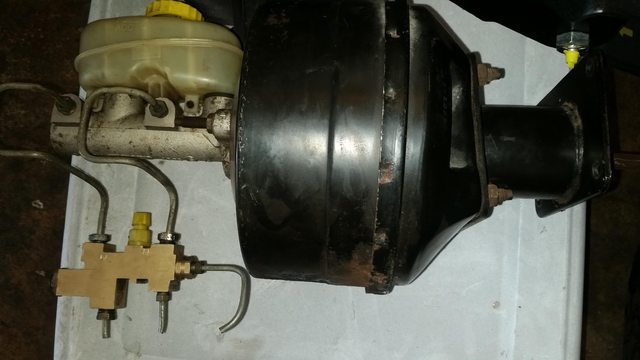
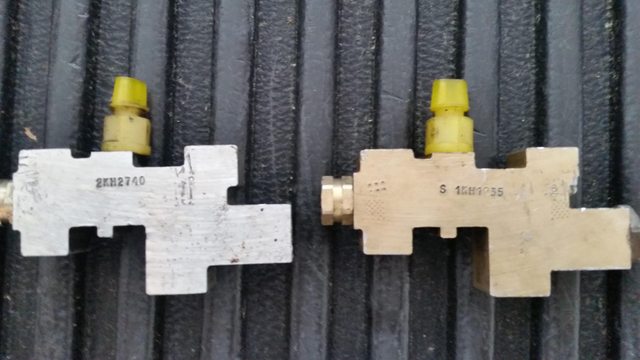
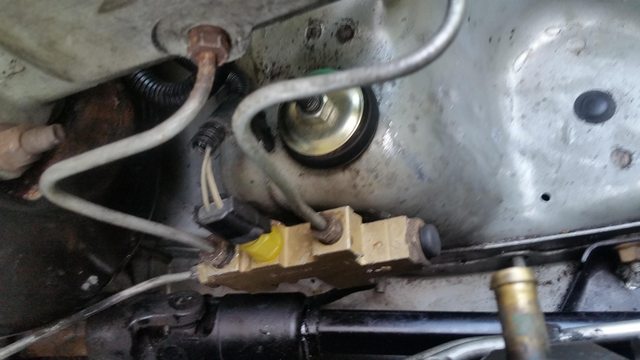
June 2017: Rear Brake LSV Delete (YJ Recipe) After updating this build thread two days ago, I got inspired to get the brakes done. I realized I really need to get this PA inspection, mostly so I can pick up that new stock bedliner from Curt at Comanche Ranch, which will allow me to stash the 4.10 D30 and D35 in the bed, cleaning up the garage, allowing me to finish the YJ and thus making room for the Comanche build to start. It's like a domino effect I guess. With the goal being to pass inspection, I have to get the brake system functioning properly. When I bought the truck the PO informed me that the rear brakes needed a hardware kit and I should look at the rear proportioning valve. I have yet to crack the drums on the D35, but the rear proportioning valve was not operational, to say the least. The bracket it sat on was bent upward, and the lever just dangling there. The vehicle felt like it had no rear brakes at all. So, in order to get things operational, I decided to install a YJ proportioning valve up front and delete the rear proportioning valve. I know that some guys here recommend using the MJ proportioning valve and plugging it, and others use XJ or ZJ valves. I chose a YJ valve for four reasons: I had one; The YJ is set up pretty much like a Comanche - rear drums,l very little weight in the back until loaded (MJ) or armor/hardtop/doors/etc. (YJ); When swapping to a rear ZJ disc brake setup in a YJ (planned for MJ) there is virtually no difference between changing to a ZJ valve versus keeping the YJ valve; I will be using a ZJ rear disc setup on the 4.10 D35 when it gets installed. Here's the stock Comanche proportioning valve and booster/master cylinder. I needed to remove the air box to get access to it: Here we are with the proportioning valve removed. Vice grips are essential to provide the leverage needed to be able to get the brake lines off. I was able to get it completely uninstalled without cutting any lines. The hard brake line that goes into the nose of the MJ valve was removed. Here's a double booster and master cylinder from a 1995 YJ. I just used the proportioning valve attached to the bottom for this phase. I really want to get this double booster and master cylinder installed, but have to check clearances and mounting patterns. At the very least I'm going to have to move the washer reservoir about an inch forward and go to a cold air intake system to remove the air box. FYI, only late 1995 YJs used this type of booster. All others were single boosters. Some 95s have them, some don't. Depends on if the YJ was built before or after they ran out of the single booster units and started putting TJ parts on the YJs. Here are the MJ and YJ proportioning valves side by side. Part numbers should be visible. They are virtually identical in dimensions. All fittings are exactly the same as well. It was bolt in. MJ on the left, YJ on the right. Before I did anything I bled all the fluid out of the system. While doing this, I couldn't bleed anything out of the driver's front caliper. I noticed the passenger caliper hose had been replaced by the PO and wondered if there was a blockage in the driver's caliper hose. I went to the parts pile and pulled out two YJ caliper hoses as I read somewhere on here they fit and are good for a moderate lift. Here they are: And here's one installed. Virtually bolt in. Even the brackets are a 100% match. That didn't fix my bleeder issue, ended up being a plugged up bleeder screw. Was pretty evident when I detached the caliper hose and fluid flowed everywhere. Grabbed a bleeder screw out of the parts bin and installed and was good to go. With the front brake hoses replaced with YJ versions that I knew worked, and the YJ proportioning valve installed, I was done with the front: I then moved onto the rear. I began by cutting out the hard brake line that ran from the nose of the MJ proportioning valve to the rear. I just followed it from the front and cut it out in 2-3 foot sections. I didn't take any pics of the rear proportioning valve installed (for lack of a better word), but here is a shot of it bypassed. I basically replaced everything with a union that attached the remaining hard brake line to the line attached to the drop hose that runs to the D35 axle. Here's a pic of the union, completely replacing everything. I will eventually run a new line without a union, but didn't feel like flaring anything yesterday: And the other side, looking at the drop hose, for reference: After everything was hooked back up I got help to fill and bleed the system. We used the standard old school two man bleed process with one person pumping the brakes and the other bleeding each wheel back to front, passenger to driver side, and filling the reservoir. It didn't take long to fully fill and bleed the system and we got to the point where the pedal was so hard my helper said "I can't possibly push it in any further, it's got to be good". Awesome. So I then put the air box back in, started the truck, verified pressure myself quite vigorously with the emergency brake on and the truck in neutral. Then I moved a few feet forward to test, reapplied the emergency brake and did a second vigorous pressure test. Then BOOM, the driver's side line on the D35 blew due to rust was shooting fluid out like old faithful. So, I'll likely be replacing that today or tomorrow so I can check off this brake job. At least I know everything works, and this pretty much confirms the fact that the rear brakes were not getting fluid with the rear proportioning valve mangled the way it was. I do have a stock rear proportioning valve, and the bracket that attaches the drop bar from the valve to the D35 cover. I do not have the drop bar, but it looks to use the same sort of attachments the throttle does, so I'm assuming one could be fabricated. I am unsure if the valve works, but it does seem to have a working spring or something in it that I can feel operating when I move the lever. I am putting the valve and bracket aside in case anybody on here is interested in them. Just accumulating MJ-only parts now, will list when the build is close to do to be sure I don't get rid of anything I may need. Also, I forgot to mention that when I picked up my 4.10 axles, I grabbed an amber driver side turn signal lamp cover for a couple of bucks from the guy as mine had a chip out of it. I put that on last night too. Took two minutes and it was nice to complete something.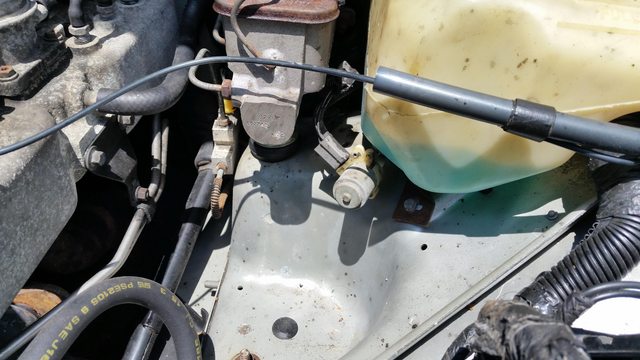


-
Silver Star 1991 Pioneer Build
kryptronic replied to kryptronic's topic in Member Projects: Your Comanches
@Minuit: I'll let you know about the radio, and the maroon interior and steering column as well. At some point in the near future I expect all of it to become available. Thanks for your interest. -
Silver Star 1991 Pioneer Build
kryptronic replied to kryptronic's topic in Member Projects: Your Comanches
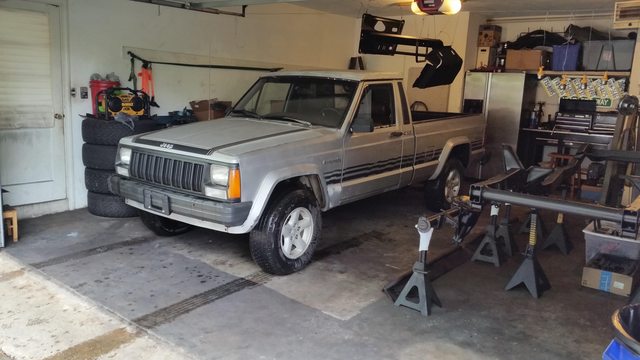
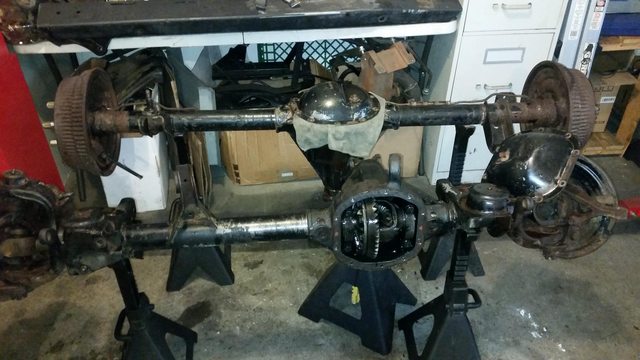
May - June 2017: Initial Electrical Fixes This is a summary post to list out everything that I've done with the truck since April. Today is Day 65. As I stated initially, my goal is to get the Comanche on the road, completely legal and PA inspected prior to making any modifications. I am currently building a 1995 YJ, and the Comanche is pretty much on the back burner until that's done. At this point I've got the chassis at about 90% complete, and intend on dropping the stock drivetrain and tub on with minimal mods, so I'm nearly done. I'm not going to hijack my own thread here by posting about my YJ, but this will give everybody an idea of the special treatment in store for the Comanche when the YJ is done. It's been a lot of fun doing the YJ, but since I purchased the Comanche, I'm more anxious to start working on the truck. While I'd love to start ripping things apart, I'm going to be very disciplined in how I progress. With that said, no matter how boring, I'm sticking to the plan of getting the Comanche ready for PA inspection, tackling the laundry list of items that would keep it from passing. He's the first day the Comanche made it into the garage. It fit great: The following items have been addressed over the last few months as I've made time for the truck and pushed work on the YJ build. 1. Engine Squeak: I tracked what I initially believed to be a squeaky water pump pulley. It was a misaligned power steering pump pulley. After looking at the water pump, it appears new, as does the idler pulley, and the A/C compressor is new too (see below). When looking at the belt, I could see it was stretching across the water pump pulley to the tune of about 1/8" on it's way to the power steering pump pulley. I couldn't tighten down the pulley to where I needed it until I removed it, cleaned all surfaces and used a little grease. I think the PO put a new belt on when the engine was put in and the squeak developed just before I bought it. I replaced the belt too. I've got to say that working under the front of the vehicle with that skid plate on there was a pain in the butt. I removed it and it will likely stay off until the full build is done and will be put back on as a finishing touch. Here it is removed: 2. Electrical Mess: I was able to successfully remove all original owner added wiring in the engine bay, under the dash and at the rear of the truck. From what I could tell all the added wiring was for a fairly elaborate trailer lighting apparatus. Removal from the engine bay and under the dash was easy. The taillight harness required a near complete rebuild. I'm happy to say all the harnesses that I know were fouled up are now fixed. 3. Brake and Tail Lights: Once the wiring was cleared up, I replaced bulbs in the taillights and they all worked in Hazard mode, but not for flashers, brakes or lights. I was able to track the issue down to a bad flasher module/relay on the fuse panel, and a loose wire in the under dash clip on the steering column. I also had to track down a couple of connectors that worked to tie the stock wiring harness into the stock license plate lights. 4. Horn: The horn was just DOA. After verifying there were no blown fuses, I ran a wire from the battery to the horn to test function. No dice. So I went to the parts pile and found a YJ high tone horn. Replaced the non-working unit with the YJ horn and ran a ground wire to a nearby bracket. The horn works, not that I ever use it. Gets blown once a year during annual PA vehicle inspection. My dad loves the horn. 5. Need Bedliner Hardware: Actually, now I don't. I ran into Curt from the Comanche Ranch in Jacobus, PA (the guy that sold me the black steering column and interior) at the annual Settler Jeep Offroad Show in York, PA. He brought two of the five MJs there, and they were by far the nicest. I brought mine too, and risked the inspection ticket to do it. Anyway, when Curt and I were looking at another pretty rusted up MJ with a factory bedliner in it, I commented that I sure would like to get a factory bedliner to replace the Pendaliner in it now. Amazingly he said he had one for a shortbed and would sell it to me. I paid him for it, but told him I couldn't pick it up for a few weeks until my inspection goes through. I really shouldn't drive the MJ without it. He's just holding it at the back of the property for me until I get there to get it. Awesome guy. So the stock bedliner tucks under the bed rails, so no need for a hardware kit. Not that I could locate a single one that looked to fit the Pendaliner anyway. 6. I removed the radio to see if it's a lose wire behind it that was causing it to cut out. Unfortunately not. I have narrowed it down to what I believe is a loose connection inside the radio that seems to only affect the driver side speakers. It will cut out, and if some pressure is put on the radio faceplate, it cuts back in. The original owner seemed to beat the dash pad above the radio to oblivion to achieve the same result. I think this is one of those radios that @Minuit referenced as the stock radio to have: I'm not necessarily tied to it and would rather just stick a newer head unit in there that has USB and possibly CD support. Maybe it's worth something to somebody that knows which connection inside needs to be re-soldered and could trade for other MJ parts. Or maybe I'll fix it and use it. Not sure. 7. Installed new A/C compressor and condenser and all plumbing. I still haven't charged the system with the replacement R-12 refrigerant, mostly because I can't find a tutorial on how to do it for a completely purged system. Will probably post something in the tech forum asking for advice. ---------------------------- Updated list of Known Issues, the last item stands in the way of PA inspection: 1. Harmonic balancer may be approaching end of life. 2. Retighten the new Banks belt after it's broken in and loosened up a bit. Re-tap two of the power steering pump tensioner bolts (appear stripped). 3. Fully research cruise control module removal and verify the PO properly removed everything. The cruise control wire in the steering column was cut at the multiswitch by the PO. 4. Check contacts in the steering column for the horn for corrosion or debris. The horn seem to want to work only when pushed at certain angles. 5. Refurbish or replace door vent window seals, and continue to look for a suitable rear slider window replacement. 6. Narrow down intermittent exhaust vibration. 7. Charge the A/C system. Requires full charge. 8. PA Inspection Items: Delete non-functioning rear proportioning valve; Fix small glass chip in windshield; Replace rusted tailpipe. I've purchased all the stuff needed for these, just need time to do it. ---------------------------- With each update, I have lived with and worked on the Comanche more and more, and it would only be natural for future build plans to change over time. Concerning future build plans: I have nearly decided on a spring under suspension lift at 4.5" and running 32x11.5" tires on 15x8" Cragar Soft 8s. The only other alternative in my mind would be to run 31x10.5" tires on 15x7" rims, either Cragar Soft 8s or Jeep Turbines. I've got to do a lot of research to be sure everything will work. As at present, I don't believe I'm going to go with a 97 front end conversion. There's something special about the original MJ frontend to me. And I really, really want to keep my factory flares and front spoiler intact. I have to figure out how much lift and what other changes (trackbars, tie rods, swaybar links, control arms, etc) are needed to accomplish that with full articulation. Currently the MJ is geared at 3.07. This will not do. While both tire combinations above would have been awesome using a 3.73 gearset, I think 4.10 is going to work just as well and leave opportunity for a little more tire, if ever desired. So for the past couple of months I've been on the lookout for a set of Cherokee (XJ) axles in 4.10. I was able to pick up a set from an 86 XJ with the GM V6 in it that was being parted out. The rear is a non-c-clip D35 which is super clean inside and out. The only issue with the D35 is a leaky pinion seal, which is a cheap and easy fix. I intend on doing a ZJ rear disc conversion on it, so I'll need to work around the non-c-clip setup for that. The front D30 is in great shape as well. Being that the D30 is from an 86, it's got AMC knuckles, etc. I am going to get a long side TJ axle shaft from the local Jeep guys and use spindles, knuckes, the short side shaft and brakes from my 95 YJ's front D30, which is about to be replaced. So, that will give me a non-disconnect D30 with the bigger 297x u-joints up front. Nice. Only problem is that they're taking up room in the garage I need to finish the YJ. As far as hard to find stuff, I really think I'd like to try to locate a stock rollbar for a shortbed. I've got about 90% of the black interior - all the really hard to find pieces already. Need headliner material and carpet. I also need to have the bench seat reupholstered and the sun visors to match. Need black door panels and possibly a black mini console. Still up in the air about paint as well. Really thinking seriously about midnight blue with the current hood decal set in silver, and the older style hockey-stick pioneer decals for each side in silver. Some days I hate it, some days I appreciate it. I guess that's enough for now. I'll post back when I make another block of progress. I really hope it's soon, and I'll be able to say the Comanche passed PA inspection and I've got that stock bedliner picked up.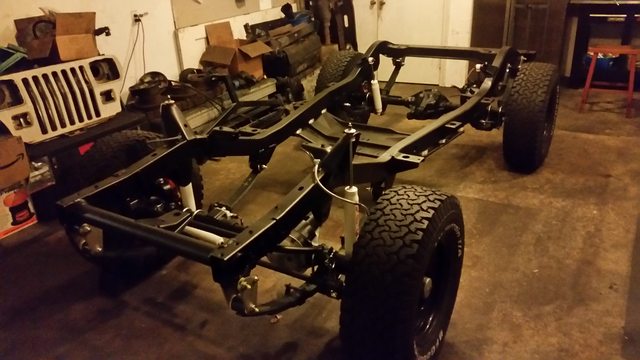
-
Silver Star 1991 Pioneer Build
kryptronic replied to kryptronic's topic in Member Projects: Your Comanches
@Minuit: When all the US manufacturers switched from single stage to base coat clear coat in the late 80s the products they used were substandard. I've got the same issues. @john92131 said silver is notorious for this, wasn't aware of that. Anyway, that burgandy interior is being pulled sometime in June most likely. It's in great shape, no holes in anything. B pillars are clear. I'll list it here when it's ready. -
Silver Star 1991 Pioneer Build
kryptronic replied to kryptronic's topic in Member Projects: Your Comanches
April 2017: Registered in Pennsylvania Registered the MJ in PA yesterday. The insurance lady had never heard of a Comanche. The lady at the registration center had to come out to look at it. Said she had never seen a Jeep truck before. Then she had to manually submit the VIN to the state as it wasn't recognized. Guessing people outside the Jeep world don't know about these things. Adding to the list of current issues: Nasty vibration from exhaust hitting trans cross-member area, rust holes in tailpipe, small glass chip in windshield, rear window is pretty sloppy aftermarket slider unit, need bedliner holddown hardware Concerning that rear window, Chrysler says the MJ was optioned with 'MMCS Rear Door Solid Window Insert', which makes me think that it didn't come with a slider from the factory. Anybody able to back that up? I have a lead on a stock sliding window, but wondering if they all leak, even when installed right? Would prefer to use a slider, but not if they leak, and how it came stock may come into play. Comments welcome on this. Thanks. -
Rough idle has me going crazy
kryptronic replied to SBpunk's topic in MJ Tech: Modification and Repairs
Sorry, I missed that the issue happens all the time. To clear rough idle prior to reaching closed loop I would look at fuel pressure and vacuum. Test both at the fuel rail. -
Rough idle has me going crazy
kryptronic replied to SBpunk's topic in MJ Tech: Modification and Repairs
Does this happen all the time, or just after the engine has reached its 190 degree operating temp? Computer doesn't kick in on Chrysler contolled motors until operating temp is reached. If you only have an issue after the engine is warm, look at the TPS, IAC, O2, Crankshaft and Camshaft sensors in that order. -
Silver Star 1991 Pioneer Build
kryptronic replied to kryptronic's topic in Member Projects: Your Comanches
Chrysler Build Sheet Thanks for the replies. I understand how rare some of these parts are, so my intention is to preserve as much as I can during removal to sell or trade. Received the build sheet today. Only took Chrysler less than a day to send it to me. Let me know if anything stands out as important. I see the tire specification TMWA is obviously off. ADLA Skid Plate Group ALN Open APAS Monotone Paint ARLA 300 Premium Group BAFP 130 Amp Alternator BGAS Power Front Disc/Rear Drum Brakes CBAP Straight Back Bench Seat CKAP Carpets - Floor and Cargo Area CUMS Mini Floor Console DBBC All Manual Transmissions DDQ 5-Speed Manual Transmission DHNS Command-Trac Part Time 4WD System DJHS 230MM Front Axle DMMS 3.07 Rear Axle Ratio DRJS 175MM Rear Axle ERH 4.0L I6 Power Tech Engine GACS Tinted Glass Windows GBBS Tinted Windshield Glass GCBS Front Door Tinted Glass GEC Front Left Side Sliding Window GFDA Rear Sliding Window GRZP Left Remote Mirror GSZP Right Remote Control Mirror GTZA Manual Remote Mirrors HAA Air Conditioning JAYA DO NOT USE - See JP, KA classes JCAS 85 MPH Primary Speedometer JGBP Digital Clock JHAA Var Intermittent Windshield Wipers JJAP Cigar Lighter LAPS Shift Indicator Warning Lamp LBCS Glove Box Lamp LMAS Halogen Headlamps MBJP Black Powder Coated Front Bumper MB1S Black Front Bumper MDAP Front License Plate Bracket MFFS Black Grille MHAP Black Windshield Moldings MMCS Rear Door Solid Window Insert MMGS Belt Moldings MMKP Lower Grille Surround-Painted Silver NAAS Federal Emissions NBKS EVAP Control System NF2S 18.5 Gallon Fuel Tank PAC Silver Star Metallic Clear Coat QACS Silver Star Metallic Clear Coat RAAC All Radio Equipped Vehicles RAFA AM/FM Cassette Radio RCDP 4 Speakers SBAP Power Rack and Pinion Steering SCES Alcantara Wrap Steering Wheel SFAS Standard Duty Shock Absorbers SGAS Rear Shock Absorbers TBBA Full Size Spare Tire TBMS Tire Carrier Winch TMWA P265/60r18 BSW A/S All Terrain Tires TZHP Michelin Brand Tires WJDP 15X7.0 Styled Steel Wheels WLYC All Steel Wheels XBSS Pickup Box YAAS Build To U.S. Mkt. Specifications