


cruiser54
-
Posts
9413 -
Joined
-
Last visited
-
Days Won
14
Content Type
Profiles
Forums
Gallery
Everything posted by cruiser54
-

Renix 4.0 high warm idle
cruiser54 replied to RustyRodder's topic in MJ Tech: Modification and Repairs
O2 should go from .1 to 4.9 rather quickly. Have you snugged up your intake manifold bolts? Done tip 5? -
Renix 4.0 high warm idle
cruiser54 replied to RustyRodder's topic in MJ Tech: Modification and Repairs
what does the REM say about TPS? -
Climate control problems
cruiser54 replied to All around mj's topic in MJ Tech: Modification and Repairs
Begin at the vacuum reservoir behind the passenger side front bumper and work toward the firewall.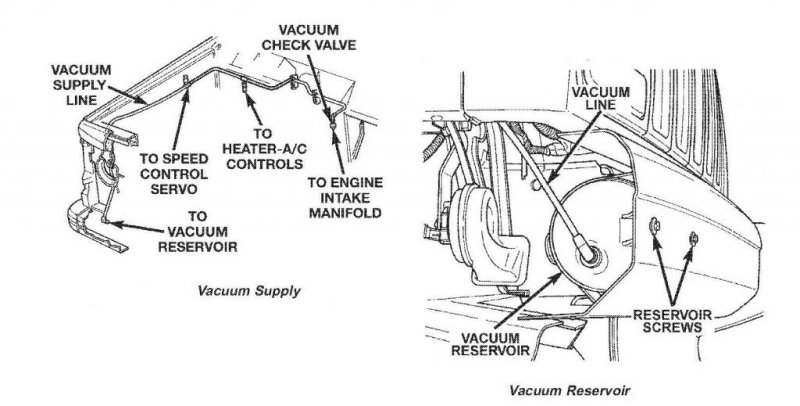
-
I've got a box of them. They're different. Save your money.
-
Passenger Side window manual regulator
cruiser54 replied to Dylan's topic in MJ Tech: Modification and Repairs
On one I had, I lifted the window to where it would operate and shimmed it up with a block of wood. Used a screw from below to hold the block. -
Unreal. Great job!!
-
That's funny!! I was cleaning out the parts shed yesterday and though "I wonder if I should ship some of this to Pete?"
-
Take a deep breath and then a few hours to complete Tips 1 through 5 at www.cruiser54.com.
-
clean the connector.
-
also check and clean the connector featured in the photo :: CRUISER'S MOSTLY RENIX TIPS CONNECTOR AND RELAY/RECEPTACLE REFRESHING OCTOBER 30, 2015 SALAD 12 COMMENTS I suggest unplugging EVERY electrical connection in the engine bay you can find, whether engine related or not, and spraying it out with a good electronics cleaner, visually inspecting the terminals making sure they haven’t retracted into the plastic holder, and then plugging it back together. There’s a critical 10-pin connector for the front lighting system located in front of the air cleaner and behind the left headlight assembly. Don’t miss that one. Also be sure that the connectors to the ballast resistor mounted near the air cleaner housing are clean and tight. ALL of the relays should be removed, the terminals wire-brushed until shiny, and the receptacles sprayed out with contact cleaner. Then plug them back in. I do this on every Renix Jeep I purchase or work on for someone else.
-
Wiggle the blower motor connector and see if the fan comes on. Doing that lead me to this fix: On 87 to 90 MJs and XJs, the blower motor’s factory grounding point is on the driver side inner fender under the sheet metal screw. This ground is shared with windshield wipers, front windshield washers, rear windshield washers, AC clutch relay, fan control relay, fog lamps, fan motor, headlamps, front turn signals, front side markers, and park lamps. So your blower motor has its ground point 10 feet away from where it is located!! What we’re going to do is leave that ground intact and also ground the blower motor on the passenger side inner fender much closer to the blower motor itself. This will also benefit the other components on the factory ground circuit. Take this opportunity to refresh the factory ground as a matter of course. Remove the screw, scrape the surface to bare metal and reinstall the screw securely. Here’s what I do to get the ground much closer to the blower motor and add another ground point to this overloaded ground circuit. Find the blower motor connector on the passenger side. Red and Black two wire connector. Find a location where the black wire can be made to reach the passenger side inner fender, and cut the wire. You may have to do some rerouting of the harness to achieve this. Take both cut pieces of wire and put them together into a yellow eyelet and crimp. Fasten the eyelet to a place on the passenger side inner fender with a sheet metal screw after applying OxGard to the contact surfaces. Be sure to scrape the attaching point on the fender to bare metal first. Your blower motor will now turn faster and last longer, and the other electrical components on the circuit will benefit from a better ground path.
-
Yes, it will. XJ Cherokee and ZJ Grand Cherokee 4.0L engine blocks interchange. 2000+ TJ Wrangler and WJ Grand Cherokee 4.0L engine blocks interchange. XJ/ZJ blocks, and the 2000+ TJ/WJ blocks DO NOT interchange without significant modifications. (1991 to 1995 YJ and 1997-1999 4.0L TJ Wrangler blocks will interchange in XJ/ZJ and visa-versa). TJ/WJ 4.0L Engine blocks underwent clean sheet design changes effective in the 1999 WJ Grand and 2000 TJ Wrangler. These blocks are not interchangeable with XJ/ZJ engine blocks. The reason is motor mount bolt holes and belt driven accessory mounting bolt holes are in different locations, or not present at all, TJ/WJ vs. XJ/ZJ. XJ: "Regular" (not Grand) Cherokees 84-01 ZJ: Grand Cherokee 93-98 (Gen1) WJ: Grand Cherokee 99-04 (Gen2) YJ: Wrangler 87-95 (Gen1) TJ: Wrangler 97-06 (Gen2)
-
Anti-seize and 85 foot pounds here for years.
-
86 2.8 5spd. Can’t get in gesr
cruiser54 replied to terrygw63's topic in MJ Tech: Modification and Repairs
Does the clutch pedal have little to no resistance to foot pressure? If so, try this: Pump the pedal 40 to 50 times and then just walk away for about 20 minutes. see if that got some stubborn air out of the system. -
LED dash lights that dim?
cruiser54 replied to schardein's topic in MJ Tech: Modification and Repairs
I did mine in green from onewaylight.com. 4 vehicles. I feel no need to dim or brighten them. They're just right. -
As predicted. and you were forewarned.
-
2.5 to 2.5 is very simple. The only real difference in blocks was the early models had a mechanical fuel pump spot.
-
This guy:
-
WJ Brake Booster
cruiser54 replied to JustEmptyEveryPocket's topic in MJ Tech: Modification and Repairs
I trust my cutting more than I trust my welding!!!!! -
WJ Brake Booster
cruiser54 replied to JustEmptyEveryPocket's topic in MJ Tech: Modification and Repairs
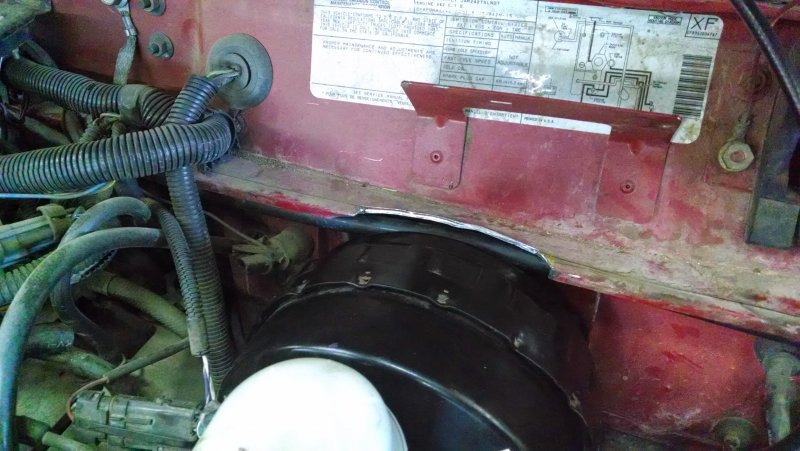
You only notch the firewall seam a little FYI.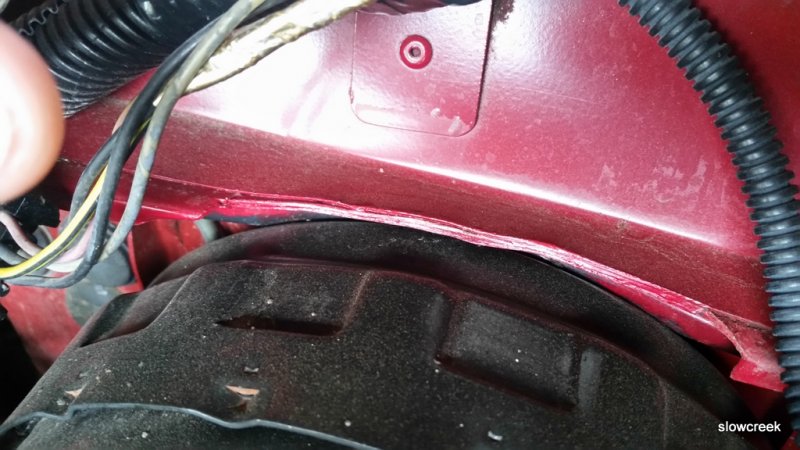
-
Mine has them on both sides. You planning on putting your eye liner on while driving to work?
-
Valve covers/catch cans
cruiser54 replied to charlierebel1967's topic in MJ Tech: Modification and Repairs
-
Valve covers/catch cans
cruiser54 replied to charlierebel1967's topic in MJ Tech: Modification and Repairs
-
We're not sure it has blowby. Just that it's leaking from the oil fill cap, right? It can be pretty messy. This could be as simple as a CCV issue, vacuum leak issue, and a crappy sealing oil cap, which is super common. Make sure the intake manifold bolts are snug, the hoses below the throttle body on the intake manifold are in good shape, CCV tubing is in good shape and clear by spraying out with carb cleaner.
-
CRUISER'S MOSTLY RENIX TIPS OIL FILLER CAP MOD NOVEMBER 17, 2015 SALAD 2 COMMENTS We all get tired of the oil film/leak on top of our 4.0 Jeep aluminum valve covers. Many times the biggest culprit is the loose fitting oil filler cap. Here’s a real easy fix: Remove the plastic oil filler cap and wrestle the original rubber gasket from it using a small pick or screwdriver. Make a duplicate of the gasket out of an old bicycle inner tube using scissors and a knife or razor blade. Install the duplicate on the cap first, and then the original over top of it. It will be a tight fit on the valve cover the first time, and may require some persuasion with a pair of pliers, but will get easier with time.