schardein
-
Posts
2190 -
Joined
-
Last visited
-
Days Won
2
Content Type
Profiles
Forums
Gallery
Everything posted by schardein
-
 I was skeptical. I swapped a used 2001 motor into my 91 XJ. Went from 40 wipes per minute to 52 on a wet windshield. I think that is a noticeable difference. Would a new motor intended for a 1991 give the same results? I don't know. Something I do know, it would have cost twice as much money.
 -
Rare Black spoke steering wheel?
schardein replied to MariaManche's topic in Craigslist/eBay... i.e. Not Your Stuff
Where did you learn that? I don't want to sound like I know it all, because I don't. But I have a steering wheel I personally pulled off an 88 XJ, horn button has the logo. I've got some photos of an 88 MJ, it has the logo. -
Rare Black spoke steering wheel?
schardein replied to MariaManche's topic in Craigslist/eBay... i.e. Not Your Stuff
It sure looks like it. Interesting that it's a red interior and red rubber on the steering wheel. The only one I've ever seen, before I knew they were an option, was from an 84 XJ, also red interior. Another indicator that it's an early production part- is the horn button doesn't have the "horn" emblem molded into the rubber just below the "Jeep" logo. -
Seat Belt Mounting Hardware
schardein replied to Salvagedcircuit's topic in MJ Tech: Modification and Repairs
I have a collection of these bolts. Not necessarily from MJs, but various ones. I could get a pic if you like. -
There is a rather simple way to do this. It helps if you are handy with vehicle wiring on these old rigs. 1. Take apart the dash to get to the fog light switch. 2. "de-pin" the center wire from the fog light switch connector. 3. Make a new wire with a factory terminal on one end to go into the fog light switch connector. On the other end, put on a terminal and connector that mates to the appropriate port in the fuse box. 4. Choose the power port you want and plug it in. You could have it hot all the time (battery) or hot with key on (ignition). I did this to my factory fog light switch so I could run my driving lights whenever I want, separate from the headlights. And it's a simple modification to undo, de-pin one wire and re-pin the old one. Be sure to tape over the de-pinned wire. You can also use a plain old 1/4" male spade terminal to plug into the fuse box, but the factory type connector is keyed to specific power ports and locks the wire in place. I thought I made a post about this in the do it yourself section, but I can't find it.


-
I know it's been a while, are you still looking for a bracket? I have one.
-
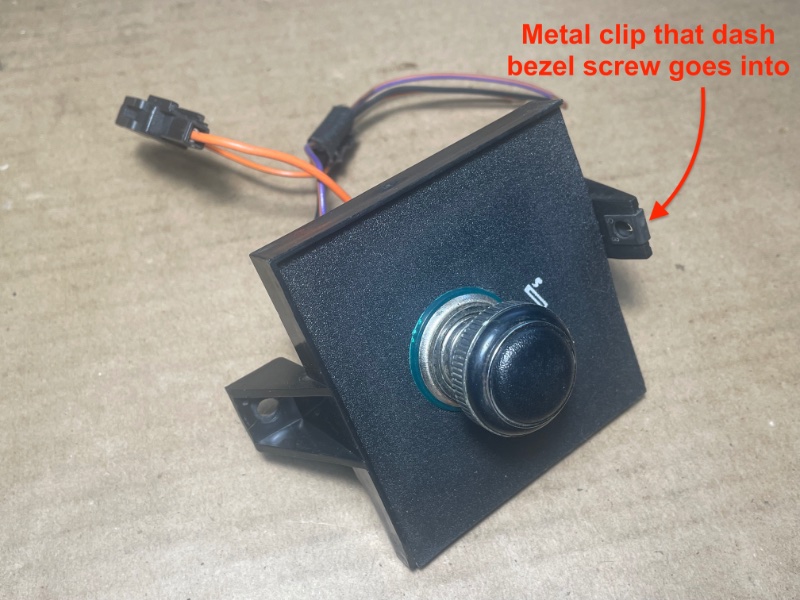
If you are talking about removing the dash bezel, there are four screws. Two above the instruments. One above the headlight switch. One above the cigarette lighter panel. When you remove the dash bezel, there is a tiny metal clip on the cigarette lighter panel that the dash bezel screw goes into. It is easy to bump it, knock it off, and lose it.
-
If you have cruise control, there will be the regular speedo cable, which screws into a speed sensor. Then a short section of speedometer cable that goes from the speed sensor to the instrument cluster. Not sure what you are asking here. Pictures would be helpful. Here is a picture of the speed sensor and short cable if you have cruise.

-
I have one, it's not perfect but is original. In Missouri. I could get pictures if you like. That said, the new ones from SMS are really nice.
-
I'm not a Renix expert, but my understanding is the 428 ECU gives a performance boost and was specific for 89 & 90. My first thought would be that ECU was swapped into the 88. But if the "8844" date means (year/week of the year) (like tires are dated), then it would be late Oct/early Nov production, and maybe that's when the 428 was introduced? Either way, good find.
-
export turn signals for under 20$
schardein replied to motownXJdad's topic in MJ Tech: Modification and Repairs
Gotta say, when I saw this post, I thought we would be talking about the fender mounted marker lights on the export models.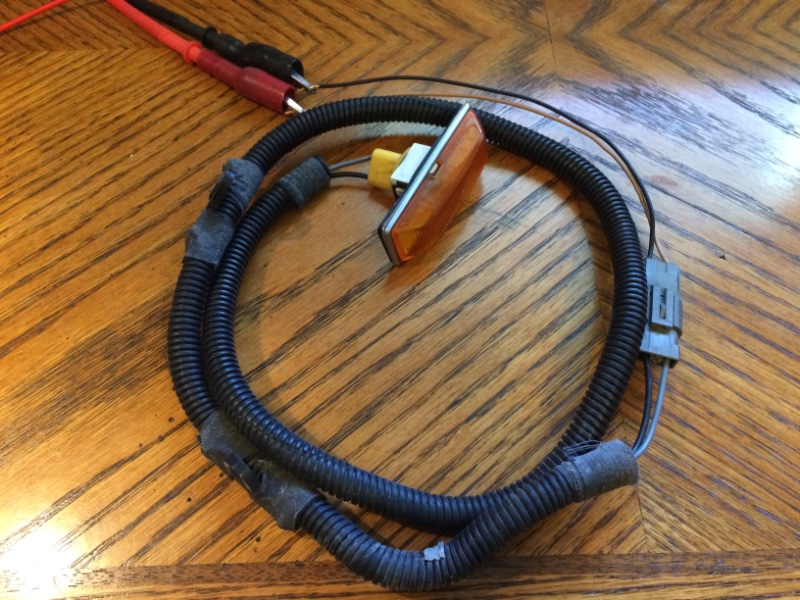
-
Blower switch - all or nothing
schardein replied to JZLAJeep's topic in MJ Tech: Modification and Repairs
Yes, check the blower switch connector. It's common for them to be burnt and melted even if everything else seems to be working ok. If you have problems in the system, it's even more likely the switch connector is also compromised. https://www.ebay.com/itm/233456730333?mkcid=16&mkevt=1&mkrid=711-127632-2357-0&ssspo=bpFa1QANQb2&sssrc=2380676&ssuid=bpFa1QANQb2&widget_ver=artemis&media=COPY https://www.ebay.com/itm/334256319949?mkcid=16&mkevt=1&mkrid=711-127632-2357-0&ssspo=bpFa1QANQb2&sssrc=2380676&ssuid=bpFa1QANQb2&widget_ver=artemis&media=COPY https://www.ebay.com/itm/234400215688?mkcid=16&mkevt=1&mkrid=711-127632-2357-0&ssspo=bpFa1QANQb2&sssrc=2380676&ssuid=bpFa1QANQb2&widget_ver=artemis&media=COPY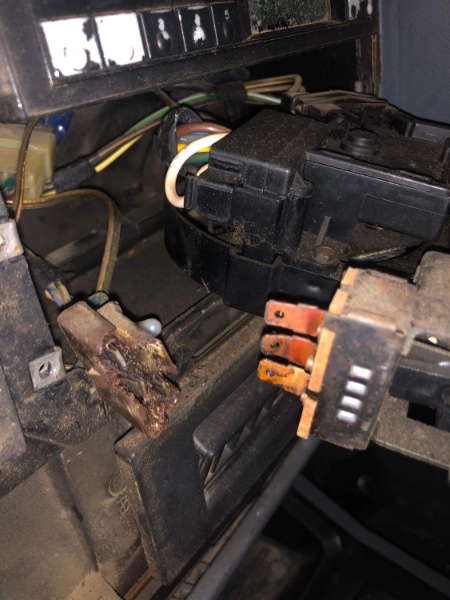
-
Nice! Congratulations!
-
Solid axle conversion dana 30 help!
schardein replied to Warthog's topic in MJ Tech: Modification and Repairs
If I could hijack this thread for a second, have you used that tool? Does it work? I bought a similar one off amazon and it was garbage. Had to modify it to even get it to sort of work. -
Replacement Blower resistor pigtail
schardein replied to Anthi4078's topic in MJ Tech: Modification and Repairs
I've done the same thing in the past! -
Not unreasonable at all. I recently ordered a somewhat obscure (factory Mopar) part from Jegs. Got the email a day or two later that it would be a couple weeks. I considered cancelling, but that was ok for me, as the price was extremely good, and I was only buying the part for research/mockup purposes. But to order a part to complete a build, like a shock, or ring and pinion, or bumper, or lift kit, I find it totally dishonest and frustrating to order the part and find out it will be several weeks. It should be noted on the website and I don't say that lightly. I am a seller on eBay, so I know that it's easier said than done. But I still say it's the right thing to do. Not doing it is lazy at best and dishonest at worst. And if it falls in the category of "the new normal", I reject all of that. Saying "the new normal" is an excuse. Integrity and customer service never go out of style. I recently ordered some of the two piece D rings from Moose Knuckle. On the website, they said certain colors were out of stock, it would be several weeks or months before the order was filled, BUT they were accepting orders at a discounted price if the customer was willing to be patient. They notified me when the order was inbound, and included some additional swag in the box. Perfect example of how it should be done.
-
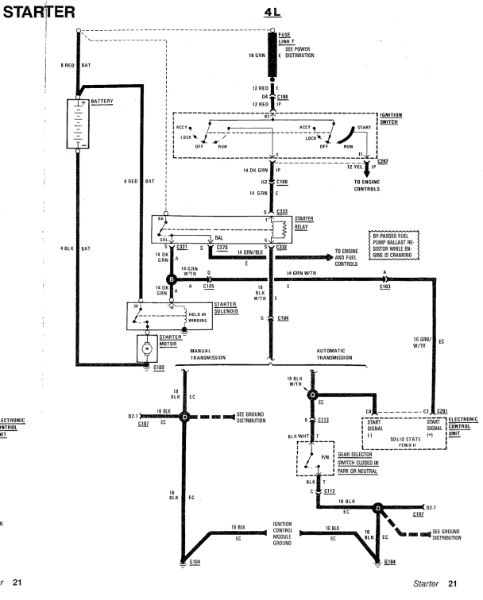
This is a screenshot of the starter circuit from the 1988 Comanche electrical troubleshooting manual. The starter solenoid wire is 14 gauge.
-
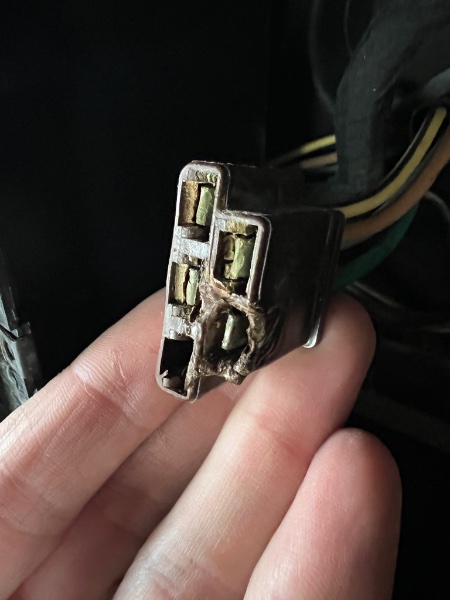
If you are referring to your photo, that isn't a starter solenoid. That is a ballast resistor. The wires look like 14 or 16 gauge. The terminals are commonly referred to as Packard 56 terminals. I have new, original terminals available if you need some. I also have those single terminal connectors in the picture. https://www.ebay.com/itm/334313756275?mkcid=16&mkevt=1&mkrid=711-127632-2357-0&ssspo=bpFa1QANQb2&sssrc=2380676&ssuid=bpFa1QANQb2&widget_ver=artemis&media=COPY https://www.ebay.com/itm/235169838739?mkcid=16&mkevt=1&mkrid=711-127632-2357-0&ssspo=bpFa1QANQb2&sssrc=2380676&ssuid=bpFa1QANQb2&widget_ver=artemis&media=COPY
-
Replacement Blower resistor pigtail
schardein replied to Anthi4078's topic in MJ Tech: Modification and Repairs
If you didn't want to buy the pro crimpers, I could make for you some 12g wire leads, with the Packard 56 terminals crimped on. Then you could attach them to your existing wires using butt connectors and generic electrical crimpers. Like what is shown in this picture, but without the connector body.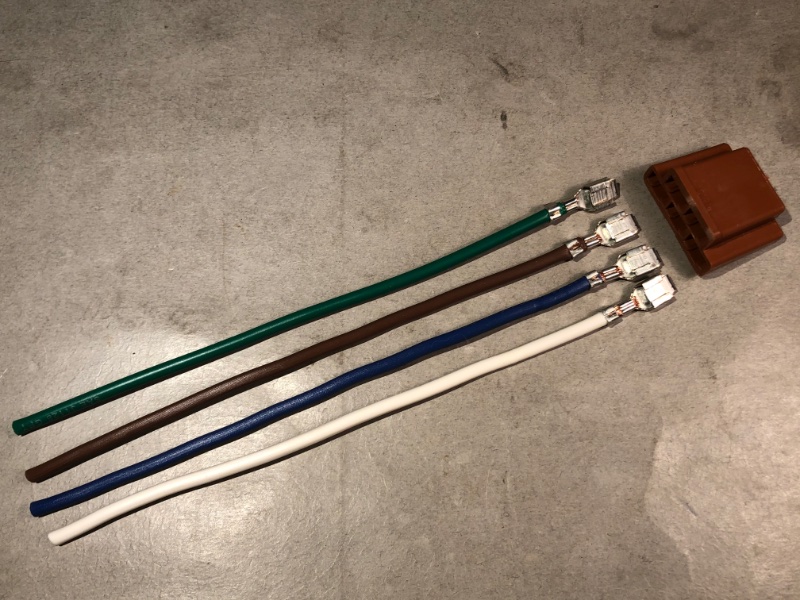
-
Replacement Blower resistor pigtail
schardein replied to Anthi4078's topic in MJ Tech: Modification and Repairs
Here are some options for Packard 56 terminals. I don't know how much experience or knowledge you have with these, but they are best used with a professional level crimper. Delphi 8913440 is a great choice for 18 and 16-14 gauge Packard 56 connectors. 10-12 gauge, not so much. The Tool-Aid 18980 has a Packard 56 die, and if you install it in the crimpers backwards, with the 10-12 gauge die at the outer end of the jaws, they work great for 10-12 gauge. Not sure what size wire is used in that blower resistor connector, but probably 12g. https://www.ebay.com/itm/334149514466?mkcid=16&mkevt=1&mkrid=711-127632-2357-0&ssspo=bpFa1QANQb2&sssrc=2380676&ssuid=bpFa1QANQb2&widget_ver=artemis&media=COPY https://www.ebay.com/itm/334215094615?mkcid=16&mkevt=1&mkrid=711-127632-2357-0&ssspo=bpFa1QANQb2&sssrc=2380676&ssuid=bpFa1QANQb2&widget_ver=artemis&media=COPY https://www.ebay.com/itm/235169838739?mkcid=16&mkevt=1&mkrid=711-127632-2357-0&ssspo=bpFa1QANQb2&sssrc=2380676&ssuid=bpFa1QANQb2&widget_ver=artemis&media=COPY -
What you may be seeing is the wiring for the optional cargo light. That wiring was always present (whether the light was optioned or not) up until about 1990. Then it would only be there if it was factory optioned. There was no optional dome light. There were the under dash courtesy lights, and the b pillar lights. It would be helpful if you added some info about your rig to your signature line. Year, engine, transmission type, at a minimum.
-
Interior plastic paint… worth it?
schardein replied to Elwiscon's topic in MJ Tech: Modification and Repairs
SEM is great stuff. I've found it to be very durable. I sold my K5 Blazer back in 2020, but it had interior parts painted in 1998 using SEM that still looked like new. If the part starts to show wear, like around a window crank, or the top of a console lid, or whatever, it isn't a big deal to give it a light re-coat every 10 years or so. In the first pic (1998), the door panels, dash pad, center console, A pillar plastics, and all overhead trim have been done with SEM. 2nd pic 2020.
-
I was going to say the same thing. I've ordered in the afternoon and received it the next day.
-
Main power distribution wire splices
schardein replied to xxmetal's topic in MJ Tech: Modification and Repairs
AMC Jeep CJs had silver duct tape covering factory splices in the wiring harness. Comes up all the time in the forums. Sort of related- I use adhesive lined heat shrink for the majority of my splices. For the times I need to use tape, I have a couple types/brands that I use depending on the application. I started using this Tesa tape recently and think it's a good product. https://www.amazon.com/gp/product/B01I2MLN2Q/ref=ppx_yo_dt_b_search_asin_title?ie=UTF8&psc=1 -
2.5L Aluminum valve cover swap
schardein replied to GrandBoost98's topic in MJ Tech: Modification and Repairs
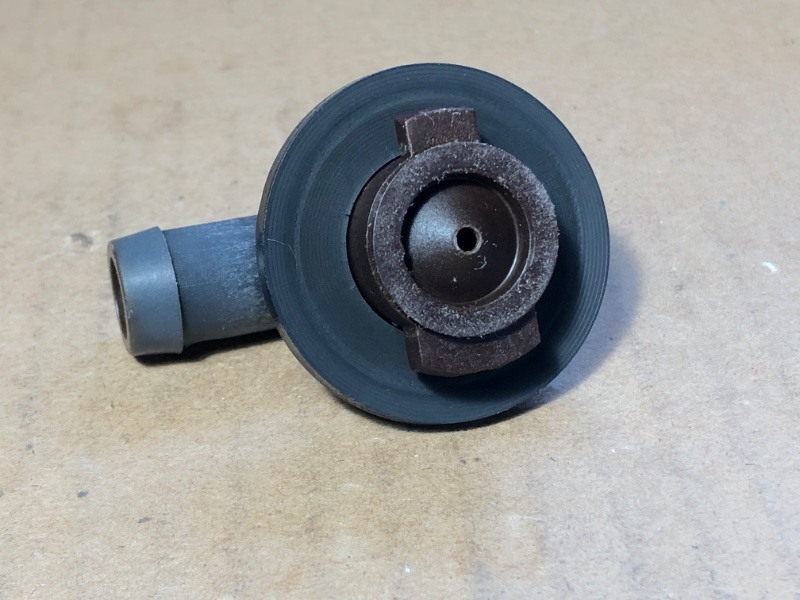
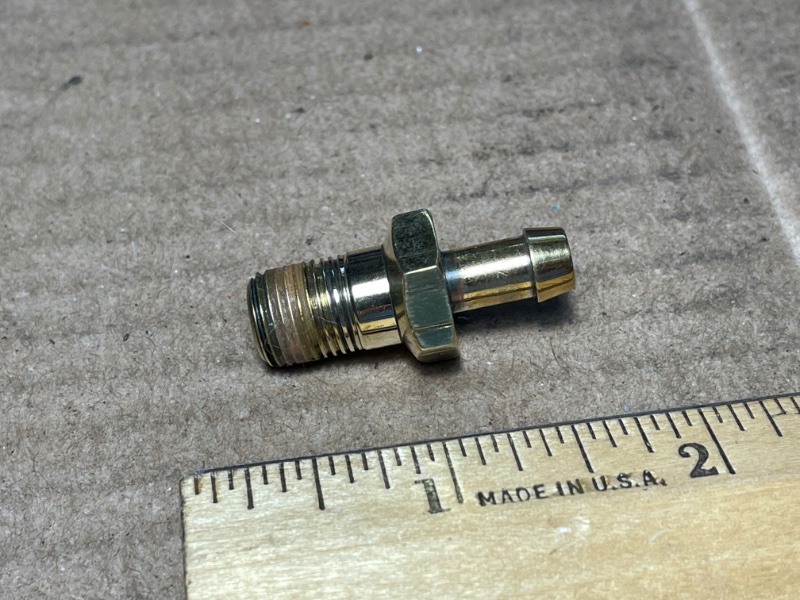
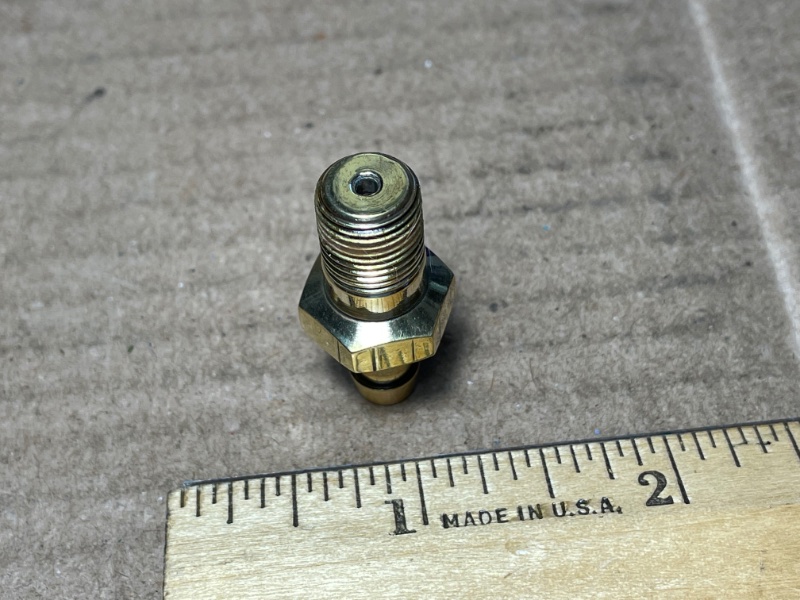
I forgot to mention that the breather should have an opening like the one in the picture in my first post. These engines don't use a Positive Crankcase Ventilation Valve in the traditional sense. They use a "metered orifice" to control the flow of vacuum that vents the crankcase. In the 4.0, that metered orifice was in the rear fitting. That rear fitting looks just like the rear one in the 2.5, except for the smaller hole (first pic in this post). The 2.5 uses a small brass fitting on the side of the valve cover that is the metered orifice. Two things, 1. make sure the breather elbow fitting you buy does not have the small hole, and 2. make sure your brass metered orifice is clear. Every one I have ever pulled is clogged with gunk/carbon.