howeitsdone Posted June 27, 2021 Posted June 27, 2021 Updating this first post with updated info and what's been done vs what still needs to be done. Purchased in North GA, but appears to have been driven all over the country. A PO of this traveled all over and camped in the back. That's what I understand a lot of the rust to be from. I had planned on a restomod fairly quickly but I ended up moving cross-country and funds weren't quite as available anymore. So it's been a slow crawl, but progress nonetheless. So let's get what's in this thread out of the way with also mentioning the plan still taking place. Done: Lots of little things I can't even remember with a lot of just cleaning it up a bit and mechanical maintenance 4.5" Rough Country Lift Rough Country Upgraded Steering '98 Cherokee axle w/ 3.55s (Stock was 3.07) Sourced Turbines & 31" Tires 1.5" Spacers in the rear Swapped in an MJ Rear Axle with 3.55s instead of regearing Replaced Driver Floor Converted to Open Cooling 1 Kilmat Layer (Should do another as I have more leftover) Jeep Cables Upgrade AX15 Swap Azzy's Shift Linkage Replaced Topper Seals and Build a Camping Setup 97+ Header Panel WJ Brake Booster To-Do: Complete the 97+ Clip (Eventually a full swap) Bumpers - Front & Rear Re-Gear to 4.10s LOTS of bodywork lol New Leaf Springs I'm happy with driving it as my primary vs my 2012 WK2. Just love the overall experience and the fact that I can take it anywhere. It's still not pretty, but sure is fun!
fiatslug87 Posted June 27, 2021 Posted June 27, 2021 Welcome to CC, enjoy the journey! Just so you know, that is not the JEEP option shell. Please post the VIN in the registry and someone will get you build sheet info and selling location.
howeitsdone Posted June 27, 2021 Author Posted June 27, 2021 16 hours ago, fiatslug87 said: Just so you know, that is not the JEEP option shell. That’s unfortunate. It fits so well that it could very much pass. Today was a simple day. I cleaned out the bed and wiped down as much as I could. Unfortunately found part of the fiberglass is leaking and there is a crack on a side window. I am going to reach out to the manufacture tomorrow for potential replacement parts for the shell, but if anyone can point me elsewhere that may have them I would appreciate it. I’m in need of the shock hinges, lock (may be able to get generic replacement), the broken acrylic window panel,a glass replacement piece for where it butts up to the cab, and if the weather strip can’t be generic then I’ll need that too. Potentially the hinge for that window too since mine is all bent up. But may be able to simply straighten it out. If these parts are unavailable then may sell off the shell, but I’d use it so looking to repair as much as possible.
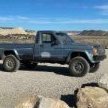
Pete M Posted June 30, 2021 Posted June 30, 2021 tech questions should probably go itn he tech forum so more eyes will see it and give the best chance of an answer. not everyone checks the builds regularly. but that looks like a great project! do you have a side shot? I'm curious as to how closely the angle of the topper matches the cab.
howeitsdone Posted June 30, 2021 Author Posted June 30, 2021 Today I drove what seemed like forever to 2 different junkyards to find a couple of parts. I got a driver's door in great shape from an XJ ($100), and two 10-Spoke wheels ($70) from another yard. Unfortunately no caps, but there is another yard around here that has all 4 with caps, so I'm going to try and offer a price to get two of their wheels and all 4 caps. I would have gotten all 4 from them but they're a bit more expensive at that yard. I also forgot to post, but I ordered a ton of parts for the front as well as the RC 4.5 lift, beefy tie rod, track bar, and stabilizer. RIP My Wallet 2021... Seals and bushings are practically dust! Valve cover gasket is already here. Will change that this weekend with the other parts. 3 hours ago, Pete M said: do you have a side shot? I'm curious as to how closely the angle of the topper matches the cab. I'd say it matches pretty well!
JMO413 Posted July 1, 2021 Posted July 1, 2021 Welcome to the club! Sounds like you have a good plan going.
howeitsdone Posted July 1, 2021 Author Posted July 1, 2021 I haven't even unboxed everything yet I certainly have my work cut out for me. Pitman arm is the only part of the lift that didn't show up yet. If anyone is in the area, I have beer... Thankful I have a brother who is an auto tech if needed, but the cool thing about these old vehicles is that almost everything is just a bolt or two!...and maybe a couple of choice words...
olddude Posted July 1, 2021 Posted July 1, 2021 Man, where did you find such a rusty Comanche in Georgia?
howeitsdone Posted July 1, 2021 Author Posted July 1, 2021 2 hours ago, olddude said: Man, where did you find such a rusty Comanche in Georgia? What a great question! Scratching my head over here... The P-PO lived in CA and drove it all across the country camping and settled in NC. He put the square holes into the bed of the truck. I'm assuming to cut out the really bad rust. Then all he did was spray all of the bare rust to attempt to keep it from spreading (the white areas). It was also reported as a total loss from collision back in 2014. Can't find out for the life of me where though. It could have been totaled because you can't find new body parts though, but who knows. Rear bumper is slightly mangled. Then the PO that I bought it from just had it sitting in the woods in Hiawassee. No idea how long he had it for as I forgot to ask. He bought it as a parts vehicle for his Comanche, but didn't end up needing it. I think the most time-consuming and stressful part will be the welding for sure to fix the rust. The driver's floor is gone.
howeitsdone Posted July 1, 2021 Author Posted July 1, 2021 Decided to tackle the engine bay today. Forgot to take a "before" photo Believe me when I say that this thing is GUNKED up. No telling how long that VCG has need to be replaced. The water pump was literally buried in oil. Having a hard time with the walls of the block though. I'm using a heavy degreaser at a 4:1 and it's just not budging. Been taking brushes to it for the last hour or so. I'm going to continue to spray and rinse and see what happens. Whoever did the heater core bypass really took "put a cork in it" and gave it new life I also went ahead and replaced the broken lock on the shell. Had to drill out two holes and fits like a glove. The only problem I ran into was that the shocks I bought for the window are way too short (13"). That's what I get for watching a YouTube video... I'll order larger and wait to return these while the new ones come in.
howeitsdone Posted July 12, 2021 Author Posted July 12, 2021 Small update: After a lot of rain, I was able to get back to work on the front-end removal. Most things came out fairly easily with a bit of force, however did break a couple bolts and stripped the upper caliper bracket head on the driver's side pretty bad. Not even a socket extractor is working. Fortunately, I can probably just leave it for now. I'm very stuck on the hub & axle shaft currently. Nothing I do seems to be affecting the rust bond this thing has. Since I'm replacing the rotors, I turned it around, bolted it back on, and gave it a lot of whacking with the BFH. So much so that it began to chip off and wasn't really safe anymore. When I tell you I'm almost to the point of purchasing another D30 and swapping, I think that's an understatement. But there's no telling if the Control Arms and strut mounts will come off at this point. I'm going to drown everything in PB blaster all week. Not like I haven't already done so... I also accidentally ruined the passenger lower caliper bracket bolt by not having it in enough when trying to get the hub bolt off with the flathead/wrench. Now the tip is no longer threaded... So I'm searching for two of these now. Had to break out the air impact gun which I should have done to begin with. Thankfully the pitman arm was about the easiest thing to have removed so far. I purchased a tool off Amazon that is almost exactly what the Snap-On tool looks like.
Pete M Posted July 14, 2021 Posted July 14, 2021 dang. at this point, I think I'd just start over with a 95+ non-CAD axle.
howeitsdone Posted July 17, 2021 Author Posted July 17, 2021 On 7/13/2021 at 10:40 PM, Pete M said: dang. at this point, I think I'd just start over with a 95+ non-CAD axle. Aaaaaaaaaannnnndddd Drumroll Please! Just got that stupid hunk of metal out of there. Headed to the JY tomorrow AM to look at a 1998 XJ front-end with 3.55 gears. I think that's a great idea that I have honestly never heard of before (since I'm a newb). So thanks Pete! They're asking a premium at about $350 so I'll try and show up with cash and talk them down. Shoot, for the shafts alone they wanted $185... So I said screw it, there has be be at least 150,000 less miles on this one, and I know I'll need to regear at some point due to the tire size, so let's upgrade. I've got everything for the brakes (assuming I can use the same pads and rotors), just need new U-Joints. But I don't want to count my eggs before they hatch, so I'll drive down there tomorrow and inspect it before they remove it. If that doesn't work, I know there are a couple other yards within about a 1:30hr drive that also has one. Just aren't open on Saturdays. Plus, I've decided to swap the rear for the 8.25 when I get to it. Those are only $200 around here and all I'll have to do is move the leaf mount (so I've read). Boy, is she ugly. The Joint at the driveshaft literally fell apart in my hand. Road-Ready!
MiNi Beast Posted July 17, 2021 Posted July 17, 2021 Ewe. holy issues. making progress and learning new tricks along the way. Thanks for sharing 👍
howeitsdone Posted July 17, 2021 Author Posted July 17, 2021 4 minutes ago, MiNi Beast said: Ewe. holy issues. making progress and learning new tricks along the way. Thanks for sharing 👍 The vacuum motor was even more Ewe. Safe to say I don't think 4x4 actually worked And if it did, God bless this indestructible hunk-a-junk
eaglescout526 Posted July 17, 2021 Posted July 17, 2021 For giggles I would pressure wash the hell out of that hunk just to see if its rusted or pristine under all that oil and road cake.
howeitsdone Posted July 17, 2021 Author Posted July 17, 2021 3 minutes ago, eaglescout526 said: For giggles I would pressure wash the hell out of that hunk just to see if its rusted or pristine under all that oil and road cake. That's the plan. I'd rather clean it up and try to sell to someone who's looking for one and make up some of the cost back. Certainly may need some bushings first. I wonder though...
MiNi Beast Posted July 17, 2021 Posted July 17, 2021 That should clean up real nice. i remember fixing my vacuum lines for the cad with zipties just as you have there. even fixed my internal slave lines the same way. Goes to show though as long ad you got fluid, run it. Hunk of junk holds till it doesnt.
howeitsdone Posted July 17, 2021 Author Posted July 17, 2021 Well, the XJ at the JY had a front left impact direct at the wheel. I decided not to take the chance and work with what I have until another opportunity comes along. So I took off the UCAs today and look at the difference of a washed up one vs what it looked like! Unfortunately I tried to remove the bearing the wrong way so I also crushed one... Since I already have the new bearings, I'll just bend it back and buy some new ones after we're back up and running. The axle cleaned up too. Not quite done, but I wanted to get most of it cleaned up. Most of the scratches and removed paint are from my steel brush. I'm sure it was very clean under all of that crud. Look! A CAD! Who would've thought And I FINALLY got the passenger side hub & axle assembly out!!! No joke, 2 hours straight of constant heat, banging, sliding, banging, heat, etc... you get the idea. I know my neighbors hate me, but I'm on cloud 9 at this point so I don't really care. The driver's side came out within like 15 min. Go figure! I told myself I wouldn't order new hubs unless I got the old ones off. So that, and a beer, are my rewards. Huge thanks to my brother who brought me his 10# slide from the shop. Not the right size claw, but still managed regardless. The aftermath
howeitsdone Posted July 23, 2021 Author Posted July 23, 2021 More parts arrived today. Hubs won't be here until Monday unfortunately. The crazy thing is that I haven't installed a single part yet. The past month has been entirely teardown and cleaning pretty much all on one weekend day. Weird when I think about how much $$$ in parts are just sitting there. But my side-gig is done after Monday and I'm done moving after today so I should be able to get back to work on weekdays! I think the rear main & oil filter adapter gaskets will be the most fun
howeitsdone Posted July 27, 2021 Author Posted July 27, 2021 I painted the D30 & knuckles, but forgot to take photos. And broke another bolt... Will update sometime today. This was my view for a lot of Sunday. Scraping away the old gasket from the block. No matter where you lay, you will get oil and gasket in your face and mouth. I looked like Wylie Coyote after a failed TNT attempt! It took a little longer because I didn't feel like removing the exhaust DP and the starter. So it's more difficult to get your blade in those places. Friendly tip: Go FEL-PRO! The 4 mounting tabs were a lifesaver. I couldn't get the top of the rear main seal out because I don't have a brass punch and my Harbor Freight doesn't carry them (or was out) so I did the bottom. I'm sure that'll be fine anyway. Not even sure it's leaking, just a preventative measure since I was already taking the pan off. It's taking a lot longer to do some of the work because I have a 6gal pancake compressor. The grinder eats through that like nothing so getting things cleaned up is taking forever.
howeitsdone Posted July 31, 2021 Author Posted July 31, 2021 Made a bit of progress on smaller items today. Got the U-Joints off the axle shafts and painted them. Then I realized I bought drive shaft U-Joints instead of axle... Oh well, can't hurt to have more of those anyway. But that means no hub install tomorrow. Two of the u-joint caps didn't even have any pins inside them. My brother tried to get the old bushings out of the UCAs using the press at the shop. They're completely seized in there and he got a couple of his bits stuck between the walls when using to keep from crushing. I'll have to heat 'em up and see what I can do. May just need to buy new ones. Maybe adjustable... I just don't really want to drop $200 on some and the crown replacements are garbage. Other items: Rebuilt the calipers Got the oil pan torqued. My brother said "Who in the hell torques oil pan bolts?!" I told him "Someone who just spent a lot of money on new parts." Cleaned up the skid plate. Definitely needs a fresh paint job. Installed the UCA bushings Installed Upper Ball Joints. (not pictured) The bottom are giving me trouble. Will do those once the axle is back in. Installed the U-Joint for front driveshaft and prepped it for when the axle goes back in. The old one literally crumbled in my hand when removing the axle. Bypassed the CAD with the e-clip hack
watchamakalit Posted August 1, 2021 Posted August 1, 2021 Core 4x4 adjustable short arms, unless you have plans to wheel it hard. Then go long arm. I saw you bought a rc 4.5" lift. The short arms would be a good match. Gives you all the ad k ustment you need to maintain proper alignmment adjustments with the lift.
Pete M Posted August 1, 2021 Posted August 1, 2021 doing the oil pan gasket is just the worst. doesn't Lowes or Home Depot have brass punches?

Recommended Posts
Create an account or sign in to comment
You need to be a member in order to leave a comment
Create an account
Sign up for a new account in our community. It's easy!
Register a new accountSign in
Already have an account? Sign in here.
Sign In Now