MancheKid86 Posted January 26, 2011 Posted January 26, 2011 http://www.bcjeepclub.ca/index.php?topi ... #msg109341 :thumbsup:
MiNi Beast Posted January 26, 2011 Author Posted January 26, 2011 http://www.bcjeepclub.ca/index.php?topic=9480.msg109341#msg109341 :thumbsup: well I put in a registration, so if accepted then I will be able to look at what you posted. :thumbsup:
MancheKid86 Posted January 26, 2011 Posted January 26, 2011 This started as a group buy for some buddies and got a bit out of hand - I've sold quite a few but I have a few more orders and am going to place another order this week so I thought I'd offer it up here too. Ideal Hand tire groovers, they are 250 W and capable of grooving and sipping tires. Unit cost is about the same as getting 4 tires done at a tire store - then you have the tool for years to come. My currently one has been used for almost 4 years. $69.00 for the basic groover comes with a #4 head and 1 pack of #4 blades. Extra heads and blades of different sizes as well. Can take paypal, visa, MC or cash at my door in Kelowna. I'll mail them anywhere as well. Pictures below. I'll just list the head sizes- kit comes with a #4 head. Each blade size needs the head size to match the bigger the head the longer it takes to heat up. #1 1/16 #2 3/32 #3 5/32 #4 7/32 - included with 1 pack of blades #5 9/32 #6 3/8 #8 1/2 #10 5/8 #12 3/4 OK prices for heads and blades like the irons there is volume discount so I'll list the 1 price the discount isn't that big anyway like a buck but only if over 10 ordered. Heads #1 $15.00 #2-5 $12.00 6-12 $13.00 Blades per dozen #1-5 $9.00 #6-12 $10.00 groover heads: Image Not Found You can flip the blades and sipe as well: Image Not Found #3 #4 #5 heads: Image Not Found Groover kit: Image Not Found Tires I've groover grooved 46 Claw: Image Not Found Grooved Pitbull Image Not Found Grooved Krawlers - kinda hard to see: Image Not Found Pm me or email to: albert@can4x4.com
MiNi Beast Posted January 26, 2011 Author Posted January 26, 2011 those tires are to chunk bad. It is best to not groove all the way to the outer edge. siped yes but full groove no.
MiNi Beast Posted January 29, 2011 Author Posted January 29, 2011 So a long time coming I had my over sized battery tilted in order to fit under the hood, wasn't good just haven't had the time nor the warmth to mess with it. Well being as everything was tore down, I thought I take care of it now. What needed to be done was the inner fender well had to be cut so the battery could sit straight as was a bigger battery then stock. So as well needed a new battery holder. So got to messing around and made one up and just welded it in and called it good. Worked out just as I said it would when I installed battery and said I needed to do this. lol fender cut and battery fitted bracket made and painted up with the bumper Works good, its tight at the bottom and once radiator is mounted the upper rubber hose fits snug against it and holds the battery down. will add a solid hold down later. Now being a over sized battery in this position, I had to remove the passenger side hood latch, which was no big deal as I plan to run hood pins anyways.
MiNi Beast Posted January 29, 2011 Author Posted January 29, 2011 Well pretty common deal on the MJs is cut the lower section on the beds. And I found out last time at R&V why that is, they drag on rocks and get beat up so why not cut it out and make that much more room for tires as well. And as I plan to run full width axles with 37's I might as well make the room. Beside they were bent up anyways. before after Now need a rear bumper back there.
MiNi Beast Posted January 29, 2011 Author Posted January 29, 2011 well I finally plan on carrying a spare tire, one time stuck without one is only reason I need, lol, So i picked up a YJ tire carry from a buddy, Creepy Death, and figured I could use it in the bed as a cheap way to carry tire and yet have is secure and not bonce around in the back. And with my solid tool box and tire I figure this would help with a little weight over the rear axle. And with the tool box I welded it to the bed as I do not want to take it out for any reasons and with roughly a 8ft bed I wanted to be able to remove the tire carrier if needed to haul anything. And again it turned out how I expected it to and cost was under $20. will be running 37's so measured it to fit center with a 37" tire. So marked and drilled my holes and I didn't want to deal with crawling under the bed to add the nuts and two holes were above the cross member so be a pita, and I had forgot that a buddy, Creepy Death had given me some threaded bungs that would be perfect for this application, be the same as what we planed the use of them with mounting skid plates, easy to just drill hole weld bung and tighten bolt down. And with this I can easily unbolt the mount if needed. welded and painted bolted down 33" tire with 4.25" BS mounted, couple inches from bed floor now I plan to run a tonneau cover so wanted everything to fit under the bed rails, and the 33 is a perfect fit and with the 37" tire it will have a stock H1 rim with 7" back spacing, so still be under bed rail and will have to build a spacer adapter bolt plate to fit the 8 lug rim with that BS.
MiNi Beast Posted January 29, 2011 Author Posted January 29, 2011 And being as the axles were swapped an to hold me over till the 44/60 are done, I wanted to weld up the rear for the Dog party. So we welded weld the rear. So pulled the cover and found a little surprise :( seemed to look like a part of the pinon but it was good inside after looking at it and opening another beer we figured out what the hell it was... it was the tip of a pry bar, lucky it didn't do any damage except one small chip in the ring gear but nothing I'm worried about. Choppergar welded up the rear with ac rod forgot to take a after pic, but its welded and tested and it works.
MiNi Beast Posted February 8, 2011 Author Posted February 8, 2011 picked up 3/4 D44 hubs and rotors and my new winch as well. :jump:
comanche12 Posted February 9, 2011 Posted February 9, 2011 thats pretty scary to see that broken off pry bar tip in differential carrier. :nuts: good job with project. is it easy to trim those rear quarter off? I'm planning to do same with mine later.
MiNi Beast Posted February 10, 2011 Author Posted February 10, 2011 yeah I just used a air die grinder and followed the body line, did not go fully around on the ends as will finish that once put a new bumper on the rear. So far no issues with the rear end so good thing I guess I pulled the covers on it as was just going to run it and call it a day. :ack:
buxmj Posted February 10, 2011 Posted February 10, 2011 That is some great work, the only thing I would question about your truck is that you got parts from a guy named Creepy Death. Really like the idea of welding the tool box down.
MiNi Beast Posted February 10, 2011 Author Posted February 10, 2011 That is some great work, the only thing I would question about your truck is that you got parts from a guy named Creepy Death. Really like the idea of welding the tool box down. thank you. Its not a pretty deal and is ongoing, but I do what I can. Yeah his screen name is Creeping Death from my local board, he is a great guy and has a sweet build going himself to a CJ. We are good wheeling buddies. :cheers: And yeah welding the box down was a simple and fast way to put it in, but again did not want to mess with nuts and bolts, the tool box it self is very solid and heavy grade, so couple welds that I could easily grind later if wanted to pull it. but I like the low profile look and advantages of it. And when it comes time will be making a tonneau cover for it to, which will be nice with winter and rain when hauling gear.
MiNi Beast Posted February 10, 2011 Author Posted February 10, 2011 Well not going to be able to do the hidden winch set up like I was hoping , I could I guess if I redid some stuff but not worth it at this point and need it mounted up by next weeks run. So since the front is solid now anyways, just going to add to the top and make my own winch plate and just mount it up and just build off what I have there. So after some measuring, going to get a (L=front to back)11"x15"(W=side to side)x1/4" flat stock. then L will be bent 90* at 3" to act as my mounting surface for the fair lead. then the remaining 8" of L will be where the winch will sit and mount, with a 1 3/4" of the plate plug welded along the top of the existing bumper, (made up of a 1 3/4"x6"x1/4" c-channel), then will be adding 6"x6" corner gussets to tie the plate fully into the bumper. So that is pretty basic and will work just fine for my needs. :yes: So trying to take care of the winch mount parts tomorrow, and then possibly swap out steering column if all works out for that, then going to try to button a few more things up in the cab of the jeep and ensure its ready for the Dog Party, next weeks wheel fest.
MiNi Beast Posted February 11, 2011 Author Posted February 11, 2011 picked up some hood pins to install tomorrow. swapped steering columns today as well.
MiNi Beast Posted February 11, 2011 Author Posted February 11, 2011 Finished the install of column and cleaned up the wiring some, unfortunately I need a new fuse block, so handle that when swap out all the wiring for 94 H.O. wiring and install the h.o. under the hood. :D Also yanked the center console for the mini console, as be putting a bench seat back in it so that both kids can ride with Daddy. but for now just put my ammo box in the middle for more storage and keep things protected and give me room to add a couple cup holders for the Dog Party. Then pick up my winch plate yesterday, couple pics of the rough idea on how it will be mounted. and thanks to 1x1_Speed_Craig for giving me a couple Ballistic Skulls to add to the rig. :beerbang:
MiNi Beast Posted February 12, 2011 Author Posted February 12, 2011 fixed a bad injector leak today. thread on my injector fixing Now be heading out to buddies to groove the 36's and mount on the h1's, be welding the winch plate on and getting the winch mounted as well.
MiNi Beast Posted February 13, 2011 Author Posted February 13, 2011 Well Creeping Death and I got lots of work done yesterday, from 5:30pm to 6am what a long night, longer for him as he worked then went to garage. So we got my 36's grooved, not pretty but they will be better then how I got them. Mounted them up on the H1's, then Creeping Death did a fab job making the winch plate sweet as hell. So got that installed and the winch bolted up and it works. Some gayness but not to bad last night, nothing like getting hit on by a drunk 40 yr old, huh ladies? :D: So wife is happy as we won't have to relie on someone to tow us out if we get stuck up at Dog Party.
MiNi Beast Posted February 15, 2011 Author Posted February 15, 2011 So finishing up little things before big run this sat so noticed trac bar a bit loose so checked that and a good thing too and thought I need to to just adjust my CA, so went to do that today and well guess I do need to adjust something. Pass LCA axle mount good side looks like this..... Drivers LCA axle mount in need of some adjusting... trac bar bolt I pulled out today and replaced... and during a break from messing with the jeep, wife made me a snack... So I need to replace the lca mount, as it sags on that corner and is seemingly ready to spit out my coil.
Darren Posted February 16, 2011 Posted February 16, 2011 You just started this project, and already things are going downhill.
MiNi Beast Posted February 16, 2011 Author Posted February 16, 2011 yeah down hill cause of the junk @$$ axles I'm using, be fine once I install the leafs and other axles. :yes:
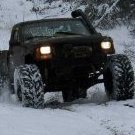
MiNi Beast Posted February 21, 2011 Author Posted February 21, 2011 couple pics from this weekend at the Dog Party. buddy Coppergar caught fire, header pipe separated and caught harness on fire all people were fine but jeep is done under the hood and dash. couple shots or the main scramble area.. video may have to click on pic
MancheKid86 Posted February 21, 2011 Posted February 21, 2011 who dem yellow jacket people? looks like they are crashing the party

Recommended Posts
Create an account or sign in to comment
You need to be a member in order to leave a comment
Create an account
Sign up for a new account in our community. It's easy!
Register a new accountSign in
Already have an account? Sign in here.
Sign In Now