

DirtyComanche
-
Posts
7945 -
Joined
-
Last visited
-
Days Won
11
Content Type
Profiles
Forums
Gallery
Everything posted by DirtyComanche
-
Comanche power/towing
DirtyComanche replied to SatiricalHen's topic in MJ Tech: Modification and Repairs
Sure it was under 3klbs? Either way, with 35s and 4.56s your XJ is effectively geared lower. But I'd look at the cat, as mentioned, along with the other basic maintenance items. -
There is where it is cold. I have no opinion on fluids for that transmission though.
-
Funny thing about the fear of heights, I don't mind flying at all, doors off, whatever, as long as it isn't anything too stupid. Climb a tower or get even near to the edge of a cliff? Hell NO!
-
Shifters took a long time. I did not want cables. Much time was spent figuring out how to make a pivot bracket for the NP205 shifter. The end result put the triple sticks in a nice position where they did not interfere with the gearshift, and the seats and center console still fit. A rear mount was put on the NP205, as hanging the weight of the Ecobox and NP205 (combined is 220lbs or so) off the tailhousing of the AW4 is not recommended. I think I'll have to figure out what images come next and see if they're already uploaded. I have a ton of other images, I just have to go through them. If anyone actually wants to see anything specific just ask, I may have more pictures or can take some...
-
A ring gear was broken out of a NP241: There is a tool to remove them, I don't have it, it was a little violent doing it that way but it worked well enough. It was pressed into the Northwest Fab Ecobox. A Ford NP205 was cleaned up to use with the Ecobox. Painted it, turned out to be a waste of time. Because I could not make it clear the seat with the big mount on it. These are hollow, you can just grind it down, you have to cut them off and cap the area. Capped and mated to the Ecobox.
-
Oh thanks!
-
The engine was refit with a HO intake, and a V8 WJ power steering pump, the overflow bottle, washer reservoir, brake boost and master, etc were all manged to be packed in there. I hate that cone filter and will get rid of it once the summer (dust) comes around. A Ford HP D60 was built up: I went with a Spartan because they had good reviews: Installed with the hydro assist tucked in behind its own skid: A Wagoneer pitman arm was used, due to needing more up travel for the steering (and to get the frame side of the panhard as high as possible), and the box was drilled/tapped. It could then actually sit properly on it's own tires and axles. The knuckles on the D60 had to be modified to allow the tie rod to be run on the top side of the steering arms, and yet still clear the 17" Dodge wheels. A DOM sleeve was welded in with a tapered insert.
-
The inner fender pinch seam was trimmed slightly, and then a lot of hammer work was done to move the metal back without having to put relief cuts in it. And the inner fenders were closed back in. The battery was relocated and the wiring harness redone to run around the back of the engine, as there was no space for either with the stretched inner fenders. An upper link mount was cut through the passenger floor and braced on the top and bottom.
-
Some more big holes in the floor had to be patched, along with a big cover for the NP205. Rockers were cut out, and 6x2 HSS welded in. Parts of the unibody were plated, and the position of the track bar mount was worked out to clear the diff. Inner fenders in the front were cut out.
-
Some sweet mods were done to the hatch so it could be opened from the inside. And a gate handle was added to aid closing it from the inside. Some shock towers were added to the missing section in the wheel tubs. Metal was bent up to close them in. Everything was painted, shocks installed. Including the interior. And I started to paint around the exterior as repairs were completed.
-
At this point I'd built a really ugly rat rod looking Cherokee thing: A Chinesium stainless header was bought: It really didn't fit how I wanted. Nor did it clear the intake manifold for that matter. So I cut the flange off and put a V-band flange on it at a different angle. Then made a 2.5" downpipe with a flex coupling in it.
-
The gas tank didn't clear the diff cover with the axle shoved back, and it had to come out anyways (for repairing the floor). Some basic suggestions of how to modify the locating points for the tank were penned in place: They were cut open: And squished and welded: The forward mounts were then cleaned and modded with new ones being bent up out of 16ga sheetmetal: The tank then cleared: The seams did have to be modded to get it back far enough: With the tank moved back like that it is very vulnerable and a skid/bumper/etc is an absolute must to protect it. It's basically touching the rear valence panel (or whatever you want to call it) so in an accident the crumple zone would be the gas tank!
-
So many of these pictures are ugly/out of focus because I was lazy and used my cell phone for most of them, plus I didn't pick through them to find the best when multiple shots were taken and instead uploaded them based on the thumbnail view. I am sorry, it's really bad.
-
The other front outer fender was cut too, again this was the rough shape. Obviously I'm going forwards with the front axle, and I am also going back with the rear. There was some horrible stuff going on with the floor. This was the typical area above the exhaust were moisture gets trapped: A GM14 bolt or two was sourced, and some hacking was done: That left the casting paper thin, and I decided to do the shave in a somewhat unconventional way: Cover ring getting modified, basically I welded in the filler piece to be as close to the ring gear as possible: I did it this way so the two remaining lower bolt holes (the lowest is gone completely) wouldn't have to be reproduced in the joint of the original casting of the center section where it met the filler plate. I would NOT do it like this again in the future and would straight up shave the ring gear and go farther with the entire shave and just accept that the holes might have to be moved to allow them to be drilled in an ideal position. Shave and cover welded up: Disk brakes were put on the axle, typical K20 front junk. Perches were welded on at 42" and paint was applied with a hose.
-
Here is the before cutting picture, with just the flare off, I missed it earlier: Other side getting cut and sectioned: The fill neck complicates it a bit, but it was all massaged to fit. Edges welded up: More work was going to be needed on the front of the wheelwells, and a shock tower was going in the middle. But the rough opening was made. I then measured approximately for the shocks and the bumpstops at this point. I added 1.5" of bumpstop to the rear in the end, I believe, as that wound up being a good compromise which still allowed for reasonable uptravel. There was also a sweet access panel pop riveted (with 3 rivets) over where the fill hoses meet the tank. The hole was cut right into the uniframe rail. I patched it and made a nice rounded access hole with a rolled edge, and later put a cover over it.
-
Some basic trimming was going to be required to fit the tires I wanted, so off I went. Before: Roughly how big and where the opening needs to be: Rear before: Cutting the rear initially: The lines were traced out using stock fenders and some measuring to make both sides the same, I wanted to preserve the boxy nature of the wheelwell as it is what gives the XJ a lot of its character. I also got these black doors from a parts Jeep that the PO had: I made quick hinges for them more because I like to be able to take them on and off quickly to access areas for working on the sheetmetal and checking clearances. The cut edges were rolled back, and the inner fender was sectioned and the process of stretching it to the new shape started:
-
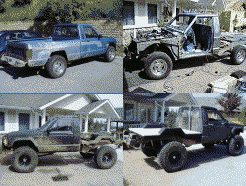
Photobucket ruined all versions of this build on the internet, and people have asked on other forums if I had the old pictures. I do, but it's a lot to sort though, so I've basically decided to post the build over from the beginning, just much more condensed than it was originally. I am going to upload everything to Imgur, so hopefully they don't pull a Photobucket at some point, but we could cross that bridge when the time comes. Since I was doing that anyways I figured I'd throw it in here, as it really takes no added effort and some of it is applicable to the MJ platform. The day I bought it: I had actually thought it was an SJ Cherokee based on the terrible ad and the owner's lack of helpfulness. Turns out it was an XJ, but for $100 I couldn't say no. It didn't run, but as it turned out it was just the ground cable off the battery. I should have sold it right there, pocketed the couple hundred in profit I could have made, and moved on. But nooooooooo. It honestly was terrible. Rust, disgusting interior, hack repairs... The piece of aluminum instead of a back window was a nice touch. Disgusting. Steering column was all torn up because of a NSS issue and really bad troubleshooting. Yeah.
-
They'll flog it at auction unless they decide it's worth fixing, dealers never lose. That's a great looking truck you picked up though.
-
Ticking after engine shut down
DirtyComanche replied to coolwind57's topic in MJ Tech: Modification and Repairs
Normally you're just hearing the exhaust shrinking back to shape. If it's loaded up, the joints are too tight or too loose, or whatever other random factors can exaggerate this. It could be something else too. Without hearing it I've got no idea. Noise diagnosis without being able to hear it is well, futile. -
You're almost better off starting with a 2wd so you can pick and choose components and do a lot of the maintenance items while you're in there.
-
88 Comanche SporTruck Project Daily
DirtyComanche replied to Jeepzahn's topic in Member Projects: Your Comanches
The GM IAT should work, you just need to make a pigtail to plug it in IIRC. It's just a GM sensor under another P/N to make life confusing, basically, many of the Renix sensors are. -
-
Those are JK gears. They aren't the same. I don't know about using them, as I don't think they use the same bearings and some of the dimensions are not the same, but Jantz Engineering might offer a kit to do so?
-
I (almost) always carry a comealong, and a few straps and shackles all in one bag, just for that sort of situation. That said, Murphy's law would be that I'd get stuck the time I didn't have it.
-
Does it have any means to determine that the solenoid isn't there? Worst case it would seem you'd cycle a slightly lean condition at idle.