
.jpeg.f07a13a160462b96483a23ac6c034f57.jpeg)
89 MJ
-
Posts
7472 -
Joined
-
Last visited
-
Days Won
8
Content Type
Profiles
Forums
Gallery
Everything posted by 89 MJ
-
Nope. Original Gladiator.
-
I see the wrong steering column, wrong seat. Is it at least 4x4?
-
For me it would need to be a bench and column shift.
-
I made mine too pretty. Because of that, I kinda want to sell it to get another one.
-
 I appreciate that.
 -
Are you keeping fuel injection?
-
Holy crap. It was on a 67-72 Suburban too.
-
Jeep Scrambler 2 owner in AZ
89 MJ replied to Park13's topic in Craigslist/eBay... i.e. Not Your Stuff
Wow -
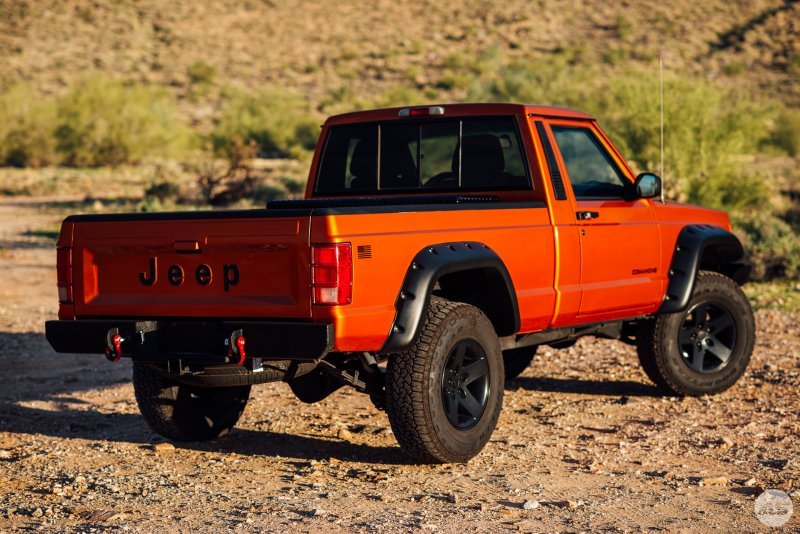
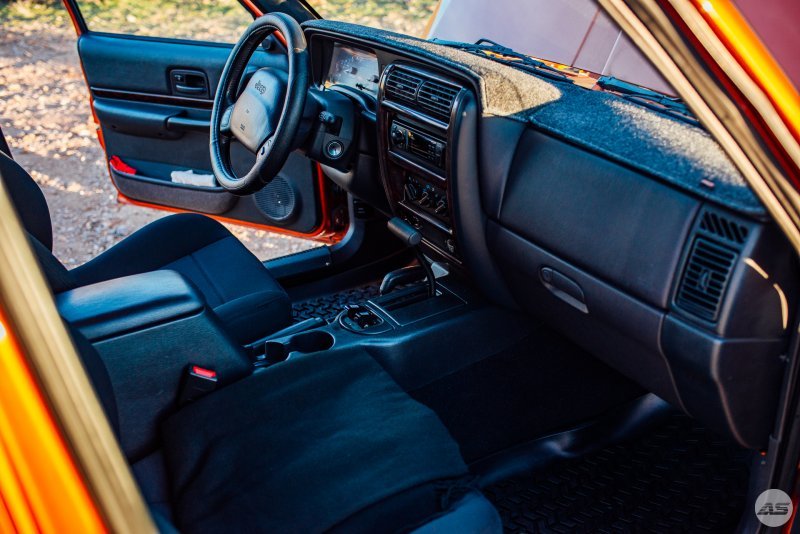
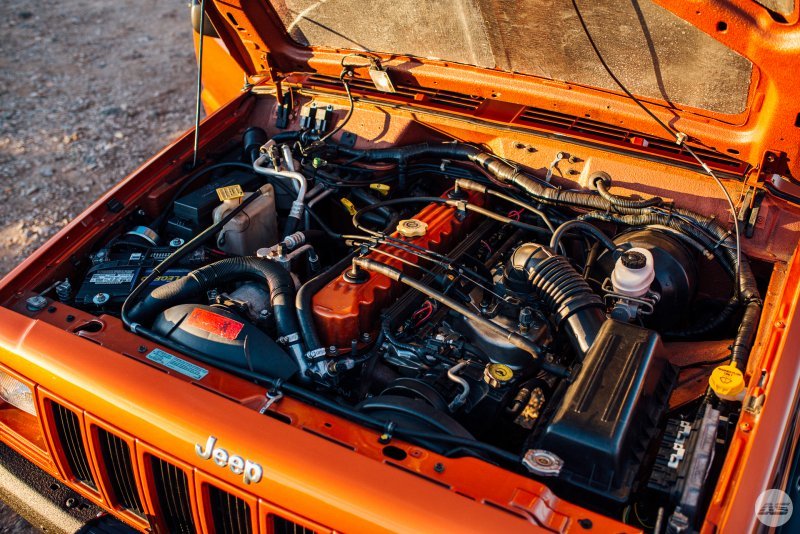
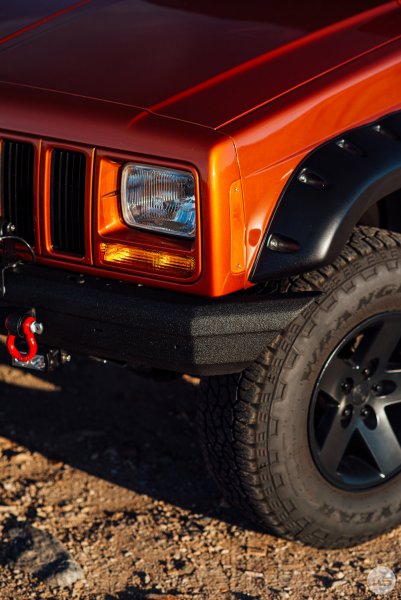
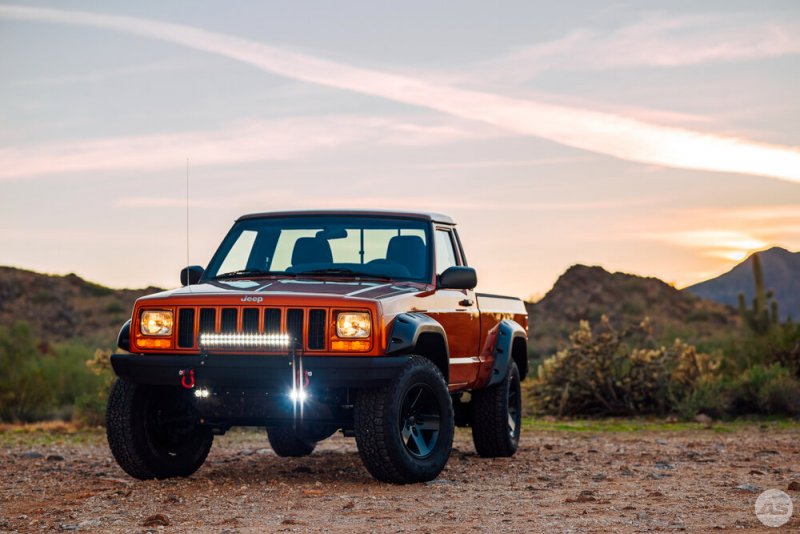
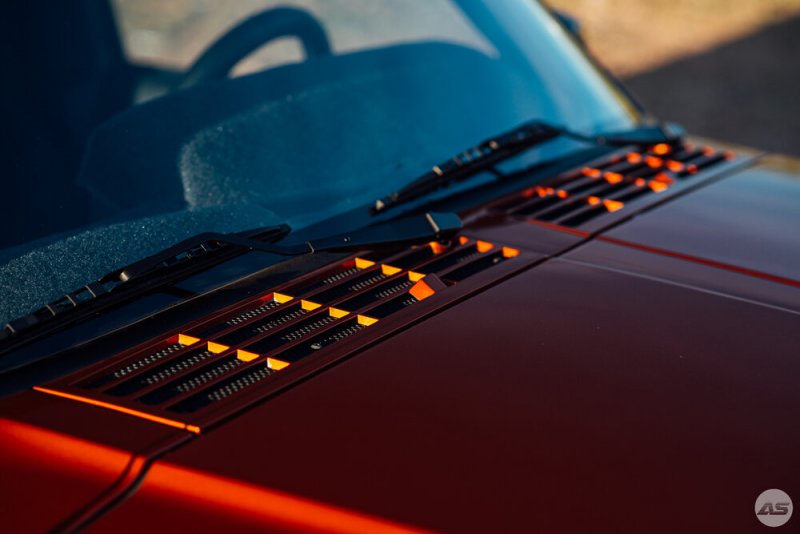
April 2020's Quarantine Comanche Owned by @AZJeff YEAR/MODEL The VIN is for a 1989. I don’t know what model it started out life as, since I have never had the VIN decoded. (I guess I should do that on this forum.) ENGINE/PERFORMANCE · 4.0 is from a 2000 XJ donor, with no modifications (except new cylinder head to replace the infamous “0331” head that was cracked) · The fuel tank and pump are from a 1998 Dodge Dakota, and modified to adapt to the XJ fuel delivery system. All mounting was custom designed to reuse the old MJ hardware where possible. DRIVETRAIN · AW-4 is from the same 2000 XJ, again with no modifications · NP231 is from the same XJ donor vehicle, no mods. · Rear axle is a Dana 44 (open diff.) · Front axle is a D30 low pinion from 2000 XJ COOLING · All metal CSF radiator (3 row) is installed · Stock viscous clutch and electric fan are used ELECTRICAL/IGNITION · Stock ignition system is in place, with the late 4.0 style coil rail · From the cab on forward, the vehicle is wired as a 2000 XJ · The wiring from the back of the cab aft is custom done by me to duplicate the regular MJ features, but adapted to deal with the interface to the XJ wiring, along with the use of the Dakota fuel tank/pump SUSPENSION/STEERING · Vehicle is lifted 3.5 inches above stock height · Steering linkage is stock MJ, except for an upgraded steering damper and a remanufactured Delco/Saginaw steering box · Front control arms are Core 4x4 Adjustable type · Track bar and bracket is Rubicon Express adjustable type · Front shocks are Quadratec Nitro · Rear shocks are Bilstein · Front springs are Rusty’s, but cut ½ inch to achieve proper leveling · Rear springs are of unknown make, but with new rubber bushings installed by me. INTERIOR · Dashboard, door panels and overhead console are from a 2000 XJ in the OEM “Agate” color · Seats are Corbeau black cloth with pneumatic lumbar support · New carpet and headliner were installed to match the “Agate” XJ interior color · The rear cab panel below window was recovered in black headliner material to replace very rough and nasty carpet from original cover BRAKES · A dual-diaphragm master cylinder and booster from 1996 XJ · The front calipers/rotors/hubs are from a 2000 XJ · A rear disk brake conversion using 1996 ZJ parts was installed · Parking brake lever, equalizer assembly and cables from 2000 XJ LIGHTING · High mounted stop light from 1996 Ford Ranger · LED front headlights · 24” LED light bar · LED fog lights EXTERIOR · Paint color is “Mango-Tango Metallic” used on Jeeps from 2010 to 2016 · Bushwhacker fender flares · Rear bumper is custom, made from rectangular tubing, welded, and then covered with bed liner · Front bumper is custom, fabricated from the metal center section of the later XJ bumper. Three bumpers were cut/welded together to create the one-piece wrap-around appearance, and then coated with bed liner. · D-rings are from Quadratec WHEELS AND TIRES · Jeep OEM 16” wheels from Wrangler · Goodyear “Wrangler” 265/70R16 tires MISC · Spare tire carrier was custom designed/fabvricateed by me and uses a Ford Explorer tire ‘winch’ to retain the spare. · Jack and handle are modified from late-model XJ and are adapted to work with the Ford spare tire winch · Entire bottom of chassis is covered in bedliner, as is the interior of the cab (except the doors) Remember That One Time?... Tell Us Your Best MJ Story PRO TIP: Don’t let foreign material fall into the intake manifold and then fail to retrieve it before starting the engine. While installing the new intake manifold gasket on the MJ the other day, I decided it would be a good idea to keep stuff from falling into the hole where the throttle body mounts, and so crammed a hunk of old tee-shirt as a “plug” in this hole, and it worked just fine. When I installed the throttle body, I pulled the tee-shirt plug out and bolted up the remaining intake parts. Now came time to start it up. It starts right away, and runs smoothly immediately. I let it warm up, and check for fuel rail leaks, and all seems good to go. Now for a short test drive. I pull out of the garage, and about 400 yards down the street, the engine starts running rough. REAL rough. I nurse the machine home, and shut it off. I look under the hood, and see nothing amiss. No loose hoses, no disconnected wires. I start it back up, and I hear a VERY noticeable whistle coming (like a MAJOR intake manifold vacuum leak), and it seems to be coming from around the area of the throttle body. I pull the throttle body and begin inspection. The gasket on the bottom looks fine, but then I peer into the intake manifold, and see a small amount of cotton rag material off to one side of the opening. That’s odd…. I grab the rag piece, and start pulling. Out comes a HUGE hunk of tee-shirt, about 15 inches long, and about 4 inches wide. Judging by the burns on the one end, it apparently ran all the way down one of the runners of the manifold, and was probably getting beat up and burned by the intake valve. After I removed the piece, I spent a while fishing in the manifold for any other pieces, but nothing came out. I reassembled it all, and started it up. It ran pretty crappy for a few minutes, and then the engine smoothed out. My theory is that the hunk of tee-shirt rag I stuffed into the throttle body hole was actually TWO rags, and when I pulled out the first one, the second one fell down into the manifold and I failed to see it. When the engine was idling, the rag stayed put. Once I started moving down the street, the airflow in the manifold sucked the rag into the intake port for cylinder #2, and it began to choke on that cylinder, creating the rough running. Now before any of you declare me unfit to work on anything more complicated than a door knob, please know that I have been working on cars for almost 55 years. I had done LOTS of intake manifolds, so this wasn’t a venture into uncharted territory. It WAS, however, the first time I ever left a rag in an intake runner!! In the end, it’s pretty funny. Had my error been made on a more modern engine with limited (or no) valve clearance, I would have been tearing the engine apart after that mistake. Thank God the AMC six is too primitive to have problems dealing with a few bits of cotton rag. CC is Awesome!... Why Do You Think So? I have owned 2 XJ’s in the past, and fell in love with the basic chassis. I had always wanted an MJ, and when I got one, I realized it was just different enough that I needed a forum where I could consult with experts on the MJ. That is what makes the CC so valuable to me—a place where those “in the know” about MJ’s hang out. Congrats Jeff, and always if you would like your MJ to be an MJotM, pm me, it doesn't need to be the nicest or most expensive MJ, you just need to care about it.
-
Awwww, c'mon Pete, rust means you get to weld in shiny, new, strong metal! Its all in how you look at it.
-
Any updates?
-
Just knowing it is the floor tell me that there is more rust than what you are seeing.
-
Rebuilding/Restoring 1987 Comanche
89 MJ replied to nateppler10's topic in MJ Tech: Modification and Repairs
We are not trying to overwhelm and care you though. -
This, but I’m also going to recommend butt welding it. It will prevent moisture from getting between layers causing rust.
-
I’m currently 16 and live in WI. I plan to move where there isn’t salt used on the roads as soon as I can do I can drive older vehicles that can be fixed easier every day for this reason.
-
Rebuilding/Restoring 1987 Comanche
89 MJ replied to nateppler10's topic in MJ Tech: Modification and Repairs
This. -
I was super excited to get my baby out this spring.

-
Rebuilding/Restoring 1987 Comanche
89 MJ replied to nateppler10's topic in MJ Tech: Modification and Repairs
Seriously though, I could probably put together a parts list with costs to show what all I’ve stuck into mine. And I have gotten cheap and free parts because I have friends that are adults (I’m 16). I have more than $4k in mine excluding paint, replacement metal (it didn’t need much) and labor. -
Rebuilding/Restoring 1987 Comanche
89 MJ replied to nateppler10's topic in MJ Tech: Modification and Repairs
Don’t plan on building one that is nice and done correctly for less than $5k. And that is excluding purchasing the truck. -
Ok. Thank you. I think it is a good plan that you are replacing the taillights with something more common. You could probably fit 35s, but don’t quote me on that.
-
Looks like an Eliminator.
-
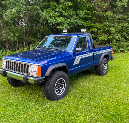
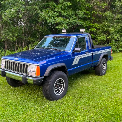
Here is mine with a 3in lift and 31s for reference. I personally like the stance for daily driving. I do have a write up for what I did with my rear lift too on here. In regard to a radio, @Minuit is your guy should you have any questions.
-
Love that step side look.
-
I was trying to give you an answer, but you didn’t answer my question. Do you feel comfortable with cutting your truck fenders and bed up?
-
Maybe you should add this build thread to your sig...