


ghetdjc320
-
Posts
5212 -
Joined
-
Last visited
-
Days Won
1
Content Type
Profiles
Forums
Gallery
Everything posted by ghetdjc320
-

Waggy F44, Isuzu R44
ghetdjc320 replied to WVpioneer_88's topic in MJ Tech: Modification and Repairs
I just made my own using the ruff stuff heim steering kit with 7/8” heims. This requires a 3/4” through hole on the knuckles -
HVAC Control Panels, Finally!
ghetdjc320 replied to ghetdjc320's topic in Vendors- members making products for MJs
Just tagging those who were looking for a rebuilt deck earlier: @All around mj @ValpoManche @Torq_Shep @derf May also be interested in a few extra cores if anyone has some they'd like to get rid of. Shoot me a PM -
Here is also another member who has good experience with body work as well as some diy info @89 MJ
-
You need to remove any and all oxidation so you’ll have to see how much sanding is required to remove that. You also don’t want to paint over any existing clear. The factory base coat is very thin and will likely sand right off after you get through the clear. Other than that it’s all about good surface prep. I’d recommend a good epoxy primer over any bare metal. Make sure to apply a good sealer over all your body work and any existin base coats you intend to paint over. The sealer gives you a nice uniform substrate and seals out any previous work. You also need a decent sprayer and compressor to get the right finish. Here is my personal preference and setup. PPG Epoxy, Sealer, Base and Clear Devilbiss sprayer with 1.8 tip for epoxy, 1.4 for sealer and base and 1.2 for clear. i always shoot 4 coats of base and 6 of clear so I can cut and polish off a couple of coats for a perfect finish.
-
It could also be they jacked up the price because they are out of stock and don’t want any orders they can’t fill. I see that on eBay sometimes.
-
HVAC Control Panels, Finally!
ghetdjc320 replied to ghetdjc320's topic in Vendors- members making products for MJs
Do both the bezels line up on the deck the same? Same spacing between the blower switch and slider controls? -
HVAC Control Panels, Finally!
ghetdjc320 replied to ghetdjc320's topic in Vendors- members making products for MJs
Sounds good, and you wanted to see about using the old style bezel on a new style deck correct? -
thoughts on how to preserve this crumpled paper...
ghetdjc320 replied to Pete M's topic in MJ Tech: Modification and Repairs
Somehow it will have to be rehydrated as suggested. The thermal printing type may be another story. First and foremost though, it needs to be flattened. -
Replacement factory decals
ghetdjc320 replied to Pete M's topic in Craigslist/Marketplace/eBay... i.e. Not Your Stuff
I’ve used them for the tailgate letter a couple of times now too. Good quality -
HVAC Control Panels, Finally!
ghetdjc320 replied to ghetdjc320's topic in Vendors- members making products for MJs
If anyone is following this, I may be interested in a few more used control decks if you want to snag some from your next junkyard run. -
If the knuckles are not reamed, consider the Currie CE-9701 kit. It’s a kit for stock Jeep size tapers but is a super strong kit
-
If those are GM 1tin TRE’s then just get an ES2233L. That kit looks a lot like the JCR kit but there are many copies and manufacturers making similar kits. Here is a link for all the replacement TRE’s if they are indeed the GM 1 tons. https://www.jcroffroad.com/product/1TS-TRE-KIT.html
-
Mj Brake Proportioning Valve
ghetdjc320 replied to jordan's topic in MJ Tech: Modification and Repairs
First off, the previous posts are valid comments that provide some good insight to help you decide what to do. Here is some further reading that may help answer some questions: -
I can’t tell for sure but that looks like those may be GM 1 ton tie rod ends in which case the knuckles and pitman arm would have been reamed out to fit them. If they are the GM 1 tons, pretty much any auto parts store will have those parts on the shelf. ES2234L is the passenger side moog part number. It should cross reference at the parts store. If it’s not a 1 ton end then it should just be a standard Jeep end but obviously that steering configuration is not stock for an MJ. If the GM one doesn’t fit check out a passenger tie rod end for an 88 Jeep YJ (just a random year that should have a separate tie rod end that isn’t integral to the drag link)
-
HVAC Control Panels, Finally!
ghetdjc320 replied to ghetdjc320's topic in Vendors- members making products for MJs
Was able to shoot some pictures of the nighttime illumination using a white LED. With a standard incandescent “74” bulb the glow is the factory greenish color that matches most other items on the dash. the white led provides plenty of illumination but will look blue on the lettering due to the oem color filters.
-
Did the tie rod end just fall out of the steering knuckle? Missing a cotter pin?
-
I’d be up for that! That way members will be active when I post lol. About 4pm my time comanche club goes silent.
-
Upgraded Headlights
ghetdjc320 replied to GrandComanche's topic in MJ Tech: Modification and Repairs
I used to use an eBay harness before swapping to HID’s the male headlight adapter connector always had pins coming loose. The wiring was significantly undersized as well. The amount of insulation on those wires makes them seem 14awg but the actual copper was right at 18awg. The included relays were not meant to handle the constant on duty either and had to be replaced in short order. I’d just build my own harness with some quality sealed motorcycle style relays and quality wire and connectors. I’d also do a 30/40 amp relay setup vs the 30/30 setups they normally come with. -
Jeep comanche trailer wiring harnesses
ghetdjc320 replied to 88mjsally's topic in Vendors- members making products for MJs
Any ideas on this connector for my tail lights on my 91? Doesn’t seem to be what I’ve seen on here.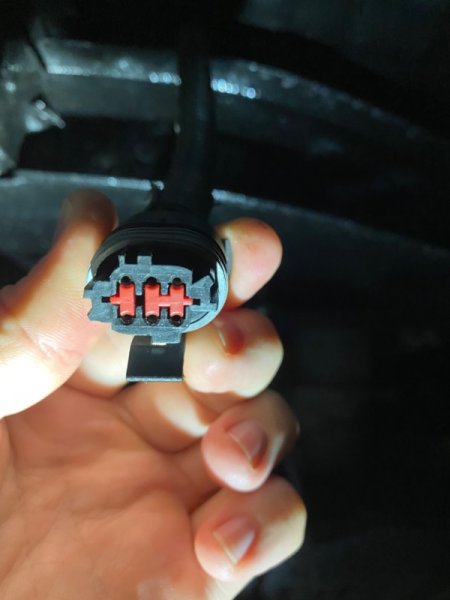
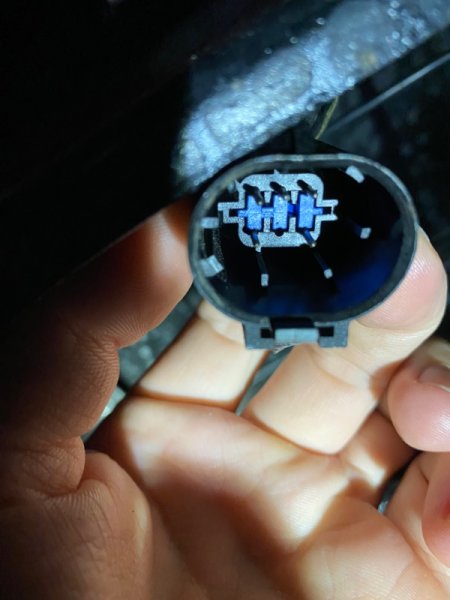
-
Jeep comanche trailer wiring harnesses
ghetdjc320 replied to 88mjsally's topic in Vendors- members making products for MJs
-
91 HO Shut Off While Driving
ghetdjc320 replied to kryptronic's topic in MJ Tech: Modification and Repairs
If either of those the relays are failing intermittently that could cause the issue. Other issue could be the ecu connector. You can try removing it, cleaning it all out and reinstalling. The ASD circuit basically feeds power to the injectors and coil so the ecu can control the ground side pulse. -
91 HO Shut Off While Driving
ghetdjc320 replied to kryptronic's topic in MJ Tech: Modification and Repairs
Have you tried replacing the ASD relay in the power distribution center. Or fuel pump relay also? -
HVAC Control Panels, Finally!
ghetdjc320 replied to ghetdjc320's topic in Vendors- members making products for MJs
Sounds good. Just shoot me a PM before you send anything so I can make sure you have minimal down time -
HVAC Control Panels, Finally!
ghetdjc320 replied to ghetdjc320's topic in Vendors- members making products for MJs
First batch of two completed.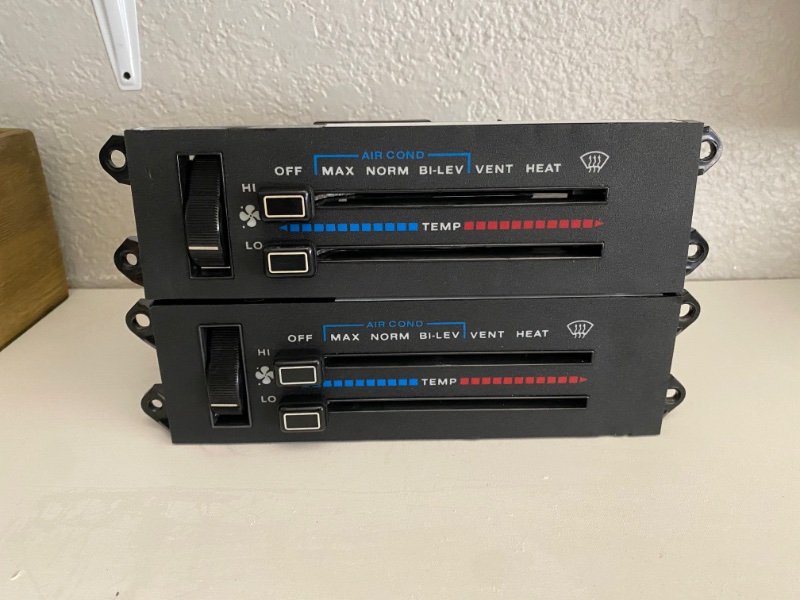
-
HVAC Control Panels, Finally!
ghetdjc320 replied to ghetdjc320's topic in Vendors- members making products for MJs
I would need an original to do that with but yes it’s possible.