


cruiser54
-
Posts
9413 -
Joined
-
Last visited
-
Days Won
14
Content Type
Profiles
Forums
Gallery
Everything posted by cruiser54
-

Blower fan resistors upgrade
cruiser54 replied to Manche757's topic in MJ Tech: Modification and Repairs
and while you're at it: CRUISER'S MOSTLY RENIX TIPS IMPROVING BLOWER MOTOR PERFORMANCE NOVEMBER 28, 2015 CRUISER54 28 COMMENTS EDIT On 1984 to 1990 MJs and XJs, the blower motor’s factory grounding point is on the driver side inner fender under the sheet metal screw. This ground is shared with windshield wipers, front windshield washers, rear windshield washers, AC clutch relay, fan control relay, fog lamps, fan motor, headlamps, front turn signals, front side markers, and park lamps. So your blower motor has its ground point 10 feet away from where it is located!! What we’re going to do is leave that ground intact and also ground the blower motor on the passenger side inner fender much closer to the blower motor itself. This will also benefit the other components on the factory ground circuit. Take this opportunity to refresh the factory ground as a matter of course. Remove the screw, scrape the surface to bare metal and reinstall the screw securely. Here’s what I do to get the ground much closer to the blower motor and add another ground point to this overloaded ground circuit. Find the blower motor connector on the passenger side. Red and Black two wire connector. Find a location where the black wire can be made to reach the passenger side inner fender, and cut the wire. You may have to do some rerouting of the harness to achieve this. Take both cut pieces of wire and put them together into a yellow eyelet and crimp. Fasten the eyelet to a place on the passenger side inner fender with a sheet metal screw after applying OxGard to the contact surfaces. Be sure to scrape the attaching point on the fender to bare metal first. Your blower motor will now turn faster and last longer, and the other electrical components on the circuit will benefit from a better ground path. Revised 01-31-2016 -
1993 Cps plug to 1987 Plug?
cruiser54 replied to Joshua_A's topic in MJ Tech: Modification and Repairs
FINALLY!! The correct answer. I'm amazed at the amount of misinformation given to the OP before Eagle came along. -
replacement EGR for renix 4.0
cruiser54 replied to 10thta's topic in MJ Tech: Modification and Repairs
Same bolt pattern. -
IIRC, the same fan when used as a Puller rather than a Pusher moves more air.
-
That makes no sense.
-
It could be. 87 to 90 will work. Stick or auto.
-
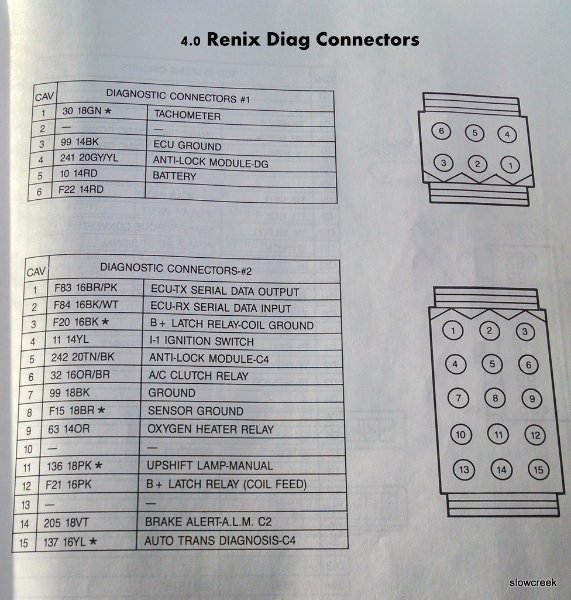
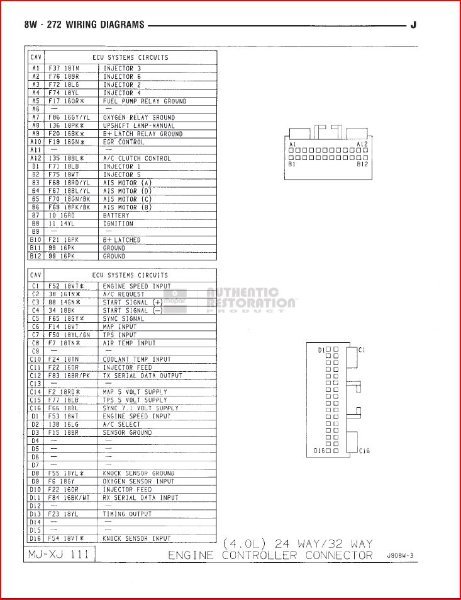
You've done a great job so far. I've seen ECUs lose individual injector drivers. Not ever all of them. I'll add this ECU pin out.....
-
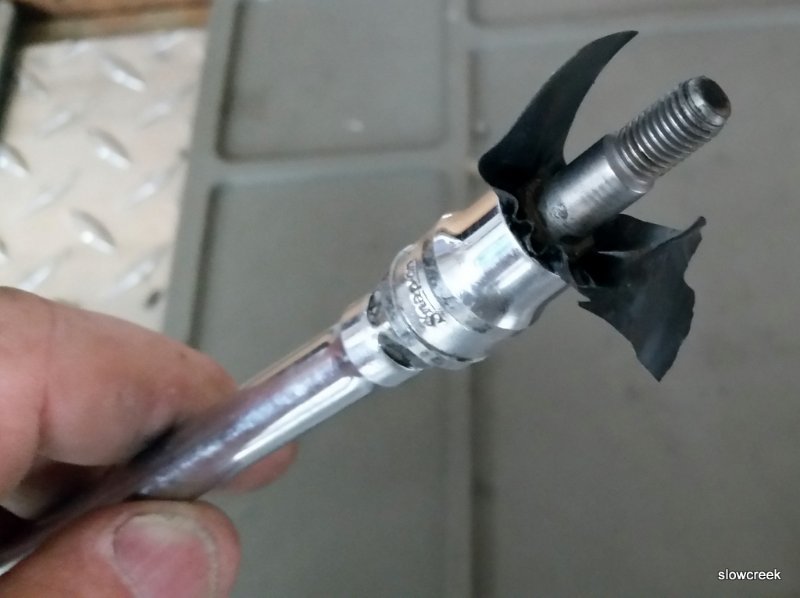
Here's a little trick to keep from dropping the bolt.
-
AC condensation leaking into passenger foot well
cruiser54 replied to Virginia's topic in MJ Tech: Modification and Repairs
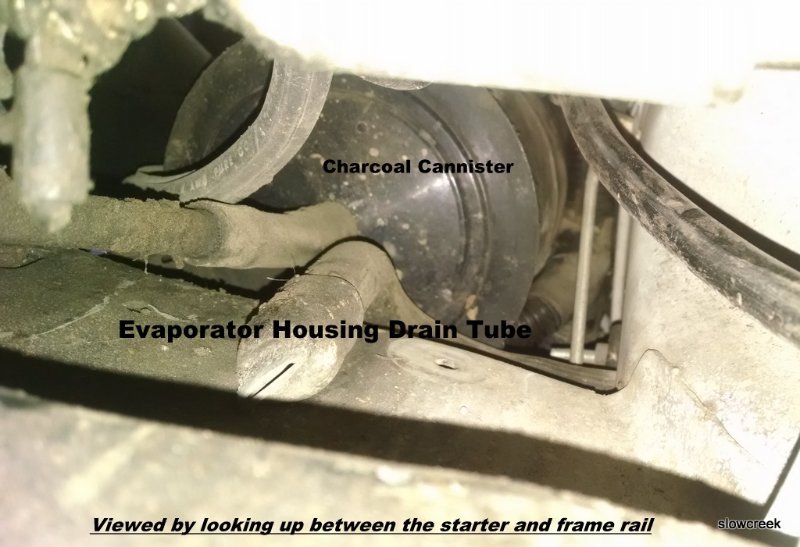
Getting it off is way easier than putting it back on as you can see. The squeeze trick has always worked for me. -
AC condensation leaking into passenger foot well
cruiser54 replied to Virginia's topic in MJ Tech: Modification and Repairs
Just squeeze the snake's cheeks and stay clear!!! -
AC condensation leaking into passenger foot well
cruiser54 replied to Virginia's topic in MJ Tech: Modification and Repairs
-
RENIX - Volatile Memory - Discussion Only
cruiser54 replied to Ωhm's topic in MJ Tech: Modification and Repairs
Nick's REM engine monitor does more than the factory scan tool. I have them both. Do yourselves a favor and visit Nick's website and think hard about purchasing one of his Renix Engine Monitors. https://nickintimedesign.com/ -
100% sure it is the RMS?
-
Trans/Power holding gear issues
cruiser54 replied to CGCWO's topic in MJ Tech: Modification and Repairs
Drive it with the fuel pressure gauge hooked up. -
Trans/Power holding gear issues
cruiser54 replied to CGCWO's topic in MJ Tech: Modification and Repairs
Have you tested actual fuel pressure? -
CRUISER'S MOSTLY RENIX TIPS CONNECTOR AND RELAY/RECEPTACLE REFRESHING OCTOBER 30, 2015 SALAD 29 COMMENTS EDIT I suggest unplugging EVERY electrical connection in the engine bay you can find, whether engine related or not, and spraying it out with a good electronics cleaner, visually inspecting the terminals making sure they haven’t retracted into the plastic holder, and then plugging it back together. There’s a critical 10-pin connector for the front lighting system located in front of the air cleaner and behind the left headlight assembly. Don’t miss that one. Also be sure that the connectors to the ballast resistor mounted near the air cleaner housing are clean and tight. ALL of the relays should be removed, the terminals wire-brushed until shiny, and the receptacles sprayed out with contact cleaner. Then plug them back in. I do this on every Renix Jeep I purchase or work on for someone else.
-
Test your CPS. You done the C101 connector refresh and every connector in the engine bay yet? CRUISER'S MOSTLY RENIX TIPS RENIX C101 CONNECTOR REFRESHING OCTOBER 30, 2015 SALAD 33 COMMENTS EDIT The C101 connector on 1987 and 1988 Renix Jeeps was a source of electrical resistance when the vehicles were new. So much so that the factory eliminated this connector in the 1989 and 1990 models. The factory recommended cleaning this connector to insure the proper voltage and ground signals between the ECU and the fuel injection sensors. We can only imagine how this connector has become a larger source of voltage loss and increased resistance over a period of more than 25 years. The C101 connector needs to be cleaned at least once in the lifetime of your vehicle. Chances are it’s never been done before. Almost every critical signal between the engine sensors, injectors, ECU, and some to the TCU, travel this path through the C101 connector. That said, the cleaning described below is a real MUST DO right off the bat for any new-to-you Jeep. But, I strongly advocate eliminating the C101 at some point by following the procedure with photos and video in Tip 27. Soldering skills are required and it takes about an hour and a half. The C101 connector is located on the driver’s side firewall above and behind the brake booster. It is held together with a single bolt in it’s center. To get the connectors apart, simply remove the ¼” bolt and pull the halves apart. You will find the connector is packed with a black tar-like substance which has hardened over time. Take a pocket screwdriver or the like and scrape out all the tar crap you can. Follow up by spraying out both connector halves with brake cleaner and then swabbing out the remainder of the tar. Repeat this procedure until the tar is totally removed. This may require 3 or more repetitions. Wipe out the connectors after spraying with a soft cloth. If you have a small pick or dental tool, tweak the female connectors on the one side so they grab the pins on the opposite side a bit tighter before bolting both halves back together. If you wish to eliminate this connector entirely (highly recommended), see Tip #27 – C101 Elimination
-
Another random electrical problem
cruiser54 replied to rsmecham's topic in MJ Tech: Modification and Repairs

-
https://itstillruns.com/how-to-get-better-mpg-in-vehicles-10710.html
-
Engine won’t start
cruiser54 replied to Dickinson County Comanche's topic in MJ Tech: Modification and Repairs
Go to www.cruiser54.com and see Tip 12 and 13. -
Test it. CRUISER'S MOSTLY RENIX TIPS RENIX CPS TESTING AND ADJUSTING OCTOBER 30, 2015 SALAD 119 COMMENTS EDIT Renix CPSs have to put out a strong enough signal to the ECU so that it will provide spark. Most tests for the CPS suggest checking it for an ohms value. This is unreliable and can cause some wasted time and aggravation in your diagnosis of a no-start issue as the CPS will test good when in fact it is bad. The problem with the ohms test is you can have the correct amount of resistance through the CPS but it isn’t generating enough voltage to trigger the ECU to provide spark. Unplug the harness connector from the CPS. Using your voltmeter set on AC volts and probing both wires in the connector going to the CPS itself as shown in Figure 2 as Connector A, crank the engine over. It won’t start with the CPS disconnected. You should get a reading of .5 AC volts. If you are down in the .35 AC volts range or lower on your meter reading, you can have intermittent crank/no-start conditions from your Renix Jeep. Some NEW CPSs (from the big box parts stores) have registered only .2 AC volts while reading the proper resistance!! That’s a definite no-start condition. Best to buy your CPS from NAPA or the dealer. Sometimes on a manual transmission equipped Renix Jeep there is an accumulation of debris on the tip of the CPS. It’s worn off clutch material and since the CPS is a magnet, the metal sticks to the tip of the CPS causing a reduced voltage signal. You MAY get by with cleaning the tip of the CPS off. A little trick for increasing the output of your CPS is to drill out the upper mounting hole to 3/8″ from the stock 5/16″, or slot it so the CPS bracket rests on the bell housing when pushed down. Then, when mounting it, hold the CPS down as close to the flywheel as you can while tightening the bolts. Another little tip to save tons of aggravation is to stick a bit of electrical tape to your 11mm socket and then shove the bolt in after it. This reduces the chances of dropping that special bolt into the bell housing.
-
Engine Vibration Mystery - HELP!
cruiser54 replied to lcoutback's topic in MJ Tech: Modification and Repairs
Closely inspect the hose from the throttle body to MAP sensor. A slight leak will cause an over rich condition. -
Zero reading at TPS, stalling issue
cruiser54 replied to jeepmjga's topic in MJ Tech: Modification and Repairs
Nicely done. be sure to do Tip 5. -
Renix 4.0 electric fan clarification
cruiser54 replied to Clueless's topic in MJ Tech: Modification and Repairs
Nothing will "plug in". -
I sold them for $35 when I was parting out XJs.