
.jpg.03fe42450761a0d4be1d3ce71ecb7c53.jpg)

87Warrior
-
Posts
3839 -
Joined
-
Last visited
Content Type
Profiles
Forums
Gallery
Everything posted by 87Warrior
-
 The defrost vent cover can be removed. Carefully pry up the cover then fish your power supply through the dash. Once you get the wire passed the radio it should be easy going. Take your time and don't shove the wires or pull them too much so you do not break any dash wiring.
 -
His WK looks ok for a mall crawler... but that snorkel is.... :thwak:
-
Shawn - I have gone through a few trackbars on my TJ. I would highly recommend the Currie ATB. This bar is pure beef. http://northridge4x4.com/proddetail.php?prod=CE-9120 Although I went with the 9120TJS because my frame mount was drilled out for a Rubicon Express ATB. http://northridge4x4.com/proddetail.php?prod=CE-9120TJS Having been there, done that with cheap lifts I feel obliged to share my experience with others thinking about going down the same path. I'm not here to say the cheap lifts will self destruct, but more than likely you will never be happy with the ride, performance (and what is most important to me) the longevity of the parts. I have been driving my TJ lifted for over 80k miles and I work it hard when wheeling. What makes the difference in allowing a cheaper 3" lift to be 'better' than a cheap 4.5" lift is the fact your stock parts won't be AS out of alignment. Most budget lifts include shocks, springs and not much else. If additional parts are included, more than likely they will not be adjustable and will only last about 20k miles. With a 3" lift you are able to utilize more of the stock components and can slowly replace them as time/money permits. At 4.5" of lift everything suspension relayed should really be replaced.
-
I think what Rob is saying is that you can piece together a high quality and good performing 3" lift for the same price as a cheapo 4.5" lift 'kit'. I too, would take the shorter well built lift over a cheap 4.5" kit. Then again, I am trying to build a truck that functions perfectly on and off road and not just shove big tires under it.
-
1986 MJ 2.5L 4x4 | "Heavy Four"
87Warrior replied to 87Warrior's topic in Member Projects: Your Comanches
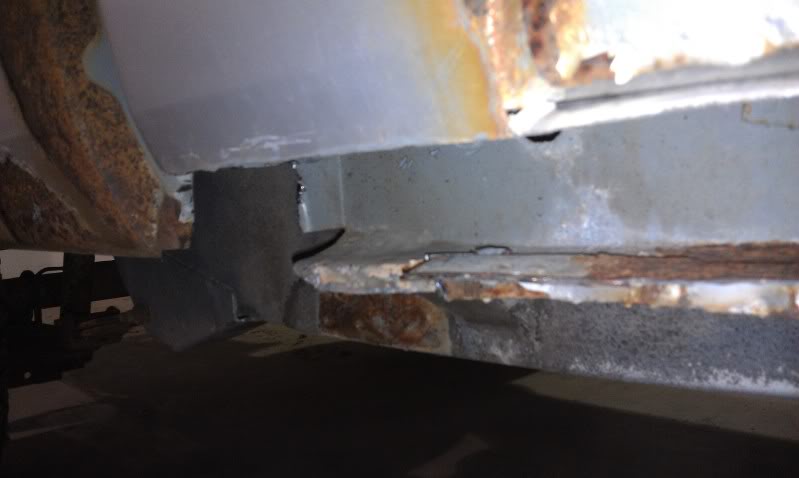
Thanks! Want to swap steering columns? I really like the factory 'fixed' position and that is where this tilt column will ride. If somebody else could benefit from the tilt, I would be more than happy to help an MJ brother out :brows: Today I started cutting out the driver side rocker. This went way to fast as the metal is VERY thin on this side. I think we will need to reinforce the mounting/weld locations with some flat stock. You can see the crud which fell out of the rocker (most of it used to be the inner rocker). I stopped at the pinch seam since that is where the thickest metal on the bottom side of the rocker is located. My buddy notified me of some possible scrap material I could use for rockers from an old cultivator in a pasture. 2x4, 1/4" box steel. Perfect! After torching it out and putting out the grass fire which was inevitable, a section was cut down to size for the truck. I cut around the back of the cab corner to the pinch seam at the back of the cab. The inner rocker also had to be cut out (what wasn't rusted out).
-
A straight, rust free truck like that would sell between $1k and $3k in KS.
-
If you are converting to 4wd, you will need a new transmission anyhow. Replace with a good one and replace clutch (if manual) when it is all apart.
-
Seems way over priced. Where are you located? That does make a difference in the cost of parts.
-
Riddler :yes: Not my picture, but I have two of them on my TJ and boy howdy, they take a beating.
-
Budget rear leaf spring options?
87Warrior replied to FKreider's topic in MJ Tech: Modification and Repairs
Close but no cigar. The MJ shackles are longer than the XJ shackles. You can replace the stock MJ shackles with XJ lift shackles but you will net zero to very little lift. Chevy drop shackles will net you about 2" of lift. Oftentimes they have multiple holes drilled to mount the spring so you can fine tune how much lift they will give you. -
2.5 Rear Main and Clutch Slave diagnosis
87Warrior replied to Zenobian_84's topic in MJ Tech: Modification and Repairs
Yeah, I thought the gasket kit was a good deal too! The clutch kit I linked was for an internal slave setup ;) I too thought about going external, but the additional cost and time to spend finding the parts wasn't worth it to me. -
I replaced the ball joints in my TJ last year (same as an MJ). I used these videos as general instruction for the procedure. The process is not hard, just very time consuming. I used the Harbor Freight press as well. $400 isn't a bad price to install these, but you can do it your self. Spicer brand is the stock replacement for ball joints.
-
That is absolutely amazing.
-
2.5 Rear Main and Clutch Slave diagnosis
87Warrior replied to Zenobian_84's topic in MJ Tech: Modification and Repairs
http://www.carolinaclutch.com/ShowItem/ ... 20Kit.aspx Luk kit: Rear main is a one piece. It has a greater diameter than the 4.0 rear main as well. I ended up buying the entire FelPro engine gasket kit (#FS 9196 PT-1) as I plan on replacing the rear main, head gasket, oil pan gasket, timing chain cover gasket and valve cover gasket and it was much cheaper to go this route. Was cheapest to order through Advance Auto, about $20 cheaper than any other vendor at the time. http://shop.advanceautoparts.com/webapp ... SKAMS_____ -
Interesting idea: 03 Rubicon: 9 years 92 Comanche: 20 years 86 Comanche: 26 years Average: 18.33 years old. Sheesh, I thought my Rubi was still new :shake:
-
87/00 Comanche Classic Diesel LWB 4 X 4
87Warrior replied to b16gsr's topic in Member Projects: Your Comanches
Nick, subscribing so I can follow your build! :wavey: Glad to see the truck showed up to you in good shape. And don't forget my offer to help you out -
That auto probably doesn't have much life left in it ;) He probably would have fared better in low-range with the lockers locked. Was the bus driver helping at all? I can't say I saw any bus tire spin. I would be lying if I said I wouldn't have tried as well :yes:
-
Can tranny cause sluggishness?
87Warrior replied to MJRemi's topic in MJ Tech: Modification and Repairs
Transmission fluid color has little to no indication at the quality of the fluid. Transmission fluid is dyed so that it does not look like motor oil or other fluids. Over time the dye breaks down and is not necessarily related to the fluid condition. You have to use your nose to test transmission fluid. Granted, a transmission filled with 20 year old transmission fluid should be drained and filled (not flushed). Are you sure your truck isn't dragging a brake or bearing? Does it have 3.55 gears? What size tires? -
1986 MJ 2.5L 4x4 | "Heavy Four"
87Warrior replied to 87Warrior's topic in Member Projects: Your Comanches
No pictures, only busted knuckles :ack: The driver fender took me 2 hours to remove. Passenger side was less than 20 minutes, most of which time was spent pulling apart the corroded antenna. It is also important to note that I left the flares and plastic inner fender liner attached. To detach the fender from the header panel you must remove two forward facing nuts from two studs that are attached to the header. These studs go through the front of the fender and are only accessible between the inner fender well and inner fender liner. Naturally, the studs twisted out of the header instead of the nuts coming off. You will also need to remove the plastic and metallic bezel around the turn signal indicator. Unbolt the fender bracket from the from the frame. Then remove the torx bolts along the length of the fender under the hood, two near the door hinges and then two more at the bottom of the fender at the rocker (just plan on cutting/grinding these out). There will be three more torx behind the header that need removed which attach the front of the fender to the inner fender well. To do this I removed 4 nuts along the top of the header panel and shoved a small 1/4" ratchet with torx bit behind the headlight buckets that are part of the header panel. -
1986 MJ 2.5L 4x4 | "Heavy Four"
87Warrior replied to 87Warrior's topic in Member Projects: Your Comanches
Yella, thank you for the tip. I have done a lot of reading about the weld in rockers and hadn't come across the angled recommendation. This truck is not and will not be a trail rig. That's what my TJ is for. The reason I am doing the weld in rockers is because it should be easier, cheaper and faster than trying to weld in a new inner rocker and outer rocker skin. I will certainly take pictures of the process I use :cheers: -
1986 MJ 2.5L 4x4 | "Heavy Four"
87Warrior replied to 87Warrior's topic in Member Projects: Your Comanches
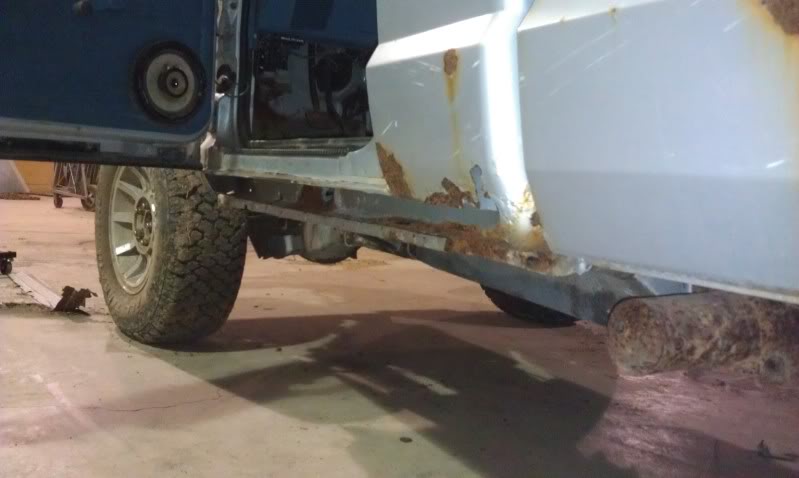
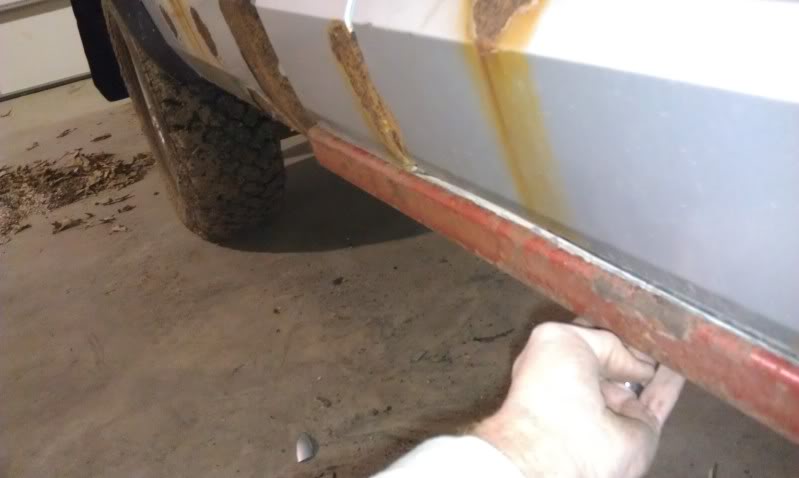
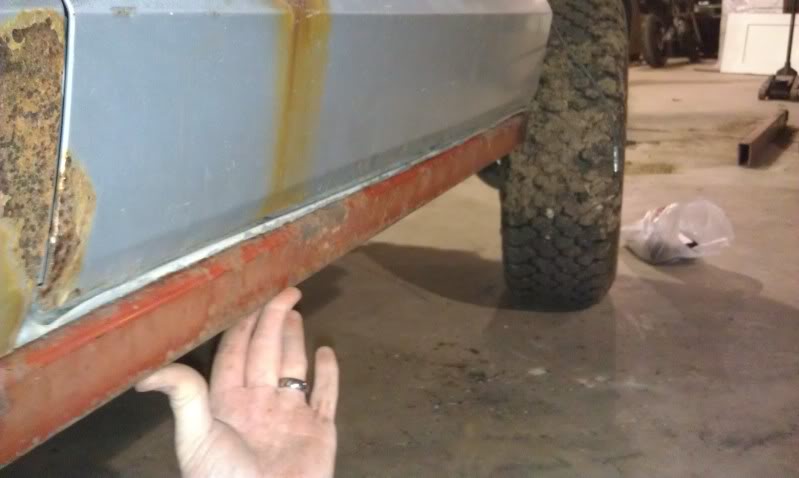
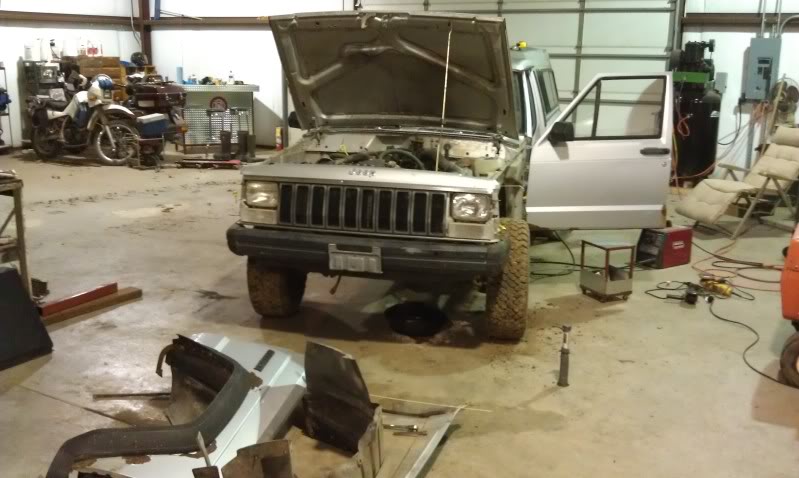
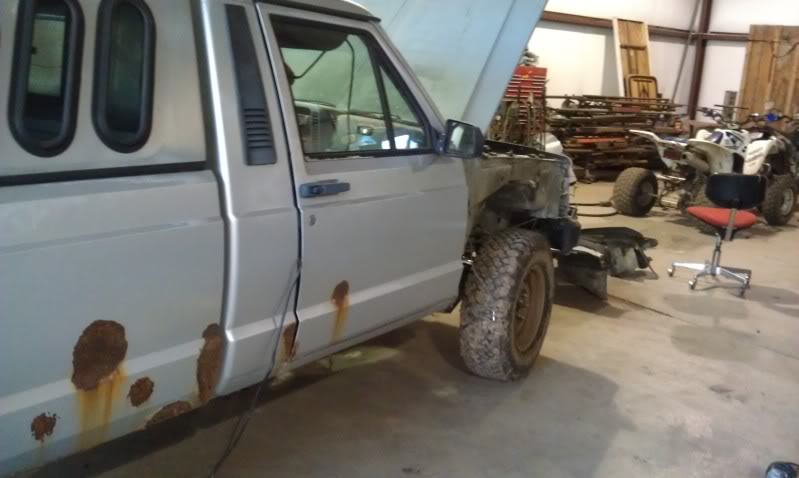
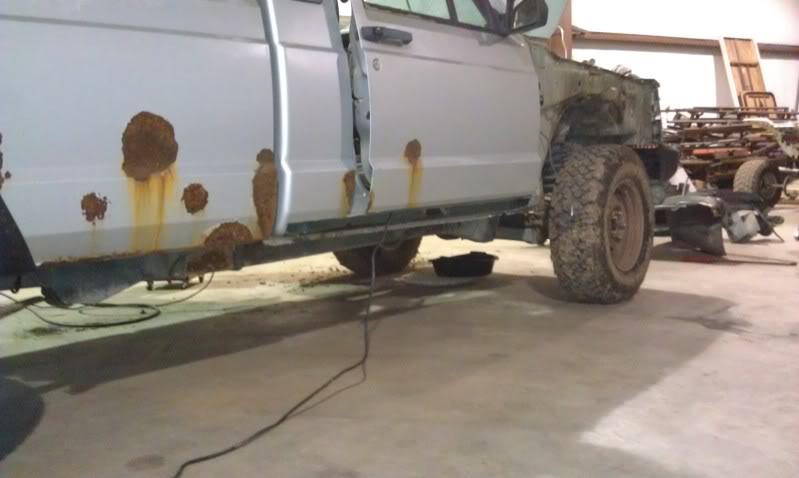
Thank you for the comments. I was all slated to get a ME degree, but got accept into the architecture school and tried it out. In hindsight, I probably should have stuck with my gut. Did a little work on the truck today. Got the floors cut out any my buddy started welding in patch panels: Pulled the fenders: Being an '86 it took me a while to figure out how the fender/header panel mount which is quite different than my '92 or the '99 XJ. Before: During: Instead of trying to repair the rusted rockers I have decided to replace the rockers with 2x6 (or 2x5 if I can find it locally) box tube. At the front of the rocker, the distance from the inner rocker to the outer rocker is 4 1/2" and the distance from the inner rocker to the outer portion of the cab corner is 5". I plan to weld the box tube to the bottom side of the inner rocker and along the door sill. On the drive side this will also provide a new mounting point for the floor as it has rotted away. The box tube will protrude from the side of the truck some, but I believe it will look sharp painted black.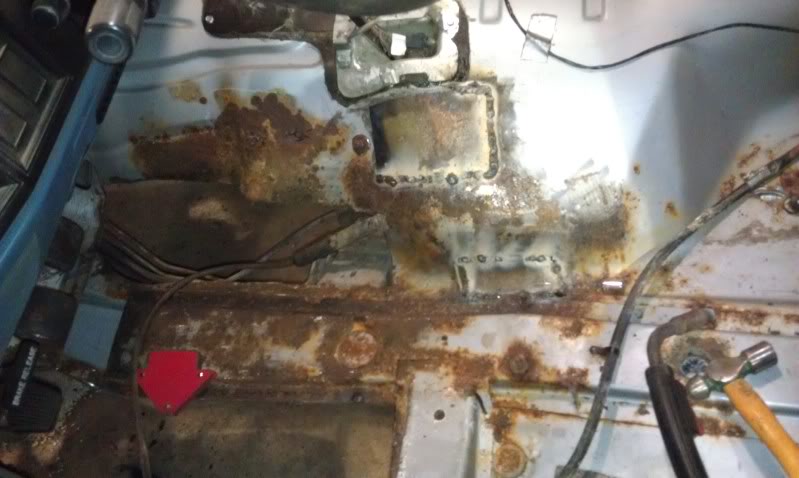
-
1986 MJ 2.5L 4x4 | "Heavy Four"
87Warrior replied to 87Warrior's topic in Member Projects: Your Comanches
Not an engineering background, but landscape architecture. Nonetheless, I will share what I come up with with the Comanche community ;) -
Now I have never completed the 4wd swap, but I thought you have to drill 4 holes for the linkage plate to bolt to the side of the tunnel?
-
Ignoring the historical and emotional aspects of a 4wd street MJ, am I the only one who thinks keeping it at its current ride height and installing a 242 case would be awesome? By doing that, the only permanent scaring the truck would get is a hole cut in the floor for the shifter. All of the original parts (which may be near the end of their lives at 250k miles) could be stored away and reinstalled later. I think a low slung, road gripping MJ would be a total blast to drive on dry/wet/snowy curved mountain roads.
-
"White Lightning" 86/92 MJ build (slow moving)
87Warrior replied to 86customanche's topic in Member Projects: Your Comanches
I am subscribing here so I can easily follow your build. I like the truck!