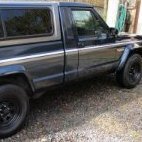
Ollie Posted June 9, 2020 Posted June 9, 2020 I found a 89 Comanche in Alabama and now I am the new owner. I am happy with it and had a nice ride home to Mississippi with no issues. Got alot of "things to do" on my list. The "Ram" hood ornament is on the list. It is running ok but I know there is alot of room for improvement. The seller told me that he just put in new injectors and they were the cheapest he could find on line. It just seems to bog out about 65 mph, idle is not that great and is rather poop less. I have read here on the forum where 4 hole injectors are the thing to do. I have located some on the internet. Any recommendations as to which are the best? He has done some engine work. It was full of sludge when he got the truck. He cleaned out the engine, put in a new oil pump, time chain, water pump, radiator and new injectors. First, I need to install gauges, not to much into idiot lights. Some white graphics would be a nice upgrade too. Having Comanche Fun, Ollie
eaglescout526 Posted June 9, 2020 Posted June 9, 2020 Its almost like the PO wanted a Dakota but "settled" on the MJ instead. What an oddity. But damn that's clean. How does the underside look?
thecodemonk Posted June 9, 2020 Posted June 9, 2020 Welcome! Looks like a great truck and a great platform to clean up!
JMO413 Posted June 10, 2020 Posted June 10, 2020 Welcome to the club. And welcome to the wonderful world of the Renix 4.0 http://cruiser54.com This link is the first thing you should read. It will give you a great jump start on a good reliable truck. I have done them all. 1-6 are a must do in my opinion. Tip 37 is about injectors. You should add your VIN to the registry so someone can get you a build sheet.
tugboat95 Posted June 10, 2020 Posted June 10, 2020 Wow, that's a good looking ride.89 ComancheEliminator2wd4.0L5 speed PukeGoatFactory Original
Ollie Posted June 16, 2020 Author Posted June 16, 2020 Started ordering stuff for a couple of upcoming projects. For the Engine New injectors, 4 hole Throttle position sensor Fuel filter Air filter For the Transmission Filter Oil I am going to my buddies shop Thursday and work on the trans and engine. I am up on carbs but not to handy on injectors so Pete is going to teach me. It's great to have car guy friends. I don't like all the idiot lights so I am installing gauges. There are plenty of blank spots on the dash to mount the gauges. Just to the right of the speedometer there is a large panel. The panel that the cig lighter was in I added a gauge I removed the transmission selector switch. I by-passed it to stay in the power mode. I found that info here at the site. The switch was bad and would not move. I filled in all the areas that needed filling with body filler. I had some black matrix contact vinyl paper left over from my dash board in my Rambler, so i covered the pieces with that. Tomorrow I will starting installing them in the dash. Its going to take me awhile but in a time I will have this truck to my liking. Having Comanche Fun, Ollie
early comanche owner Posted June 20, 2020 Posted June 20, 2020 very nice truck, just bought one today
Ollie Posted June 21, 2020 Author Posted June 21, 2020 WOW...........We recovered this truck from one foot in the grave to a lighting bolt !!!!!! I purchased this truck in Alabama and on the drive home to Mississippi I couldn't get it moving faster than 70 mph. If you went up any type of grade.......it was completely bogging out. That was back in the "olden' days" A new set of good injectors, from Performance Injectors, throttle body clean up, new gaskets, throttle position sensor, air cleaner, fuel filter and my 4.0L has a new life. The spark plugs were new. I also did as Cruiser 54 suggested about the power/comfort transmission switch. Just wire jumped it to power. New filter and trans fluid for a refresh. It is now shifting like a new trans and at 95 mph (still climbing) I backed out of it. Got my gauges all installed and working........ The air conditioning system is toast. I think the seller put as much freon in it as he could the morning I bought it. It wasn't blowing cold but passable. Next project is a new compressor, a Sanden 7 piston, new hoses, drier, and expansion valve. It will be 134 when completed. Wiper motor or switch needs attention. Only has 1 speed and no delay. A new back glass as the slider window is gone and has a piece of Plexiglas siliconed in. I am waiting for my shop manual to get here before I start on the wiper motor. Tuesday I am going to my graphics shop for the Pioneer stripping. Having Comanche Fun, Ollie
Ollie Posted June 26, 2020 Author Posted June 26, 2020 My graphics came out great....... Worked on the wipers. According to the shop manual the motor and delay board are bad. Today I changed out the wiper motor and hooked up the windshield washer system. Everything works except the delay. I understand the part is not available except a good used OEM. See one on E bay but its not worth $45 to me. Put on some new blades. Heat and AC next. My plan is a new compressor, dryer/receiver, expansion valve and hoses. I am having a problem with the vacuum operated heater water valve. I see it in the eng compartment, but here is no vacuum line running to it. I have found the following page, 24-29, in the heating and air conditioning section. Where does this vacuum line originate? I see no location for it thru the firewall? Where is this panel that all the vacuum lines are hooked to? It must be in the below dash unit somewhere? I assume I will have to a new line. All my doors are opening and closing as they should. The vacuum is entering just below the expansion valve and is being supplied by a line from the intake manifold. Any help appreciated. Having Comanche Fun, Ollie
eaglescout526 Posted June 26, 2020 Posted June 26, 2020 That line you are looking for is probably now on top of the air box inside the cab under the dash. Chances are it dry rotted away.
Ollie Posted June 27, 2020 Author Posted June 27, 2020 I found this pic of the AC and Heater control for sale on E Bay. This has gotta be where I pick up the control going to the water valve. Correct?
jdog Posted June 27, 2020 Posted June 27, 2020 16 hours ago, Ollie said: The vacuum is entering just below the expansion valve and is being supplied by a line from the intake manifold. there should be two vacuum lines out there, one goes to the ball, the other to the heater valve on the hoses, if there is only one line that comes out there, i would agree with eaglescout and say someone either cut it or its shoved under the dash. that is correct . you can see the two lines foamed together at the bottom of the connector, that's the two lines
Ollie Posted June 28, 2020 Author Posted June 28, 2020 I found the vacuum line to the heater valve........ It was just below the the the vacuum inlet line. It has vacuum all the time holding the valve closed and no vacuum when in the heat position. Someone thru the years had pushed another long line into the fitting and it ended up by the radiator hooked to nothing. Now I am moving on to redoing both the heating and AC systems. Having Comanche Fun, Ollie
eaglescout526 Posted June 28, 2020 Posted June 28, 2020 5 hours ago, Ollie said: Someone thru the years had pushed another long line into the fitting and it ended up by the radiator hooked to nothing. That other line that is hooked to nothing should be hooked to a vac ball on the inside of the bumper on the passenger side.
jdog Posted June 28, 2020 Posted June 28, 2020 That other line that is hooked to nothing should be hooked to a vac ball on the inside of the bumper on the passenger side. I wonder if they didn't switch something, he says the other line goes to the intake.
Ollie Posted June 30, 2020 Author Posted June 30, 2020 On 6/28/2020 at 1:38 PM, jdog said: On 6/28/2020 at 1:07 PM, eaglescout526 said: That other line that is hooked to nothing should be hooked to a vac ball on the inside of the bumper on the passenger side. I wonder if they didn't switch something, he says the other line goes to the intake. I disconnect all the ECS today and there was missing stuff. The heater vacuum hose was run towards the the right front, extended by a small line pushed into it. It hooked to nothing. The vac ball had a about a 7/32 vacuum line hooked to it and stopped at the fire wall hooked to nothing. The heat/AC system is is getting vacuum from the manifold. I got all the heat/ac components removed today..... The pink line (faded was originally brown) in the above pic was the one that was giving me a time trying to find. That is the vacuum line to the heater valve. My new issue now are the rubber mounts on top of the radiator. They hold the top of the radiator to the cross member. They were turning in the rubber and i had to cut them off. Anyone know of a source for these? I can rig up something if I have too. Going to be awhile while i assemble all the parts........ Having Comanche Fun, Ollie
JimB Posted June 30, 2020 Posted June 30, 2020 Bought some from ebay just last week. https://www.ebay.com/itm/Radiator-Isolator-for-Jeep-Cherokee-Comanche-1987-2001-17470-17-Omix-Ada/191242313033?ssPageName=STRK%3AMEBIDX%3AIT&_trksid=p2057872.m2749.l2649
Ollie Posted July 12, 2020 Author Posted July 12, 2020 Time for some updates......... I worked on the taillights. The drivers side was the worst, The lens had broken off the housing and someone had tried to put it back together with silicone and drilled holes in the lens and added screws. What a mess. It also had two big chips, about a inch long on the edge....... I cleaned off the silicone, glued it back together with super glue and filled the holes with fiberglass resin and built the edges with glass and resin. Also a bunch of polishing with rubbing compound. I saw in another post how someone painted the edges black. I needed to do that because of my repairs. The passenger side was not as bad, but a Phillips head screw was totally rounded off. I very patiently drilled it out. I didn't want to crack or brake the lens. Not to much repair to this side except polishing and new j clip. Compressor arrived and got the belt on. My big order from Jeep Air arrived and a lot of progress. Condenser installed on the radiator... Radiator and condenser in........ Heater control valve in........ Looks as if I am back on hold again. They sent me the wrong suction hose. The invoice has the correct part number but the hose is not correct. Also I was planning on using the charging valves off the old compressor but they won't fit. The connections on the old compressor are both 1" male and I need one 7/8" and one 5/8" on the new compressor. I will order the correct charging valves as I see them at there web site. My radiator isolators, the rubber pieces for the top of the radiator are suppose to show up Monday. So I can get another step done. I am using Power Grips instead of hose clamps and I ran out and had to order another box to finish up the heater hose. Next week will mostly waiting on stuff but I see light in the tunnel........ Having Comanche Fun, Ollie
Ollie Posted July 20, 2020 Author Posted July 20, 2020 Charged the AC system today.......Total Success.......blowing dead on 40 Switched to heat and darn nay melted the windshield !!!! New ignition switch so you need a key........boy we are almost uptown now Trailer light plug wired up. I need to go to U-Haul and get a 2" ball to fit thru the bumper. I see they have one with a 3/4" shank, 2" long. That will fit the stock bumper. A couple of 1/2" eye bolts for the safety chains and my towing system will be on line. Got a new set of shocks ordered and on the way. Having Comanche Fun, Ollie
tugboat95 Posted July 21, 2020 Posted July 21, 2020 Looks like you're coming along well. Those tall lights look awesome. Gotta get my AC done. Wife won't ride with me in 110 degree heat. Up til now I've been focused on the safety and running stuff. Getting ready to switch from the must haves to I wants.89 was a big year. We owned one of these new (bought in 88), I graduated from high school. And joined the USAF and left home. Gotta keep these on the road.89 ComancheEliminator2wd4.0L5 speed PukeGoatFactory Original
buxmj Posted August 8, 2020 Posted August 8, 2020 Awesome work! From another 89 mj owner, looking great and I am jealous about the ac, need to get it replaced so I can drive mine in comfort here in blistery Florida! Buck.
Ollie Posted August 8, 2020 Author Posted August 8, 2020 13 hours ago, buxmj said: Awesome work! From another 89 mj owner, looking great and I am jealous about the ac, need to get it replaced so I can drive mine in comfort here in blistery Florida! Buck. Thanks, it sure was worth the effort and a blessing here is Mississippi especially in August! All things considered it was not that bad of a project cost wise. Total was $562. I replaced everything from the front bumper to the fire wall. You could knock off $200 easy by using your original hoses and condenser. You can get by with a compressor, drier and expansion valve. I got everything at Jeep Air and bought the new 7 piston Sanden style compressor from Summit. I sure recommend that compressor as they use alot less power than a OEM. I also was lucky as my friend had a vacuum pump so that didn't cost me any thing other than some beer..........

Recommended Posts
Create an account or sign in to comment
You need to be a member in order to leave a comment
Create an account
Sign up for a new account in our community. It's easy!
Register a new accountSign in
Already have an account? Sign in here.
Sign In Now