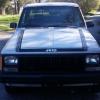
kryptronic Posted October 5, 2018 Posted October 5, 2018 This is the Old Blue 1995 Jeep Wrangler (YJ) build thread. Old Blue is special because he's got square headlights. That makes him different from every other type of Wrangler. He's also got windshield wipers that won't lay flat because the windshield is too small. Or the wipers are too long. Jeep couldn't figure it out, so we shouldn't try. A direct decedent of the CJ, the YJ was the only leaf-sprung Wrangler that Jeep made. There are some who consider the YJ the last "True Jeep". This is Old Blue's story. Meet Old Blue Vehicle: 1995 Jeep Wrangler (YJ) VIN: 1J4FY29S6SP203191 Engine: 4.0L HO (Chrysler Electronics) Transmission: AX-15 Transfer Case: NP231 Front Axel: Dana 30 3.07 Gears Rear Axel: Dana 35 3.07 Gears Build Date: May 1995 Purchase Date: December 21, 2013 Purchase Date Mileage: 27,901 Factory Options: Aqua Pearl Coat Paint; AM/FM Cassette Radio; 4 Speakers; Leather Wrapped Steering Wheel; Tilt Steering Column; Cloth High-Back Bucket Seats; SE Decor Group; Floor Carpet; Cargo Compartment Carpet; Full Length Floor Console; Cigar Lighter; Courtesy Lamps; Underhood Lamp; 15" Aluminum Wheels History Old Blue was purchased in 1995 for use at a horse farm in Sykesville, Maryland, which is located in southern Frederick County. From 1995-2013 he served the horse farm by carrying riders and equipment all over the property. He was likely parked on grass when not in use. In December of 2013, Old Blue was traded in for a newer Jeep at Tate Dodge Chrysler Jeep in Glen Burnie, Maryland, in Anne Arundel County. When traded in, Old Blue had 27,901 original miles on him. A former Maryland State Trooper quickly bought Old Blue from the dealership after receiving a tip from a buddy in the service department on what had just come through the door. Then he listed it on the local Baltimore Craigslist for $5,300, and I happened to be the first person (of 28) to call him in the first twelve hours after the listing going live. I met him in Glen Burnie, Maryland at Wells Automotive the next day. My uncle owns and operates the place, and made time to inspect Old Blue for me. He went over everything pretty well, and he noted the frame was going to need attention in the rear due to rust, and said things like brake lines and belts should be gone over due to age. He said Old Blue looked like a solid Jeep, and had low miles, and ran very well, so I bought him. Chrysler Build Sheet T5 Cloth High-Back Bucket Seats ADCP Convenience Group ALAP SE Decor Group APAS Monotone Paint BAPS 75 Amp Alternator BCCS 430 Amp Maintenance Free Battery BGAS Power Front Disc/Rear Drum Brakes CADP High Back Bucket Seats CDBP Reclining Front Seats CFMP Rear Folding Seat CKCP Floor Carpet CKNP Cargo Compartment Carpet CUFP Full Length Floor Console DBBC All Manual Transmissions DDQ 5-Speed Manual Transmission DHNS Command-Trac Part Time 4WD System DJJS Dana 30/186MM Front Axle DMMS 3.07 Rear Axle Ratio DRJS 175MM Rear Axle EAAC All Engines ERH 4.0L I6 Power Tech Engine GBBS Tinted Windshield Glass GCCS Plastic Front Door Window GCHS Half Metal Doors with Locks GRVP Left Manual Mirror GSVP Right Manual Mirror GTVP Swing-Away Mirrors GVAC All Vehicles W/O Power Mirrors HCDS Heater w/Instrument Pnl Ventilation JCDS 100 MPH Primary Speedometer JHAP Var Intermittent Windshield Wipers JJAS Cigar Lighter JJHS Single High Note Horn JKAP Locking Glove Box LAPS Shift Indicator Warning Lamp LBBP Courtesy Lamps LDAP Underhood Lamp LMAS Halogen Headlamps LPSS CHMSL Lamp MBAS Painted Front Bumper MCFP Dark Chrome Exterior Accents MFBS Body Color Headlamp Bezels MFRS Black Front Frame Overlay MFTS Body Color Grille MWBS Sport Bar w/Side Padding NAAS Federal Emissions NBKS EVAP Control System NFAP 20 Gallon Fuel Tank NMCS Heavy Duty Engine Cooling PQEA Aqua Pearl Coat QQES Aqua Pearl Coat RAAC All Radio Equipped Vehicles RAF AM/FM Cassette Radio RCD 4 Speakers RDDP Fixed Long Mast Antenna SBAP Power Rack and Pinion Steering SCG Leather Wrapped Steering Wheel SDAS Normal Duty Suspension SHAS Front Stabilizer Bar SUAP Tilt Steering Column TBBP Full Size Spare Tire TBRS Outside Tire Carrier TMSP P215/75R15 RBL Wrangler AT Tires TZAS Goodyear Brand Tires VJXS Black Easy Folding Soft Top WJN 15" Aluminum Wheels WLZC All Aluminum Wheels XEES Fuel Tank Skid Plate Shield YAAS Build To U.S. Mkt. Specifications Day 1 Pics Initial Issues Rear brake lines needed to be replaced immediately; The radio didn't function; Lost the key cylinder for the center console pulling away after the purchase (never to be found again); Frame rust at passenger rear shock tower (apparent, moderate); Frame rust at driver rear shackle (not apparent, bad) December 2013 - July 2015 Initially Old Blue was intended to be a daily driver for my daughter, who at the time was 14. The plan was to work on Old Blue together as a father-daugher project, and then give the Jeep to her when she turned 16. I drove Old Blue around quite a bit in order to ensure he was in good working order. I'm a big fan of the Chrysler High Output platform, and was very excited to have my hands on a 4.0L HO with an AX-15 with all the bells and whistles added to the YJ over the years coming into one package. The 1995 YJ is unique in that it got stuff like beefier u-joints in the front axles, the external slave on the AX-15, and for 4.0L engines - a double break booster from the factory. In 2014, we entered Old Blue in the 1st Annual Stetler Jeep Dodge Jeep Show, and took second place. We lost to a supercharged Comanche that was done up inside and out by a guy that must have done hot rods or muscle cars at some point in his life. The paint was dripping wet on the thing. Anyway, second place for a bone stock YJ in a field of around 100 Jeeps wasn't bad. Did almost as well in 2015. At some point my daughter decided she didn't want a Wrangler. Who am I to question a woman, especially one that's 14? Not into Jeeps. A shame, but not the end of the world. So I took Old Blue as my own, did a little updating here and there. I added a 1" add-a-leaf lift, and 30x9.5x15 BFG KOs wrapped around 15x7 Cragar Soft 8s. I redid all the brake lines and tuned him up pretty good. I also replaced the top, changed the decal package to black and added an overlay on the grill (chrome factory overlay painted black). The last time Old Blue was on the road was July of 2015. I took him round trip to Rodanthe, North Carolina (Outer Banks) on vacation, without issues. I parked him with 36,076 miles on him in my driveway looking like this: In July 2015 when I parked him, everything was running great, but the frame rust at the rear driver side shackle had gotten so bad, that I knew he wouldn't pass the upcoming annual Pennsylvania safety inspection. So I was going to have to do frame work to keep him alive. The wet grass he had sat in all his life finally got the better of him. On the bright side, though, he had a drivetrain with very few miles on it, and the tub had no rust except a small bit on the driver floorpan. At some point in the fall of 2015 before pulling Old Blue into the garage to work on him, I decided to do a frame-off restoration, with a full frame replacement, engine refresh and upgrades, axle and suspension upgrades, and more. The works. I felt like Old Blue deserved it. Square headlights and all. I have been documenting the build from 2015 through to the present, and will be posting it here in segments as time allows. I will likely catch up this thread before Old Blue is finished. He's still being worked on, and is split in half at the moment. More on that to come later...
kryptronic Posted October 10, 2018 Author Posted October 10, 2018 Fall 2015 - Fall 2016: The Donor The plan was going to be a full frame-off restoration for Old Blue, so that meant finding a viable donor for the frame. Old Blue came with a D30 front and D35 rear geared in 3.07, and since build plans included a mild 2-3" lift and bigger 31" tires, I would want 3.73 or lower gearing on the donor. With 3.73 gearing being optimal, I decided to look for an automatic as the 4.0L automatics came with 3.73 gearing from 1987-1995, and the 2.5L autos also came with that gearing, but were only offered 1994-1995. Looking for the beefier u-joints on the front axle, I narrowed my search to 1995 only. I didn't have to wait long and a 1995 2.5L automatic showed up on Craiglist in Harrisburg, PA. The YJ was being sold by a younger college guy, and it was priced cheap. Everything was running, although rough, and it was originally from California and had only spent the previous year outside of California. So the frame and all the lower components were virtually rust free. Due to the rough running condition of the engine, I sealed the deal at $1900 and drove it home. Here is the donor right before I bought it: I know, it looks like Old Blue, but it's not. The donor had a couple of dings and dents. The rear tub was repaired at some point. Fuel delivery issues, bad distributor, rough idle, etc. Rear frame crossmember had minor damage. All in all, not bad. The idea was to part the YJ out and keep the frame and axles for Old Blue. So I started breaking it down and took my time with it, saving parts I'd need and selling everything else. I got the engine running great and sold it. Sold the transmission and steering column along with everything to convert a manual to an auto as a package deal. I sold the tub to a guy in Southern Maryland doing a frame-off resto of his own. Various bits like doors, fenders, the hood, etc. sold over time. Lifting the tub off to reveal that sweet California frame: Old Blue looking on to see what's coming: Finally down to what I needed, a frame and axles: All in all, it took around a full year to get the donor down to the pieces I needed and to sell the rest of it to make enough space to start real work.
Minuit Posted October 12, 2018 Posted October 12, 2018 I've always had a soft spot for YJs. Can't wait to see what you've done with this one.
kryptronic Posted October 17, 2018 Author Posted October 17, 2018 Fall 2016: The California Frame It took a year to fully break down and sell the donor, but it was all finished by fall 2016. After it was all said and done, I took the frame and axles and made $2700 in profit by parting the rest. All the profits were earmarked for the Old Blue fund. I love it when a plan comes together. This is where I start having more pics for the build. I wasn't really documenting the tear-down process for the donor, as I didn't see much point in it at the time. The donor was originally from California, and spent most of it's life there. That's the reason I bought it - to get at the rust-free frame. It was in incredible shape for a vehicle of it's age. After getting the suspension off, and the axles out of the way, I had a very nice YJ frame configured for a 2.5L engine: There was a little damage from an accident to the passenger side rear crossmember, and the frame mounts for the engine needed to be configured for a 4.0L. The latter would require moving the driver side mount forward, and replacing the passenger side mount with one from a 4.0L YJ frame, and moving it forward. I had another 1995 YJ in the same configuration as Old Blue (4.0L, AX-15). It was a pile of rust that I drove for year, then I parted it out and broke even on it. A few parts on Old Blue came from that YJ like a couple pieces of soft top hardware, the fuel pump and the starter (both of which were new). I cut the mount I needed off of it's frame, which I had previously cut into pieces and saved for this build. Here are a couple of pics showing the sourced passenger side mount, and close to where it needed to be located for the 4.0L. I cut the engine mounts off the frame very carefully, and ground everything clean, then media blasted the frame. I used a 40lb blaster hooked up to an 60 gallon air compressor, and blasted with fine grade coal slag from Tractor Supply. That was just the first blast run - enough to get it clean, identify any issues and get it ready for welding the mounts. I removed the front and rear track bar mounts from the frame at this point and went over the whole thing, and cleaned up a bunch of sloppy factory welds. Four 1" drain holes were added to the bottom of each frame rail, and the shock towers and gas tank crossmember received 0.5" drain holes. Every area the factory should have put them. I used Old Blue for the measurements to place the engine mounts. I measured from both front shackle mounting points, as well as referenced the shock towers for proper placement. I welded them on with an Eastwood 135 MIG Welder nearly maxed out using gas. The welds came out beautiful with very good penetration, and I didn't really need to grind much to smooth anything out. I have no post-weld pics of the mounts. I then moved onto the rear crossmember. I don't have a good picture of the damage to the passenger side, but it was minimal - just the outer edge was bent slightly. I couldn't just let it roll like that with everything else I had planned for Old Blue. Besides, I wanted to see what the rear frame rails looked like inside because that's where Old Blue had trouble. Minimal surface rust only, thank goodness: I needed a rear crossmember, and the one on Old Blue was in perfect shape. So I backed him up to the garage and cut it off. The point of no return. I cut right behind the shackles so he could still be rolled around. There were piles of rust in the frame on both sides. The driver side is gone on the bottom frame rail, although you can't see it in the pic because there was so much rust in there it clogged the hole: I carefully cut the crossmember off the donor frame so as not to disturb the frame. Then I cut the remnants of Old Blue's frame off the crossmember being swapped, and it got blasted. I also blasted the inside frame rails while it was open. Then I welded it onto the frame with the MIG. I missed post-weld pics again, but they looked great, and the frame went back outside for full media blasting. Here's when it came back in completely clean: At this point I took a short break to install a 30 amp heater in the garage, which required wiring in a new 100 amp sub panel. I moved everything for the garage to that sub panel, so it runs the lights, outlets, welder, plasma cutter, heater and air compressor. I knew I needed heat in the winter to paint anything, so it had to be done. The rest of the winter would be spent on prepping and cleaning the axles, and getting the first phase ready for paint. More on that later.
kryptronic Posted November 8, 2018 Author Posted November 8, 2018 Winter 2017: Axles and a Whole Lotta Painting Going On With the frame done I turned my attention to getting the axles ready. This is a mild build, so the Dana 30 front axle and the Dana 35 rear axle that came with the California frame would be plenty sufficient in stock for to handle intended use. Both axles are geared at 3.73, the front has the large 5-760X u-joints and the rear has factory limited slip. When I cracked them, they both looked great. The Jeep they came from was never offroad or ridden hard. I had already removed the track bar mounts from the frame, and needed to remove them from both axles. Track bars cause binding and other issues on leaf sprung suspensions, and nearly everybody agrees YJs without track bars ride way better than stock. I needed to remove all evidence of them. The Dana 35 rear was a simple cut and clean affair. The Dana 30 front took a little creativity. In stock form the track bar bracket is molded to the casing that holds the central axle disconnect (CAD). It needed to be removed, but in a way so that you'd never know it was there - that also didn't weaken the CAD housing. After clearing the axles of track bars, they underwent the same blasting treatment that the frame got in the fall. I also cleaned and restored everything else including the axle shafts, steering knuckles, etc. The hubs and ball joints for the Dana 30 were trashed and new replacements were ordered. All the seals were good and the axle internals needed no work, as mentioned before. I even re-blued the front and rear axles. Then it was time to get a whole lot of painting done. I needed to paint basically the entire frame, both axles, all brackets and more. The Dana 35 was getting a disc brake conversion so that needed new calipers, etc. The plan was to get everything painted then have everything ready for assembly to do that all in one shot. Basically I was getting a completely restored rolling chassis ready for the second phase, which would be the drivetrain from Old Blue. I used four base coats of Chassis Saver in Satin Black, and topped that off with three coats of Eastwood Extreme Chassis Black in Satin. Inside all frame rails was done using a 3M undercoating wand hooked up to a shutz gun used for spraying undercoating. All other paint was applied using a cheap HVLP gun run by my 60 gallon compressor. Lots of painting. Spring plates, bolts, slid plates, the front bumper (which I cut from a stock YJ bumper and welded half an MJ bull bar onto), gas tank skid, transfer case skin, gas tank straps, etc. If I wasn't painting it black, it typically got painted with Chassis Saver Aluminum, which has real aluminum flake in it. I did things like the ends of the axles, sway bar links and diff covers in the aluminum color. It was quite an undertaking, I had to clean and clear the center caps for the wheels and paint and rebuild all four calipers. These wheel center caps were a rusty, nasty mess inside and out. The disc brake conversion for the rear axle is the ZJ (Grand Cherokee) setup. All that was done in an effort to get everything together to build the rolling chassis over a week or two. Everything came together very nicely and at the end of it, I really felt like all the prep paid off. Before I started assembly, I felt like a kid on Christmas about to play with a bunch of new toys. New Timken hubs, Spicer u-joints and ball joints, Old Man Emu Springs, all the disc brake conversion parts and more. A freshly painted frame, and all new brakes and rotors. The CAD system was redone and every part was cleaned and painted and brought back to better than factory goodness. All ready to put together. Don't mind those rock sliders - they weren't touched yet. Hadn't done anything with the rear bumper (got a tire carrier bumper from a TJ). More on those later... In our next installment we'll take a look to see how everything fit together. Thanks for reading.
Pete M Posted November 9, 2018 Posted November 9, 2018 I love the detailing! also, you're garage is so organized I bet the spiders have name tags
kryptronic Posted November 9, 2018 Author Posted November 9, 2018 Spring 2017: Rolling Chassis Assembly I was so wrapped up in assembling everything over the course of the weekend that I did it, I didn't really take any pics of the process. Everything went very well, with the exception of having the wrong shocks. The recipe included: a Dana 30 front axle geared 3.73 with all new u-joints, hubs and brakes; a Dana 35 rear axle geared 3.73 with limited slip and ZJ disc brake conversion; Old Man Emu 036R (heavy rear) leaf springs at all four corners; Old Man Emu HD greasable shackles and bushings; Skyjacker hydro shocks; Daystar greasable main eye Bolts; Rancho u-bolts; All new hoses, lines, etc. I initially was going to do a transfer case drop, as can be seen in the pic above, but plans changed and a SYE was done on the transfer case instead. At full droop the front shocks were too short (so I needed to go with the next size longer for those), and I ran into an issue with the shock body contacting the rear axle. Longer shocks fixed the front and Teraflex shock relocation brackets fixed the rear. Also got rid of all the shock boots. All in all I didn't really run into any problems other than the shocks during assembly. I had everything prepped, purchased or otherwise ready to go. At some point during the spring of 2017 I got my 1991 MJ, and inadvertently ended up taking the last pic of Old Blue before disassembly when taking a pic of the underside of the MJ. He was sitting in front of the garage ready to be broken down. In our next installment, Old Blue goes through full tear down. Thanks for reading.
kryptronic Posted November 9, 2018 Author Posted November 9, 2018 Summer 2017: The Point of No Return (Disassembly) After the rolling chassis was finished (or at least together), it was time to turn direction to the drivetrain. It was as good a time as any to fully break down Old Blue, so I started the process one weekend during the summer of 2017. I had torn down three YJs previous to Old Blue, so I knew what I was doing, but I didn't trust myself to get everything back in the same spot when final assembly would occur (whenever that might be). I started out with the fenders and marked everything with high visibility tape, clearly labeled before disconnecting. Then just worked my way around the engine compartment, then removed the hood, fenders, etc. High visibility labeling on everything! I got everything clear of the firewall, removed the top, removed the interior, then started working on the interior harness. You can see the one spot on the floor that has rust in the pic directly below. Afterwards, I removed the rollbar, every bolt, bracket, wire - everything. Old Blue was clean under the rollbar feet - very uncommon for YJs. Then I lifted the tub off without too much trouble. At this point I had one rolling chassis in better than new shape, and Old Blue's rolling chassis with the drivetrain on it. I had the two side by side for a moment before I flipped the drivetrain from old to new for a test fit. I flipped the tub on it's side for easy storage. I put it on a couple of spare tires on top of dollies so it can be moved around with little effort. I switched the drivetrain from old to new. It fit perfect. Engine mounts were located exactly right - everything lined up. The drivetrain wouldn't stay there long, though. This was test fit territory only. In another installment we'll go over how the engine, transmission and transfer case were gone over. The final step was to cut Old Blue into little pieces and make him disappear. I saved the axles for spares and the frame went into storage for when I need good metal. You could really see well at this point how bad the frame had gotten over time. Within a couple of weekends Old Blue had disappeared, the tub was on it's side in the garage ,and the drivetrain had been fully swapped over, ready for the next phase. More to come next time. Thanks for reading.
kryptronic Posted November 11, 2018 Author Posted November 11, 2018 On 10/11/2018 at 10:39 PM, Minuit said: I've always had a soft spot for YJs. Can't wait to see what you've done with this one. It's the square headlights. Plus I've got a really awesome period correct Minuit Enhanced Radio for it and new speakers for the dash and soundbar. So there's that, too. On 11/8/2018 at 9:06 PM, neohic said: Really enjoying this build. Thanks. I've really enjoyed following yours, too. Means a lot. On 11/8/2018 at 9:58 PM, Pete M said: I love the detailing! also, you're garage is so organized I bet the spiders have name tags I'm a software engineer, so I can't help but label and organize everything. I've got issues. It's bad. I just realized that if you watch the garage over the course of the build you'll notice more and more shelving and shuffling around of things to optimize space. It's a two car oversize garage, and I have room enough in it to line both sides about 30" deep and still get an MJ and the separated tub and frame for the YJ in there. It's not big enough, though. If I ever move, I dream of a setup like Alexia just built.
kryptronic Posted November 12, 2018 Author Posted November 12, 2018 Fall 2017: The Drivetrain I ended up working on my 1991 MJ, Silver Star, over the spring and summer quite a bit. When I first bought the truck it was a basket case with a bunch of issues. It took a few months to get to driver status, which took focus away from Old Blue. In the early summer I had swapped the 4.0L High Output engine, AX-15 manual transmission and NP231 4WD transfer case as a single unit from Old Blue over to the new chassis. The drivetrain sat there until the fall, when I decided to break it down and clean and refresh it. Due to the low mileage on the engine and other components, the plan was to refresh everything, as nothing needed to be rebuilt. I broke everything down and cleaned the engine thoroughly. Then I painted it with Hemi orange engine paint from VHT. I would have done AMC blue, but the YJ is practically that color already, so I went with orange for contrast, and picked a Chrysler color. I really liked how it turned out, and will probably do the MJs the same way. I also blasted all the aluminum brackets, valve cover, intake, etc. and then cleared it with Diamond Coat HT Clear. Same treatment was done to the AX-15 and NP231. Everything was properly sealed up before blasting to prevent any damage to any and all areas which needed protection. The engine got all new Felpro gaskets all the way around, a new AC Delco water pump, new thermostat and housing, a Banks revolver header for the exhaust manifold and a new distributor and wires. And then the electrical harness was gone over and put into perfect shape again. With all the wiring set and other items like the fuel tank and skid installed, everything looked like this: That pretty much took then entire fall up until the holidays when it's always tough to find time to work on projects. In the winter of 2018 I took a short break to build out my 2013 Jeep Wrangler Unlimited Rubicon (JKUR). Might post a quick build thread up on that at some point. Then I came back to the YJ in the spring of 2018 to do an SYE on the transfer case (instead of the previously installed transfer case drop) and to start work on the tub. More on that in the next installment. Thanks for reading.
HOrnbrod Posted November 12, 2018 Posted November 12, 2018 On 11/11/2018 at 6:17 PM, kryptronic said: I'm a software engineer, so I can't help but label and organize everything. I've got issues. It's bad. I know another CC member who is just like you, Gjeep . His current build is HERE. I've always thought my work was semi-decent until I go through you guys respective build threads. It's depressing.
Minuit Posted November 12, 2018 Posted November 12, 2018 I've seen and done a lot of crazy things in the name of details, but I have NEVER... EVER heard of someone re-bluing axles as part of a restoration like this. You're an absolute madman and I love it. The fact that I'll be providing the tunes for this build is just icing on the cake And as someone who's just cleared enough space in his garage to park the MJ in and walk around it, there is one simple truth: No matter how big it is, the garage is never big enough.
kryptronic Posted November 12, 2018 Author Posted November 12, 2018 17 hours ago, HOrnbrod said: I know another CC member who is just like you, Gjeep . His current build is HERE. I've always thought my work was semi-decent until I go through you guys respective build threads. It's depressing. Gjeep operates on a whole other level. Between his build and yours I've got tons of inspiration once I get to the MJs. The plan is to do them the same way (at the same level) as the YJ, so keep an eye on those build threads when they heat up at some point. Hopefully soon. Already making plans. 10 hours ago, Minuit said: I've seen and done a lot of crazy things in the name of details, but I have NEVER... EVER heard of someone re-bluing axles as part of a restoration like this. You're an absolute madman and I love it. The fact that I'll be providing the tunes for this build is just icing on the cake I thought everybody re-blued their axles. I have a handgun that I had to re-blue a while back, and had what I needed on hand. So after I cleaned the axles up, I figured what the hell. It took all of 20 minutes and they looked almost new when done. I did four axles, but only took pics of the fronts - before: After:
onebigmj Posted November 14, 2018 Posted November 14, 2018 Can you give me some info on the guns you sprayed the frame with and the setup you used to paint the inside of the frame? I’m doing a frame off on my 2004 rubicon, not half as nice as your work though. The wands I’ve found for internal coating are all for wax type products and say not to use with paint. Thanks allot, amazing work!
kryptronic Posted November 14, 2018 Author Posted November 14, 2018 10 hours ago, onebigmj said: Can you give me some info on the guns you sprayed the frame with and the setup you used to paint the inside of the frame? I’m doing a frame off on my 2004 rubicon, not half as nice as your work though. The wands I’ve found for internal coating are all for wax type products and say not to use with paint. Thanks allot, amazing work! First, If you've got rust inside your frame rails, you've got to get it out before doing anything. I'm dealing with that on a 2004 TJ myself right now. The process is to use a cleaning wand for a pellet stove with small chains attached to the end, run with a drill. Basically a DIY tool for ripping rust out of frame rails. Also, make sure you drill four drain holes in each frame rail at the front, back and near the skid plate to ensure the rails drain right and doesn't clog up with dirt and mud, causing more rust. I thoroughly cleaned the inside and outside of the frame rails with xylene and allowed to dry before painting. All surfaces were clean and grease free. My process to clean the inner frame rails was to use a sponge soaked in xylene tied on a long rope and pull it through the rails to clean them up. This was after all the blasting and cleaning and blowing out of everything to be sure I had good clean surfaces to paint both inside and out. With that said, for the actual painting: I used a Walcom Shutz Gun, which you can get here from Monstaliner. It's used for spraying undercoating and bedliner. I attached a 3M Rust Fighter-I Application Wand (PN 08998), which you can get here from Amazon. I used a basecoat of Chassis Saver in Satin Black by Magnet Paints, which you can get here from Monstaliner. For the topcoat on the frame (not inside the rails) I used Eastwood Extreme Chassis Black in Satin, which you can get here from Eastwood. Four applications of basecoat. Where topcoat is used, three applications. The Chassis Saver is not UV-resistant, so it needs a topcoat or it will fade. That's not necessary inside the frame rails, but you will want to topcoat the frame if you paint the outside of the frame rails. I cut the Chassis Saver with 10-15% xylene. Both Chassis Saver and the Eastwood Extreme Chassis Black are xylene/xylol based paints. Do not buy special reducers like the Chassis Saver X8 reducer - it's just xylene. You can get the xylene at Home Depot or Lowes for around $18 a gallon in the paint thinner section. I painted in my garage, and used a heater to get the temp in the garage to 75 degrees Fahrenheit. I ran the Walcom shutz gun with the 3M wand at around 35PSI off my 60 gallon air compressor to shoot the Chassis Saver cut with xylene inside the fram rails. It worked very well. The amount of paint sprayed wasn't as much as I would have thought looking at the setup - it took multiple passes to ensure full coverage - but it sprayed well. I used a cheap purple HVLP gun, which you can get here from Harbor Freight, for the applications of basecoat and topcoat to the outside of the frame rails. A minimum of 3 hours and a maximum of 18 hours between coats. The only other thing I have to add is that both the Chassis Saver and Eastwood paints are air cured. It will take 1-2 weeks depending on temperatures for the paint to fully cure. It will be very, very slightly tacky to the touch until fully cured, and it takes a while. In my experience it cures faster in cold weather than warm weather. Once cured, it's nearly indestructible. The Chassis Saver product should be considered as an alternative to something like Por-15. Do not try to topcoat it with anything that is not xylene based. I repeat, do not try to topcoat it with anything that is not xylene based. Also, either block off any bolt holes with something like earplugs, or be ready to re-tap any bolt holes that get paint in them.
onebigmj Posted November 14, 2018 Posted November 14, 2018 Thank you so much! That was the most fanatastic, clear and descriptive explanation I could have ever hoped for! I’ve used the chassis saver product many times before with good results. I actually painted the new tub with monstaliner. The xylene tip is also gonna be helpful. can't thank you enough.
kryptronic Posted November 15, 2018 Author Posted November 15, 2018 1 hour ago, onebigmj said: Thank you so much! That was the most fanatastic, clear and descriptive explanation I could have ever hoped for! I’ve used the chassis saver product many times before with good results. I actually painted the new tub with monstaliner. The xylene tip is also gonna be helpful. can't thank you enough. No problem. Glad to help. I jusr re-read my post and I guess the only thing I didn't mention was that I ran the HVLP gun at around 20PSI to shoot the outside of the frame. Good luck.
kryptronic Posted November 18, 2018 Author Posted November 18, 2018 Spring 2018: Transfer Case Slip Yoke Eliminator When building out the suspension, I chose to go with Old Man Emu 036R springs at all four corners. These are technically 2.5" lift heavy duty rear springs. Using rear springs in the front with a 4.0L engine basically levels the Jeep providing a bit more lift in the front than true front springs. The YJ uses the same length spring at all four corners. Using four 036R springs is a common mod in the YJ world, and I chose to do so after having several discussions with knowledgeable people at ARB. With the lift, the rear driveshaft angle was not going to be optimal. Initially I thought I'd save money and do a transfer case drop to compensate, but even with the drop installed after the chassis initially came together, the angle of the rear driveshaft was too extreme. These pics show the transfer case drop removed. I chose to solve this dilemma by installing a slip yoke eliminator. I chose the Advance Adapters model 50-7906 for the install. It's a substantial kit containing everything necessary, except RTV and oil. I recommend a really good pair of lock ring pliers as well. I did the install on my workbench, as recommended by other club members. I also watched several videos ahead of time, but mostly followed the Advance Adapters instructions, which were very good. I had never dug into a transfer case before, so I was a bit nervous, but it was no big deal. By this point the transfer case is disassembled and we can see the difference between the lengths of the output shafts. A couple of pics of the AX-15 without the transfer case mated to it, just before it was bolted back on: Here is the end result, with the transfer case reinstalled and the slip yoke eliminator ready to go: The rear axle will need to be pointed towards the transfer case output using proper shims, and a new driveshaft will have to be ordered and installed. Neither of those items can be done until the full weight of the tub and everything else is back on the frame - one of the last steps. Thanks for reading. Next time we'll start the process of cleaning and fixing up the tub.
Lthompson741 Posted March 6, 2019 Posted March 6, 2019 Any updates? Your attention to detail is awesome.
kryptronic Posted February 23, 2021 Author Posted February 23, 2021 On 2/20/2021 at 10:32 AM, 89 MJ said: Any updates @kryptronic? A bunch of stuff has happened since my last update on this build. I've been kind of distracted working on other things around here. I have done a little, though. I've been working on the tub as I get time. I stripped and blasted the underside, and fixed a busted body mount. Then I got stuck fixing a pair of holes in the floorpan. It's taken a while to get my technique down for butt welding sheet metal. I was stuck for a bit. I'm just about finished with the welding on the tub. After that's done, I'm going to cover the underside and inner tub with Chassis Saver and Monstaliner. I may have the tub back on the frame this spring, and will post a full update with pics when that's done.

Recommended Posts
Create an account or sign in to comment
You need to be a member in order to leave a comment
Create an account
Sign up for a new account in our community. It's easy!
Register a new accountSign in
Already have an account? Sign in here.
Sign In Now