


ghetdjc320
-
Posts
5079 -
Joined
-
Last visited
-
Days Won
1
Content Type
Profiles
Forums
Gallery
Everything posted by ghetdjc320
-
On mine, the top corners had solder but the lowers did not. I used seam sealer on all the overlap joints. Also used some to form a bit of a slope in the corners to get the water to flow out better. I’ll see if I can find some pics of what I did.
-

Power door and window wiring questions
ghetdjc320 replied to ghetdjc320's topic in MJ Tech: Modification and Repairs
I guess I Can comment on the topic. After more research, it’s a very simple design. The cross cab harness does incorporate a few extra items that will not be used and I’ll be adding the wiring for the power mirrors but the windows and locks are straight forward. The tan single wire get fused 12v from the fuse box and is the power window + input. The ground is the black 14awg wire that is in the green connector. With those two wires plugged in all the windows work. The door locks are a “positive” switches setup. You’ll need to 5 pin micro relays along with the terminals and sockets. I’m using the factory electrical manual to recreate the relay configuration needed. Will post up the info on my build thread once I get to interior electrical. -
That’s also the reason why I cringe at someone saying they have a “rust free” truck. It’s hiding there somewhere, you just can’t see it yet. Factory workmanship was horrendous, though probably on-par for that time period. It will be great knowing that it’s done right
-
Project “Tomahawk”
ghetdjc320 replied to ghetdjc320's topic in MJ Hardcore Tech: Epic Journeys to Greatness
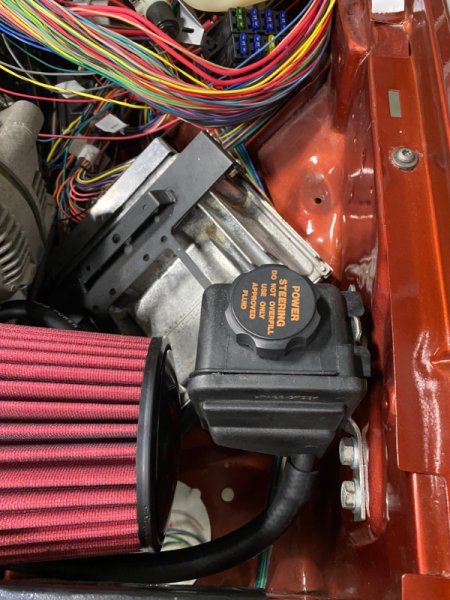
Lot of small things accomplished. Fabed up a bracket and relocated the power steering reservoir to clear the intake. The bottom of the reservoir is still higher than the top of the pump for a good gravity feed. Planning and engineering the layout under the hood is quite a task. Once the components are all where they need to be, wiring will commence which is actually the easier part at this point. Still have to install the accessories tray for the compressor and pdc area, install the condenser, compressor, radiator overflow and starter.

-
Project “Tomahawk”
ghetdjc320 replied to ghetdjc320's topic in MJ Hardcore Tech: Epic Journeys to Greatness
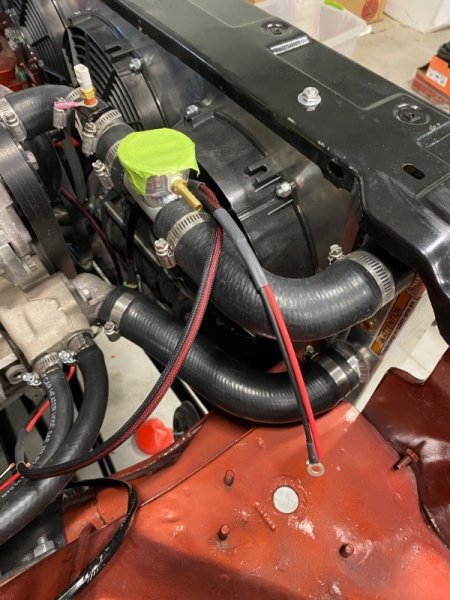
Lower radiator hose installed. Added an inline spot for temp probe but also had to add a ground to the sensor body since it can’t get engine ground where it’s at. Complete the intake as well. Building the shelf for the electronics and compressor now.

-
Forgot to mention, but make sure you have a small unobstructed and sealed “channel” in each lower corner of the windshield frame that will allow water to drain out down through the cowl to fender seam.
-
Yep that should work. Just give that aersosol 2 part epoxy some heat to cure if you can. Once it dries to the touch and is no longer soft, hit it with a heat gun, heat lamp or just leave it in the sun for several hours. I’ve noticed the aerosol 2k primers take longer to cure as hard as the ones you mix and shoot in a gun. If you can, I’d even give it a few days to cure.
-
I used one of those oscillating tools with a fine metal blade. It works excellent and save a lot of time removing all the old urethane. Also cleans up the rust very nicely. I would suggest some POR15 followed by some good medium bodied 2 part seam sealer in those corner seams. The medium bodied stuff should flow into the seams a bit. When it’s all done, mask off surrounding areas and shoot it with 2 part Roxy primer and let that cure before installing the windshield
-
Project “Tomahawk”
ghetdjc320 replied to ghetdjc320's topic in MJ Hardcore Tech: Epic Journeys to Greatness
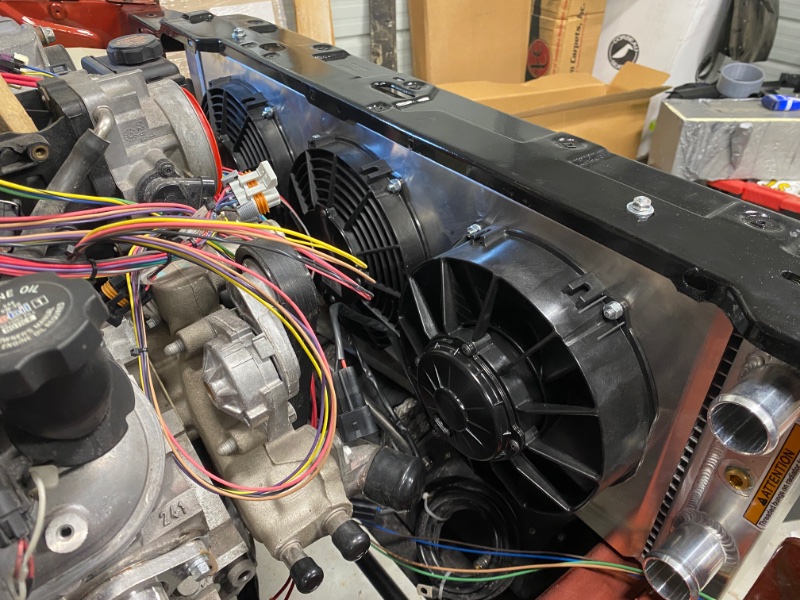
The core is a solid 3.25” thick. It’s quite an epic radiator -
Project “Tomahawk”
ghetdjc320 replied to ghetdjc320's topic in MJ Hardcore Tech: Epic Journeys to Greatness
Will fab up a bracket to relocate the power steering reservoir to the drivers side inner fender. The bottom of the outlet will be at 37” from the ground and the top of the inlet is at 35” so there should be zero starvation issues there. Will take some creative hose routing though for sure. -
Project “Tomahawk”
ghetdjc320 replied to ghetdjc320's topic in MJ Hardcore Tech: Epic Journeys to Greatness
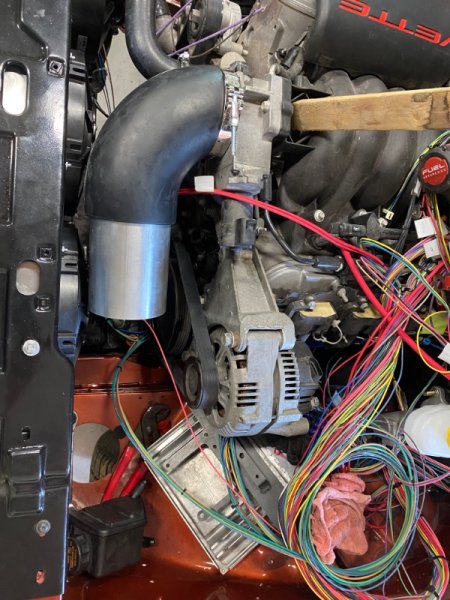
Going to extend the intake 3” longer to get it closer to the factory position. Tight fit but was able to keep 4” tubing throughout and it looks very clean. I just didn’t want the intake in the hot side of the radiator. I’ll duct the original opening for the air intake to dump right on the new filter.
-
Project “Tomahawk”
ghetdjc320 replied to ghetdjc320's topic in MJ Hardcore Tech: Epic Journeys to Greatness
Coming along nicely. Can’t say enough about this Novak radiator. I bought the complete system with fans and shroud all pre-assembled. All the fans are genuine Spal units and the hot side of the radiator has a larger fan that the other two aux fans. It also just so happens that the word “Comanche” is the same length as the word “corvette”… that leads to an interesting idea

-
Project “Tomahawk”
ghetdjc320 replied to ghetdjc320's topic in MJ Hardcore Tech: Epic Journeys to Greatness
Keep in mind that this isn’t a cover they stock. They can custom make it though but you’ll have to send them the specs. I ordered mine February of last year. -
Intermittent wiper module repaired
ghetdjc320 replied to The86manche's topic in MJ Tech: Modification and Repairs
I have one I’d like to get tested and repaired. Let me know -
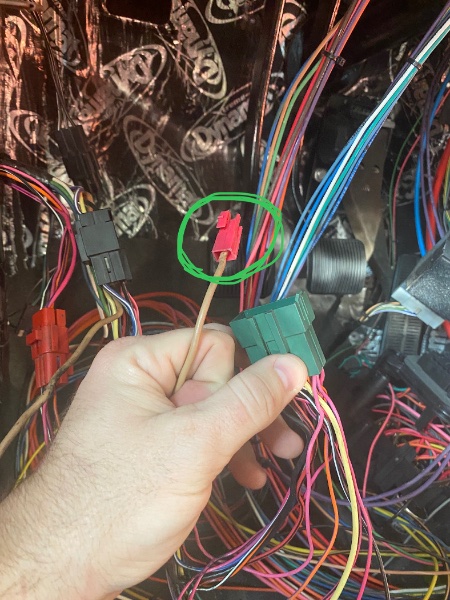
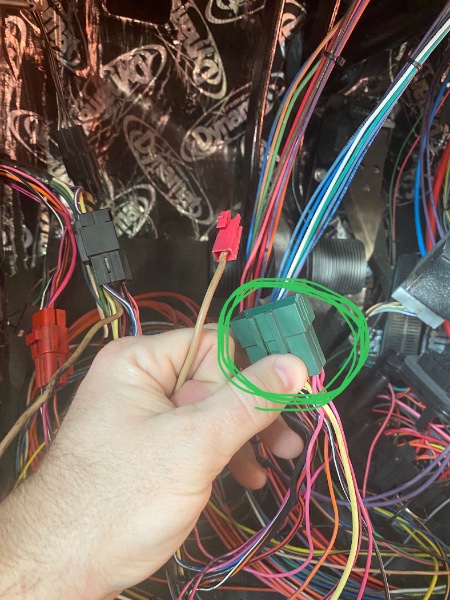
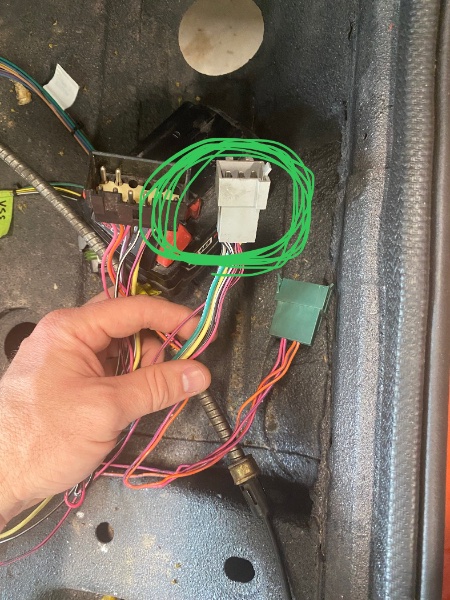
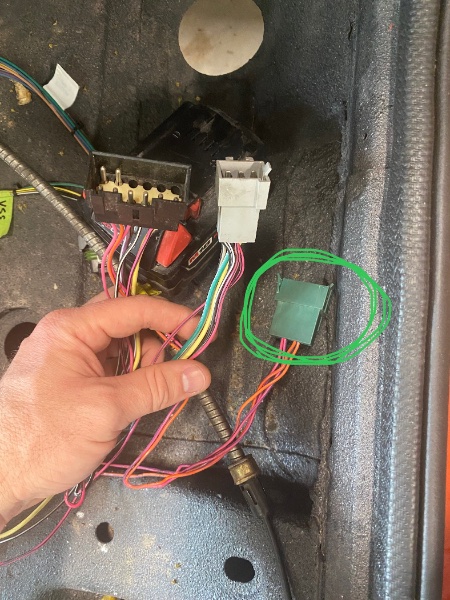
So I have between a 94-96 XJ 2dr door and cross cab harnesses. I have the door locks and window motors all wired to the harness and have connected the cross cab harness as well. Each end of the cross cab harness has a connector that plugs into the door harness. I need to identify what three of these connectors go to as I don’t have an oem harness to connect it to so I’ll have to build it and improvise. Here is what I have so far. In picture 1 (drivers side), I assume this is the power window power wire that goes to the fuse box but would like to get confirmation In picture 2 (drivers side), I need to identify what circuits connect to this green connector. I’m assuming again that door lock relays connect here along with maybe power and grounds? Need some info on this. In the third picture (passenger side), I need to identify what circuits plug into this grey connector. In pictures 4 (passenger side), I believe this is the connector for keyless entry as those two wires are for the door locks only. If someone can confirm that would be great. Thanks in advance for any help as I get this wiring sorted. For reference, this is part of my “Tomahawk” build project in Epoc Tech. I’m running a 23 circuit painless harness. I have fused circuits from the fuse box for both the power windows and locks. I also have a simple 1-way Viper keyless entry/alarm module I’ll be installing.
-
Project “Tomahawk”
ghetdjc320 replied to ghetdjc320's topic in MJ Hardcore Tech: Epic Journeys to Greatness
I did and I’m in the process of identifying everything. The power windows are very simple as they pretty much just get power and ground and the harness takes care of the rest. The power locks are a bit more complex as they use a relay system I’m trying to figure out to integrate into the harness. My harnesses are from a 94-96 XJ. I’m about to post some tech questions about this harness setup to get some insight on the connectors. -
Project “Tomahawk”
ghetdjc320 replied to ghetdjc320's topic in MJ Hardcore Tech: Epic Journeys to Greatness
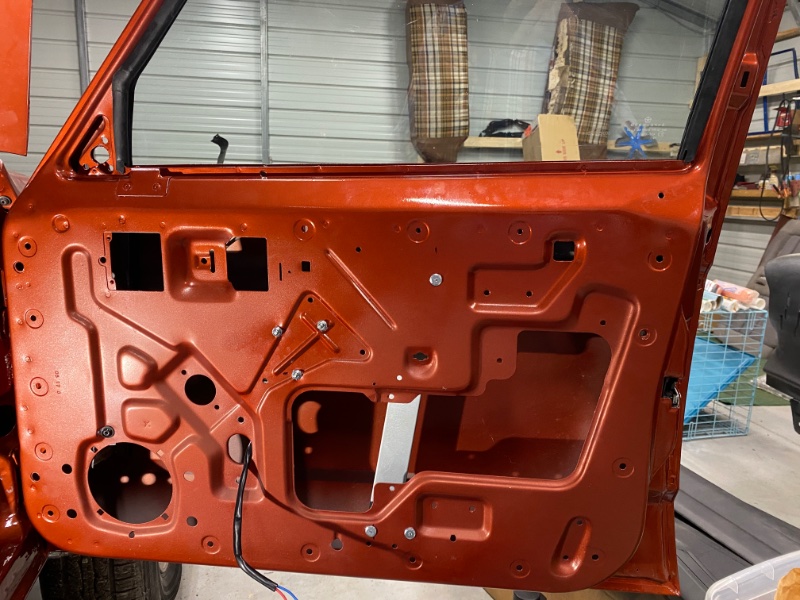
Full size power glass installed with 97+ regulators and power locks installed. Lots of work but I was able to mirror the other side that I had already done.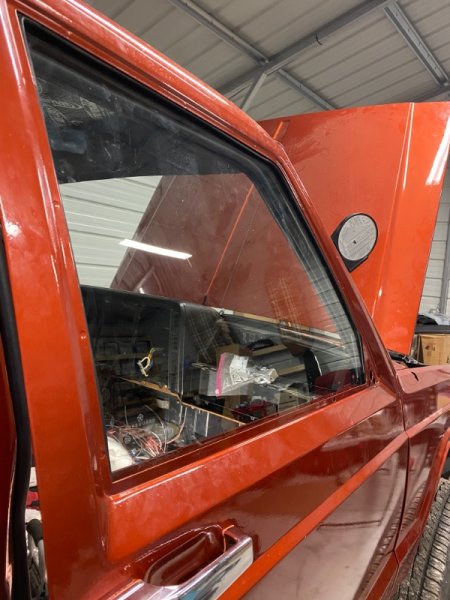
-
Project “Tomahawk”
ghetdjc320 replied to ghetdjc320's topic in MJ Hardcore Tech: Epic Journeys to Greatness
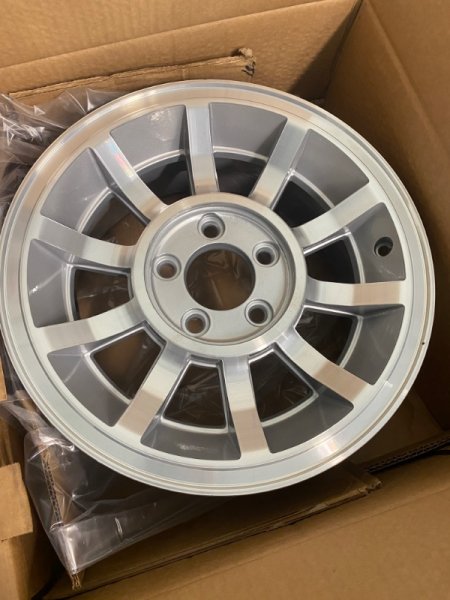
Made new door handle gaskets. Also going to get these wheels wrapped in some 31” BFGs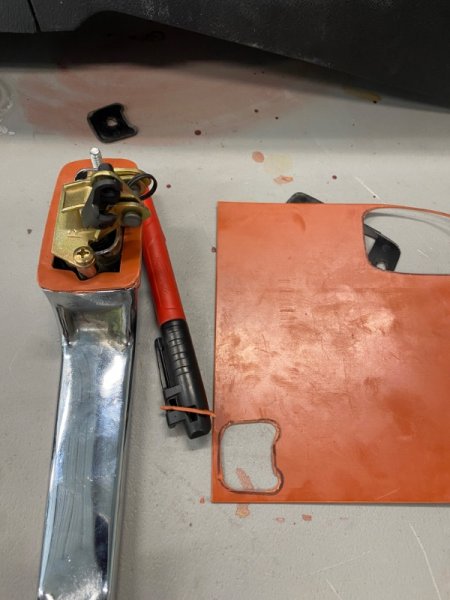
-
Project “Tomahawk”
ghetdjc320 replied to ghetdjc320's topic in MJ Hardcore Tech: Epic Journeys to Greatness
Yes it is. I was able to get the company to make another custom one -
Project “Tomahawk”
ghetdjc320 replied to ghetdjc320's topic in MJ Hardcore Tech: Epic Journeys to Greatness
By far the nicest bed cover I’ve ever come across.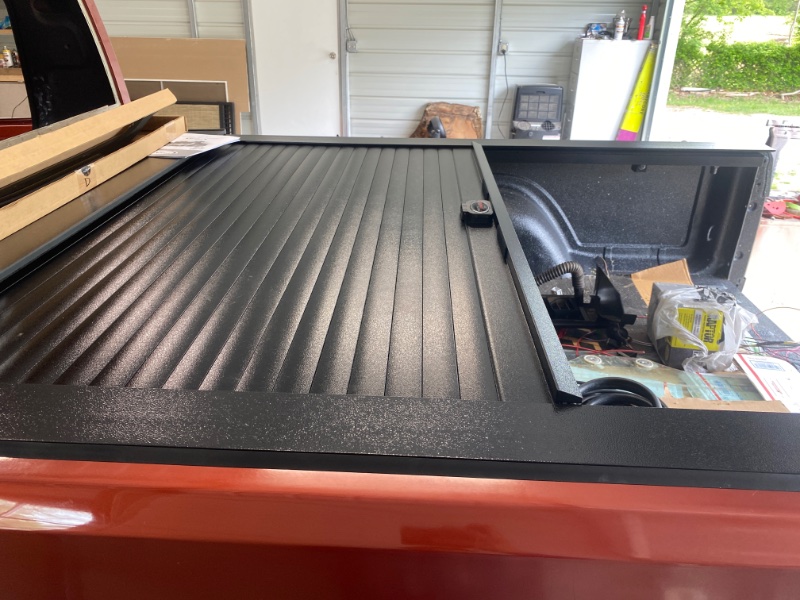
-
The TDS for most window urethanes indicates there should be no paint in the jamb. Only fully cured 2 part epoxy primer (note that even the factory ignored this). On my build I primed then seam sealed the corners and primed again.
-
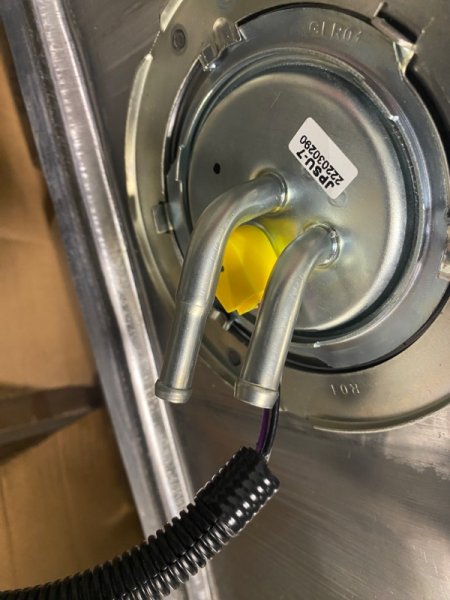
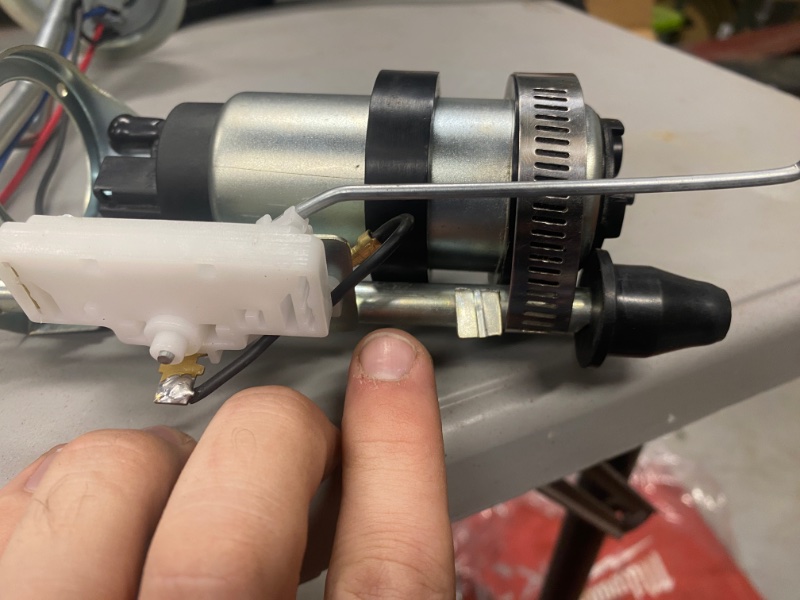
Project “Tomahawk”
ghetdjc320 replied to ghetdjc320's topic in MJ Hardcore Tech: Epic Journeys to Greatness
Here is the completed fuel sending unit with the DW200 pump. Tank is ready to install.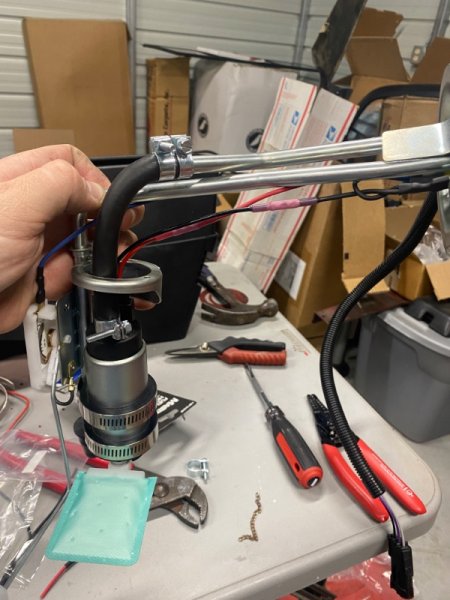


-
Project “Tomahawk”
ghetdjc320 replied to ghetdjc320's topic in MJ Hardcore Tech: Epic Journeys to Greatness
Moved from the garage to the shop. For those who are curious, I’m running a Deatshwerks DW200 pump which is considerably smaller than the oem pump. It’s a turbine unit which is typically smaller. I’m running an MTS sender for the MJ and removed the lower pump bracket. I reused to of the rubber spacers from the old airtex style pump and added them to the DW pump. I then used two stainless band clamps to secure it to the return line tube. I retained the upper pump bracket to keep the clocking correct. Going to browse for an appropriate strainer for this custom setup at the local parts store. I’ve also decided to nix the LS filter/pressure regulator setup in favor of a fuelab regulator mounted around where the old map sensor location was. Will add a Russell silicone filled pressure gauge also and all AN fittings. I think I’ll retain the oem Jeep filter and filter location but that’s still TBD.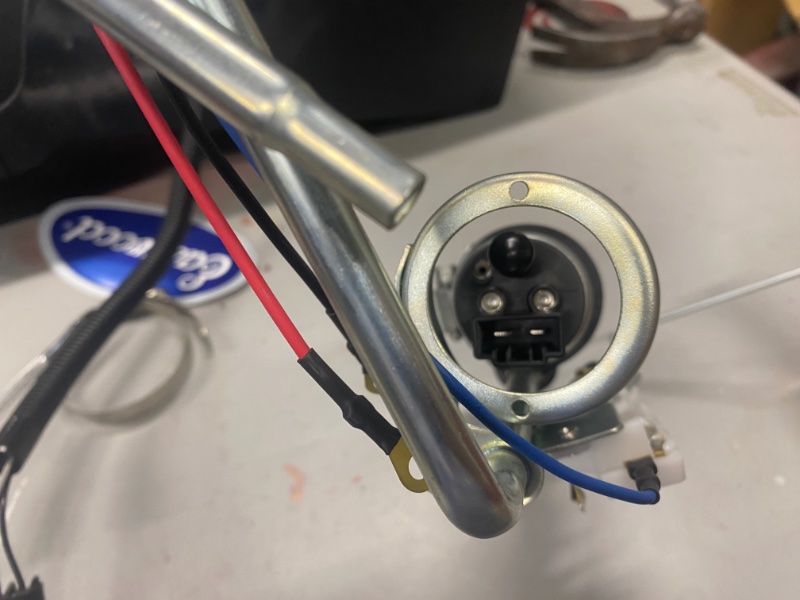
-
Project “Tomahawk”
ghetdjc320 replied to ghetdjc320's topic in MJ Hardcore Tech: Epic Journeys to Greatness
So it turns out that the driver side door is slightly smaller by about 1/8” lol. No wonder I was having trouble with the gaps. Anyways, I kept working with shim packs and alignment until I got it absolutely perfect in the frame. The door to b pillar is exactly 3/16 top to bottom and the a pillar to door is exactly 1/4”. -
Project “Tomahawk”
ghetdjc320 replied to ghetdjc320's topic in MJ Hardcore Tech: Epic Journeys to Greatness
Thanks! Everything is lining up nicely except the drivers door.