


cruiser54
-
Posts
9413 -
Joined
-
Last visited
-
Days Won
14
Content Type
Profiles
Forums
Gallery
Everything posted by cruiser54
-

No turn signals or wipers
cruiser54 replied to Comanche chief 87's topic in MJ Tech: Modification and Repairs
Blower motor work? -
First long drive in new to me MJ.
cruiser54 replied to CoastChief's topic in MJ Tech: Modification and Repairs
While we're on the topic, I want to talk about another potential MJ fire hazard. The blower motor switch. Yet another sad tale of full accessory current being passed through a switch. Over time, the blower motor can develop friction in its bearings. Thanks to this resistance, the blower motor draws more current than designed, but not enough to blow the fuse. If it gets bad enough, this excessive current draw can cause the fan speed switch and the connector on the back of it to get hot enough to start melting. Let this go on for long enough and your truck burns down. I've seen this happen enough that I recommend preemptively replacing the blower motor and inspecting the fan speed switch connector for any signs of heat damage. Clean the contacts for the switch connector while you're in there. This is a high current circuit anyway, so it's very important to have low resistance at all of the connections. CRUISER'S MOSTLY RENIX TIPS IMPROVING BLOWER MOTOR PERFORMANCE NOVEMBER 28, 2015 CRUISER54 24 COMMENTS On 87 to 90 MJs and XJs, the blower motor’s factory grounding point is on the driver side inner fender under the sheet metal screw. This ground is shared with windshield wipers, front windshield washers, rear windshield washers, AC clutch relay, fan control relay, fog lamps, fan motor, headlamps, front turn signals, front side markers, and park lamps. So your blower motor has its ground point 10 feet away from where it is located!! What we’re going to do is leave that ground intact and also ground the blower motor on the passenger side inner fender much closer to the blower motor itself. This will also benefit the other components on the factory ground circuit. Take this opportunity to refresh the factory ground as a matter of course. Remove the screw, scrape the surface to bare metal and reinstall the screw securely. Here’s what I do to get the ground much closer to the blower motor and add another ground point to this overloaded ground circuit. Find the blower motor connector on the passenger side. Red and Black two wire connector. Find a location where the black wire can be made to reach the passenger side inner fender, and cut the wire. You may have to do some rerouting of the harness to achieve this. Take both cut pieces of wire and put them together into a yellow eyelet and crimp. Fasten the eyelet to a place on the passenger side inner fender with a sheet metal screw after applying OxGard to the contact surfaces. Be sure to scrape the attaching point on the fender to bare metal first. Your blower motor will now turn faster and last longer, and the other electrical components on the circuit will benefit from a better ground path. -
First long drive in new to me MJ.
cruiser54 replied to CoastChief's topic in MJ Tech: Modification and Repairs
Just teasin ya!!! -
First long drive in new to me MJ.
cruiser54 replied to CoastChief's topic in MJ Tech: Modification and Repairs
Yeah. We walked you through that when you were still in diapers.......
-
WJ Booster/MC Conversion & Distro/LSV Delete?
cruiser54 replied to jrl3's topic in MJ Tech: Modification and Repairs
The distro block is exactly that. A block. The passages to the front brakes are smaller than an XJ. -
The blowby issue is an easy fix. CRUISER'S MOSTLY RENIX TIPS CRUISER’S VALVE COVER MOD NOVEMBER 17, 2015 SALAD 44 COMMENTS Most early and even later Renix 4.0s could be bothered by excessive oil in the air cleaner box. A fix from my old days as Service Manager at a Jeep dealership follows. Information was provided to me from a buddy at JeepTech during those days. I don’t believe it ever came out in a Technical Service Bulletin. Remove the valve cover and turn it over. Next, remove the fluted tubes that are now facing you by removing three screws on each. Chop 1 inch off each of them. Then, drill a half inch hole as shown in the photo. The flat side of the flute that’s closest to the edge of the valve cover. Clean and de-burr/sand all rough edges nicely, clean with solvent, and reinstall. Don’t be concerned about the chintzy gaskets that will probably crumble into oblivion when you remove the fluted tubes. They can go back together without gaskets. Here’s a handy video from my friend Brendan showing more detail.
-
checked fuel pressure?
-
Keep us in the loop.
-
Most likely the track bar BRACKET TO FRAME RAIL bolts need to be tightened. Don't just look at them. Tighten them. Known issue from the factory.
-
My website has info regarding upgraded ECU s for Renix.
-
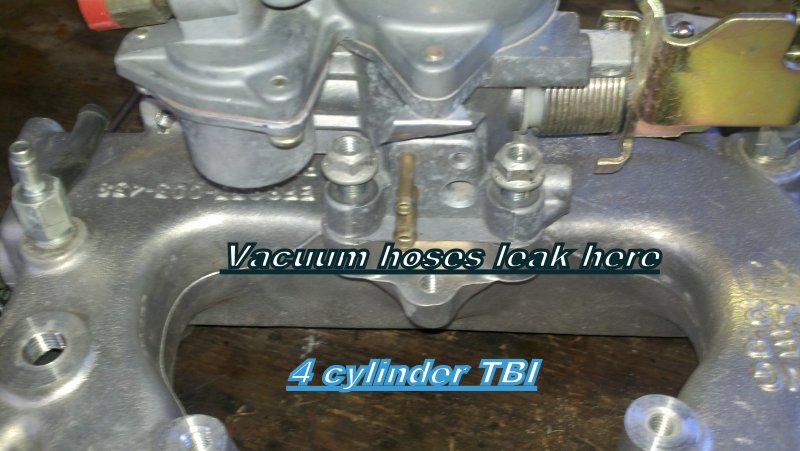
Make sure the intake manifold bolts are snug. Inspect these hoses closely.
-
Nicely done. Have you checked the intake manifold bolts?
-
Fuel pump still won’t work
cruiser54 replied to KatahGii's topic in MJ Tech: Modification and Repairs
Both of them. The one Pete posted also. -
Fuel pump still won’t work
cruiser54 replied to KatahGii's topic in MJ Tech: Modification and Repairs
Nice to know you've got my back!! LOL. Use that stuff!!! -
Fuel disconnects Quick disconnect part numbers The Napa part numbers for just o-rings *is: Napa 730-5018 3/8 Viton individual o-rings Napa 730-5017 5/16 Viton individual o-rings *Remember to re-use your old spacer between the 2 new o-rings!! Napa CRB 212305 fuel line repair kit 5/16 Dorman 800-750 trans line repair kit 3/8 Mopar repair kits: 83502745 fuel line repair kit 5/16 83504447 fuel line/Trans line repair kit 3/8
-
Fuel pump still won’t work
cruiser54 replied to KatahGii's topic in MJ Tech: Modification and Repairs
I'm glad to see you guys are using my photos!! That's what they're there for. -
Advice Needed my MJ is sick
cruiser54 replied to watchamakalit's topic in MJ Tech: Modification and Repairs
Yep^^^^ -
Advice Needed my MJ is sick
cruiser54 replied to watchamakalit's topic in MJ Tech: Modification and Repairs
It's very common for the gasket to leak oil there. Heads rarely warp unless overheated badly. A good Felpro gasket should work just fine. -
First long drive in new to me MJ.
cruiser54 replied to CoastChief's topic in MJ Tech: Modification and Repairs
Get the Tips done first.
-
No. They don't have to comply. We're talking simple punctuation here. Not grammar. They'll just get less input as a result of 2 things. 1-The posts are hard to understand and are therefore difficult to respond to accurately. This benefits nobody. 2-It's my choice, and the choice of others, NOT to bother hurting our heads trying to decipher unpunctuated and uncapitalized posts. Do what you wanna do to benefit yourself the most. I'm just stating the facts. Is it that much effort to use punctuation that it would be an issue for someone asking for free help from one of the best Jeep forums to be found? Don't strain yourselves......
-

-
Advice Needed my MJ is sick
cruiser54 replied to watchamakalit's topic in MJ Tech: Modification and Repairs
2. Except where ya gonna put your temp sender? 4. Just put a head gasket in. -
Sorry, but I don't respond to posts/threads with no punctuation.

-
Advice Needed my MJ is sick
cruiser54 replied to watchamakalit's topic in MJ Tech: Modification and Repairs
2. Except where ya gonna put your temp sender? 4. Just put a head gasket in. -
cab side vent covers