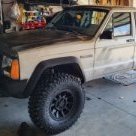
JimBorecky Posted November 4, 2019 Posted November 4, 2019 New Novak LS engine mounts almost in a couple more holes to drill. The old 2.5L mounts, no that is not me. :) Old tired four banger getting ready to be pulled. No more sewing machine under the hood, it served me well. Sitting in the driveway after the Axle swap from a Cherokee and Newish wheels. Refreshing the interior a bit. Before the project started: When I bought it 30 year ago, yes I'm the original owner.
krustyballer16 Posted November 4, 2019 Posted November 4, 2019 You have to drill additional holes to use the Novak mounts? I have a set that I plan to use. What is your setup snd plan for this truck?Sent from my SM-G973U using Tapatalk
JimBorecky Posted November 4, 2019 Author Posted November 4, 2019 Yes, most of the holes are already there. I believe you need to drill two additional holes on both sides. Planning to transplant a 4.8L/4L60E from a 2002 Yukon.
krustyballer16 Posted November 4, 2019 Posted November 4, 2019 Yes, most of the holes are already there. I believe you need to drill two additional holes on both sides. Planning to transplant a 4.8L/4L60E from a 2002 Yukon. Hmm, didnt know that. Guess I'll find out when I start on the build. I've got a 99 6.0L/2wd 4l80e to put in an eliminator that I'm gonna lower a little bit. Make it into sort of a drag truck Sent from my SM-G973U using Tapatalk
JimBorecky Posted November 4, 2019 Author Posted November 4, 2019 Yeah the plan is not to go too crazy with this "rebuild". The list of things that need to be replaced, keeps growing.
JimBorecky Posted November 24, 2019 Author Posted November 24, 2019 Some more progress today. My son and his friend are moving right along. Some close up pics. They struggled with the novak transmission mount for the 4l60e a little. Might have to be modified at a later date, but should be good enough until I break it. LOL Also found out the f-body water pump still will need spacers to line up. I'll post links to everything I bought for this build at the end.
thecodemonk Posted November 25, 2019 Posted November 25, 2019 F-body pump fits narrow and mid spacing...2010 camaro pump fits truck spacing but puts one of the connections for the hose potentially on the wrong side (depending on your radiator). The build looks great! I'm excited to see this continue to progress! :)
Drahcir495 Posted December 14, 2019 Posted December 14, 2019 The original owner - very cool! It is going to be like a new Jeep.
JimBorecky Posted December 19, 2019 Author Posted December 19, 2019 Not much has been done. I managed to delete the VATS out of the PCM last night with little trouble. Water pump is mounted. The alternator is a little high and some hood support trimming might be needed to keep it from rattling. Might have choosen a different relocation set if I had known. But looks good.
JimBorecky Posted January 6, 2020 Author Posted January 6, 2020 So I've been playing around with a few ideas. Haven't started wiring yet. Bought a newer gauge cluster off of Ebay(91-96). Going to add jeep temp and pressure senders to the block. I've done some various reading and found out the tach is adjustable. Since I spent all that money on a HP Tuner, going to attempt to drive the tach and speedo with the chevy PCM, making whatever adjustments I need in the PCM. Has anybody tried this?
JimBorecky Posted January 6, 2020 Author Posted January 6, 2020 BTW I took the tach out and drilled a hole in the casing so that I can adjust it while it's plugged in.
JimBorecky Posted April 3, 2021 Author Posted April 3, 2021 Ok so after some covid delays and a few minor set backs. We have a running engine. And drive train. Just need to clean up some things and fix the headlight where someone ran into it and I'll have a operating truck!!!!! 932858526_20210328_1811552.mp4
JimBorecky Posted April 5, 2021 Author Posted April 5, 2021 Some more pics. I'd like to find a better way to do some of this, but as I said this was being done by my son and his friend. So I'm very thankful.
fiatslug87 Posted April 5, 2021 Posted April 5, 2021 Congrats on getting it running!! Pease add it to the Registry And you should also add yourself to the Original Owners thread:
JimBorecky Posted May 10, 2021 Author Posted May 10, 2021 Gauge Update This is just a write up on how I updated my 89 Comanche to have stock looking gauges with an LS Swap. I wrote this to help someone save a little money, as I did a LOT of experimentation here, and spent lot more money than I needed too. Of course your mileage may vary. First goal was to ditch the old cluster with idiot lights for electronic gauges. So I bought a 91-96 Jeep Cherokee Factory Speedometer cluster from ebay for $60 After much research and gnashing of teeth I was able to come to the conclusion that I might be able to drive a Jeep Speedometer and Tachometer from the VSS out and Tach signals of the Chevy PCM. So my plan was to use Jeep sensors for the Oil and Temp and tie the PCM straight to the electronic speedometer and tach. So my adventure began. My first goal was to make ready the Cluster. I had done some various reading and found out the tach is adjustable depending of if you had a 4 or 6 cyl. Since I spent all that money on a HP Tuner, I was going to attempt to drive the tach and speedo with the chevy PCM, making whatever additional adjustments I needed in the PCM. So I took the tach out and drilled a hole in the casing so that I could adjust it while it's plugged in. You could do this with the tach still in the casing but I wouldn’t recommend it. I also rolled the Odometer to match mine, which is NOT for the faint of heart. Also be very careful when adjusting the potentiometer it’s really not made for the abuse. Picture of old Cluster and Connection Picture of new Cluster and Connection PinOut: Function Old Gauges Colors New Gauges Lamps 1 Orn/Blk A7 Oil Gauge 2 Lt Blu B7 Not Used – Alt Lamp 3 Tan/Grn - Lamps 4 Orn/Blk A7 Lamps – GND 5 BLK A3 Ign (Oil and Volt) 6 Wht/Blk A8 RH Turn 7 Brn B6 High Beam 8 Wht A4 Lamp 9 Orn/Blk A7 GND 10 BLK A3 LH Turn 11 Gry/Blk A2 Tach 12 Grn/Wht A6 Ign 13 Wht/Blk A8 Temp 14 Vio A1 Not Used – Fuel 15 Tan - Lamps 16 Orn/Blk A7 Fuel Gauge 17 Tan B1 Low Fuel 18 Wht/blk - Speed New wire Pick a color A5 GND!!!! New Wire BLK B2 Note: Oil, Temp, and Tach I used the existing wires through the firewall. On my Comanche at C100 I had (Oil-C6),(Temp-D2), and (Tach-C3) you can chase further down the stream based on your application. On the PCM side of the house the Red connector holds both Speed-pin 50 DkGrn/Wht and the Tach-pin 10 Wht. So after wiring up the cluster and accepting defeat too quickly I purchase a Digital Dakota SGI-100BT. After sticking it in line with A5 and A6, I still had no gauges - UGH!!. I later discovered that I missed a GND to B2. Suddenly the tach and speedo came to life. It’s highly possible that I didn’t need the SGI-100BT, but liked the fact that I could fine tune the tach and speedo by bluetooth, which means if I change tire sizes or gears later I have less guessing. So I left it in. If you discover that you don’t need it you can leave info in the comments. Chevy PCM Settings: VSS out 4000 ppm SGI-100BT Settings: When I went to mount the oil pressure sender, I discovered that the block had an old block heater in the way. Something I definitely don’t need here in North Carolina. I decided to take advantage of the location to place both the oil sender and temp sender closer together, which required a little more work from a mechanical point, but made wiring easier. I bought a ICT Billet LT Gen V Engine Block M12-1.5 Coolant Crossover Feed Adapter to fill the hole in the block where the block heater stood, then drilled and tapped the hole to 3/8 NPT to hold the temp sender. (You’ll find out later that I didn’t need to do this). After wiring and mounting the senders, I found out that the white wire in the harness I purchased for the oil pressure was not the signal. The black wire was. This pegged out my gauge, which didn’t hurt anything, so I swapped the wires and left the white wire unattached, This fixed the gauge. So after getting all the air out of the system and finding a happy 180 degrees through the PCM. I noticed that the temp gauge was about 50 degrees off. After researching some more I found out I bought the wrong temp sensor . The 4.0L I6 has two!! One for the gauges and one for the PCM. WTF! Oh and finding a connector/pigtail for the gauge one outside a junkyard. Impossible. So I did a little temporary jeep engineering. First I cut a screw to fit over the proper sensor. Be sure to measure your connector. My screw was too big and I had to grind it down. Placed over the terminal. Then filled with epoxy: After cutting off the screw head I was left with a post. I ended up going to the head location because I didn’t want to drain the coolant again, and was able to stop up the hole with my finger. Fortunately I had left plenty of wire to relocate. Wrong one: https://pe-ltd.com/assets/coolant_temp.pdf Note: I notice that with all the adaptors on the sensor that it took a little while to come up to temp, but eventually settled in. I will most likely buy another sensor and adaptor for the lower location, and swap out the next time I need to drain the coolant. I left plenty of wire just in case. May also hunt down the pigtail in the yard next time I’m there. This is what it looks like. If someone has a part number please let me know. Gas gauge is another story. Apparently Chrysler reversed the ohm level for the float. So even though I know the fuel tank is full the gauge is pegged out at empty with the light on. I can live with that for a little while. Or at least until the tank isn't full. You can find out more info here: https://comancheclub.com/topic/15047-ho-fuel-sending-unit/ Hope this helps someone. Items used: 91-96 Jeep Cherokee Factory Speedometer cluster – ebay.com Delphi 16 Way Black Micro-Pack 100 Unsealed Female Connector - https://www.eficonnection.com/ Delphi 16 Way BLUE Micro-Pack 100 Top TPA - https://www.eficonnection.com/ Delphi 16 Way BLUE Micro-Pack 100 Bottom TPA - https://www.eficonnection.com/ Delphi Micro-Pack 100 Female Unsealed 20-22ga Terminal - https://www.eficonnection.com/ Delphi Micro-Pack 100 Female Unsealed 18-16ga Terminal - https://www.eficonnection.com/ Delphi TS10019 Engine Coolant Temperature Sensor ACDelco PT2386 Professional Multi-Purpose Pigtail Crown Automotive 56027012 Temperature Sensor Standard Motor Products PS257 Oil Pressure Sender Standard Motor Products S727 Pigtail/Socket Digital Dakota SGI-100BT My LS Swap Included: ICT Billet Oil Pressure Sensor Relocation Adapter Port LS ICT Billet LT Gen V Engine Block M12-1.5 Coolant Crossover Feed Adapter Auto Meter 5284 LS Install Kit – Only used one fitting here. Might consider another product. ICT Billet LS Master Adapter Set Engine Oil & Coolant Sensor Specs: 93 or 96 Cherokee ohms 89 Comanche ohms Oil 0 psi 1 1 40 psi 46 ??? 80 psi 87 88 Gas Empty 105 0 ½ tank 33 ??? Full 5 88 Temp ---------- 100 Degrees – 1365 ohms 100 Degrees – 1600 ohms ---------- 220 Degrees – 93.5 ohms 180 Degrees – 309 ohms ---------- 260 Degrees – 55.1 ohms 240 Degrees – 113 ohms
JimBorecky Posted May 14, 2021 Author Posted May 14, 2021 I promised a rough list of what this took for the LS transplant and here it is. I may edit as I remember other things. Novak RMU Mount, rear, transmission, polyurethane, Jeep, Novak style 1 Novak LSXJ3 Headers, exhaust, GM Gen III V8 engines in XJ Cherokees / MJ Commanches, natural steel finish 1 Novak MMXJ3 Kit MMXJ3, engine mounts, GM Gen III engines into XJ Cherokees & MJ CommanchesICT Billet (LS1 Camaro to Truck) Water Pump Spacer .7" Adapter Swap kit LSX LS LS3 LQ4 GTO 551690-71 Auto Meter 5284 LS Install Kit LS ENGINE ECM MOUNT ICT Billet LS Truck Alternator Bracket Kit LSX LS3 LQ4 LQ9 L33 LR4 5.3L 4.8L 6.0L 551750-3 HiwowSport Billet Aluminum Thermostat Housing for Chevy,GMC,LS Series Silver OAW G7290 Engine Water Pump for Chevrolet Camaro Corvette & Pontiac Firebird GTO LS1 LS6 5.7LCT Billet 5.3L LS Heavy Duty Truck Power Steering Bracket Kit for Saginaw Pump Relocation swap 4.8 6.0 4.8 6.0 551321-3 Kyostar Throttle Position Idle Air Control Throttle Body Sensors TPS IAC For LS1 LS2 LS6 LSX LS7 Goodies Speed 75116 - Fuel Filter/Regulator 58 PSI Kit with AN-6 Fittings for LS swaps and EFI conversion QIKE 4AN Nylon Braided CPE Fuel Line Kit 10FT Set (6AN) OzCoolingParts Pro Top 3 Row Core Aluminum Radiator + 3 x 9" Fan w/Shroud + Thermostat/Relay Wire Kit for 1984-200 Jeep Cherokee XJ/Jeep Comanche Alex Tech 25ft – 1/4 inch Split Wire Loom Tubing Wire Conduit – Black Dakota Digital SGI-100BT Universal Speedometer and Tachometer Interface Dorman 47076 Vacuum Amplifier Coolant Overflow Tank Recovery Bottle Overflow Expansion Reservoir Replacement for 91-01 Jeep Cherokee SUV 91-92 Comanche 52027984 HP Tuners MPVI2 VCM Suite Standard (2 Universal Credits) Lokar XCOS64L60EEB Ls6 intake manifolds with fuel rails injectors Ls2 lsx lq9 4.8 ls1 Fbody... Various connectors, hoses and fasteners as needed. Donor for LR4, 4L60e, and 261 GM transfer case with wiring harness. Donor for Dana 30 and 35 axles. Rims and Tires from craigslist. Sold old 2.5L with AX4 for $500 Generic transmission cooler. Lift kit from who knows where? FYI - This was not a cheap thing to do. I'm in roughly $4-5K. But I definitely like it. There is no lack of power and the Chevy power steering pump does a better job of driving the power steering box than the AMC did. I have no hint of death wobble any more, and although there is more road noise it drives well. I also bought things that didn't get used, that I'm not factoring in here.
JimBorecky Posted January 3, 2022 Author Posted January 3, 2022 Engine bay starting to become crowded.

Recommended Posts
Create an account or sign in to comment
You need to be a member in order to leave a comment
Create an account
Sign up for a new account in our community. It's easy!
Register a new accountSign in
Already have an account? Sign in here.
Sign In Now