The_Anvil_Grey_Comanche Posted May 10, 2019 Posted May 10, 2019 Here is my start to a thread on my 1989 Jeep Comanche short bed. I'll be uploading pictures and info along the way. I found this truck on Craigslist in need of a new home. It started out as a 4.0L 5speed 2wd Pioneer. Previous owner had it for years and was given it but his brother. They had it restored 8-10yrs ago. Engine completely rebuilt, full paint job, graphics, etc. However one day while driving it the truck started smoking from the dash and then went ablaze. Luckily they were able to put it out before anymore damage. I bought it as is after sitting abandoned for 7yrs. The body was super straight and solid so that was a plus. Once I got it home I began teardown to see what all I was going to need to get this thing back on the road again.
The_Anvil_Grey_Comanche Posted May 10, 2019 Author Posted May 10, 2019 Got the interior gutted of all the burnt stuff. Needed pretty much everything replaced. Found a small spot of rust in the passenger floor so replaced that section from a donor. Treated the rest of the rust and coated the whole interior with a heat and noise reducer. After that dried I added some Rattle Trap sound deadening mat. The donor XJ I bought was also an 89 and the original firewall insulation was in great shape. So I swapped that over. (Not pictured is where I added more sound deadening to the floors and back wall.)
The_Anvil_Grey_Comanche Posted May 10, 2019 Author Posted May 10, 2019 Now starts the reassembly. Purchased a donor 89 Cherokee 4.0L Automatic 4wd. This truck is being built for my wife as a daily driver and she wanted an automatic. So the engine harness, interior harness, and all 4wd parts are getting swapped over. While the dash was out I put in a new heater core and EVAP core. New dash cleaned and dyed. I'm using a product called Hi-Tech Vinyl/Plastic dye. The color is Doe Skin. Everything has been cleaned and dyed to look like factory. New carpet added. Also found a headliner board and covered it. The original seatbelts have been cleaned and am able to reuse them. Door panels and woodgrain are from a 95 XJ Country. (wife loves the woodgrain)
The_Anvil_Grey_Comanche Posted May 10, 2019 Author Posted May 10, 2019 I found some speaker grilles from the front doors of anothed XJ Country and modified the B Pillars to accept them. Made new speaker housings to hold a 5.25" speaker now.
The_Anvil_Grey_Comanche Posted May 10, 2019 Author Posted May 10, 2019 Found some replacement B pillar lights and dyed them to match as well. Got a tilt column with cruise and intermittent wiper. Took it apart and tightened it and added a new lock cylinder. Might as dye it too while I'm at it. About the only thing left I could use from the Jeep was the steering wheel. I soaked it in high concentrate cleaner overnight and it cleaned up nice! Dyed it and ready to use.
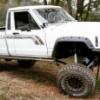
The_Anvil_Grey_Comanche Posted May 10, 2019 Author Posted May 10, 2019 Since this is going to be a daily driver I wanted a nice ride. I opted for a CavFab 4 link for the front along with their crossover steering. 3.5" Rubicon Express coils, extended stay bar links, Bilstein 5100s all around, full XJ AAL out back. While everything was apart I cleaned and painted the donor transmission and T case and undercoated the entire underside of the Jeep. I ended up having to get a new fuel tank and source a good sending unit from where the Jeep had sat for so long.
The_Anvil_Grey_Comanche Posted May 10, 2019 Author Posted May 10, 2019 The bed was taken off while the tank was out and cleaned and coated the remainder of the frame and underside. Not a dent in this bed floor! Wheels are tires I'm using are 17x8.5 Mayhem Scout in matte gold. Only available in the 5x5 pattern so running 1" adapters on them. Tires are Amp AT Pros in 265/70/17. With the adapters on I think it sits perfectly. Doesn't stick out too far. Added some JEEP decals to the centers to make them appear more stock.
The_Anvil_Grey_Comanche Posted May 10, 2019 Author Posted May 10, 2019 Cleaned up all the exterior parts and repainted them in a semi Flat black to freshen it up. Added some NOS Export Amber turn signals and clear aide markers. Wife wanted to add the bumper pads up front also. Sprayed a bedliner in it to protect the bed and we will still be using it as truck. Light duty only though.
The_Anvil_Grey_Comanche Posted May 10, 2019 Author Posted May 10, 2019 Now all the tedious stuff! Reassembled the interior. Had an old seat that was from my grey Jeep. Cleaned it up nicely and dyed the surrounding vinyl. Turned out nice!
The_Anvil_Grey_Comanche Posted May 10, 2019 Author Posted May 10, 2019 Made it just in time for it's first show at the Unlimited Off-road Expo in Nashville, TN this year. I was featured in the Dirty Life, Mayhem, and Amp Tires booth along with my other grey Comanche. I still have several things I want to do with this Jeep before I call it done but it is back on the road and driving again!
WahooSteeler Posted May 10, 2019 Posted May 10, 2019 C88, I talked to you about this on FB.........glad you posted here for all to see. Amazing job, one of the best looking MJ's I've seen, hands down.
JMO413 Posted May 12, 2019 Posted May 12, 2019 I have to ask what brand of corner lights are those. I got a set of clear Crown ones and they fit horribly.
The_Anvil_Grey_Comanche Posted May 13, 2019 Author Posted May 13, 2019 14 hours ago, JMO413 said: I have to ask what brand of corner lights are those. I got a set of clear Crown ones and they fit horribly. These are Depot. Picked them up on eBay for like $20. Fit great.
Pete M Posted May 13, 2019 Posted May 13, 2019 very nice! way to bring one back from the dead all the kudos to you. a side note... that truck is precisely why everyone needs to install the headlight relay harness.

Recommended Posts
Create an account or sign in to comment
You need to be a member in order to leave a comment
Create an account
Sign up for a new account in our community. It's easy!
Register a new accountSign in
Already have an account? Sign in here.
Sign In Now