Automan2164 Posted March 14, 2012 Author Posted March 14, 2012 Captains log: 3/13/12. Picked up a bunch of engine degreaser last weekend with the talk of nice weather, planning on spraying down the engine compartment and trying to pin down the leaks. Also got a call back from someone who has been selling an '86 XJ for half a year, after multiple emails about it's interior... He wanted to sell it whole, but finally got back to me this past weekend. Decided to part it out, and had my number. Told him I wanted everything front seats forward, he said $75. Sold. :D Today was an exceptionally nice day, so I couldn't resist the temptation to go on a cruise to retrieve the diesel's new porn red interior. XJ was actually in pretty good shape for being so old, and living in the midwest all its life. Someone had done touch-ups here and there, but couldn't touch up a rod knock. The guy who had it was the tow truck driver who picked it up as an abandoned vehicle. Jackpot! The seats are mint. They don't match the pattern on the original diesel's, but this is close enough. Dash was mint also, didn't have a canyon running across the dash like the current one. An hour later.> Bam! Comfy comfy: I might have to go look at a YJ tomorrow for one of the guys at work, but hopefully, I can dive into cleaning/prepping the diesel this week like I want to. Stay tuned! Rob
nicholasdances Posted March 14, 2012 Posted March 14, 2012 This thing is great, can't wait to see a finished product.
Automan2164 Posted March 15, 2012 Author Posted March 15, 2012 Interstate guy paid me a visit today, dropped me off a fresh blemish battery. $32.10 and I have a new interstate for the diesel. Also, after a discussion with Neohic, he has convinced me to go back to that XJ and pull the back seat assuming it's still there. I mentioned the door panels not matching the seat pattern and how I was just going to have to deal with it. Not knowing where to get some clean fabric to match the seats, Ben asked about the backseat. Ding! Hopefully the guy still has it, and I can pick up the skin for later. Rob
Automan2164 Posted March 15, 2012 Author Posted March 15, 2012 $10 for the backseat. Picking it up tonight. Rob.
neohic Posted March 15, 2012 Posted March 15, 2012 $10 for the backseat. Picking it up tonight. Rob. ... yeah? What, you didn't ask how much for the wheels?!
JeepcoMJ Posted March 15, 2012 Posted March 15, 2012 why would you want those wheels? that chrome trim ring pops right off. they're regular steel wheels.
neohic Posted March 15, 2012 Posted March 15, 2012 why would you want those wheels? that chrome trim ring pops right off. they're regular steel wheels. They hold a soft spot to me. On the right truck, I think they're just as handsome as all get-out! Just part of another theoretical build in my head. :hijack:
acfortier Posted March 16, 2012 Posted March 16, 2012 why would you want those wheels? that chrome trim ring pops right off. they're regular steel wheels. They hold a soft spot to me. On the right truck, I think they're just as handsome as all get-out! Just part of another theoretical build in my head. :hijack: I understand completely, and it seems that they'd go even better with a nice '86 diesel MJ... Mmmm... :cheers:
Automan2164 Posted March 17, 2012 Author Posted March 17, 2012 Well, got some stuff done today. Step one was degrease the nasty, oil covered mill. Soaking in one can gel degreaser and one can regular: Already working its magic. Then the hose came out... Sorry grass. Finished: Once I had the engine done, I was sitting around with nothing to do until it dried off a bit, so I decided to replace the passenger wing window with one I had laying around the garage. The old one broke at the pivot, and was missing its latch: I was pleasantly surprised when I pulled the door panel off: The factory cut sheet was still on the door panel! I know they hide these sometimes in the seat, or here, but this was an awesome find: Special instructions? You bet your @$$ there are! And... Back to the boring stuff... Window out, next to the new one. I should have grabbed some seals when I was at this, because the old ones are just horribly dry, but all went back in for the time being: About this time it was drip dried enough for me to crawl under and only get a little wet. Things suddenly got a bit brighter. I was worried about the vacuum pump because I didn't have any power brakes, and from what I gathered from Pat, they are non-existent in the aftermarket. Then I saw this... Not saying that the pump might not still be bad, but having the line broken off sure as hell won't help it out! I then looked over the bell housing, fearing that it would be a victim of the usual. The diesels are known for cracking the bell housing because of the harsh torque from the starter, and I wasn't looking forward to dropping the trans and repairing it if it was: Bam! Turns out that someone already had the problem and it's been addressed. Everything is looking better and better. Another known problem out of the way. Power steering pump also looks to be a replacement, as I don't think metallic blue was normally found under the hood of this thing: Also noticed the "Paris Rhone" alternator was no longer there, but replaced with a Valeo. Everything looked like it bolted in/on so I have hope I can just pull the numbers off and get a new one. That would be sweet. The stock alternator is also one of those "Good luck" kind of parts... This is a good sign. All in all, I am pretty excited on how things are developing. I am going to give it a second degreasing tomorrow, pull all the cable and stuff for the second battery/hook up the stock wiring, and do an oil change before starting it and seeing where the leak(s) are coming from. I really want to get some fresh oil into it, so I'll just run out and grab some cheap stuff. More news tomorrow! Rob
Automan2164 Posted March 18, 2012 Author Posted March 18, 2012 Not a whole lot of good news today... Might have a potential big problem on my hands. I dropped the oil to get some fresh stuff in there. I pull the front plug, which is the higher of the two in the forward sump, and got instant black oil out of it. Let that drain, and moved onto the back. As soon as I cracked it loose, water. I yelled at the g/f who was standing there to grab me a cup to catch it in, but she was dumbfounded and scrambling... By the time I rolled out and grabbed a container, it had started dripping oil. I would say that if I really had to take a guess on the amount, maybe half a shot glass worth of water came out. I really want to say(or don't want to say for that matter) it was coolant, but couldn't get a good read on the oil/water mix coming out once I got back under and put my hand under it... The drips on the pan/bolt didn't look too promising... Every time I look at them I want to weep, because they look green-ish. I don't know if I am seeing things though, or if the sun/grass right next to the truck are playing with me: Figured I had already bought the oil/filter, so I would go ahead and change them anyway. The oil filter was a bear to get off. Makes me wonder when it was changed last. I removed the air cleaner and tubes to the turbo for easy access. Bear to get off: Turbo pics while I was at it: I sort of left it at that for the night. I did talk to Pat, and we were kind of hoping that the water may have been from me degreasing the engine, but we will see. Because it had to be done, and because I was curious - I hit the engine with some more degreaser, and sprayed it down exactly like I did yesterday with the oil drain plugs put back in. Hopefully - Tomorrow I find some water in the pan. Hopefully. I really don't want that to be anything serious. Anyone have any input? What is your take on the water? Rob
Automan2164 Posted March 18, 2012 Author Posted March 18, 2012 That water wasn't run with the oil Do you think it could have separated out? It hasn't ran since November... I've had it running for maybe a hour, and traveled all of 30-35 miles with it since I've had it... Rob
camjeep3 Posted March 18, 2012 Posted March 18, 2012 :( sorry to hear everytime ive seen water in an engine or oil in general its milky looking. maybe it could of separated though.
carnuck Posted March 18, 2012 Posted March 18, 2012 The oil doesn't look milky. I've blended and tried to unblend oil and water/antifreeze (I finally came up with a good way to do it) after running it through motors (usually unintentionally)
whowey Posted March 18, 2012 Posted March 18, 2012 I have to agree with Jim... That oil sure doesn't look like it was run with the water in it. It doesn't look milky or have that green sheen it gets when anti-freeze gets mixed in.
Automan2164 Posted March 19, 2012 Author Posted March 19, 2012 Well... Some good news, or what appears to be good news today. After putting the drain plugs back in last night, I degreased and sprayed at the engine from all angles like I did the previous night. Hoping to find that the water in the oil was from me spraying it. Lo and behold, I rolled under there today and cracked the front plug - nothing. Moved back to the rear - Water. Not completely as much as the first time, but I didn't spray it as long either. Wanting to be sure, I ran to work to grab a couple torque wrenches and the coolant pressure tester. The truck has one of those latch style Stant caps on it, so I am pretty much assuming it is anything but original. The caps says 13 pounds, but I wanted to verify that before I started putting pressure to it... Looked in the engine manual, the '86 MJ manual, the parts book to see if it gave a detail, nothing. I also had some trouble getting it under pressure. The system is weird. It's like a hybrid of the closed and open system I have yet to decipher. The nipple on the side of the neck goes to the tank at the firewall, and the tank at the firewall is under pressure... So basically, I would put pressure into it, it would force the coolant up into the bottle, and then it would shoot down to the neck, then spray everywhere... I have no idea how this is supposed to be, but it can't be correct. There is no logical way for it to build pressure this way. But I digress... I just ended up putting a vice grip on the line from the tank to the neck to keep the pressure in, and pumped it up. I pumped it up to about 9 PSI, and walked away. Still not knowing what is the proper pressure for the system, I just would rather be safe than sorry. So this is where it sat: I went about cleaning the garage, putting some tools away, and enjoying the weather for a couple hours. Two hours later, the needle hadn't moved a hair. Good news there. I also still had the drain plugs out, waiting to see if any green drips came out of the pan. Nothing there either. All seems well. I released the pressure off the system, and tossed the plugs back in with some RTV. Then it was on to the valve cover. Let me just say that it is a totally uncomfortable feeling working on something made from all aluminum. Every creak, hesitation, or tension makes me think I am about to take threads out or break a bolt off... But, off it came: I could sort of tell by looking down through the oil cap, but once the cover was off and out of the way, you can really see how clean the valvetrain is: Someone had gone nuts with black RTV: Have to keep the bolts in order, just in case there is an oddball: While I had the valve cover off, I wanted to check the head bolt torque (which I understand is pretty important), and the valve lash. The head bolts get torqued in a sequence, and in three steps. The first step is to 22 ft lbs, then to 37 ft lbs, and to a final 70-77 ft lbs. There is a whole layout, with specific bolts to do, and the process. So I started out with the first step, all good. Second step, all good. Third step, since they give you such a window for torque, I just shot for the middle, 74 ft lbs. The first bolt was good. The second bolt turned, and just about gave me a heart attack. Then the next turned, and the next, and the next... All in all only maybe 4 or so didn't move at all, most moved maybe 1/10th of a turn or less, just enough to feel the wrench take up some before clicking. One moved maybe 1/8th turn... Don't know if I should be all too worried about it, as the spec was so wide. I am just thinking that the ones that did turn were closer to the 70 ft lbs to the 74 I did. Everything clicked down tight though, so hopefully all good there. Some bolts were up top and normal, the ones in the head were 10mm hex. Checked the valve lash, all seemed good. Had a small set back reading the manual and transferring it to the engine, but it took me a second to remember that the number one cylinder is actually at the firewall... :roll: Once I was done in there, the lip got cleaned and I put on a small layer of RTV, followed by the gasket. The cover also got a thin layer: With all the excitement done, I put the cheapo Wally world 15W40 in to keep everything primed and ready to go for now. Have some more stuff to do before I start it and find where it's leaking. I plan on starting it up, finding the leaks, and doing those at the same time I do the timing belt and have some stuff out of the way. That's all for today. Rob :cheers:
Automan2164 Posted March 19, 2012 Author Posted March 19, 2012 Just spent some time looking for the radiator cap. Rock Auto showed a part number for it, but not a pressure reading. Rock Auto says it's a Stant 10203... I searched for the PSI on that cap, found nothing. The Stant website did however, give me a CarQuest number. Punched that in work's CarQuest parts counter we have set up, number is good. Clicked the number for more detail... It had a pic, and everything suddenly became much, much clearer. http://weblink.carquest.com/acl/?mfgNam ... mber=33001 Bingo. It's a closed system using an open radiator, and this is the way they cheat around it... Looks like my thinking the Stant latch cap that is on it doesn't belong was right. Time to pick up the right cap. CarQuest has one in stock. According to the Stant website, the only other vehicles this crosses to is 1936-9 Buick Roadmasters, and 1936-8 Cadillacs. Nothing else... Haha. I still wonder what the reservoir cap is rated for though. Sometimes the weirdness of this thing is entertaining. Rob :D
Automan2164 Posted March 19, 2012 Author Posted March 19, 2012 Yet another "Could have had a V8" moment... Dawned on me to check to see what the part number is on the 4.0L Renix pressure reservoir cap. One page back from the Diesel's coolant system parts explosion, I found the 4.0L breakdown. Part number is the same. Now that I have a more common vehicle to search on, a quick hit on CarQuest tells me it's a 15 lb pressure cap. Going to order a new one along with the correct radiator cap tomorrow. Rob
Alexia Posted March 19, 2012 Posted March 19, 2012 Yet another "Could have had a V8" moment... Dawned on me to check to see what the part number is on the 4.0L Renix pressure reservoir cap. One page back from the Diesel's coolant system parts explosion, I found the 4.0L breakdown. Part number is the same. Now that I have a more common vehicle to search on, a quick hit on CarQuest tells me it's a 15 lb pressure cap. Going to order a new one along with the correct radiator cap tomorrow. Rob I believe it would be safe to go with nothing in the old Renix Jeeps makes any sense. There is a big wire loom that goes outside the safety of the engine bay, in front of a hot radiator, and back inside.
500 MJ Posted March 19, 2012 Posted March 19, 2012 Big push to get this roadworthy, I think I know what you'll be driving to LKQ with us on March 31st...
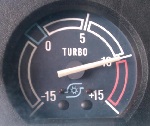
Automan2164 Posted March 20, 2012 Author Posted March 20, 2012 Welp, I think I can be pretty satisfied with the results from the full blown coolant pressure test today, but you be the judge. I started around 4:40, and applied 15 lbs of pressure to the system: About an hour later: What appears to be a little movement, so I let it go another half hour: I'm thinking I am good. The needle had some movement to it whenever it was tapped, or moved, and that would explain why the 3rd reading is higher than the second... So that's where I am with that. 15 lbs rating for 1.5 hours, and little fluctuation, or no more than I would contribute to the gauge anyway. Pretty satisfied with that. I also picked up some hose for the vacuum pump to booster, as well as snapped a reference pic for me to look up and cross the part numbers on the alternator: Trucking along. Rob
Automan2164 Posted March 20, 2012 Author Posted March 20, 2012 Success! I searched around a bit, and found a couple places that the part number on the alternator crossed to, most were the el cheapo's, but I got lucky at O'Reilly's. Ran a search by vehicle, knew I was on the right path when it asked 60/70 amps... Then bam! I am staring at a rebuilt Paris Rhone alternator. http://www.oreillyauto.com/site/c/detai ... &ppt=C0330 Ultima - Alternator Part Number: 14891 Line: ULT limited lifetime warranty UPC: 29175106270 Remanufactured Paris Rhone 70 Amps External Fan 1 Groove V-Belt Pulley Internal Regulator 3:00 Plug Sounds good to me. I knew there might be some weirdness because the didn't show it in stock, so I gave them a call. I pretty much expected to get the "Can no longer get this part" or something of the like. Sure enough, they didn't have any available, nor any in other stores. That, and he had to email the manufacturer to even ask about whether or not they still made them. He got my info and told me he'd call me back in 24-48 hours. Hung up the phone and got a call 5 minutes later. The company already responded. They had them and would ship out as soon as ordered! Dropping by there tomorrow to order it up since they need payment before custom orders. I have to pay a $10 freight charge, but hey, I'll be back to the goofy Paris Rhone it originally came with. Can't beat that. Should have it in 7-10 days. Rob

Recommended Posts
Create an account or sign in to comment
You need to be a member in order to leave a comment
Create an account
Sign up for a new account in our community. It's easy!
Register a new accountSign in
Already have an account? Sign in here.
Sign In Now