


ghetdjc320
-
Posts
5079 -
Joined
-
Last visited
-
Days Won
1
Content Type
Profiles
Forums
Gallery
Everything posted by ghetdjc320
-

Key Parts Wheel Well Arch Panels
ghetdjc320 replied to Dandxj's topic in MJ Tech: Modification and Repairs
Yep that’s right. The LH accommodates the gas filler closer to the wheel well for the long bed. Use two RH panels if you have a short bed -
Olympic Edition Window Sticker
ghetdjc320 replied to boxyjeep's topic in MJ Tech: Modification and Repairs
It would also be better if it was a reverse print so it clings to the inside of the glass. Would last a lot longer that way -
Wheel Center Cap Emblems
ghetdjc320 replied to ghetdjc320's topic in Vendors- members making products for MJs
-
Wheel Center Cap Emblems
ghetdjc320 replied to ghetdjc320's topic in Vendors- members making products for MJs
Going to give this a few more days then tally up the batch. Thanks -
Wheel Center Cap Emblems
ghetdjc320 replied to ghetdjc320's topic in Vendors- members making products for MJs
I’ve taken off several now. Some come off very easily, otherwise you can soak them in water for a couple of days or you could heat it up a bit until the adhesive gives way -
Perfect, thanks! Looks great.
-
Wheel Center Cap Emblems
ghetdjc320 replied to ghetdjc320's topic in Vendors- members making products for MJs
Got it. I’m getting a spreadsheet together to keep total numbers and keep everyone updated on where we’re at with timing. -
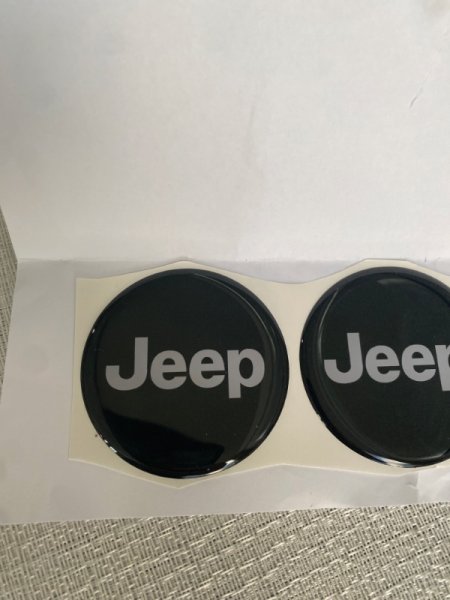
I managed to finally reproduce the OEM center cap emblem for the turbine wheels. Could also do the eliminator style wheels but would need the exact size (mm work best for measurements). I could also do custom designs down the road but don’t have the time to render those just yet. At the moment I’m getting some numbers on how many I should make in the next batch. These are made with a UV coating and 3m emblem/outdoor adhesive backing. Price is $14/ea or $50 for a set of 4 plus shipping (just a few bucks through usps to pretty much anywhere). at the moment I need to gauge interest and see what the total quantity would be so I can run a single batch. Lead times May be a few weeks depending on where your order falls within a batch. Here is what they look like. I’ll get some pictures of them on a turbine cap shortly PS. For those of you looking for switch trim covers and all the accompanying goodies, I’ll be producing those again staring around mid-June and custom options will be available again as well.
-
WJ sway bar upgrade
ghetdjc320 replied to CheepComanche's topic in MJ Tech: Modification and Repairs
I have that nos sway bar at home and can measure it in a bit -
I had a set on my last MJ. The length of the remote adjuster is too long and the holes were not tapped but they worked ok other than that. They were also missing the remote adjuster gasket
-
I wasn’t able to see the video. Says it’s been removed, any chance of getting that back?
-
WJ sway bar upgrade
ghetdjc320 replied to CheepComanche's topic in MJ Tech: Modification and Repairs
IIRC there are only two sway bar sizes that came on the MJ/XJ. This is the larger of the two. I believe it’s 28mm -
How soon do you need it? I have one but won’t have it available for a few weeks
-
WJ sway bar upgrade
ghetdjc320 replied to CheepComanche's topic in MJ Tech: Modification and Repairs
Here is the easiest and cheapest sway bar upgrade I’ve found. It’s the larger factory option bar and is a bolt on (just need to use the larger bushings) https://teamcherokee.com/products/front-sway-bar-assembly-oem-jeep-cherokee-xj-1994-2001.html -
That was Limeys build
-
Looking to install a 3.5-4.5 Lift Kit
ghetdjc320 replied to DesertComanche86's topic in MJ Tech: Modification and Repairs
I ran ZJ steering linkage. I had the iron man track bar setup which had a 1.5” drop on the frame side bracket so I also installed a 1.5” drop pitman arm. Also used the iron man steering box sector bearing and support. Ran a PSC non-ported steering box. The steering and handling was absolutely wonderful given the amount of lift. -
Could you part with the two on the left? Shoot me a price when you can. Thanks
-
Just saying, I’d still like to see installed daytime pics of the lights from different angles…
-
A push button start is a very simple switch to install. But a modern push button start system will typically incorporate an rfid tag from the key fob for security. Similar to the “chip” keys that many manufacturers used in the 90’s and early 2000’s.
-
Project “Tomahawk”
ghetdjc320 replied to ghetdjc320's topic in MJ Hardcore Tech: Epic Journeys to Greatness
Very interesting. I have the tail piece as well with the two light -
There are a few versions of the D44 and they are all quite different. Same goes for the D35.
-
Source for A pillar door seal
ghetdjc320 replied to pizzaman09's topic in MJ Tech: Modification and Repairs
Any chance you have the part numbers for the different early models? I’ve only seen original and aftermarket versions of the same early style seal along with the foam pieces on some originals. -
I had one in my 5.9 ZJ also. Lots of towing and some off-road with no issues, but no oversized tires. I know several years of corvettes also have the d44a in an irs setup. On a side note, the D35 can be a pretty decent axle lol
-
Source for A pillar door seal
ghetdjc320 replied to pizzaman09's topic in MJ Tech: Modification and Repairs
I’m beginning to think it’s just two designs. The rubber strip that had plastic retainers into the A pillar then the redesigned A pillar in the 97+ with the lip that the new seal would go on. Thanks @jpnjake for those pics! So one would need to fabricate a lip for the 97+ secondary seal to mount to. I’ve heard many times about upgrading to the 97+ style seal but I believe most comments are referring to the door to cab seal and not to this secondary A pillar seal. It seams many are missing that secondary seal. -
Source for A pillar door seal
ghetdjc320 replied to pizzaman09's topic in MJ Tech: Modification and Repairs
Like @Limeyjeeper did. So from what I can gather, the original pre 97 seal was just a rubber strip that mounted to the a pillar. It also had small foam pieces attached to it to help keep its rigidity. The 97+ is a rubber seal (part number 55175355AC) and it mounts onto a similar seal as the 96- (sort of a rigid plastic piece that is mounted to the a pillar. The rubber seal is still available but the plastic strip it mounts to isn’t… does that sound correct?