


ghetdjc320
-
Posts
5079 -
Joined
-
Last visited
-
Days Won
1
Content Type
Profiles
Forums
Gallery
Everything posted by ghetdjc320
-
Sounds good, let us know if you have questions
-

Reproduction switch trim covers
ghetdjc320 replied to ghetdjc320's topic in MJ Tech: Modification and Repairs
Hey guys, just providing a quick update. It has indeed been very difficult to nail down the exact material for the switch. It needs to have a degree of transparency, light diffusion and texture which is difficult to find. I have convinced a manufacturer to send us samples of every style transparent and semi-transparent film they produce. We will find as close to an exact match as possible. Hope to have these ready in about a month. I intend to have these truly be “replicas”. I have tracked down every other item, even the bluish green semi transparent paint that provides the right hue for the symbol. I’m focusing on the fog ligh/cargo light and trans/sports bar covers. I would like to add the extended idle as well as the sports bar only for the manual tranny models. If there were ever any other options that you would like to see please let me know. I don’t really want to start producing endless amounts of “one-off” pieces. If there is enough demand for a piece it could be produced though. Will post back when the right top layer material has been selected. -
You shouldn’t need to reset pinion depth unless it wasn’t right from the get go. This would be the time to replace the pinion and carrier bearings though but it sounds like that is not a feasible option at this point. That’s neat that it has the adjusters. Similar setup to a ford 9”
-
Agreed. An engine overhaul is easier than gears if it’s your first time (at least it was to me). Once you wrap your head arround everything that is needed though it’s not too bad. Same goes for transmissions. You just have to think in 3D when it comes to gears lol
-
It can be done in your driveway or in the trail. I’ve done it in the driveway before in about 10-15minutes. Remove the driveshaft, remove the yoke nut and yoke. Use a chisel or flat head screw driver and a hammer and knock loose the lip of the seal. Pull it out and replace. You may have a splined rubber washer that will need to be replaced as well.
-
Awesome work and great write up! If i ever head back stateside I’ll do this also.
-
NV3550 was 00-04 and was replaced by the NSG370. AX15 was in the TJ from 97-99. The NV3550 is really no better or worse but does have a slightly lower 1st gear. Good tranny
-
Also, you don’t need to pull the pinion to replace the seal
-
If the 8.25 uses a crush sleeve design than you will have to set you pinion depth using a new crush sleeve. There is a lot of input on this thread so here is my $.02 and I’m sure the rest will provide valuable input. If you are only doing the carrier than you should only have to deal with backlash and preload. If the carrier already has the shims inside of the bearings than you are going to need several special tools aside from just a dial indicator. You will not hit the right pattern using the shims from another axle. That being said, I’ve seen many poorly installed gear setups where they do just that. As for people seeing different version of where the shims go, factory d30 HP will be inboard of the bearings “if done correctly”. Factory d44 with no locker just open carrier will also be inboard of the bearings “if done correctly”. D35 will be outboard “if done correctly”. I do not know where they should be on a 8.25. You will sometimes see shims places on the inside AND outside of a carrier. In those cases, the outside shims are normally just for preload. I have also seen very loose carriers with almost zero preload that almost fall out of the housing. Aftermarket or non-open carriers will have their own requirements which should be followed. Case spreaders are used on occasion to install preload shims outside the bearings. There should be no need to use one to set only your backlash. You can also permanently damage the case with them if you are not careful. You should keep your dial indicator on the case to know how far you are spreading it.
-
about the same chances as winning the lottery.
-
The Rubicon 44’s use them outside of the bearings because of the lockers. Otherwise they are the same as all 44’s and are normally inboard of the bearings from the factory. I agree 100% that it’s actually a much easier install when they are inside the bearings. But for setting up new gear that will mean that you will need to use setup bearings or have a true carrier/pinion bearing puller. It is highly unlikely that you will hit the right specs on the forest try. Then again, sometimes people hit a hole in one lol
-
HP Dana 30’s should have the shims inboard of the bearings from factory unless you have an aftermarket carrier that is designed to accommodate them on the outside. Dana 35 is reversed and has the shims outside of the carrier bearings by default. If you have setup bearings than installing the shims invoard of the bearings is actually a much easier install than trying to get shims outboard of the bearings. You can use a case spreader “very carefully” but that will be yet another tool that the OP may not have.
-
Your job just got a lot harder if the bearings are already on. For the Dana 30 the shims go inside the bearings which means pulling the bearings frequently or using setup bearings to get your backlash set properly. Never done an 8.25 so you have to check that one. The Dana 35 is relatively easy to set since the shims go outside of the bearings.
-
I’ve done gears about 4-5 times so I am by no means an expert though
-
You will at the minimum need a decent press, dial indicator, in lbs beam style torque wrench, dial indicator (recommend a mechanical one with .001 increments) and usual hand tools. I highly recommend a “clamshell” style carrier/pinion bearing tool. You will also need a gear install kit and gear marking compound. Ultimately, it’s not terribly difficult to do but you need to really understand the process well before starting. Preload, pinion depth and backlash need to be well within spec or you’ll damage your gears in short order. Keep in mind that many shops do not even really know how to setup gears.
-
Window trim paint removal
ghetdjc320 replied to 70barracuda's topic in MJ Tech: Modification and Repairs
Just did mine. After removal I used a propane torch on the back side of the trim and the vinyl wrap came right off. A bit of wire wheel and some paint and they look like new -
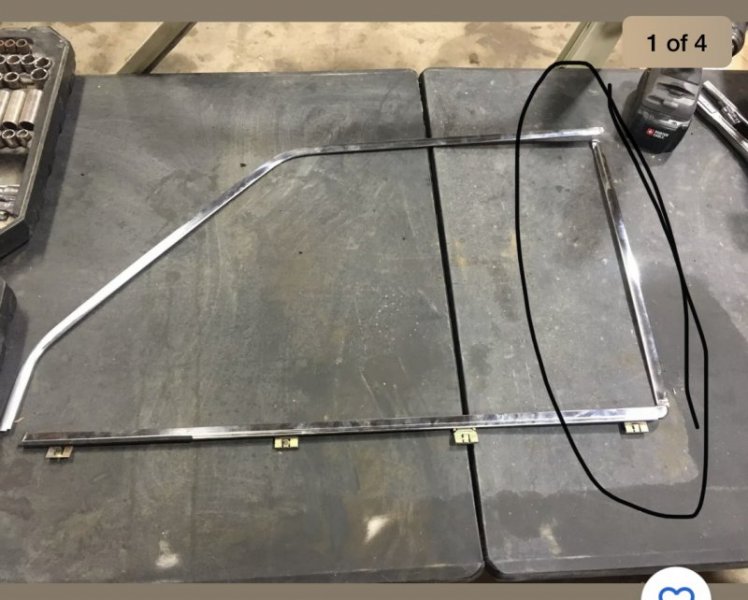
Needing the part in the pic. Let me know what you have, need one ASAP. Just need the vertical piece circled. Don’t care what color it is. Thanks!
-
Looking for a full set of mud flaps without the white Amc logo. Just the standard Jeep ones. Will take good use or nos. Let me know what you have
-
Vanco makes good kits but I’ve had poor customer support. It’s difficult to get anyone to follow up over there. I ordered a kit that was supposed to be ready in about 7 days after a month I asked for a refund. Poor communication. Hydratech and Talon hydraulics made a much nicer setup with a billet aluminum mount and stainless hoses. The Vanco kit just uses the typical universal “corvette” style booster. The other companies will let you upgrade to wilwood components. It cost me a good amount but the brakes were insanely good
-
I absolutely recommend hydroboost. I had Talon Hydraulics build my hydroboost unit with a wilwood MC and proportioning valve. I used the psc steering pump with remote reservoir and the stopping power was absolutely incredible. Was thinking about doing this to my MJ but am using an electric vacuum assist dual diaphragm setup that works well for now.
-
Also check your valve cover breathers and make sure they are all clear and functional
-
I’d recommend you try to track down exactly where the leaks are coming from. A bad water pump won’t directly cause your radiator to leak and it’s rare for a head gasket to allow an oil leak (but not impossible). That being said, you will need at least the following: head gasket (get a mls gasket) head bolts intake/exhaust gasket thermostat housing gasket water pump water pump gasket may be forgetting a few items. Id also recommend you replace your valve cover gasket. Felpro permadry are my favorites for valve cover gaskets. Reflex 10-001 would be my recommendation for the intake/exhaust gasket. Cometic makes great head gaskets but it is probably overkill for your build. Mopar/felpro/Víctor Reinz all have nice mls gaskets. With the head off, you could do lifters, cam, valve stem seals, timing set etc. as needed and the list goes on. Flowkooler makes a great water pump with a billet aluminum impeller and High quality bearings.
-
I would say perhaps a 1.125 bore master. Blaine from black magic brakes can help you find what you need for sure
-
What size pistons are in your calipers? You need to know the total piston surface area for your breaking system before choosing the right size master.
-
WJ Booster/MC Conversion & Distro/LSV Delete?
ghetdjc320 replied to jrl3's topic in MJ Tech: Modification and Repairs
I ran the 260-11179 valve. Has a nice bracket to bolt to the MC too
