

gogmorgo
-
Posts
5984 -
Joined
-
Last visited
-
Days Won
4
Content Type
Profiles
Forums
Gallery
Everything posted by gogmorgo
-
 There should be two adjusters in the system, one for the drag link and the other for the tie rod. The tie rod gets your toe angles correct, the drag link straightens out the steering wheel.
 -
The heavy axle was available as an option both with the offroad pack and just on its own, doesn't specifically come with a towing package. In terms of what oil to use, either weight would be fine for regular use, although if you're planning on stressing the axle with regular towing the heavier weight is a better choice for the higher heat, but it comes at a slight mpg penalty. It's not going to hurt anything to have friction modifier in the oil even if you didn't need it for the diff. Some specialized gear oils intended for differentials come with it already added. There isn't a ton of benefit to running 85W140 in the front diff unless you're really planning on loading it up or you get a heck of a deal on bulk oil that makes up for very slight mpg penalties, but it's not going to hurt it either. Doesn't look like you'd be seeing -40 weather with it either so having diffs full of glue at those temperatures isn't going to be a problem for you. Agreed, if you don't know how old the fluids are it's probably better to change them. The transfer case usually calls for ATF not gear oil, just FYI. My guess on the location of that leak, all over the axle tube, is it's coming from the diff breather line. Possibly the diff was overfilled, possibly the breather hose is cracked. There is a brake line going to the same point, but brake fluid tends to get rinsed off with water so it doesn't leave huge seepage stains like that. In regards to making brakes more gooder, it's a safe guess they're not adjusted correctly and could probably use a good bleed. You've still got the load sensing valve in the system, so there's a bypass line for it that also needs bled. Crack a front bleeder to simulate a front failure while bleeding the rears, then close the front bleeder and bleed the rears again, then the fronts.
-
Would you have clearance to run a 90° elbow straight off the core?
-
Coolant unexplained loss.
gogmorgo replied to Classy Comanche's topic in MJ Tech: Modification and Repairs
-
If you have uneven tire pressure the axle would end up leaning to one side, but that doesn't wear out the outer edges of both tires. Bad toe angle does. Following from Andy's post, what we do to quickly measure in the shop is lift the tires just high enough off the ground to be able to spin them freely, then spray a line of paint around the tire (hold the can in place and spin the wheel). Then take a screwdriver or other sharpish object and hold it against the tire so it won't move, and rotate the tire to scrape a line in the all the way around it. If the line doesn't meet up with the start point, start over. This will give you a good datum to measure from. Tires aren't super accurate in terms of consistent geometry, so the line in the paint is much better than trying to go off a tread block or the sidewall. With the steering wheel in the straight ahead position, you'll want a slight amount of toe in. Measure the distance between the two lines you just scribed on the tires at both the 9 and 3 o'clock position, two measurements, one at the front of the tires and one at the back. Adjust the tie rod so the front edges of the tires are roughly 1/8" closer together than the back edges. This won't be perfect, but it will be more than good enough to get you to a point where the truck shouldn't be darting all over the place. It will definitely be enough to get you to an alignment shop. Once you've got the toe dialled in a bit better, you can rotate the tires to the rear of the vehicle if they're not too far gone, and hope they even out some.
-
I would assume marker lights. The DRLs are just the headlights at reduced voltage, most people don't notice when they don't work.
-
This is arguably a potato soup. Potato and leak with shrimp, if you will. Excellent for warming you up on a cold and wet day. I think there's a mistake in the recipe though. If you only add 1-1/2 cups of stock you don't really end up with soup. It'll still cook, but it's just barely enough liquid for the potatoes and you just end up with some messy vegetables by the end. I usually end up using about a quart of stock to get enough liquid in it. I also usually do a combo of curry and cayenne, and a bit of heat in it is nice. And yes, this is a recipe from a series of children's novels. It's a staple food among otters, and the original recipe is made up of ingredients that can be found in and around water. Bulrushes, mare's tail, and watercress rather than leaks, and their tubers and rhizomes instead of potatoes, possibly water chestnuts. But then those ingredients aren't on the shelf at most grocery stores, and the alternatives aren't so bad. There's a fair bit of speculation on what the hotroot is. You might think a horseradish, but the fictional plant in the books, ditchnettle, is more of an herb, and they don't necessarily use the roots of it. The best guesses point towards smartweed, also known as water pepper, which apparently is more of a pepperminty sort of pepper than a chilli pepper, but the chilli does do nicely.

-
We can spitball at stuff all we want but you’re the only one there who can get under the front end and check for play in any of the components. Anything that could affect what direction your truck is tracking, including the rear suspension, could be at fault here. My process would be to lift the front wheels off the ground and check for play in them. Hand each on top and bottom and pushing in and out will find play in ball joints, on the front and back of tire will find steering linkage, play in every direction would be a bad bearing or loose wheel. You can also get a helper to steer back and forth just enough to move the front tires in each direction while you’re checking every pivot point in the steering and track bar to find play. Also look for excessive play in control arm and leaf spring bushings, and for witness marks for evidence brackets are moving around. Make sure the bolt at the axle end of the track bar is properly tight, and not moving around in its hole either. If you can’t find anything, just go get the alignment done. Whoever does it might find what you missed. But also it could be your issue on its own. Even but excessive wear on the outside of the tires is most likely due to incorrect toe angles, which would also cause the vehicle to wander around and can possibly also cause wobble as the tires are fighting each other to steer you one direction or the other. Unless you were careful to maintain your alignment the way it was before it’s very likely changing tie rods contributed to a toe issue… assuming the toe was correct to begin with. It’s super easy to bend a tie rod which will affect toe angle. If your wear is cupping, i.e. the tread blocks aren’t wearing off evenly from one to the next, it’s an indicator of ball joint issues. Incorrect camber can in theory cause the symptoms you’re experiencing, but it’s very unlikely with a solid axle that your wheels are leaning outwards to cause wear on the outer edge of the tire. The weight of the truck on the axle would cause the wheels to tilt inwards if there was play. You would have to somehow bend the outer ends of the axle down or push up really hard in the middle, not impossible but not likely. Blown shocks can also lead to strange behaviours but won’t cause edge wear on a tire. Funky tire wear can also cause balance issues which will cause wobble.
-
Can you get a punch or chisel onto one of the flats, and tease it loose that way?
-
Yeah I dig the 4x4 as well. And after looking at the photo with it, then back to without, it looks like it’s missing something.
-
Key Parts inner rockers are available
gogmorgo replied to Pete M's topic in MJ Tech: Modification and Repairs
Inner and outer rockers meet at the pinch weld. Don’t know I’ve ever seen one rust out without both going at once. -
Coolant unexplained loss.
gogmorgo replied to Classy Comanche's topic in MJ Tech: Modification and Repairs
Obviously new clamp on obviously new hose that were both replaced recently replaced per the first post in this threads tells me to go find a screwdriver and snug up the clamp. I’ve had a few water pumps start leaking recently and none of them were barely noticeable. I’m not saying it’s not possible for the water pump to be leaking, but when a connection has recently been messed with, it’s pretty foolish to start telling people to take on a large project if they haven’t confirmed where the leak is coming from or taken the 30 seconds to confirm the connection is good. -
VIN location on back half?
gogmorgo replied to GonzoTheGreat's topic in MJ Tech: Modification and Repairs
Is the parking brake cable hooked up to something and functioning? Parking brake on a trailer would definitely be a handy thing to have. I may or may not have crashed a boat today by tripping over the cable between the wheelchocks and pulling one out... -
Coolant unexplained loss.
gogmorgo replied to Classy Comanche's topic in MJ Tech: Modification and Repairs
Still looks to me like the hose is what's leaking, probably due to a loose clamp. But we can't see above the hose to say for sure. The coolant's coming out somewhere, usually towards the highest part of where it's wet. If that's around where the water pump pulley is, then it's a good indicator the water pump is bad. But if you just go out and change the water pump without actually knowing it's bad, then you might inadvertently fix the problem of a loose hose clamp, you just spent more money and effort to do it. It's also almost impossible to diagnose noises from across the internet. We can't move our head around and hear the sound getting louder, can't use stethoscopes, etc. That sound does sound like a bad roller bearing, but it could be any of the bearings in the belt drive system. It could also be the fan rubbing something. Or the belt catching on something. If you do end up pulling the belt off while you're changing a water pump, definitely give all the pulleys a spin. -
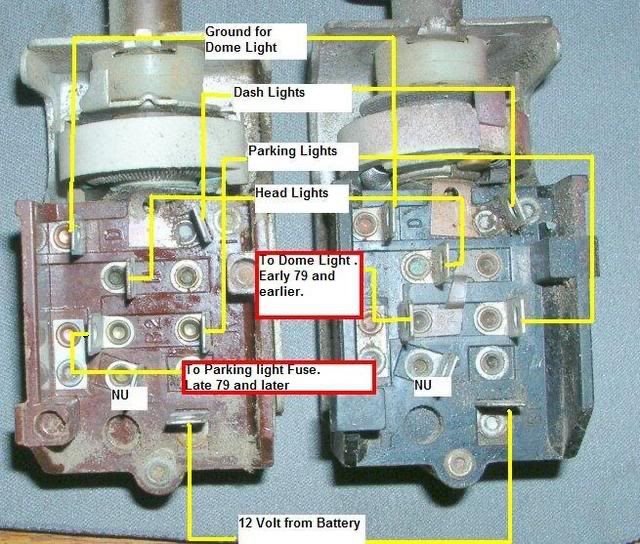
It does look like there’s been some heat on that connector, but it’s not as bad as most I’ve seen. If you want, you can probably just get a headlight harness off a junkyard XJ and swap the whole thing. It just unplugs at the 10-pin connector in the engine bay below the driver’s headlight. You might need to pull the header panel to get it out, but that might be easier than repairing the current one if it’s going to be a bunch of work. Here’s a diagram for the headlight switch. Note there’s seperate power sources for headlights and parking lights. You’re looking at the one on the left. You should be able to use a test light pushing into the back of the plugged in connector.
-
Coolant unexplained loss.
gogmorgo replied to Classy Comanche's topic in MJ Tech: Modification and Repairs
Yeah that’ll do it. I often find myself with small leaks after opening up the cooling system because I don’t like torquing the crap out of clamps. I’ll always pressure test before sending a vehicle out, but often don’t on my personal vehicles and end up dribbling coolant for a bit before I notice and get around to doing something about it. So you’re not the only one. You might get away with just snugging up the hose clamp. It’s also possible something got stuck under the hose or else there’s some corrosion on the nipple. If by left side of the engine bay you mean your left while you’re standing in front of the truck, I.e the passenger side, my guess would be that leak is from one of the heater hoses. Generally though left/right on a vehicle is as if you’re sitting in the driver’s seat, so left would be near the brake booster. Cooling collecting up there would be bad. Older vehicles, especially ones that sat for some time, will do this to you. Once you’ve caught up on all the deferred maintenance it will get better. But unfortunately a lot of these little issues will only become apparent as you drive it. Learning and addressing some of these things on your own will help to build confidence in both yourself and the vehicle, and will make them seem not so daunting when they occur. Or as hard on your wallet. Honestly, diagnosing the issue is the hardest part of the task of repair the vehicle, and if you’re already doing that on your own, it will usually cost you less to purchase the tools to complete the repair on your own than it will to pay someone else to do it, and a LOT of the repairs are perfectly feasible just with basic and inexpensive hand tools. -
Coolant unexplained loss.
gogmorgo replied to Classy Comanche's topic in MJ Tech: Modification and Repairs
While you’re renting the compression tester, see if you can get a cooling system pressure tester as well. It’s a little hand pump that fits onto the rad cap and squeezes air into the system to pressurize it. It’ll have a gauge on it, run it up to the pressure on the cap and let it sit for a bit. The system should hold pressure, but if it doesn’t, the leak should become obvious. It’s also worth adding that after filling the system, it’s normal for coolant levels to drop somewhat as air gets pushed out into the overflow and is replaced with coolant. That said you definitely shouldn’t be losing gallons of the stuff. -
For your interior lights, is the dash dimmer turned up all the way? Turn the headlight switch knob, at one end of travel there’s a noticeable detente that turns them on. Turn signals back feeding power through to other circuits is indicative of a bad ground path through a dual-filament bulb. Probably the easiest if not necessarily most efficient way to diagnose is to go around and pull out each turn signal bulb until it quits doing it, and then investigate that particular ground. As Pete said, the early MJs didn’t flash the front corner lights, just the lights under the headlights. But good news there’s a diy thread on how to make them alternate flashing with the turn signals. While I was looking for that I stumbled across this as well. It would be good to make sure you have the correct bulbs in each socket. Putting a single-filament bulb into a dual-filament socket or vice versa can also cause the back feeding. When you say the running lights don’t work, are you referring to all the marker/parking lights and also the taillights that should switch on at the same time, or just specifically the front corner lights? The front corner bulbs are just single filament lights, so if both the wires coming off them are tied together, that’s you’re issue. Wiring them per the above write-up should correct that. If you also aren’t getting the front markers (below the headlights) or the taillights to come on when you pull the headlight switch to the first stop, I’d be suspicious of the headlight switch itself and the associated wiring, as it’s a known common problems spot, assuming you have the correct bulbs in all the sockets. The ten-pin connector for the header panel harness (below the driver’s headlight) is also a common issue, as is the connector for the taillight harness (behind driver’s rear wheel) and the ground for the taillight harness behind the driver’s taillight. Cruiser’s tips at www.cruiser54.com will also be helpful in finding ground issues and just general wiring improvements. Aftermarket installers in general seem to do a good job of messing everything up, but I’ve been in very few Jeeps this old that haven’t had all the wiring in the dash pulled apart and shoved back together in a disastrous tangle. A lot of it was simply velcroed in place and Velcro and associated adhesives fail over time.
-
Yeah… between this and the 4-pin trailer harness that was hacked into the taillight harness in a way that literally took more work to do badly than it would’ve to replace the factory connector, pretty sure this truck’s going to burn to the ground for some reason that I won’t have discovered. But I guess that’s what happens when you buy a 3/4 ton for $3k in today’s market.
-
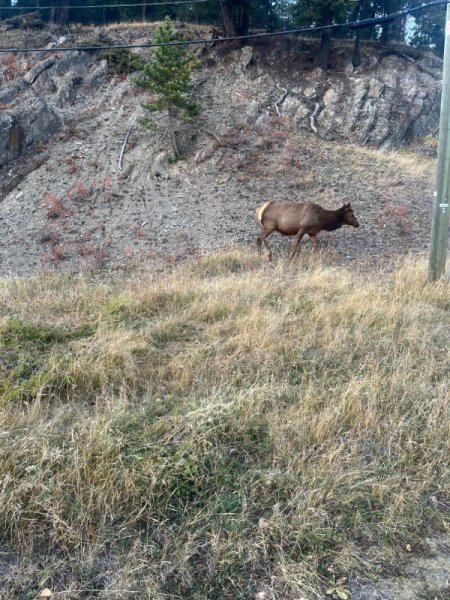
Had this girl walk up while I was changing out the blower resistor in my truck today. Whole herd was just in the trees up above the outcropping. Heard a bull bugling down the street too, figured I shouldn’t stick around much longer.
-
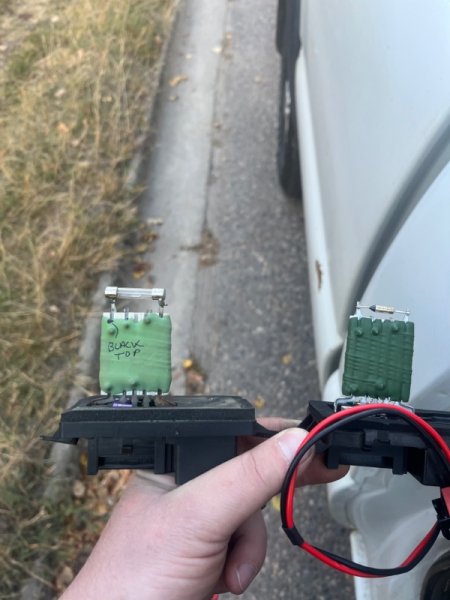
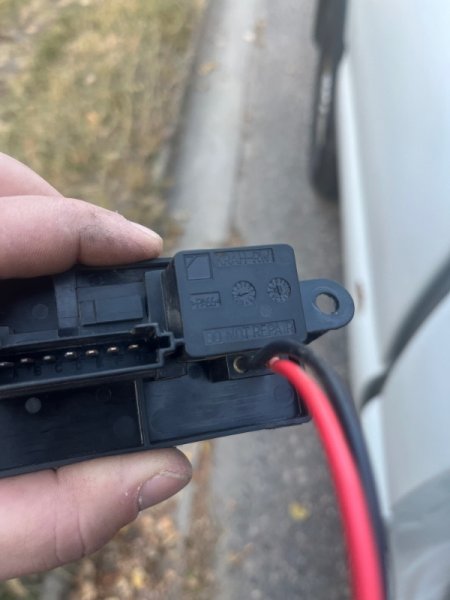
Just figured out why I only have one fan speed in the GMC… despite the clear instruction on the bottom of the resistor not to repair it. Actually on second thought no, he was just following instructions. Replacing a resistor with a fuse is definitely not repairing.
-
Sounds to me like the body shop's problem if they removed the mirrors and didn't retain the hardware. Especially considering they sent you home in a vehicle that isn't legal for road use if it has no mirrors on it.
-
Anyone heard about floor braces yet?
-
Starter Solenoid diagnosis questions
gogmorgo replied to JefCooks's topic in MJ Tech: Modification and Repairs
The whole truck dying when you pull a big load like the starter sounds more like a low battery or connection issue. Especially if you’re not turning the key to the start position which does shut some things down. I only ask this because we’ve been down the road once, but when you were bench testing you definitely had it hooked up like in the truck, with the starter housing connected to the battery negative, and power to both the b+ terminal and jumped across to trigger the starter? And did you use the truck’s battery or one that you know is good… I haven’t scrolled back up but you did verify the MJ’s battery was fully charged? Its a strange coincidence the starter would die right then while you were doing other stuff… not saying impossible but usually when I messed around with a bunch of stuff and then something else quick working, it ends up being something I messed with and didn’t put back together correctly or forgot to plug back in. And if a guy left the key on for a couple hours while he doing the messing it can definitely drain the battery. -
Starter Solenoid diagnosis questions
gogmorgo replied to JefCooks's topic in MJ Tech: Modification and Repairs
So when you’re down at the starter jumping stuff, you’re taking power from the post with the cable going to the battery, and then putting power to the small trigger post? If that doesn’t crank the engine or only spins the starter motor then you’ve got an issue with the starter/solenoid. If it does crank the engine over, then you’re not getting the start signal when you hit the key. Jumping between the two large terminals on the starter solenoid will spin the starter motor but won’t push the bendix out to engage the flywheel and turn the engine.