


gogmorgo
-
Posts
5984 -
Joined
-
Last visited
-
Days Won
4
Content Type
Profiles
Forums
Gallery
Everything posted by gogmorgo
-

Is is detrimental to overfill a gas tank?
gogmorgo replied to Classy Comanche's topic in MJ Tech: Modification and Repairs
It would be up in the engine bay. Firewall on the passenger side. I wouldn’t be too concerned about it, it’s more of a constant overfilling concern than a one-time deal. -
When you say it dies, like, does the engine stumble and quit or is it like you shut the key off?
-
Is is detrimental to overfill a gas tank?
gogmorgo replied to Classy Comanche's topic in MJ Tech: Modification and Repairs
It can damage paint if it overflows, especially recent paint. It can also force fuel into the vapour canister, which can wreck it and lead to it plugging up and causing issues. Otherwise the main concern is that you spilled a flammable liquid on your vehicle. There isn’t a ton back there to spark and set something on fire so the chance is low, but it’s still possible. -
Are you running sat-for-15-years oil or something more recent? Did it seem like you had oil pressure?
-
I don’t recommend changing parts you don’t know are bad. Any bulb with dual filaments could be causing it. The two filaments share a ground at the lightbulb. If the ground between the lightbulb and the truck is bad, then the powered circuit will find a path to ground through the rest of the lightbulbs in the other (non-powered) circuit. There are multiple ways of figuring out which lightbulb ground is causing it. The simplest is just to turn on the turn signal and pull all the turn signal bulbs out (leave them out) and checking after each bulb whether it stops doing it. Once you’ve pulled the bulb out that makes it quit you know the ground for that bulb is bad. Leave that bulb out and put the rest of the bulbs back in, one at a time, checking each time to see if it starts doing it again, and if it does take that bulb back out and keep putting the rest back in. You do this because there may be more than one bad ground but you won’t be able to isolate the bad grounds with more than one bad ground in the same cicuits. When all the bulbs are back in except for the ones that made the markers blink, you can start trying to fix the bad grounds. Alternatively you can also test the ground at each socket either with a multimeter set either to continuity or resistance, or with a test light on the positive battery terminal (or other known good voltage source). Would I just go ahead and replace the sockets? No. Absolutely not. Not unless I knew the sockets were bad. Maybe they’re corroded or melted, or contacts are bent… then maybe. But it’s very likely the bad ground is due to a broken wire, corroded ground fastener, corrosion or poor pin contact in a connector, a failed wiring repair… the list goes on. Yes it’s nice to have shiny new light sockets. But if you don’t know the socket was a problem, changing the socket is mostly just a waste of time and money. Maybe it fixes the problem, but it might not, and now you’ve added in more connection points, essentially weaknesses in the circuit, and possibly also sockets that are lesser quality than the originals and that won’t give you another thirty years life, and now you’ve made diagnosing the original issue more complicated. And if you don’t get a good splice on the ground side where there was no issue, then you’ve literally just turned a working ground into a bad one and caused the rest of the circuit to malfunction. If the taillight sockets are bad, then change them. But if you don’t know they’re bad, then you’re likely going to cause more problems than you’re solving by changing the part.
-
General exhaust question
gogmorgo replied to Classy Comanche's topic in MJ Tech: Modification and Repairs
I drove mine for a little bit with the exhaust dumping out the manifold. 200 miles to the city and back. Wasn’t too bad at idle but touch the throttle and you regretted it. Yeah, gas mileage tanks, because it stays in open loop without an O2 sensor plugged in. I put the down pipe and O2 back on when I got back, then drove 200 miles in the opposite direction. Still loud but not as bad, mpg came back up. I don’t remember whether there was much change in mpg or anything when I put the muffler back on. This was with a 4.0/aw4. I wouldn’t want to drive my 2.5 on the highway with no exhaust. 3k rpm is bad enough with a muffler. -
If the thing was working, and you didn’t unplug the wires, they’re still sitting in the same configuration they were when they were working. I’d be very suspicious of the connection at the crimps and spade terminals. It’s pretty clearly a chunk of wire that’s been added at some point, and probably looks the same down towards the sensor somewhere at the other end of the chunk. If the uninsulated spade is touching ground, that’s a problem. Cruiser54.com tip #7 details how to test the CPS. Test at both ends of the spliced-in section. If it’s below voltage at the sensor end of the splice it’s potentially a failed CPS, but if it’s only below voltage at the opposite end of the splice from the sensor, there’s a problem with the splicing.
-
X2, that was my first thought, reversed front/rear lines, either at the master cylinder or on the prop valve. While I’m not really in a position to argue with Willwood, I don’t think you’ve got accurate information there. The residual valve on a drum brake is used to hold pressure in the brake line after you release the brake. The reason for this is to stop the return springs on the brake shoes from pulling them all the way back away from the drum. If you don’t have a residual pressure valve, your rear brakes will engage more slowly, as if they’re out of adjustment. I think there’s some confusion with the effect a residual pressure valve has on a disc brake system, where it’s used to deal with weirdnesses that come up when you mount the master cylinder lower than the callipers (very unusual but it happens), one of which is a spongy pedal due to gravity pulling the brake fluid out of the callipers, lightly sucking the pistons back in. I don’t think your issue is due to a lack of a residual valve, which in my understanding is there to speed up brake applications. On the other hand, the front callipers require a much larger volume of fluid to expand the pistons than the rear wheel cylinders do. In the case of the WJ, the front callipers have two pistons the same size as the single rear piston, meaning twice the volume. If you’re pushing a huge amount of fluid into the rear brakes and only a small amount into the fronts, the rears are going to grab hard and the fronts aren’t going to do much at all, and I imagine the brake pedal would seem a little odd. One other valve that a disc/drum setup usually needs is a metering valve for the front brakes. This is used to slow down the pressure buildup in the disc brakes to account for the time needed to build up pressure to overcome the return springs on the drums, so they both apply at the same time. Generally this is included in a factory distribution block or proportion valve. But again I don’t think one missing from the system would cause your issue, considering it’s also there to slow down front brake application relative to the rear brakes. The only reason I bring it up is in case the prop valve you’re using has one built in that either is way too aggressive or malfunctioning somehow, and blocking more flow to the front brakes than it should for longer than it should.
-
Make sure the blend door is fully opening. There’s a cable going to a lever under the dash in the passenger footwell, above passenger’s left foot. Should move with the temperature slider. Sometimes the cable slips or comes off.
-
Did you check the level in the clutch master cylinder? Also trans fluid level? Signs of leaks anywhere? My go-to manual trans oil is Royal Purple Synchromax. Others have other preferences, but I’ve tried a few different things and keep ending up back at the Royal Purple. I’m in a colder climate than some, and Synchromax is on the lighter end of the trans oil spectrum which might be part of it. But it’s what has worked best for me in a bunch of very different transmissions which is nice because it’s also much easier for me to get than say a Redline.
-
Those will properly be called the parking lights. The parking lights are made up of various combinations of marker lights, clearance lights, tail lights, etc., depending on the vehicle. No big deal. The left turn signals blinking dimly indicates a ground issue. What’s actually going on is all the parking lights are blinking. One or more of the dual-filament turn signal bulbs on the right side doesn’t have an adequate ground, so it’s finding it via the other filament and the rest of the lights attached to that circuit.
-
The main issue with building a D35 is you’ll put a ton of money and parts into it just to end up with an axle that still doesn’t hold up as well as some easily obtained stock axles from other vehicles. And now when something fails you’re looking for custom parts instead of being able to walk into a parts store or grabbing something from a wrecking yard. And you’ll have all the money sunk into it so you’ll be inclined to repair rather than replace, costing you money again and again. If all you’re doing is driving it around on the road, not hauling loads or pulling trailers it might be fine. But it might not be. I didn’t put a huge amount of effort into building the D35 in my ZJ, just a truetrac and new gears, all new bearings, in the summer of 2020. I had to do it all over again this summer after I bent an axle shaft which took out a wheel bearing and the metal flakes floating through the system took out everything else. I don’t know how I bent the shaft either. I won’t say I was babying it the whole time because I do have a bit of a heavy foot up here in the mountains, but I’m also not the guy bouncing off the rev limiter spinning tires trying to get up trails every weekend. Most of the miles it does are on paved highways. Because the factory AX15 makes it a pretty rare bird I wanted to keep it as original as I could, but if it goes out again I’m absolutely not building the D35 again.
-
Don’t know about 3.07’s. My Ax15 ZJ is on 31’s with 3.55’s. It’s decent enough for daily driving. It takes a pretty steep hill to make me need to downshift. Not a big deal off-road cause you’ll just be in low range. It definitely is noticeable pulling a trailer though.
-
Oof… Don’t know if I’m good enough with an etch a sketch to make that work.
-
Put it on a truck. Hopefully I see it again on the other side.
-
Compared to most of what I deal with that's not bad at all. But if you don't do anything about it, five years from now it might become a much bigger problem. Getting the bulk of the loose rust off and then treating it so it doesn't spread is your best bet. It's tough to say, as it might just be dirty, but it looks like it maybe had a rubbery undercoating applied. This sort of thing tends to happen when you do that, as it plugs drain holes, and traps moisture right against the metal. Hopefully there aren't other spots where it's lurking.
-
Shouldn’t if it’s in good shape. But it depends on the condition of the vehicle.
-
Found a 86 2.8. Got some questions..
gogmorgo replied to 81Chero's topic in MJ Tech: Modification and Repairs
Fuel consumption like that and I’ll agree with Pete, it’s dumping it on the ground somewhere. If it was all going through the engine, you would know from the puddle of liquid gas running out the tailpipe… that or the flamethrower. Or the fuel gauge doesn’t work so good and it either didn’t start out with a full tank, or it didn’t empty it all the way, and buddy didn’t realize. -
Parking brake pedal refurb.
gogmorgo replied to A-man930's topic in MJ Tech: DIY Projects and Write-Ups
By some miracle everything worked. I’m pretty well at the end of the cable adjustment so new cables are in the future anyhow, but it holds hard enough in both directions to stall the engine, so it’ll work for the next week. -
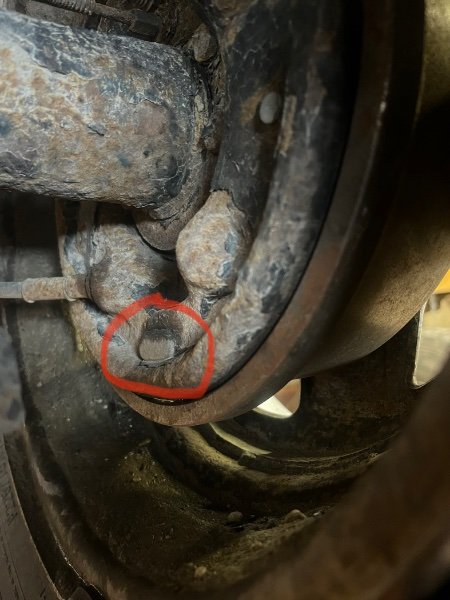
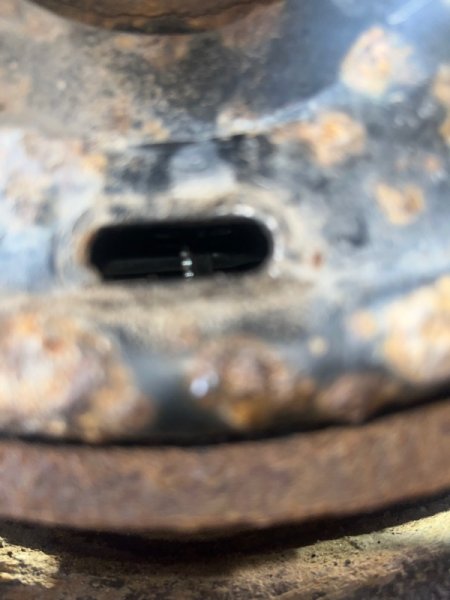
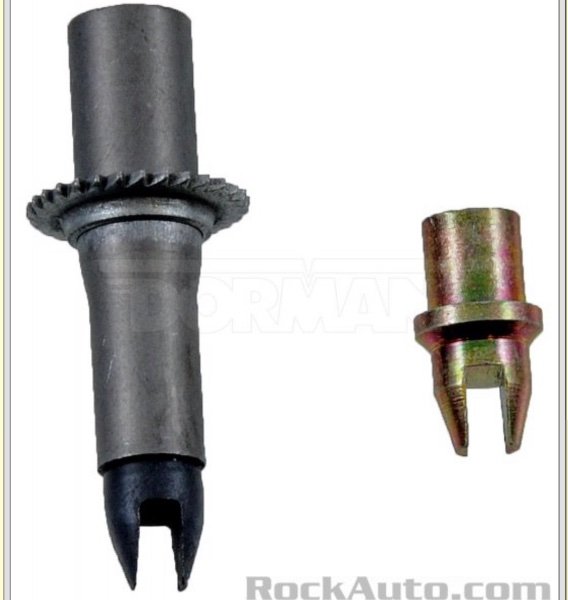
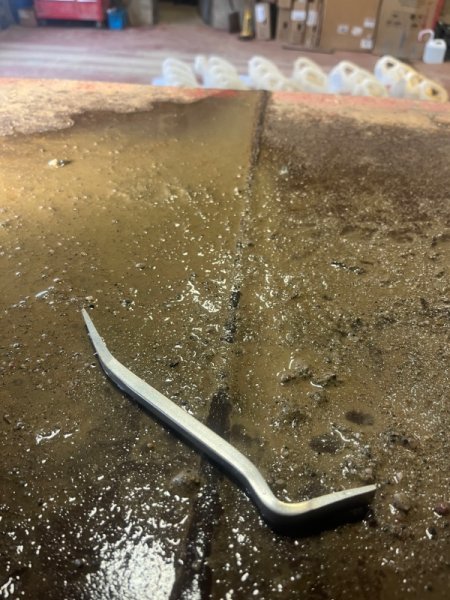
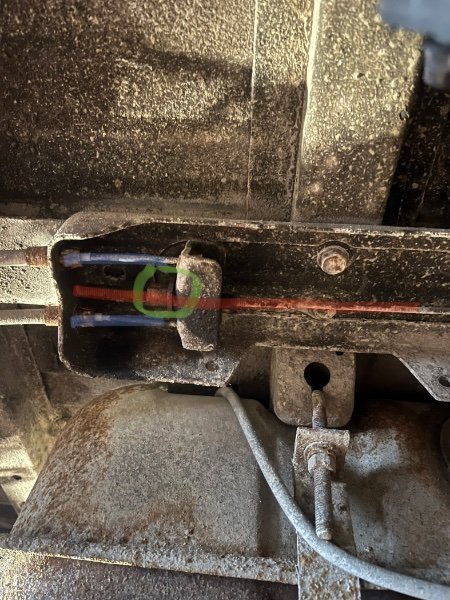
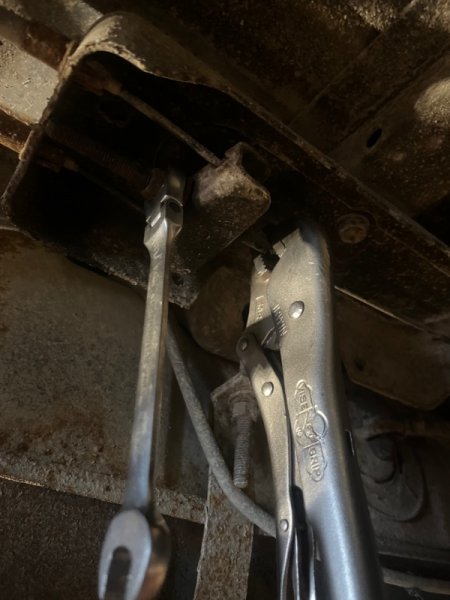
Brake Shoes: It’s a pretty basic process, common to all vehicles with drum brakes and some with a parking brake inside a rotor, but I didn’t see a specific thread about it so figured I’d do one. Why do you need to adjust them? As your shoes and drums wear, you lose some of the wear surface. This means there’s a bigger gap between the shoes and drums, and the brake components need to travel further to do anything. Eventually they get to the point where they have to travel so far that they don’t apply much pressure when they get to the drums. This is an issue that seriously affects brake performance, to the point where if something happens to your front brakes you may lose brakes entirely. It also puts much more stress on the front brakes, beyond what they were intended to deal with, especially if you’re carrying a load or pulling a trailer. The brake shoe adjustment also affects the parking brake. If they’re too far out of adjustment the parking brake will not hold. So we adjust the brakes to get the shoes back to close proximity to the drums. Adjusting brakes is something that should be done every so often. It would have been part of the annual “tune-up” maintenance that was normal for cars in the past, but that modern cars don’t really need and society has mostly forgotten about. “But they’re self adjusting!” Right. In theory, yes, but in practise not so much. They only self-adjust in reverse, and you need a pretty aggressive stop in reverse to make it happen. Most people don’t go fast enough or brake hard enough in regular driving to make it happen. If you can find an open space where you can safely get up to 10-15mph in reverse and do a hard stop or three, this may be enough to get your brakes back into adjustment on their own, assuming all your brake hardware is in good shape. This is not always the case, so what do you do? We adjust them manually. You need to do this with the parking brake released, so make sure you have proper safety mechanisms in place so you can get underneath the vehicle without running yourself over or the truck falling on you. Chock the front tires, jackstands under the frame, etc. Start with one of the rear wheels. Locate the rubber plug on the back of the drum brake backing plate. It’s an oval sort of shape, and similar to the plug in the bottom of a piggy bank. I like to use a small screwdriver to dig them out of the holes, but anything with a pry-bar action will work. When you look into the hole, you should be able to see the adjuster star wheel. You’ll probably need a flash light, because, you know… hole. It’s difficult to photograph because hole, but you can see the shiny teeth on it in the hole. This is what it looks like: Heads up, this picture is rotated 90° from how it sits in the hole. Note how the teeth are ramped, one side is much steeper than the other. The self-adjuster pushes down on the straight edge, then travels back up the ramp, like a ratchet. As it turns, screw threads push the tip out, which pushes the brake shoes closer to the drum. To turn it manually, you need to reach into the hole and push against the flats on the star wheel. Usually you would lever off the side of the hole. There is a tool for this, called a brake spoon: It’s basically a double-ended pry bar. The bends in it make it easier to get into some more awkwardly positionned adjuster holes. You don’t strictly speaking need it. You can use a screw driver or any other sort of prying device, but the spoon definitely makes it easier. Depending on how long it’s been since the adjusters last turned, it may take some force to get them started moving. Usually once you get them spinning they’ll move pretty freely. If they’re totally seized and you can’t get them to budge at all, you may have to take the wheel and drum off to free up the adjuster. If that’s the case, I would probably come armed with all new hardware, probably shoes and drums as well, because things won’t be pretty in there, and drum brake hardware is cheap. Usually the adjusters come separately from the hardware kit, and they’re different left to right. Make sure they’re lubricated when they go in so they won’t end up seized. But that’s a different thread. How far do you turn the adjusters? Good question. You want to go far enough the shoes are almost in contact with the drums, but not too far or you’ll just have brakes stuck and dragging. What you’ll want to do is lift the wheel off the ground so you can spin it, and then adjust the brakes until you can feel a very slight drag. Go a few clicks, spin the wheel, few clicks more, spin it again, until the brakes are dragging ever so slightly. At this point, go into the vehicle and push the brake pedal, then go back under and make sure you still have the slight drag. If the drag goes away, keep adjusting until it comes back, and then repeat. In a perfect world, turning the adjuster moves both brake shoes, but the world isn’t perfect so you’re probably only moving one of them, which means you’re only getting your brakes halfway adjusted. Applying and releasing the brake moves the assembly back to centre, so you can continue adjusting until both shoes are dragging slightly. When it’s where you’re happy with it, pop the rubber plug back in. Now you move onto the other rear wheel. Once you have them both adjusted to a slight drag, take it for a spin. If your brakes were pretty far out of adjustment, you should notice the increased braking performance right away. Congrats, you just adjusted your brakes! Don’t forget to pop the rubber plugs back in. It’s worth pointing out that if your brakes were out of adjustment for long enough that corrosion built up on the braking surface of the drum, you’ll find yourself having to adjust the brakes again in pretty short order. This is normal (ish). What happened is that when the corrosion got scrubbed off, the drum diametre increases, so the drum is effectively further away from the shoes. Adjusting them again will correct the situation. Parking Brake: If you were adjusting the brakes to try to get the parking brake working, and you’re now stopping on a dime but the parking brake still doesn’t hold, good news is there’s adjustment in the parking brake cable, too. It’s important to make sure the brakes themselves are adjusted correctly before attempting to adjust the parking brake cable. That may be all the parking brake needed after all. It’s also not usually necessary to adjust the parking brake cable other than initially setting up a new cable. The cables do stretch over time and with use if they survive long enough without seizing, but it’s not something that you should need to be doing more than once every ten years, if even that. Again, the primary adjustment point for the parking brake should be your rear brakes, and once the initial setup is done, you shouldn’t need to touch the cable adjustment again until you’re replacing cables. There’s only one point of adjustment for the cable, and it handles both sides. This is the equalizer assembly. On a Comanche it’s located above the rear driveshaft, next to the fuel tank. You’ve got three parking brake cables that meet here. The two in blue go to the brake drum at each rear wheel. The one in red goes forward to the parking brake pedal. It’s called the equalizer because when you pull on the forward cable, the bar then will distribute equal tension to both brake cables, and in theory equal brake force. The adjustment is in the red cable. The end of the cable is threaded, and it’s adjusted by turning a nut, circled in green. The nut is usually double-nutted, so you’ll need two wrenches. The nut against the bar is the adjustment, and the second nut locks the adjuster nut in place. Back off the first nut, then tighten the second one to adjust the cable tighter. The wrench is on the adjuster nut, and the vice grips are holding the cable, just ahead of the threads, to stop it from turning while I adjust the nut. Given the location under the vehicle this adjustment can be particularly recalcitrant, especially if you see road salt. Penetrating oil is usually a must. You want it to be tight enough to take up almost all the slack in the cable, but not so tight that it’s applying and dragging the brake with the parking brake pedal fully released. Once it’s adjusted, tighten down the lock nut. If you run out of cable adjustment and the parking brake still won’t hold, double check that the brakes themselves are correctly adjusted. If they are, then you likely need new cables. Good news is they’re still available from a handful of retailers, at least at the time I’m writing this.
-
Havd you popped the inspection cover off and had a look inside the bellhousing to see if it’s coming from something other than the engine? Definitely looks rear main-ish, it’s possible the new seal also leaks… but it’s pretty tough to say without being there to watch it leak.
-
Got my parking brake functional. Couple circlips under the rivet head and a stronger spring for the ratchet pawl. Got the pedal working mint, then just had to deal with both the equalizer bracket and the rear brakes themselves being wildly out of adjustment. Noticeably better brakes on the way home too, despite the first big dump of snow of the season turning the world to garbage.
-
Parking brake pedal refurb.
gogmorgo replied to A-man930's topic in MJ Tech: DIY Projects and Write-Ups
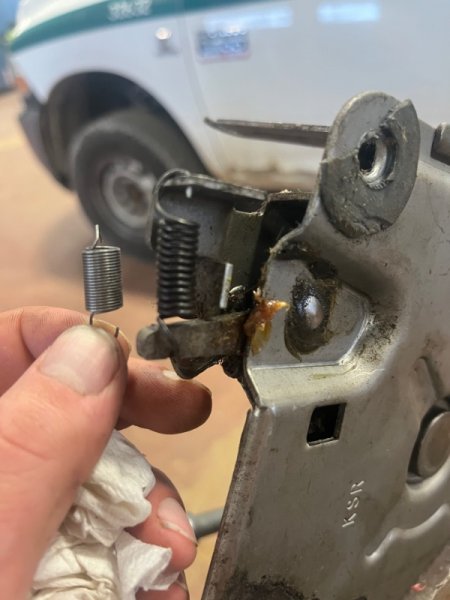
Trying to get mine working, got a shipper coming to move it and they demanded a functioning parking brake. Mine wouldn’t stay down reliably, like most. I pulled the parking brake pedal but you wouldn’t necessarily have to just to do what I did, I don’t think. First thing I used a clamp to squeeze the assembly together. This eliminated most of the wiggle in the pedal, but on its own wasn’t enough to stop it releasing. But while I had it clamped, I took the opportunity to stick a couple circlips in under the head of the rivet to take up some of the slack. You’d be able to tap them into place with the assembly installed. This was a huge improvement but still not perfect. The next thing I did was replace the pawl spring with a much burlier one. I’m pretty sure you should be able to get the spring in there with the assembly in place with a little determination. This spring came out of a set of springs, I just cut down one of the heavier ones in the kit. this was a MASSIVE improvement. I can’t wiggle the pedal loose anymore, no matter how much wiggling and in which direction I wiggle. Don’t know whether the spring on its own would’ve solved the problem, but it would be worth trying. Now I’ll put the thing back into the truck and find out my cables are straight up seized, just watch.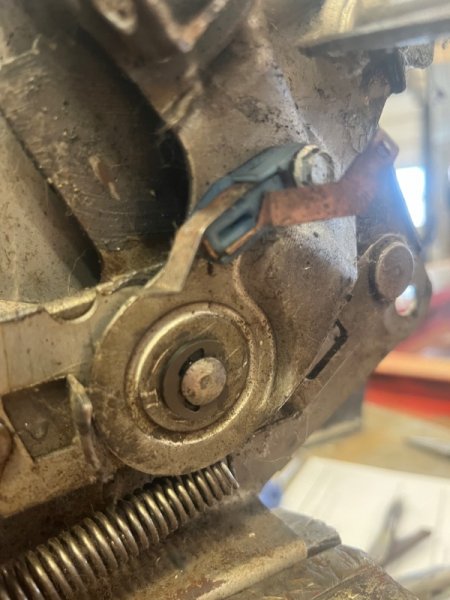
-
Engine Quest 0331 Head Questions
gogmorgo replied to big66440's topic in MJ Tech: Modification and Repairs
Edelbrock was casting heads at least pre-pandemic. Might be an option. -
You won’t get brake pull to either side if both sides are equally out of adjustment. Even self adjusting brakes get out of adjustment pretty easily. You need a reasonably firm stop in reverse to adjust them, and most people don’t drive fast enough or stop quick enough in reverse to make it happen. Yes, the friction modifier is for the LSD. Because the ring and pinion have to slide past each other under extreme pressure, gear oil has to be really slippery. But if it’s too slippery, the clutches won’t grab properly. The friction modifier makes the oil grippier under lower pressure, or something like that.