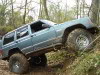
reson46 Posted February 17, 2014 Author Posted February 17, 2014 Took a trip to Tahuya yesterday. Had a great time. We had a few hours of mostly clear skies before the afternoon rain. Only a few MJ pics. Yellow Jacket Hill More pics here. Willy
reson46 Posted February 17, 2014 Author Posted February 17, 2014 Michael took some incredible shots of us. Mud Lake Yellow Jacket Hill More of his pics are here. Willy
88whitemanche Posted February 17, 2014 Posted February 17, 2014 Pure sickness!!!! Love this truck!!!!
Gnarmanche Posted February 17, 2014 Posted February 17, 2014 I wish i lived where you lived... so bad :( The only hills we have down here in the swamp are trash mounds.. :bowdown: Epic truck btw!!
Ronbo Posted February 18, 2014 Posted February 18, 2014 Mike to some really good photos. I wish my truck had been ready so I could have gone with you. Yellow Jacket hill looked like it would be pretty tough with all that mud making the rocks so slick. How did the ARB's work are you loving them? Ron
reson46 Posted February 18, 2014 Author Posted February 18, 2014 Mike to some really good photos. I wish my truck had been ready so I could have gone with you. Yellow Jacket hill looked like it would be pretty tough with all that mud making the rocks so slick. How did the ARB's work are you loving them? Ron I would not have made it up Yellow Jacket Hill without them. :D Willy
COFFMAN Posted February 18, 2014 Posted February 18, 2014 $#!& Hot ....... Awesome photo's, Great Rig.....
jbain Posted February 18, 2014 Posted February 18, 2014 I sure would like to give Yellow Jacket Hill a try...... Sweet photo's..... very Jealous.
reson46 Posted March 13, 2014 Author Posted March 13, 2014 The original shift linkage I created for the two transfer cases utilized the stock bushings on each end. They held up fairly well over the years but have caused some problems at times by popping out of the shift levers. I decided to replace them with some rod ends that should eliminate that problem. Old linkage on the left. Willy
reson46 Posted March 17, 2014 Author Posted March 17, 2014 Returned to Copper Creek Road Saturday to play in the snow. The tow straps and winches were well used by the end of the day. One rig broke a motor mount which resulted in the engine shifting enough to put a hole in the oil filter. Duct tape to the rescue. More pics here. Willy
reson46 Posted April 8, 2014 Author Posted April 8, 2014 Back to some cage work. I added some down bars. Gussets at the main hoop. As well as a couple of short pieces connecting to the main hoop on the inside of the down bars. Some gussets for the rear. The holes should make a convenient place to attach tie down straps. It seems like I can never have too many of those. I'll also add a mount for the CO2 tank and Hi-Lift. Willy
knever3 Posted April 13, 2014 Posted April 13, 2014 I always enjoy looking at your thread, the blue is such a nice color. The background is spectacular!! I drool at those pictures since I live in flatland Michigan. One can only stare at water for so long.
89eliminator Posted April 19, 2014 Posted April 19, 2014 did you keep track of how much tube you used for your cage? or do you have a rough guess?
reson46 Posted April 20, 2014 Author Posted April 20, 2014 Yes, I sketched everything out and wrote it all down but I won't be home until next week. I'll get you some numbers when I get back. Willy
reson46 Posted May 7, 2014 Author Posted May 7, 2014 I added a mount for the CO2 tank. A fire extinguisher quick release from Trophy Girl. A Hi-Lift mount. Pulled it off to fully weld it. Now I'm in the process of painting. Willy
reson46 Posted May 7, 2014 Author Posted May 7, 2014 While the cage is off it was time to finally add some bed liner. Thanks to Ron for helping out. Willy
reson46 Posted May 8, 2014 Author Posted May 8, 2014 did you keep track of how much tube you used for your cage? or do you have a rough guess? Wade, Sorry about the late response. I didn't completely forget about this....except when I was in the garage with my notes. I originally purchased 4 tubes that were approximately 20' long. I do remember going back for another tube because some of our first attempts didn't turn out so well. Hope this helps. Willy
89eliminator Posted May 9, 2014 Posted May 9, 2014 thank you. i bought 80'. based off my extremely rough measurements, i needed 71'. i know i will need to do a few test bends.
reson46 Posted May 9, 2014 Author Posted May 9, 2014 thank you. i bought 80'. based off my extremely rough measurements, i needed 71'. i know i will need to do a few test bends. Are you planning on going with the same style cage we built? Willy
zackcj7 Posted May 9, 2014 Posted May 9, 2014 How do the bars that go down the windshield pillars into the fenders mount?
reson46 Posted May 9, 2014 Author Posted May 9, 2014 How do the bars that go down the windshield pillars into the fenders mount? They bolt to these plates that are welded to the unibody just in front of the door hinges. Willy
89eliminator Posted May 9, 2014 Posted May 9, 2014 thank you. i bought 80'. based off my extremely rough measurements, i needed 71'. i know i will need to do a few test bends. Are you planning on going with the same style cage we built? Willy maybe not exactly the same, but probably similar. i will be tying mine into the rock rails.
reson46 Posted May 9, 2014 Author Posted May 9, 2014 thank you. i bought 80'. based off my extremely rough measurements, i needed 71'. i know i will need to do a few test bends. Are you planning on going with the same style cage we built? Willy maybe not exactly the same, but probably similar. i will be tying mine into the rock rails. Nice! I look forward to seeing what you do. Willy
89eliminator Posted May 11, 2014 Posted May 11, 2014 thank you. i bought 80'. based off my extremely rough measurements, i needed 71'. i know i will need to do a few test bends. Are you planning on going with the same style cage we built? Willy maybe not exactly the same, but probably similar. i will be tying mine into the rock rails. Nice! I look forward to seeing what you do. Willy me too haha. this will be my first attempt at bending up a cage. been reading a lot about tips on bending tube.

Recommended Posts
Create an account or sign in to comment
You need to be a member in order to leave a comment
Create an account
Sign up for a new account in our community. It's easy!
Register a new accountSign in
Already have an account? Sign in here.
Sign In Now