

ftpiercecracker1
-
Posts
2140 -
Joined
-
Last visited
-
Days Won
1
Content Type
Profiles
Forums
Gallery
Everything posted by ftpiercecracker1
-

Parking Brake Pedal Assembly
ftpiercecracker1 replied to gbrei87's topic in MJ Tech: Modification and Repairs
Nope, there is a metal stopper built into the bracket the acts as a dead stop for the pedal when released. When i first redid mine, i used an extremely strong return spring, to strong in fact. It would damn near break your leg when it released. -
89' Resto To 99' Conversion
ftpiercecracker1 replied to RyanL's topic in Member Projects: Your Comanches
Sweeeeeeet. B) -
Ground check? Bad socket? Quite common and it can wreak havoc. Did you check the headlight harness plug? its on the driver side between the airbox and the body of the truck. The headlight harness itself has several crimps that might have separated/corroded. I went through a week of absolute hell trying to figure my running light issues. :mad: Here is the turn signal flash sequence. . . . HL off: Everything flashes together, all at the same time. Depending on which blinker is engaged. HL on: The front corner and front lower (lights just below your HL) flash opposite one another Does that help?
-
Parking Brake Pedal Assembly
ftpiercecracker1 replied to gbrei87's topic in MJ Tech: Modification and Repairs
The spring responsible for holding the lock arm against the pedal doodad is patheticly weak, thats why i found a much stronger replacement. See writeup. The lock arm and notched rotating assembly were designed/cut poorly, allowing for it to slip easily when put under load. I like to grind out the notches on the rotating pedal deal and weld a sharper/longer tip onto the locking arm so that it seats deeper into the notches. -
Track Bar Removal Question '86 Comanche
ftpiercecracker1 replied to Echostrike's topic in MJ Tech: Modification and Repairs
What i figured. Probably welded the nut to the bracket then welded the bracket to the axle tube. -
Track Bar Removal Question '86 Comanche
ftpiercecracker1 replied to Echostrike's topic in MJ Tech: Modification and Repairs
Seriously, W.T.F How in the world did they even mount the track bar then??? :doh: -
Parking Brake Pedal Assembly
ftpiercecracker1 replied to gbrei87's topic in MJ Tech: Modification and Repairs
What's taking so long? It's been a year. LOL Done. Happy now Cruiser? :P http://comancheclub.com/topic/34536-diy-e-brake-fix/?p=346493 -
Clean 91 Comanche Eliminator...$6500 :(
ftpiercecracker1 replied to H3RESQ's topic in Craigslist/eBay... i.e. Not Your Stuff
Poking around on C-list again came across this little guy. Even in its condition i think 6k is a little steep. http://clarksville.craigslist.org/cto/3851847656.html -
Track Bar Removal Question '86 Comanche
ftpiercecracker1 replied to Echostrike's topic in MJ Tech: Modification and Repairs
Jimoshel, On my 90 i replaced the original "tabbed" nut with a standard, bad move on my part because it does make it much more difficult to take the bolt in and out, but it is still possible to get a open ended wrench in there to hold the nut still. You just have to spin the bolt until it is in just the right position. I would just give it a shot before chopping up the bracket. -
This is key if you don't want to have to take a freakin loan out on your house. For the price they want just for the super kit, i could build a pretty gnarly turbo/supercharged stroker.
-
4k!?! :eek: Ya they can kiss my bass.
-
If you can't remember the last time you did a tune up, its over due. ;)
-
This is correct. One bar bolts at a 90* angle to the steering column, just above the hood release handle. The other bar attachs to the left of the fuse box, it uses one of the parking brake mounting bracket bolts.
-
Parking Brake Pedal Assembly
ftpiercecracker1 replied to gbrei87's topic in MJ Tech: Modification and Repairs
Yes there is a stopper. The writeup will be updated again with pics here soon. -
Parking Brake Pedal Assembly
ftpiercecracker1 replied to gbrei87's topic in MJ Tech: Modification and Repairs
Sorry about the writeup, i'll see what i can do. As for the picture, your pedal may be bent or someone cut and rewelded so that this is the new normal position. Also how it bolts to the body could have been altered/damaged in some way. -
Parking Brake Pedal Assembly
ftpiercecracker1 replied to gbrei87's topic in MJ Tech: Modification and Repairs
:peek: Did someone call me??? http://comancheclub.com/topic/34536-diy-e-brake-fix/ Still having to tinker with mine. I know what i have to do, its just a huge PITA to take it out. :fs1: OP, if you have any questions PM me and i will do my best to respond accordingly. -
Not Dw, But Needs Fixin
ftpiercecracker1 replied to ftpiercecracker1's topic in MJ Tech: Modification and Repairs
FIXED: Went and got my tires balanced/rotated. Turned out my front rims were egg shaped, :ack: turns out aluminum is pretty freakin soft and my drive way is pretty freaking hard. Just by putting the warped rims from front to back completely stopped all front end wobble, but this made the back end vibrate like a mother. I had only one other good rim to put on, so we replaced the very worst of the warped rims with it and a brand new tire. HUGE difference, but the back end is still vibrating, i will be chucking the other of the two warped rims and replace it with a good one, hopefully this will take care of what little vibes are left. Crossing my fingers :crossfingers: , but i think i can safely say i have conquered my Death Wobble. -
Good to hear you got it fixed :thumbsup: , here's hopin it stays that way :crossfingers:. And thanks for getting back with the report, I hate when someone has a serious, diffcult, or unusual problem and they just drop off the face of the earth once that get it fixed without bothering to fill the rest of us in. :fs1:
-
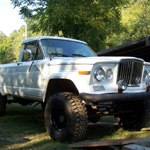
Sweet. Moses. :drool: That is one badass rig, those boggers really complete it. How bad is the road noise/ride?
-
Not Dw, But Needs Fixin
ftpiercecracker1 replied to ftpiercecracker1's topic in MJ Tech: Modification and Repairs
Update: Everything in the picture has been replaced with new components, save the control arm bushing. (mine are in good shape) The steering stabilizer was replaced with a much heavier duty version along with the stock swaybar for a V8 ZJ version. All in all since the start, the steering has improved by as much as 90%. But the wobble still persists, speed and bumps in the road do not seem provoke it, but cornering does. Dropping below 55mph immediately stops it. One thing that i have noticed, is that even after a new track bar drilled out for a 5/8 bolt, and tightening the ever livin sh*t out of it, there is still a fraction of an inch of play. Probably less than a 1/16 of an inch, could this be part of it? Plans: Tire balance and rotation Tighten steering box, slightly Something that may interest you, when i was having my Wranglers (tires) mounted the tech that was balancing them told me that one of my rims was slightly warped/bent. So we put that one on the rear passenger side. -
I Finally Got It......brought Home The J10...
ftpiercecracker1 replied to rocketwheels's topic in The Pub
Chill guys, I'm not to crazy about the Twister theme either, but just be glad he is not "pimping" it out and putting spinners on it. . . . . or worse. Actually, if its done right i don't think it will look half bad, but to be honest having "dorothy" in the bed will make it look incredibly tacky, IMHO. Please don't hate me rocketwheels :peek: This is not photoshopped. :ack: -
Horn Issue
ftpiercecracker1 replied to ftpiercecracker1's topic in MJ Tech: Modification and Repairs
Up under your dash, driver side, most likely just above your fuse box will be two relays, one will have a white cover, the other brown (possibly black). The horn relay is the one with the white cover (no idea what the brown one is for), you can pull it off and check for voltage at the plug. You can also inspect the relay it self by removing the cover, its easy as pie once you have it pulled from the socket. Mine was corroded/rusted to absolute hell. A new one will run you 7-10 bucks, no it is not a generic relay, its special apparently. There arent any so called "steering column relays" that i know of, but there is a control box, if you will, on top of the steering column near its base. Its where all the mechanical stuff happens when you turn the key in the ignition. -
Mr. Clean magic eraser, water, and some elbow grease. Probably some polishing compound afterward for good measure.
-
Us full size owners need to have a swap meet/trail ride sometime. :chillin:
-
One Good Thing Deserves Another.....and Another!!!
ftpiercecracker1 replied to Mountain Dude's topic in The Pub
Those are some pretty haggard lookin MJs (wooden bed, no tailgate, significant rust, no face), hope you got them for a good price.