

skidoo_j
-
Posts
988 -
Joined
-
Last visited
Content Type
Profiles
Forums
Gallery
Everything posted by skidoo_j
-
metric ton springs lifted?
skidoo_j replied to codymanche's topic in MJ Tech: Modification and Repairs
You can measure your current ride height, and if it DOESN'T match the factory spec you know your springs are sagged. Top of axle tube to bottom of frame rail. 9.2" +/- 1/2" for 4WD, 8.2" +/- 1/2" for 2WD. Eagle you're correct, and I even posted that prior :( late night and tired i guess. it is much more notcible through when you pull them off and take the eye eye center measurement. I remember what my thought process was though last night Because he's SOA and just kept thinking it wouldn't work, now this morning after sleeping : the measurement procedure of top of tube to bottom of frame rail must be modified to be used with SOA, you must subtract the diameter of the axle tube and height of the original spring perch, the height of the new spring perch and I'm thinking even the thickness of your spring pack from your measurement. to get it back within a factory comparable number -
metric ton springs lifted?
skidoo_j replied to codymanche's topic in MJ Tech: Modification and Repairs
Using those measurements gave me a measurement of 10.5 -10.25 inches sorry it took so long for the measurements, so much rain.. That sounds about right with aftermarket leafs. I say this because when they produce the leaf springs now they're using better calibrated presses, but following what could have been a loose machine original. So even through you had to ad 2.5" up front (do you have a large bumper?) to level it out you truely are only about an inch in the rear higher than factory spec. -
metric ton springs lifted?
skidoo_j replied to codymanche's topic in MJ Tech: Modification and Repairs
If you are SOA yes. There is no way around it a metric ton spring pack has extra leaf springs that go between the main spring and the axle thus you will see a lift of the physical thickness of the extra leafs/difference in thicknesses. Secondly I would say that a set of Metric ton springs off a similiar year will be stiffer and odds are would not have sagged as bad as non-metric so you would see a slight lift due to the spring constants. IIRC there were like 4 sets of "regular " springs each having a slightly different load capacity and spring rate. and there are 2 or 3 common types of stock metric ton springs. so if you had the lowest capacity springs currently and you happen to pick up a set of metric ton that were at the top of their load capacity the sag difference could be well over an inch right there. The bad thing is you can't measure how much sag your springs currently have unless you remove them from your vehicle. You then place a straight edge from bushing eye to bushing eye and then measure perpendicular to the center of the leaf pin. This measurement is the "free arch" according to the factory specs that were produced from the fsm and the spring engineering spec pages iirc it's 9-9.5 pending the springs. several months ago someone posted all the factory part numbers for the spring packs available with their weight capacities and their free arch. -
Did you fix that fence yet? The wind hasn't been that strong in several months.
-
the fat boy bulbs you're showing in your picture are 4 years old? If so that's pretty damn good compared to the HID what was the price of your hid setup vs the fat boys? I haven't decided on bulbs yet.
-
I think the improvement of wiring would depend on the current condition of your electrical system. On my personal vehicle i can take a stock bulb and plug it in the harness and cannot tell the difference if it's connected directly to the battery with 10 ga wire. I think it is possible for an improvement, but unless the switch is $#!&ty or the wiring and plug-ins are corroded I'd bet it's more a placebo effect. I do however plan to wire my headlights over to relays, just to reduce the amount of current being drawn through my fuse panel. Plus i think it will look nicer to have 5 or six relays next to each other in a line on the truck. High, Low, fogs, bar lights, front locker rear locker. Granted fogs, bar lights and e-lockers are a ways away in my plans and may never materialize.
-
I ordered a set of IPF Rectangular H4 Headlight Inserts from 4wd.com wednesday. I purchased them over the autopal's based on referals and pictures of light dispersion that I found between naxja and here. It was a toss up between the hella and the IPF, both seemed to be highly spoken of but I couldnt find anyone with direct experience of both.
-
H3RESQ's Dream MJ, the build continues...
skidoo_j replied to H3RESQ's topic in Member Projects: Your Comanches
Thanks. Good luck with your build. Ill keep the picks a coming. Detailed motor bay today... I don't recall seeing that bar before. Is that a strut support or? -
I like rancho 5000 shocks. They're fairly inexpensive and have a lifetime warranty. they're available at most autoparts stores. I measure out what i think i'll need and reference their charts. http://www.gorancho.com/assets/catalog/ ... ations.pdf i just bought some rs 5255 for my front with 4.5" lift using stock stud and the bar pin. I extended my bumpstops for my lift and tire combo. the shock has 10.5 inches of travel and i'm riding about in the center with that shock. my rears are rancho as well, don't recall which they were, but when you do an SOA you really need to measure out what length you need based on how you did your spring perches and your actual lift. My soa netted 4.75" of lift with new MT springs (i used xj shackles and my spring stud is 1/16" off the axle.) I've seen and read of some getting almost 6.5" from and soa lift.
-
Cherokee-Manche rear suspension swap
skidoo_j replied to manche75's topic in MJ Tech: Modification and Repairs
Yes, BUT, I believe my Cherokee is spring over axle. A block would lift it. So if he's wanting to obtain a 2" drop he could convert to sua then make a bastard pack between a comanche and cherokee to counter the 4.5-6" loss in height from the SUA -
Need Opinions about underhood heat.
skidoo_j replied to 35 Dollars's topic in MJ Tech: Modification and Repairs
That's pretty neat. and would be pretty useful at stops or slow speeds. But i'm thinking at higher speeds when the air under the car goes faster then over and the pull through the engine compartment goes under the vehicle it would not pull air in, it would seal. I guess it wouldn't be that much of a problem because at that speed you're getting enough air in your engine compartment to cool anyways. -
Need Opinions about underhood heat.
skidoo_j replied to 35 Dollars's topic in MJ Tech: Modification and Repairs
Well unfortunately for the rest of us a Reflexxion hood is not an option unless we pick one up used. They are nolonger available as the mold got damaged (rumor on the net) and they were not selling enough of them to replace/repair the stamp. -
Need Opinions about underhood heat.
skidoo_j replied to 35 Dollars's topic in MJ Tech: Modification and Repairs
On the windshield side of the cowl is is completely open? -
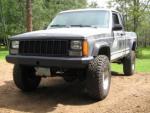
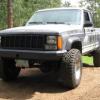
Spent money on it. Got a set of upper arms. Headlight buckets, recovery shackles, shocks, coil overs. also looking at getting her painted in the next month or so. debating on sanding priming my self or having it done.
-
Well after 8 years of use and if they honored their warranty I'm still content getting their stuff.
-
I had been looking to purchase some parts for my Comanche. Someone on here informed me of 4wd.com discount and donation program. I received 10% off my entire order, and the best part they have free shipping on a majority of their items. Then CC.com gets a kick back at the end of the year. I ended up getting jks upper arms and a bunch of other stuff and it ended up only a few dollars more then rusty's offroad after their extreme shipping prices. Thanks Rob @ 4wd.com For others not aware of the program run a search to obtain your 4wd membership account.
-
Need Opinions about underhood heat.
skidoo_j replied to 35 Dollars's topic in MJ Tech: Modification and Repairs
Do you have pictures of the top side of your install you could post? are the ones you have for sale the same as the ones you installed? -
I no longer use wd40 for much of anything. Maybe cleaning water off a part that i just washed. WD-40 doesnt' break up rust very well any longer. I think they changed their formula about 15 years ago. I remember my grandfather using it as starting fluid, and the crap that you buy now good luck lighting that, even the aerosol is hard to light while spraying. I've started using PB-blaster. I'll spray it on the nuts and bolts a few days in advance on really bad stuff. I also have a can in the garage that i use to catch the drippings and use it to soak the nuts and bolts in. PB seems to actually dissolve the rust. And often eliminates the need for breaker bars and I don't recall the last time I used an extension on a breaker bar since i started pb-blaster. I've found that if it doesn't come out i let it soak with multiple applications of PB or I tend to snap the bolt off and have to drill and chase threads later. Just my opinion I'm sure others may love WD-40 and not use pb at all, but I personally use Pb-blaster and love it.
-
Need Opinions about underhood heat.
skidoo_j replied to 35 Dollars's topic in MJ Tech: Modification and Repairs
that's funny i was just looking into this. I found this company online that sells some nice looking ones. Granted they're pricey http://www.hoodlouvers.com/ but what my concern was that adding these hood vents my inside air temp will increase as the cab air intake cowl would be right next to the hot air from the hood vent???? -
Even BETTER discount at 4WD Hardware
skidoo_j replied to COMANCHEROB4WD's topic in Vendors- members making products for MJs
pm sent -
Bright sealed beam headlights?
skidoo_j replied to Eagle's topic in MJ Tech: Modification and Repairs
I just sent my info over to get set up. :) -
the bearing in the bracket that holds the clutch fan is a water pump bearing. I picked one up at my local bearing supply (no-joke it's all they sell) for 18. I had to cut the shafts to length using a cut off saw as the steel was very very hard. Then pressed it all back together. lesson learned when pulling off the mounting surface be sure to press it out square. and back on square. I'm not sure if it was always this out of true, but once the mounting surface was pressed back on it has a pretty good walk, so the bearing got repressed out with the mounting surface still attached (after several attempt with a BFH to square it) and then turn in the lathe so my mounting surface is true to the shaft. Shaft Diameter : .6267" Bearing Diameter: 1.1811" Total Length: 4.56" Short Side (fan side): 1.10" Long Side (goes up inside bracket not all to important on this length): 1.930" Looks like napa BRG 885154B would work, it wouldnt have the shaft that goes back inside the bracket, but if you can't source it else where, It looks like it would still need a bit of shortening. but 12 dollars beat 120 for the bracket with the bearing (that's the only way my dealership would sell me). Also replaced the drive pulley with part number 53010309AB by crown as my old one appeared to have a tapper on it that may have also led to the walking of the belt to cause the squeal.
-
This...and a new pulley. I think that should cure it. It seems like you engine was able to rev past the fan that was locked up tighter than design. The belt would scrawl forward to try shortcut past the slower pulley. The new pulley will cost $20 to my local crown dealer. Hopefully i get it this week or early next and of course that it is infact the correct part. 53010309AB. Now i'm headed to see if i can press out the bearings in that bracket that the fan spins on to replace them
-
with the fan and clutch removed and only that pulley attached the belt does not walk forward or squeak. I do however notice a pretty good forward tapper on the belt running surface. so I'm not sure if it's the fan clutch or a bad/worn pulley surface. and some play in the bearings on the mounting shaft. the fan drive pulley is part number 53010309AB it's $90 from the dealer. Crown makes one but I haven't found their price yet, I'll have to call quadratec or rusty's tomorrow to see what price they can get it for. The bracket that contains the bearing for the fan is 260 dollars. I'm going to pull it and see if i can figure out how to press out the bearing and replace it. i'm also debating on returning the ZJ fan and just getting a new xj fan.
-
alright damn thing squeals all the time at 3k rpm and at hard accel. I'm 99.9% sure the belt is are correct tension less than 1/2" deflection.... from power steering to idler. I'm wondering if the zj fan clutch is causing this. I never had a squeal prior to installing it. i'm waiting for the truck to cool down, then i'm going to go remove the fan/ clutch and just bolt the pulley straight on. I figure if it doesn't squeal then it's because the clutch is not releasing due to bad or the fact it's "heavy duty" and won't disengage due to the lighter fan. if it still squeals i'm thinking alternator maybe going? or the bearing the clutch fan runs on. the harmonic balancer is brand new and so is the belt. I welcome ideas and thoughts....