


AZJeff
-
Posts
1312 -
Joined
-
Last visited
-
Days Won
1
Content Type
Profiles
Forums
Gallery
Everything posted by AZJeff
-
Harmonic balancer replacement
AZJeff replied to Car Enthusiast's topic in MJ Tech: Modification and Repairs
That is the primary failure mode for a harmonic balancer. Fix it soon, or else the outer ring can "walk" rearward on the hub and begin chewing up the timing chain cover. -
I am looking for the connector on the body half of the wiring harness for a 1996 or later XJ (my engine in my MJ is from a 2000 XJ, along with the wiring.) Does anyone have a line on one in good working order? (Wells Automotive makes a replacement, but it's FIFTY DOLLARS, and that's kinda steep for a silly connector.)
-
The engine builder who is making my new short block tells me that Pete (known here as "Cruiser54") has passed away. He will be missed for his insight into old MJ's and XJ's. I hope his "Cruisers Tips" is archived for posterity here. EDIT: address for if anyone would like to send a card to his widow. The Family of Peter Rushbrook 7255 N Spur Rd Prescott AZ 86305-8928 Funeral / Celebration of Life: - May 29 5pm, Upper Ramada @ Watson lake in Prescott, AZ
.png.ebf5c33f89ccbacd918c6c2d60e48a34.png)
-
trouble bleeding the front brakes
AZJeff replied to Pete M's topic in MJ Tech: Modification and Repairs
If worse comes to worse you can take the prop. valve out of the vehicle, disassemble it, and push the shuttle back into place from one end. (It might also be a good time to clean the whole valve to make sure any crud from within the valve assy.) Of course, this will require bleeding ALL the brakes, but that's not actually a bad thing, especially if the fluid is old. -
trouble bleeding the front brakes
AZJeff replied to Pete M's topic in MJ Tech: Modification and Repairs
It really should not take much force. I use a small pick and kind of try to drag the shuttle back to the center. It should also have an angled surface on it that actuates the switch plunger, and that surface is easier to use to actually push the shuttle along. (That angled surface might be out of view through the switch port, but some slight coaxing might make the edge of the surface show up in the switch hole. Once that surface is visible, it's easy to push it along the rest of the way towards center.) -
trouble bleeding the front brakes
AZJeff replied to Pete M's topic in MJ Tech: Modification and Repairs
The emergency shuttle often does NOT reset by itself. Years of gunk (and never normally moving) make it stick in place. It is possible to move the shuttle to the center by sticking a small pick or similar down in the hole where the switch plunger threads into the valve body, and I have done this in the past. Just be gentle with the pick on the shuttle, since it's usually made out of aluminum. -
There were no robots on the assembly line when the XJ or MJ were in production, at least nothing like what we see today. However, the use of Torx fasteners allows the power driver bits to last longer on the production line.
-
For those who may not have studied the shape of a Torx bolt: the “star” shape you see is actually an “involute spline” tooth pattern. This is similar to gear teeth and to splines on things line drive shafts. this shape of “tooth” will transmit torque MUCH more evenly across the driving surface of the fastener. This results in less tool wear on repeated driving of fasteners, and less wear on the fastener head when removed/installed repeatedly.
-
The only bed bolts I ever messed with were bolts with separate nuts. if ALL of the bed bolts are that type, 3/8 grade 8 bolts with self locking nuts would substitute quite nicely.
-
Battery drain from Starter Relay?
AZJeff replied to EdJarHead's topic in MJ Tech: Modification and Repairs
'jdog' is correct. The starter relay is merely a distribution point for the power from the battery. The wires attached to the threaded stud on the relay are the wires that distribute the power to the various circuits in the vehicle. Finding which circuit is the one that is "bleeding" the electrical system when the vehicle is turned off involves identifying the circuit by process of elimination. Start by removing ONE of the wires attached to the threaded stud, and leave the vehicle sit overnight with the battery cut-off switch left in the "ON" position. If the battery is not drained by this action, then reconnect that wire, and pull another one, and repeat the overnight test. Once you have the wire that has the bleeding identified, now you can begin searching for the specific source of the issue. By the way, I assume you have performed all of Cruiser54's tips on improving your electrical system. If you have not, do that first, before anything else. -
Harmonic balancer replacement
AZJeff replied to Car Enthusiast's topic in MJ Tech: Modification and Repairs
This is another good point. If you try to start pulling the new balancer on with the threads of the regular attaching bolt, it’s quite possible to STRIP THE THREADS IN THE CRANKSHAFT! What I always do is to polish the end of the crank with fine emery cloth to remove rust and varnish. Then clean the crank with brake cleaner or the like. Also clean the inside of the hub of the new balancer with brake cleaner as well. Then use some clean motor oil on the snout of the crank and the inside of the balancer hub. Tap the balancer on to the hub to make sure it is started evenly. I find that light taps with a hammer should get the balancer on far enough that the retaining bolt with thread in at least 4-5 turns. omce the bolt is that deep (or more) the chance of stripping the threads is very low, and the bolt can draw the balancer on the rest of the way. -
Harmonic balancer replacement
AZJeff replied to Car Enthusiast's topic in MJ Tech: Modification and Repairs
That is a VERY good tip. Most guys who have never pulled a balancer don't know about the big washer under the bolt. -
Caliper knuckle bolt hole stripped
AZJeff replied to Whitaker717's topic in MJ Tech: Modification and Repairs
So a search on Helicoil on the web, and you will find they come in virtually every standard thread size/pitch, both SAE and Metric. -
Caliper knuckle bolt hole stripped
AZJeff replied to Whitaker717's topic in MJ Tech: Modification and Repairs
You might want to define "pretty snug" and "super tight" a bit more to instill more confidence here. -
You are going to have to make your own brake lines to connect the MC to the prop. valve. The best thing to do is to take the MC to the auto parts store to match up the correct kinds of flare and thread. On a WJ, they might be using ISO “bubble” flares, and it is easier to buy the tubing with those flares pre-made. For the other end that connects to the prop. valve, be prepared to cut and bend the tube to create the custom lines you need and flare the ends with the traditional flare that attaches to the prop. valve. (You can reuse the regular flare nuts from your old tubes on the ends that connect to the prop. valve)
-
Caliper knuckle bolt hole stripped
AZJeff replied to Whitaker717's topic in MJ Tech: Modification and Repairs
It’s back together with a stripped bolt hole?😳 That might not be a very good idea. -
Caliper knuckle bolt hole stripped
AZJeff replied to Whitaker717's topic in MJ Tech: Modification and Repairs
I stripped a caliper bolt in my MJ (but my bolts don't' look like yours) and I fixed it using a "Helicoil" thread repair kit. There is also another type of thread repair called a "Keensert", but they seem to be less widely available. Compared to Helicoils, Keenserts are for higher strength applications, as explained here: https://blog.mfsupply.com/2020/02/21/heli-coils-vs-keenserts-3-differences-you-must-know-part-1-of-2/ In your situation, the application you have does not place any real load on the pins, as there is no real tension on the threads once they are tightened. The threads only keep the pin from falling out. That means a Helicoil, if installed correctly, should be more than adequate for the job. -
No-weld floor pan replacement
AZJeff replied to Elwiscon's topic in MJ Tech: Modification and Repairs
That nice work. When you say you used "steel rivets", I see what looks like "pop rivets" in some places. I assume you mean you used a steel version of those. There are pop rivets out there that require a pneumatic or hydraulic tool to clinch them, and when those are used, in conjunction with structural adhesive, I would bet it would rival the original spot welding done 35 years ago in Toledo. -
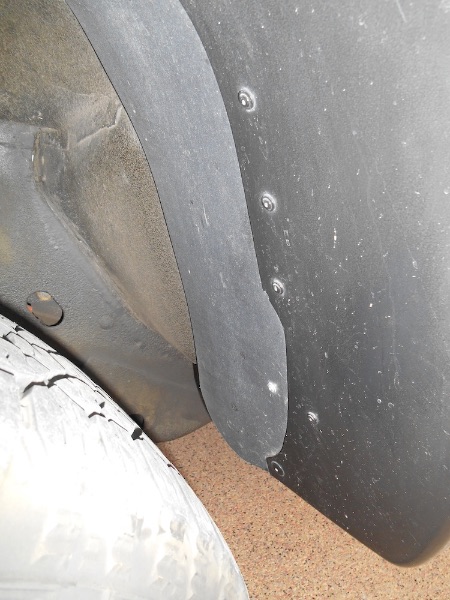
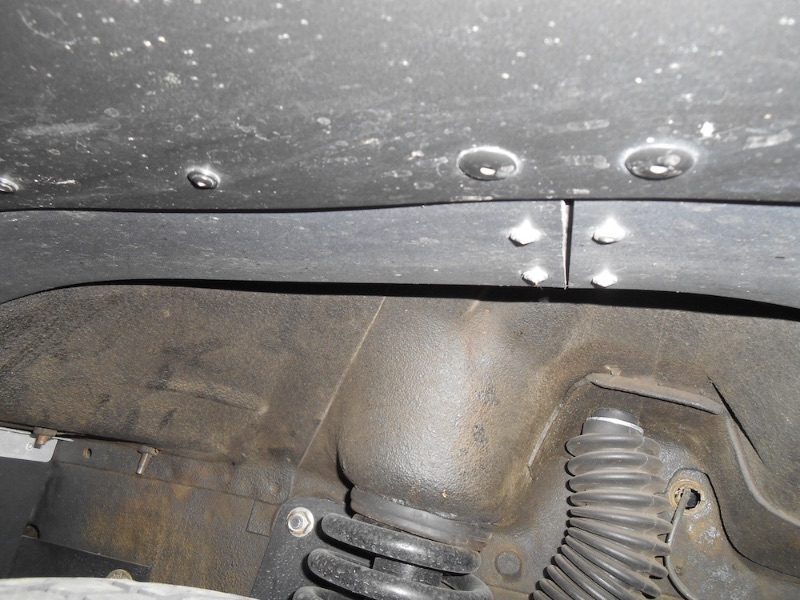
Here are a couple of snaps of the front splash shields I made. The black part is the aftermarket flares I have on the MJ, and the grayish black part is what I riveted to extend the flare inward into the wheel well to function as a splash shield.
-
Yet another bucket seat question
AZJeff replied to Aidenmoreno3's topic in MJ Tech: Modification and Repairs
The Corbeau seats I put in my Comanche are really quite awesome. They are VERY comfortable, with firm cushions and nice bolsters. I put in ones that recline, with adjustable lumbar support, in an all-cloth covering (you don't want leather in the AZ sun, unless you want the backs of your thighs fried.) My ONLY complaint is that there is a small plastic piece that covers the recliner mechanism, and the screw boss broke off on the cover on both the driver's and passenger's side. I think it was overtighted at the factory, and the piece is not tolerant of such aggressive assembly. I was able to fabricate a small metal piece to replace the broken hollow plastic boss, and reassembled it all back together, good as new. Otherwise, they are GREAT seats. They are not terribly expensive, but that's sort of relative, because virtually ALL new replacement seats are a substantial investment. -
The part highlighted is really the best way to try to isolate the leak, because the oil vapors get swirled around and deposited all over the bottom of the engine due to the wind under the car when on traveling. Even if you don't own a pressure washer, a couple of cans of engine degreaser and a garden hose with a strong nozzle on it might get rid of almost all of the film and drips. Once your chassis is degreased, a short drive or two (10-15 minutes) will start up the real leak, and crawling underneath will make it easy to spot. (The cardboard trick listed is also a good way to narrow things down.) Just looking at the photos, I don't think the pan is the source of your leak, but I could be wrong. Something is definitely leaking around the filter adapter, and other sources might show more clearly doing the above suggestions.
-
Wheel hub and axle u joint recommendation
AZJeff replied to Whitaker717's topic in MJ Tech: Modification and Repairs
Timken manufactures bearings in literally dozens of places around the world, and uses the same quality control systems in all of those locations. Thinking that ones made in the USA are automatically of some better level of manufacture is unfounded. The last time I put Timkens in my XJ (15 years ago), the ones I got were made in the Czech Republic. The Czechs are known for precision machining, so I suspect there were as good as any other Timken product. -
I am a big fan of also CHANGING the trans fluid on a regular basis. With the AW-4 having a drain plug, it's virtually no excuse to not drain the pan and refill as described above periodically. I do it about every 24k miles down here where it is hot, because the fluid breaks down with heat over time.
-
Custom Gaskets for HVAC
AZJeff replied to H3ADBANG4L1F3's topic in MJ Tech: Modification and Repairs
That's too bad, because those samples you showed looked to be of OEM quality. -
Custom Gaskets for HVAC
AZJeff replied to H3ADBANG4L1F3's topic in MJ Tech: Modification and Repairs
The laser cutter is the part I am most interested in. Is this a tool you own?