

AZJeff
-
Posts
1312 -
Joined
-
Last visited
-
Days Won
1
Content Type
Profiles
Forums
Gallery
Everything posted by AZJeff
-
Temps climbing rapidly in traffic is normally a sign of lack of airflow over the rad due to fan issues. when you put in the new rad, what did the old coolant look like? The guy @GrandBoost talked about had massive crud in his cooling system, and that will plug up a radiator pretty quick. have you correlated instrument gauge readings with measured temperatures out at the thermostat elbow, BTW?
-
If you are still seeing operating temperatures of over about 215* when ambient air is at 110* (or thereabouts), then something in your cooling system is not up to OEM specifications and performance. The two things people often "think" are OK, but are not, are the radiator proper and the viscous clutch fan. The radiator might flow water just fine, but if the passages have lots of corrosion or mineral buildup, they cannot transfer the heat as required. The viscous clutch fan is notoriously hard to actually confirm as working correctly. My rule is that anytime that is over 5 years of age, it gets replaced. Finally, as Pete said, if you don't have an e-fan, get one installed. My efan comes on regularly even when my AC is not running in the hot weather, and that tells me the viscous fan alone cannot cool a 4.0 when the ambient air is 110*
-
There was another thread on this topic about 10 days ago where I spelled out the magic formula for how to keep an XJ or MJ operating at proper temperatures in Phoenix heat. And that heat is about as high as you will see regularly inside the US. check out that thread, and follow the suggestions as needed to have a happy Jeep in the heat
-
Interior reassembly question
AZJeff replied to gogmorgo's topic in MJ Tech: Modification and Repairs
Its quite possible that the original design called for a screw to be located there, and they removed it as a cost cutting measure when they found it did little to help the panel security. I put one in that position anyhow on my MJ, as I figure the more secure stuff is, the less likely it is to squeak and rattle. -
Seat Belt Shoulder Strap Cleaning
AZJeff replied to Dandxj's topic in MJ Tech: Modification and Repairs
Agreed. Mild soap (dish soap) and a hose with a nozzle will do a pretty good job. Just be sure to rinse the fabric well so no soap is left behind. As Eagle Scout said, make sure the belt is left fully extended until dry. Hand it up in the sun, or with a fan blowing on it, will help speed the drying. -
Tips for a cool running comanche?
AZJeff replied to Discoman9001's topic in MJ Tech: Modification and Repairs
Yeah, we old guys gotta stay together. You know how there is "boomer bias" nowadays -
Looking for Help in the Phoenix Area
AZJeff replied to Discoman9001's topic in MJ Tech: Modification and Repairs
Send me a private message, and we can set u a visit to my home garage in Queen Creek. (See my note on the original thread on this topic.) -
Tips for a cool running comanche?
AZJeff replied to Discoman9001's topic in MJ Tech: Modification and Repairs
Boy are you ever old. (Said by someone who has two years on you!) -
Tips for a cool running comanche?
AZJeff replied to Discoman9001's topic in MJ Tech: Modification and Repairs
If your MJ is fully drivable, I would be willing to help you out with looking it over and discussing a strategy on what to do to bring the cooling system up to snuff. Best of all, if something REALLY needs attention RIGHT AWAY, I have something that is VERY valuable here in Phoenix: and air conditioned garage. Send me a PM and we can set up a "look it over" visit, if you like. I am in Queen Creek, which is about 25 miles from Tempe. -
Tips for a cool running comanche?
AZJeff replied to Discoman9001's topic in MJ Tech: Modification and Repairs
I don't know of any that I have used, because I do my own repairs. Other guys on the forum who are in AZ might be able to chime in on some reputable shops in Maricopa County. What part of the Phoenix are do you live in? -
Tips for a cool running comanche?
AZJeff replied to Discoman9001's topic in MJ Tech: Modification and Repairs
I have owned multiple XJ's and now an MJ here in Phoenix, and all of them have run just fine in the heat. The secret to that is to make sure your cooling system is operating AS DESIGNED by Jeep. If ANYTHING has deteriorated below OEM spec, overheating is likely. Here are my thoughts: 1. I don't trust the temperature gauge on the dash to be particularly accurate. I alway confirm temperatures by using one of the infrared meters with a laser pointer on it (Harbor Freight for the win.), and I take my temps on the thermostat elbow. By doing that, you can sort of extrapolate how far off the gauge on the dash is from reality. 2. If your coolant is even the slightest bit cruddy, a flush is the minimum to do. When you refill, be sure you run the correct mix of antifreeze, because it not only lowers the freezing point, but it raises the boiling point of the coolant as well. 3. If your viscous fan clutch is more than 5 years old, replace it, regardless of if it "feels" OK. 4. If you don't have the electric fan in your MJ, install one. 5. If your radiator has any crud that does not come out from a good flush (an inspection mirror and flashlight is needed to see inside the end tanks to look for permanent deposits in the radiator), then consider converting to an open cooling system while you are replacing the radiator. It removes a bunch of weakness with the closed system pressure tank and cap. 6. If you are redoing the system to convert to open, ditch the heater control valve while you are at it. That plastic piece of junk is prone to breaking, especially with the heat we see out here. 7. If your hoses are even the slightest bit soft, you can expect them to get MUCH softer very soon with the higher under-hood temperatures. I just automatically replace mine as soon as I see or feel any squishiness at all. 8. While you are changing the hoses and/or the radiator, put on a new belt if the one you have isn't new within the past 5 years was well. The heat kills those things as well. I know guys who run the hood louvers, but I am not convinced it really helps the actual engine cooling that much. It might make the temperature of various components lower, but actual engine temps are not going to be improved that much. Also, get some oven mitts or gloves to carry in the Jeep. When I have been out running around and its fully heated up in the summer, I can barely even reach in to release the secondary hood latch due to the heat of the hood by the radiator. Then, once it's unlatch, I race to move sideways over towards the prop rod area, where it is MUCH cooler. Gloves make this a bit more tolerable, and you won't look goofy like I do when crab walking the hood in my hands to get to the cool part -
Gotcha. Thanks for the explanation.
-
As we all know, the MJ tailgates have two red lenses, each in their own compartments in the light assembly. There is also a back-up light in its own bottom compartment with a clear lens. So my questions are: 1. which of the two red light compartments does the turn signal junction? 2. Which of the two red light compartments do the brake light function? 3. And finally, do one or both of the compartments act as tail lights? Thanks
-
I will affirm the comments from Cruiser related to techs. at the Jeep dealer(s). I had a cruise control issue on my 2000XJ a few years ago that I could not fix, since I did not have the Chrysler-specific "DRB" scanner that can talk to the cruise control functions in the PCM. I took it to the nearest dealer, and the dealer said they had no techs that could diagnose the issue. I called the next closest dealer, and explained to the service advisor I used with warranty issues on my 2014 Wrangler about my problem on the old XJ. He said they had ONE TECH. in the shop that had worked long enough to be familiar with the 2000XJ cruise control. (He had been working on Jeeps since the end of the AMC era He was able to fix it, and he used it as a learning experience for one of the younger techs. on how old Jeeps were constructed and functioned, and they enjoyed looking at my fairly nice old XJ. Taking one of our MJ's (or an XJ for that matter) to a Jeep dealer for repairs would be like asking a Ford dealer to work on a 1969 Mustang Mach One. They would be clueless, for the most part.
-
Core4x4 for the win, even with 33” tires
-
Dana 30 carrier bearing bolt size
AZJeff replied to Warthog's topic in MJ Tech: Modification and Repairs
Take one of your existing carrier bolts to the local hardware store and match thread diameter and pitch against the stuff they have in stock. That now gives you the proper tap size to use. NOTE: I am NOT suggesting that hardware store bolts can be used in place of the OEM bolts. The OEM bolts are SAE Grade 8, and probably a lot higher grade (stronger) than anything your local hardware store might stock. -
Seat belt replacement (but now radio doesn't work)
AZJeff replied to Virginia's topic in MJ Tech: Modification and Repairs
The wires to the seat belt switch, in the 1991 manual I have are shown to be a black one and a white one. These, of course, are not the colors of your two wires Others have mentioned that they suspect a ground issue, and I think they are on the right track with the root cause of your problem. The circuit is very basic for that seat belt switch. One end goes to power on the chime module, and the switch just completes the ground to the other side. I outlined this is blue on the attached diagram. The location where it completes the ground is a common ground for a ton of stuff, so my inkling would be to ground one of the wires and see what happens. I know that kinda sounds kind of a guessing approach, but since the wire colors don't line up, it's worth a shot.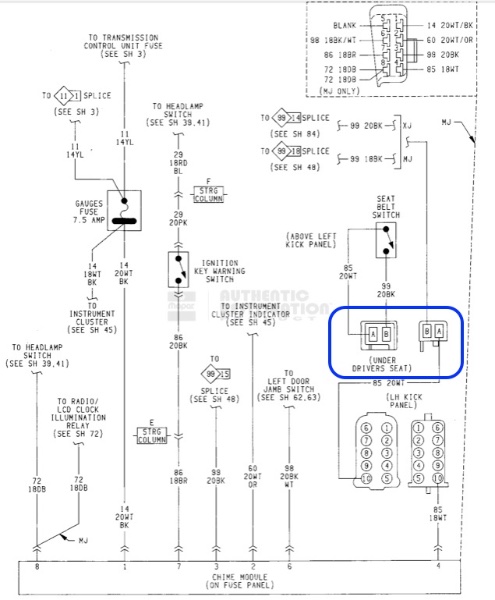
-
Seat belt replacement (but now radio doesn't work)
AZJeff replied to Virginia's topic in MJ Tech: Modification and Repairs
That's odd. I downloaded one of the PDF's I uploaded and was able to open it using "Preview" on my Mac computer. It's not crystal clear, but I can read all the text when I blow it up to a size bigger than 8.5 x 11 inches. I will try it using Adobe, and see if it opens clearly or not. If necessary, I will figure out another way to capture those pages in a bigger format. -
Seat belt replacement (but now radio doesn't work)
AZJeff replied to Virginia's topic in MJ Tech: Modification and Repairs
Virginia, I posted the wiring diagrams for the 1990 model year, and I seriously doubt if those circuits had a color change in the wires for 1991 (the year of your MJ.) I would check those if I were you. -
Sealing Glass on Wing Window
AZJeff replied to Drahcir495's topic in MJ Tech: Modification and Repairs
Black urethane glass adhesive (used to attach windshields to the body opening) is the ideal agent. Any glass shop should be able to do both windows for a few bucks, and it’s UV tolerant, more than RTV. -
weird wiring issues with radio and dome lights
AZJeff replied to Jeephazlett's topic in MJ Tech: Modification and Repairs
OP---what year is your vehicle? I might have the wiring diagrams for the factory radio and the dome/courtesy lights that can help you chase down the issues you are having. -
weird wiring issues with radio and dome lights
AZJeff replied to Jeephazlett's topic in MJ Tech: Modification and Repairs
I second that philosophy. In vehicles that have been owned my multiple persons before me, and I see ANY type of NON-FACTORY wiring, I almost invariably remove it all and start over. So much stuff that is added in by first, second, third, and fourth owners is hacked up garbage that often causes problems that can be very mysterious (and possibly dangerous). Several things that usually are clues to hacked wiring include: 1. wires twisted together to create a splice (instead of crimped or soldered) 2. use of that junky/sticky vinyl electrical tape to insulate connections (extra negative points for using duct tape or scotch tape!) The right thing to use is heat shrink tubing. 3. use of "wire nuts" intended for household wiring 4. use of "Scotchlock" connectors in under-hood applications, where they are exposed to adverse elements and can corrode. 5. any strange wires added to the fuse block by cramming them in behind the fuse blade. (They actually make a gadget that allows you to tap into an existing fuse slot and still retain the existing fuse while making reliable connection.) 6. any added circuits that get power that is unfused (talk about a fire waiting to happen.) My recommendation to anyone with a vehicle containing this kind of stuff is to (1)get the factory wiring diagrams for your vehicle and (2)start trying to redo any connections that exhibit any of the above characteristics. -
Messed up bolt extraction..... what are my options??
AZJeff replied to VorTekX's topic in MJ Tech: Modification and Repairs
Another tool that might help after the Five-way suggested by Pete M is an indexing pry bar like this one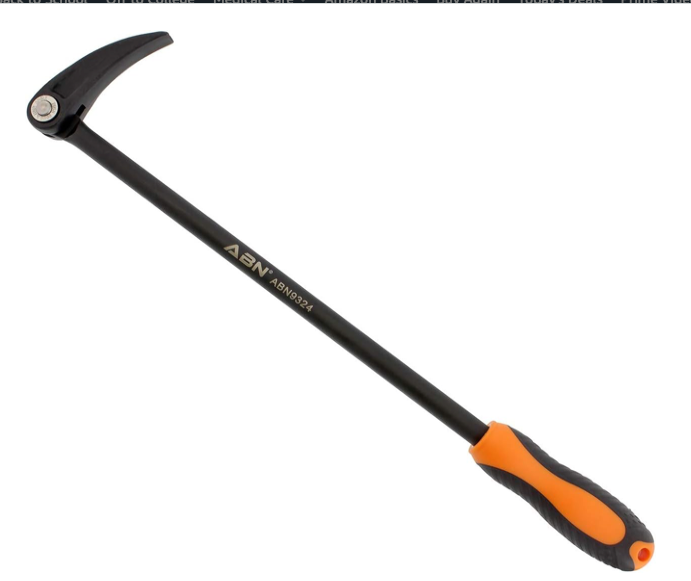
-
aw4 valve bodies all the same?
AZJeff replied to Pete M's topic in MJ Tech: Modification and Repairs
So since you seem to have experience with the TransGo shift kits, give us some feedback on how you feel your AW-4 behaves once the shift kit was installed. I am considering one, and am curious as to the net results. -
If all the major pieces of your system are in good working order, they should not need replacing in order to do a conversion. This means you should be able to reuse the evaporator, condenser, and compressor. The hoses "might" be able to be reused, assuming they don't have any cracks or dry rot visible on them. Even if all the hoses are good to go, you will need to replace all of the O-rings that seal the connections between the hoses and various other pieces of the system. The newer O-rings are compatible with the R134a style refrigerant, and the old ones are probably dried out and hardened, thus creating potential leak sources. The one piece of the system you SHOULD replace is the reciever/drier, also known as the accumulator. IT contains a desiccant in it, and that wears out over time. In addition, the accumulator contains a large portion of the lubricating oil that circulates in the system. Although leaving the old oil in the system with the new R134a isn't a problem, removing that old oil will provide a TINY increased volume of new refrigerant, and thus help performance SLIGHTLY. When you do the conversion, you will need to purchase adapter fittings that convert the old screw-on type service ports to the quick-connect type used with R134a. When you do this, I recommend you change the schrader valves in the service ports because hte old seals are probably dried and leaking already. Of course, you will need to add the appropriate amount of R134a compatible oil. That amount would be the same as the amount of oil the R12 system used. The best way to do this is to pour the oil into various parts of the system while you have the hoses disconnected. You should put about 60% of the new oil into the accumulator, 25% into the condenser, and 10% into the compressor, and the remaining 5% into the evaporator. Once all rebuilt with the pieces I described above, you will need to evacuate the system and charge it with 80% (by weight) of whatever your system took with R12. If you have questions, fire away.