

AZJeff
-
Posts
1295 -
Joined
-
Last visited
-
Days Won
1
Content Type
Profiles
Forums
Gallery
Everything posted by AZJeff
-
In addition to a visual inspection of steering linkage joints, I find that wrapping your hand around the joint so that you are grasping both halves of the connection is helpful. With this type of grip, you are able to feel the relative motion between the two parts of the joint.
-
Any welding in the middle of the hood to attach the under structure to the hood skin is going to distort the surface at least minorly, and that would necessitate some secondary work to remove that distortion. Adhesives of any kind will keep the surface skin from “oil canning” against the underlying ribs and making noise.
-
There are structural adhesives used in the body shop industry that will bond your hood pieces in the center areas quite nicely, and will be mush more effective than the stuff AMC and Chrysler used back when MJs were in production. if you know of a body shop supply store, they would carry this type of stuff. Otherwise, some internet searching is you next best bet.
-
Pete is on to the best, most reliable solution. Unless you are trying to restore your MJ to “as built” condition, keeping that sliding axle lock claptrap is a PITA. Bypassing (overriding) that mechanism makes the axle behave like all the later XJs (and the TJs) which were problem free in this aspect, and the fuel economy losses were insignificant.
-
I can see from the photos that the sway bar bushings where the bar attaches to the chassis need replacing. the chassis end of the track bar is junk as well. All the other steering linkage stuff cannot be ascertained without doing the “rock the steering wheel back and forth” test while holding/feeling each joint. Contol arm bushings need a close inspection with a flashlight to look for cracks or permanent deformation. Keep in mind that, unless those arms were replaced or rebushed some time in the past, you are rolling around on 30+ year old rubber suspension joints, and that almost guarantees that the bushings are just flat worn out.
-
On ALL versions of the MJ or XJ, the rear can be lifted by a Jack on the differential housing (aka “the pumpkin”) and Jack stands placed as shown in th OP diagram on the chassis near the front leaf spring attaching point. For the front of 2wd versions, I would Jack the front tube near the lower control arm attachment points, and place the Jack stands in the locations indicated in the shop manual. I am quite surprised that they caution against using a floor Jack on axle tubes, because I have been doing that on TONS of vehicles for the past 50+ years, including MANY Jeeps, and have never damaged any of them.
-
Any play in the steering linkage is unacceptable. The parts affected should be replaced.
-
That’s who I use. (My wife, not yours.)
-
One of the best ways to check for steering system looseness is to have a helper sit in the vehicle with the engine off and rock the unlocked steering wheel side to side until they feel the force to turn the wheel get high. This essentially takes all the lash out of the steering system. while the guy in the cab is doing that activity, you climb underneath and check each joint one at a time. The way you check the joint is both visual and by feel. the “by feel” part involves grasping the individual joint by hand, trying to encircle both halves of that steering linkage connection with your hand and fingers. You are attempting to feel for any relative play between the two parts of that particular steering linkage connection. this test only works on the steering linkage and on the track bar connections. The test for control arm looseness is only really feasible with a BRIGHT flashlight and visual inspection, looking for cracks in the rubber and/or permanent rubber deformation.
-
Steering stabilizers DO NOT remove vibrations. They merely reduce them. Pete M raises some good questions about/where the vibrations are felt. Based on the speed you stated, it sure sounds like a tire balance issue, but answering Pete’s questions will give some clues as to the source.
-
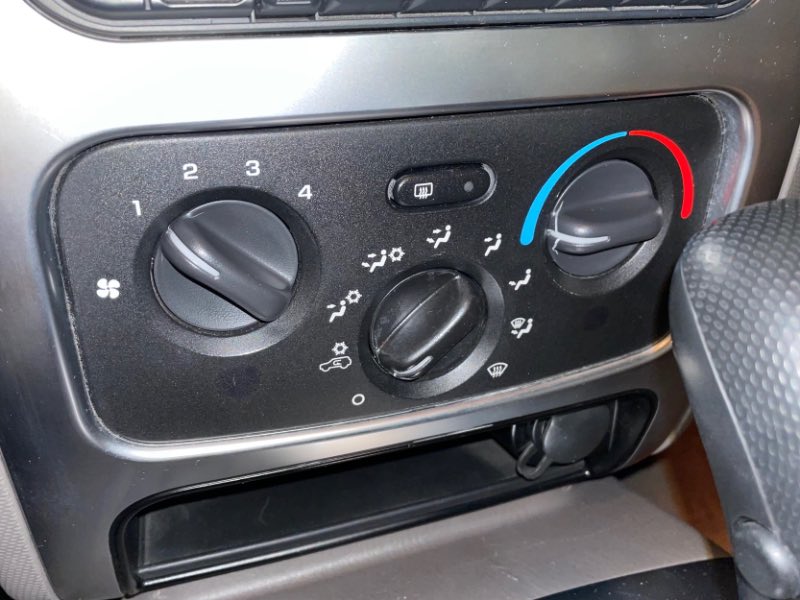
I already tried Wrangler knobs. They are significantly smaller in diameter. any other Mopar knobs of a similar era what would fit will be cracked just like mine are due to Arizona sun and heat. I guess I need knobs from some junkyard donor KJ from a region of the US that does not have the environment seen here in AZ.
-
Here is what the heater control panel looks like. All three knobs are identical and interchangeable.
-
I know this is not an MJ question, but I need guidance from one of our experienced members here. My wife’s 2004 KJ has cracked heater control knobs. The heat and the sunlight are the culprits, and any junkyards here in AZ all have knobs in the same condition. Anything on eBay only lists complete heater control assemblies, which is overkill for wanting three new knobs. does anyone know of a source for either new or used good condition knobs for this old KJ?
-
Installing a Third Brake Light/Cargo Lamp Combo
AZJeff replied to LakeOzarkMJ's topic in MJ Tech: Modification and Repairs
My MJ has a third brake light/cargo light from late 1990’s Ford Ranger. It works quite well. The brake light is tapped into the circuit going back to the taillights through the floor of the cab. The cargo bed lights are tapped into the light switch connector. All joints are soldered and sealed with heat shrink tubing. be sure to use the appropriate gasket (rubber seal) between the lamp housing and the sheet metal of the body to prevent water intrusion. -
Identify my disc breaks
AZJeff replied to dreaminbohemian's topic in MJ Tech: Modification and Repairs
That looks like someone did a half-posterior job of adapting a set of KJ disc brakes to your MJ. I would start by taking the caliper and rotor off to see how much of the parking brake system is in place on the brake backing plate. You might need to clean or replace parts that are damaged or missing. the cable that goes to the actuation lever for the parking brake shoes on a KJ has a return spring that is much larger in diameter (And with lower force) than a regular parking brake cable on an XJ or MJ. It also has a clevis on the end that hooks over the actuation lever. KJ parking brakes are actuated from a lever on the center of the transmission tunnel, so they are of equal length. If you are still using the foot actuated parking brake common on the MJ, you might need to figure out how connect that pedal cable to KJ cables. -
Factory is 195*
-
Help with Bleeding Brakes, Please
AZJeff replied to guava_jelly's topic in MJ Tech: Modification and Repairs
-
Lots of guys claim the only thermostat worth buying for the 4.0 is Mopar OEM, but I have had NO problems using the "Motorad" brand from Rock Auto. Whatever brand you choose, make sure it has a "jiggle pin" hole in the flange of the thermostat to aid in "burping" the cooling system. If you cannot find one with a jiggle pin hole, and small (1/16") hole drilled near the perimeter of the thermostat flange can be made. Then make sure you orient the thermostat with this jiggle pin hole on the "12 o'clock" position when installing it in the head.
-
Your engine is running WAY to cold, even accounting for the near zero temperatures. replace the T’stat with a known good one set for 195*. Also, make sure your cooling system is holding pressure as designed.
-
The football type reservoir was used on all the later XJ’s. I cannot see how using on an older XJ or MJ would cause any issues in terms of storing residual vacuum.
-
Help with Bleeding Brakes, Please
AZJeff replied to guava_jelly's topic in MJ Tech: Modification and Repairs
Gravity bleeding the system is quite helpful in gettin about 80-90% of the air out of the lines. It can be messy, unless you have four hoses and containers to collect that coming out of the bleeders, but having all four bleeders open wide, while keeping the master cylinder full, will shorten the final “pressure bleeding” sequence quite a bit. -
Testing the vacuum system is pretty much start at the intake manifold by applying vacuum at the hose connection there. If it fails, move to the next juncture in the vacuum system, and apply vacuum there. Repeat on down the line until you get to a junction where you no longer have a vacuum failure. at that point, you now know where the vacuum leak is, and you then start inspecting the components at that juncture for cracks, dry rod of hoses, etc. having a vacuum diagram for your MJ will help you know where to look.
-
The easiest way to test the ball is to first REMOVE IT and inspect it visually for cracks or places where the two haves are bonded together and have separated. Then take the vacuum pump suggested above, and connect the hose from the pump to the nipple on the canister ball. Pump the handle a few times and watch the guage. If the guage on the pump drops back to zero in just a couple of seconds, the canister ball is leaking. there is a less expensive vacuum pump that Harbor Freight also sells that will do the job, if money is tight. https://www.harborfreight.com/brake-bleeder-and-vacuum-pump-kit-63391.html
-
The symptoms of “defrost only” air venting from the heater box is a sure sign of a vacuum leak. Have you actually tested the ball-shaped vacuum reservoir to see it hold vacuum? Have you inspected the heater control assembly for possible cracks or leaks? you say you replaced all the vacuum lines. Did that include the one to the reservoir?
-
Does Anyone Make this Heater Core T?
AZJeff replied to oleskool's topic in MJ Tech: Modification and Repairs
If it was my MJ, I would fabricate one from copper water pipe and the appropriate fittings, all soldered together.