

AZJeff
-
Posts
1295 -
Joined
-
Last visited
-
Days Won
1
Content Type
Profiles
Forums
Gallery
Everything posted by AZJeff
-
Agreed. OEM lights/bulbs are nothing to write home about. Even LED bulbs are at best a modest improvement. doing anything than lessens the luminosity seems counter productive
-
You must be a lot stronger than I am. There was no way I could push on my carpet and manage to poke thru it in the seat studs.
-
I used this source for my new carpeting in my MJ. I had a bigger challenge than most, in that the prevous owner had welded in the "hat sections" that are used to attached XJ seats. That meant I had to purchase an XJ molded carpet, and then cut/trim/shape the area where it ends by the box secttion that runs across the back floor of the cab. It took QUITE a while to fit everything. I started by using the molded in features for those "hat sections" I mentioned above as my baseline for locating the carpet on the floor. After that, I cut and trimmed the front first, and then worked around the floor shift and transfer case. Since I have an XJ handbrake, and an airbag module from an XJ, those also had to be cut in. For the areas around stuff like the seat belt holes, seat mounting bolts, and other small features, I used a tailor's chalk to mark those spots, and then used a "hot knife" tip on my gun-type soldering iron, It cut small and precise holes for all the stuff without a chance of slipping and having an "OOPS". The final trimming was done on the door sills.
-
Need help on bed damage 1988
AZJeff replied to WolverineCub's topic in MJ Tech: Modification and Repairs
If you want it "perfect" (as in just like it left the factory), it CAN be done by a body shop. Based on the pictures you provided, those folded areas of the corner could be cut apart, straightened, and then rewelded back into the original shape. Of course, this type of work requires a HIGHLY skilled sheet metal guy who can use heat, slide hammers, and other techniques that tend to be expensive. (Think the kind of repairs that are done when classic cars get body damage.) If you are willing to fork out the bucks, you will need to search for a shop with those kind of skills. Your average collision repair joint won't generally have employees with those skills, but you never can tell. Check around and find the best body shops in your area, and then interview the guys who will do the work to see if they have the skillset you are looking for. -
The inner and outer pads have different anti-rattle springs riveted to them.
-
Replacing Brake Distribution block
AZJeff replied to dinghyboy's topic in MJ Tech: Modification and Repairs
True, but I also did my fair share of wrenching in Illinois, were I lived for 40 years. I am, unfortunately, VERY familiar with what happens to flare fittings (and lots of other bolted joints) that spend much time in the "rust belt" -
Replacing Brake Distribution block
AZJeff replied to dinghyboy's topic in MJ Tech: Modification and Repairs
So when you say you deleted the block, I assume you then take the front axle output from the MC, and "tee" that output to sent it to each front wheel. (The rear, of course, is "tee-d" on the rear axle.) The only thing you loose doing this is the brake imbalance warning light function. If you are diligent about vehicle maintenance and care, that is of dubious value. -
Replacing Brake Distribution block
AZJeff replied to dinghyboy's topic in MJ Tech: Modification and Repairs
I normally use flare wrenches to loosen older brake tube fittings. If they don't want to cooperate without excessive force, I always break out the propane torch and heat the fitting a bit. It never fails to get it apart. Heat is your friend on frozen threaded joints. -
Logic ground is generally going to be the same as chassis ground.
-
One other thing that can help make connectors more reliable (once they are clean and tight again) is to put a dielectric grease into the hole for the female contact before you plug the connector together again. This sounds counter-intuitive, but a normal connector will have sufficient force between the mating metal parts to force any grease away from the actual contact point. THe remaining grease that has been displaced from the actual connector contact point will surround the contact point and form a seal against moisture and OXYGEN that causes connector corrosion. Do a search on the term "fretting corrosion" for more details on how/why this works. We did this when I worked at Motorola for 32 years on all of our outdoor radio installations. PS---just about any grease will work, but be sure the grease you use is NON-CONDUCTIVE and does not have stuff like lithium or molybdenum in it. Silicone or polyethylene greases are the most common ones used for this sort of application.
-
For my main back panel below the window, I bought a piece of "masonite" hardboard at the lumber yard, and cut it to shape using the old warped/broken OEM board. Then I covered it with black headliner fabric. The "B" pillar moldings have small spots molded in on the area where the hardboard attaches. Instead of using the poorly-designed factory clips that are rivetted to the OEM hardboard, I installed some "j-nuts" onto the edge of the "B" pillar moldings and then used black uphholstery screws that thread into the j-nuts (3 on each side).
-
Your best bet is to get the FSM for a 1993XJ and look into the wiring diagrams that specifically relate to the console. It's not technically difficult, provided you actually know which wires provide which functions, but that only will come from the FSM wiring diagrams.
-
The bridge stiffens the rocker towers and reduces flex in the rocker arm assembly. It functions very much like the girdle that is belonw the main bearing caps in the bottom of the engine on the 4.0
-
Winch popping BUSS fuses and Starter relay
AZJeff replied to Me&my86MJ's topic in MJ Tech: Modification and Repairs
Some of the posters who are helping you with your original question are ALSO offering suggestions on how to IMPROVE the reliability and safety of your MJ's electrical system in general. The early XJ/MJ vehicles had truly HORRIBLE electrical systems with a poor design that resulted in LOTS of problems, and the problems got worse as the vehicle got older. In addition, our older MJ's have often been "repaired" by former owners in often equally poor methods. Yours looks like it falls into this group. What I am trying to say here is to take the advice these other posters have given, and save yourself some grief and frustration later on down the road. -
Outside rear view mirror glass
AZJeff replied to AZJeff's topic in MJ Tech: Modification and Repairs
Cool guys. I will check around here at the local glass shops -
Rock Auto shows rear view mirror glass for the door mirrors that comes in a plastic frame. This frame presumably connects to the power mirror gimbal, but the shop manual does not show how to separate the mirror glass from the gimbal. does anyone know how to separate the glass and its plastic mounting plate from the rest of the mirror?
-
I bought belts from these guys. They will work fine.h
-
Thanks for the link to the Dorman part no.
-
Dana 35 to ZJ rear disc problem
AZJeff replied to big66440's topic in MJ Tech: Modification and Repairs
Yes, I am. I put them on my XJ when I had it, and loved the improvement. My MJ rear drum brakes were totally shot, along with axle leaks, so I figured it was time to do the upgrade while fixing the axle leaks as well. -
You make a good point. Now to see how to mount a cooler in front of the condenser. I hate those zip-tie type mounts that poke through the adjacent radiator. I want it mounted like it was and OEM type device.
-
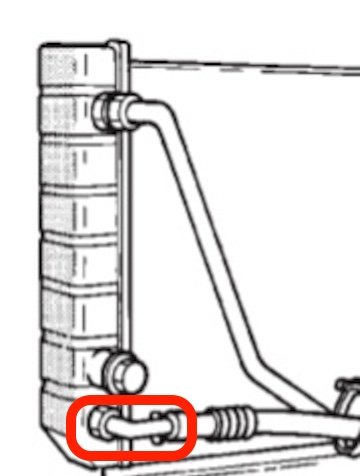
I have a leak in the trans cooling line where it leaves the lower port on the radiator. I have confirmed the leak is NOT in the quick-connect fitting on the hose, but is in the threaded flare fitting that screws into the tank end on the rad. I cannot find the part in the 2000XJ Mopar factory parts catalog I have, nor do any auto parts houses list a source for this item.k The part I need is highlighted in a red circle in the attached picture. Does anyone know where I can get a new one?
-
Dana 35 to ZJ rear disc problem
AZJeff replied to big66440's topic in MJ Tech: Modification and Repairs
If you are putting in a Dana 44, you will need the spacer ring to hold the seal in the correct position in the axle housing (just like on the D35). The trick is.....the axle tube ID where the seal goes is actually SMALLER on a D44 than it is on a D35. (Ask me how I know). That means the D35 rings are too large in diameter to fit a D44 housing. I had to have my D35 spacer rings turned down on a lathe on their OD to fit the D44 housing. YMMV..... -
I made a set from some very large self-adhesive heat shrink tubing from my local hardware store. They work quite well. i would expect the solution proposed by "HOrnbrod" would work quite nicely.
-
Hood Latch Issue (NOT the Normal Problem)
AZJeff replied to AZJeff's topic in MJ Tech: Modification and Repairs
There are no rubber hood stops in the corners of my hood, so that wasn't a factor. (I don't know about older MJ/XJ's, but the later ones don't have such stops.) I DID SOLVE the problem, and it was simple (and yet unexpected.) It turns out the new Dorman hood release cable had a HUGE amount of friction built into the cable out of the package. I just assumed it was normal, but after taking each piece of the system and testing it for release force contribution, the cable was the MAJOR factor. I removed the cable and lubricated it with a VERY lightweight aerosol gun oil, and it made a HUGE difference is the smoothness of the cable. After reinstallation with all my other clean and lubricated parts, the hood latch system now functions normally. -
Dana 35 to ZJ rear disc problem
AZJeff replied to big66440's topic in MJ Tech: Modification and Repairs
The first thing I would do is to pull BOTH axle shafts, and start measuring tube diameters, bearing recess depths, and the like. The idea is to look for any dimension between the two sides that is more than about 0.010 inches different. (If the axle housing is the culprit, it's likely the offending dimension will be MUCH greater in variation than this between the two sides. Another thing to consider is if the axle housing FLANGES are flat and perpendicular to the axle housing bore. That is needed to insure the axle retainer is applying a uniform force to retain the seal/bearing/axle shaft into the axle housing.